Showing posts with label Vikings. Show all posts

Monday, August 3, 2026

Review: Pillage- Victrix


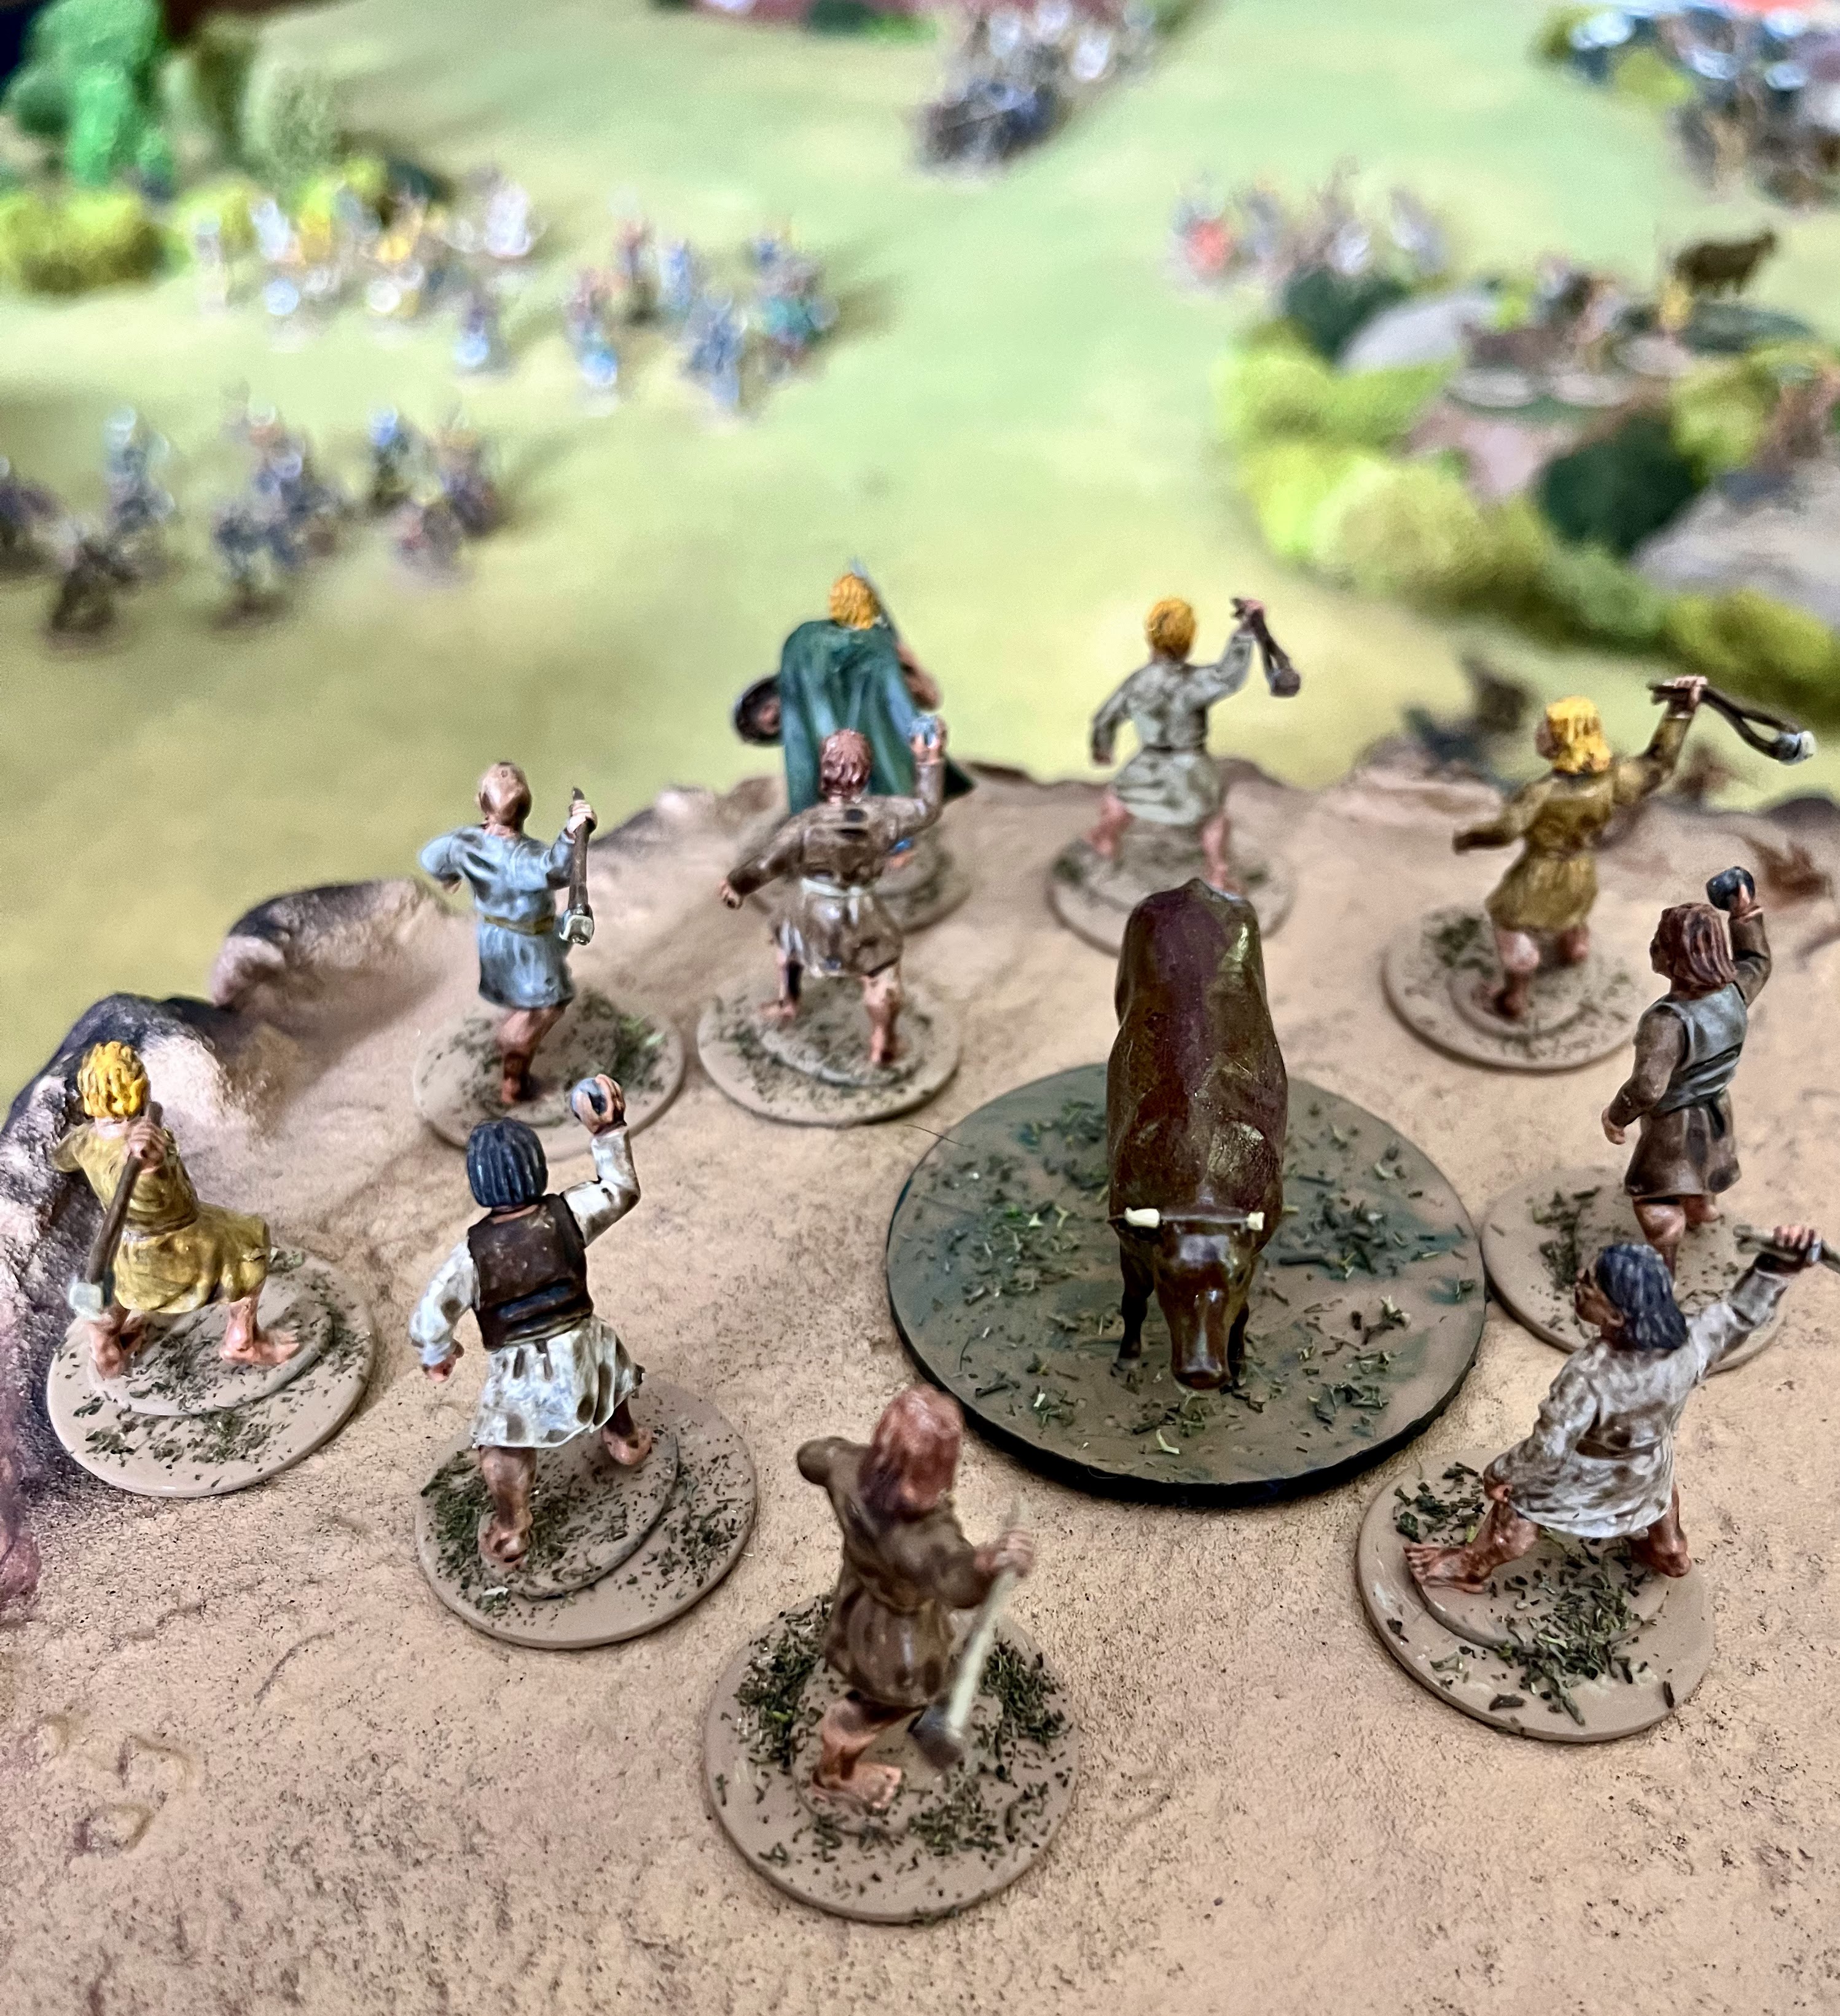
I was buying a lot of miniatures, so I figured I might as well pick-up this set of rules to go with them.  I all ready have a large Viking, Anglo-saxon, and Dark Age Irish army so I had more than enough miniatures for a dozen or so figure, model-vs-model skirmish game.  I also have cattle and loot markers.  Therefore, this one seemed like a low-cost investment for me to pick up! 

This would not be my first raid into the Viking Age.  I myself have a few rulesets related to Vikings; Fury of the Northman and Odin's Ravens.  Therefore, I know my way around a Viking based game.  I was curious what this brought that could be new to my table.  

This one has a very nice forward where the author is very clear that this game is about "forging the narrative".  I.e. the focus is on telling stories on the tabletop and revolves around scenarios and scenario play.  This is not intended to be a competitive, tournament ready ruleset.  

So, don your hauberk, heft your shield, and hoist your spear arm for now is the time to loot this rulebook of ideas!  

Things I Liked

This is a gorgeous looking book.  It has very high production values, great photos, great miniature pictures, and really nice terrain lay-outs.  This reminded me of what separated early GW books from the competition.  Rules are detailed with images and diagrams over laid on the photos.  This is a sumptuous looking book with great, hard cover, artwork.  Just really top-drawer production values all around. 

This book is pitched at beginner wargamers.  It is written like the reader is unfamiliar with the hobby of wargaming.  In addition it has a short history section, timeline, historical sidebars, etc.  There is also a Hobby section about collecting miniatures, making terrain, and painting.  There are some fun little tutorials about painting miniatures and making nice looking terrain.    Again, it reminds me of early GW rules as an introduction to wargaming.  I do not need this section, but I unironically LOVE this section.  

There are a few charge reactions a model can make when they are the target of a charge.  If you have a missile weapon you can shoot, you can run away, or you can stand and accept the charge.  Nothing super hard to do, but gives some options for melee early on.  

Armor is similarly simple with unarmored, some armor, and fully armored.  Of note, armor dictates how fast you can move as well.  That is a good idea, and everyone basically moves the same.    

This game is called Pillage, and there are several chapters on looting and another on setting things on fire.  That matches the theme of the game and ties into several scenarios.  Interesting, there is also rules for ship-to-ship combat!  Nice!


Things I Did Not Like

The game does not use frontage or combat arcs.  Weapons and line-of-sight is 360 degrees.  This reduces some of the tactical gameplay. There is some detail about shooting from windows or other constricted spaces, but that is a niche rather than the standard.   

Charging into combat is an extra 1d3 of movement leading to contact.  I am not a huge fan of random charging typically.  No real reason, but for such a critical action I like a bit more certainty in the action.  Melee is pretty quick and brutal by design but still is a bit of Melee Yahtzee coming down mostly to dice rolls based on a table with different weapons hitting better or worse based on armor type. Pretty basic.  Thankfully, the advanced weapon rules add some more nuance to the weapons and melee about supporting allies.  

There are 5 scenarios.  Nothing that you have not seen before.  The game explicitly recommends you to design and make your own scenarios.  However, I think the game could have provided a few more guidelines on alternate deployment zones, objectives, and perhaps some complications.  


Meh and Other Uncertainties

Of note, this game does not allow pre-measuring.  If you grab a tape measure, it is assumed that you are committed to the action.  I.e. you do not measure until you are all ready going to shoot at that target, move to that place, or charge that model, etc.  

Of note, this game only uses d6 to resolve all actions.  It uses simple modifiers and rules for rolling above a 6.    

It also uses WYSIWYG for simply determining who is armed with what.  

The game itself is for 4x4 tables or even 3x3 tables.  This makes it just a bit too large for a Kitchen Table game.  However, it is a good size for a convention or club game.     

The game turn is broken down into the usual of Initiative, Move, Shoot, Melee, and End.  This gives you all the basic 4Ms.  Of note, games use alternating Phases, so it is not IGOUGO but not alternate activation either.       

Army lists include Vikings, Anglo-saxons, Normans, Irish/Scots/Picts, Carolingian Franks, Bretons, Welsh, and Generic.   

Final Thoughts

This is a solid, well-produced product.  It is a basic wargame, but comes into its own with the Advanced Rules.  Here is where it shines allowing some period specific and unique activities to add some tactical depths.  However, it is still relatively straight forward and easy to teach.  That is its strength.  

This is not for Competitive play because there is a fair amount of randomness in the rules.  It is not intended for that.  It is intended for a beer-and-pretzels experience focusing on story-telling, social interactions, and narrative fun.  This is explicit in the foreword and in the rules themselves.

For a first rulebook product from Victrix, this is a slick product!  It is intentionally designed to get people into playing the period and folks that are new to wargaming.  I applaud this approach BUT I am not sure that it is a good strategy.  I think they are simply following the GW template of a rulebook, but I am not convinced that people get into Dark Age Wargaming cold by buying a rulebook.  However, I really do not know how people get into Historical Wargaming anymore.  

Anyway, a great introductory product but not a great wargame.  It is very serviceable but old hands to the period will find it wanting.  To veterans the big adds are the pillaging and ship-to-ship combat ideas.  

Until next time! 


Become a Patron and get access to all the cool stuff, a peak behind the curtain of Blood and Spectacles, and early-access to playtest games!  


You can follow Blood and Spectacles Facebook page or Instagram for more fun! 

Check out the latest publications and contact me at our Blood and Spectacles website

Or purchase all out games at the Blood and Spectacles Publishing Wargames Vault Page!                   

Monday, June 9, 2025

Battle Report: Odin's Ravens - Into the Lair of the Beasts


Today we are going to be taking a closer look at these rules for recreating Viking Sagas on the tabletop.  We are going to be using a Norse hero versus a group of game-controlled monsters.  We will also be using one of the Mythic scenarios from the rules.  

You can find those rules here: 

Erik Greybeard was attempting to build up his legend.  He was planning an expedition across the ocean, and to do that he needed to gather followers.  The Jarl's were not taking him seriously and he knew he needed to prove himself.  Therefore, he gathered his kin and out to face the horrors in the Shieldlands above Geatland.  He had heard rumors of an Ogre and his kin band terrorizing the people of the area.  Erik was determined to track them down.

Forces: 

Vikings:
Erik Greybeard - Hero - Chain Mail, Shield Hand Weapon - Patron: Heimdal- Disengage

Gunnar Erikson - Second- Spear, Armor, Shield

8 Kin - Soldiers- Shield, Mix of spears and hand weapons

These will be my Victrix models.  


Monsters:
Ogre - Monster- Chain Mail, Two-Handed weapon

Winter Wolf - Beast- Shield, Fast 

7 Black Elves - Creatures- Hand weapons, shields, armor

1 Wolf- Creature- Fast 

I will be using my Heroquest models to represent the Monsters! 


Mission: 

For this game, we will be using the Into the Lair of the Beasts scenario found in the main rulebook.  We will be using 1 MU = 1 inch on a 36 x 36 MU board.  

We also rolled up two complications!  The first is Long Shadows and the second was Bad Omens!  Let's see if I recall them during game play.  These make it easier for the Hide action and more likely for things to fail Fear tests.  

The Vikings are trying to get into the Lair of the Beasts. 

Set-up: 
We set-up terrain per the rules in the main rulebook.  However, we also needed 1 terrain piece to act as the entrance to the monster's lair!  This time I used two frozen ponds to represent the entrance, similar to the lair for Grendel's Mother.   


We rolled up Connected Edges for deployment and then followed the rules for deployment and the scenario.  These can be found in the main rulebook. 

As normal, I will not be covering each action and dice roll.  I will only discuss those if they are relevant to the game, or to help you understand the basic rules.  However, I will be breaking the game up into the Maneuver phase, Battle Phase, and End Phase.  Normally turn 1 and 2 is the Maneuver portion, 3-6 is the Battle, and 7-8 is the End phase.  This game lasts 8 turns or until the Heroes break.   

Maneuver Phase
   
One soldier bravely leaves the woods and soon draws the attention of all the beasts!  They quickly close in on him, while his comrades are hampered by the woods behind him.  The soldier bravely steps forward to face the Winter Wolf, but has his head knocked off for his audacity!   


Gunnar bravely challenges the Winter Wolf next, and their fight is inconclusive.  however, it gets crazier as the Ogre and another Viking charge in as well.  Meanwhile, as the Vikings emerge from the woods, they are engaged by the Dark Elves.  A beast manages to bludgeon another Viking to death.  

Battle Phase
Things start poorly for the Vikings as Gunnar is downed by the Ogre right off the bat!  However, Erik manages to slay a Dark Elf in return and charges into the next!  Fighting across the slowly forming front is inconclusive as the last of the Vikings start leaving the woods.  


The Viking fighting the Winter Wolf and the Ogre sees the long odds and the bad omens and runs away back into the woods.  The Ogre finishes poor Gunnar off.  The Ogre than charges into the next melee, and quickly smacks another Viking to the ground!  


Things are looking bad for the Vikings as the Ogre wades in and kills another Viking with the help of his minions.  However, Erik finally finishes off his Dark Elf and runs towards the objective.  However, he is intercepted by the Winter Wolf.  

End Phase
Things look bleak for our Viking Heroes as they have been whittled down by the beasts.  The ogre lumbers into a melee and swings wildly, giving that viking the opening, and he dashes away from the wolf, a Dark Elf, and the Ogre.  The Wolf chases him down, but is unable to injure him.  However, another Viking is brought down by the Dark Elves.  

Erik Greybeard manages to twist away from the fangs of the Winter Wolf and sprints to the Lair entrance and ducks inside.  With Erik getting to the lair, the rest of his kin decide it is better to flee and live to fight another day!  


Conclusion
That was ugly!  Somehow, the Vikings held on long enough for their Hero to get to the lair and secure the win.  However, they had to pass a few Runaway checks to do it.   They needed 3 VP to win, and Greybeard making it to the Lair gave them 3.  However, he lost 3 killled kin, and 2 Missing after the fight.  Those two would eventually make their way home to fight again.  Thankfully, Greybeard's son would also manage to survive the engagement, with a nasty scar.  In return, they barely managed to injure the Beast, downing only 2 Dark Elves in the fight.  

Some thoughts.  The terrain really hampered my Vikings ability to coordinate.  Plus, moving one of my soldiers out of the woods allowed all the beasts to move towards my deployment zone early, that was  a big mistake.  The Woods played a big part in this battle.  

My Vikings also had a hard time getting past the Beasts armor and shields.  The beasts also came for blood today, often choosing to Deal Damage whenever they could.  Ouch.  That Three Dice Ogre was cutting through Vikings like a hot knife through butter, especially when he was getting help from Dark Elf friends.  Being Outnumbered is no joke in this game!

Ultimately, my victory came when I won a couple key fights and chose to disengage and then move with extra activations rather than Deal Damage.  Heimdall's Gifts paid off in spades in this scenario.  If I would have focused on killing enemies, I would have lost.  I guess you have to keep your eyes on the prize and tactical movement paid off in this game.  It is hard to recall sometimes that you are not locked in combat, but to unlock you have to win a combat.  It is a bit counter to a lot of games I have played in that way. 

You can find Odin's Ravens: Viking Age Bad Boys on the Blood and Spectacles Wargame Vault page. 

Until next time!    


Become a Patron and get access to all the cool stuff, a peak behind the curtain of Blood and Spectacles, and early-access to playtest games!  


You can follow Blood and Spectacles Facebook page or Instagram for more fun! 

Check out the latest publications and contact me at our Blood and Spectacles website

Or purchase all out games at the Blood and Spectacles Publishing Wargames Vault Page!     


Monday, June 2, 2025

Wargame Design: Odin's Ravens: Viking Age Bad Boys


You know what really speeds up the wargame design process?  Two things: 

1. Having an existing set of rules to build off

2. Having the miniatures for photos in your collection

Both of those details can be the difference between finishing a game in 1-3 years, versus finishing in 5 years.  For me, post-production is the longest part.  That is where those two points really help out.  Post-production involves making sure the game works as intended and getting all the parts to publish together.  Those parts take the longest amount of time in the whole process.  

If you all ready have a set of rules to work off of, then you know the game mostly works.  It really speeds up the process if you don't have to test the 4Ms, just the chrome.  You probably recall the Play-testing process, well building off an existing game cuts the first couple layers of play-testing off.  

The second point is self-explanatory.  Most miniature wargamers have a pile of shame they are painting through.  Buying, building, and painting models takes times and money.  If you all ready have the models in your collection then you can go straight to the photography stage, that alone can save a year in the production pipeline!  

So, that brings us to today's game: 


Odin's Ravens is a model-vs-model skirmish game with a narrative campaign element added to it. As the sub-title implies the game is focused on Norse warbands with a Hero, a Second, and up to 8 other soldiers.  The game can be played as a straight historical game, or with mythological elements added into it.  

Like all my games, Odin's Ravens is scale and model agnostic.  I did this by using generic measurement units with no fixed scale.  This way it works with 15mm, 28mm, 54mm, or other scales.  All models are individually based because this is a model-vs-model game.  There is no fixed time or ground scale, as is my design preference.  The game can be played on just about any playing surface thanks to the adjustable size of an MU, but typically plays on a 36-48MU square.     

This game can be played as a Versus game, Solo, or Co-op.  There is a simple Narrative Campaign added so warbands can evolve and grow based on your Heroes Legend.  There is myth magic, mythological monsters you can fight, mythical gear to find, and several special solo/co-op only scenarios.  

Taking on a troll

The game is trying to answer the problem of Melee Yahtzee and how to add Tactical Gameplay to a melee heavy game.  In addition, it is trying to capture the idea of Heroes being heroic and special, but not game breakers.  These are all tough needles to thread.  So, how does this game do it?  

Here are a couple key features of gameplay to keep in mind: 

  1. It uses facing as a tactical component to gameplay
  2. Outnumbering plays a critical roll in combat
  3. Winning a combat can do more than just causing damage, sometimes causing damage is not the best option so you have to decide what to do
  4. Melee does not lock you, as there are several ways to escape melee
  5. Heroes have more dice and activations than soldiers    
In addition, there are about 6 Versus scenarios, and 6 different methods for deployment and 3 special Solo/Co-op scenarios.  This gives the game a lot of replayability with different tactical set-ups.  In addition, Heroes, Seconds, and Soldiers can also have a variety of set load-outs.  Each hero also has a special ability granted by his god to make him a worthy hero to follow.    

A hero and his loyal warband of followers

The astute observer will notice something right away.  This is not a new game!  It is a reskin of my popular Greek Mythology game; Homer's Heroes: Bronze Age Bad Boys.  The core gameplay is the same and uses the same core mechanics.  The Chrome has been modified to fit a Norse setting.  For example, chariots have been removed from the game.  Instead, I have replaced it with the chance to have a mounted soldier, Hero, or Second and updated the Mounted rules accordingly.  I have also changed some of the weapons and load-outs to better match Viking warfare compared to Greek Homeric combat.  

Most of the miniatures in the book came from my existing collection.  Thanks to my Viking Age rules Fury of the Northman; I have a decent sized selection of Vikings and Dark Age warriors to choose my Odin's Ravens from.  My monsters came from my rather larger selection of HeroQuest and Reaper models.  That made post-production on these rules a snap!  

When I started the year, this game was not even on my radar.  I had toyed around with some expansions of the Homer's Heroes concepts, but it wasn't until early this year when I started working on this particular version of the game.  Maybe I will expand the core game further into new periods and eras?  Got any suggestions?  

Final Thoughts

The first step to being a game designer is to create your game and get it out there for others.  From there, they get easier and easier.  The first one is the hardest because you are building it all from scratch.  Once you have the first, you have a set of templates to build your next one.  

To get more games to market, it is easiest if you: 

1. Build off of your existing designs

2. Use miniatures and art you all ready have in your collection

The more games you make, the easier it gets to make more of them!      

If you like Vikings, you like Skirmish games, or you like Homer's Heroes: Bronze Age Bad Boys then you will probably enjoy recreating the Norse epics and sagas with this game.  You can find Odin's Ravens now on Bloodandspectacles.com.  


Become a Patron and get access to all the cool stuff, a peak behind the curtain of Blood and Spectacles, and early-access to playtest games!  


You can follow Blood and Spectacles Facebook page or Instagram for more fun! 

Check out the latest publications and contact me at our Blood and Spectacles website

Or purchase all out games at the Blood and Spectacles Publishing Wargames Vault Page!    


Monday, April 28, 2025

Battle Report: Fury of the Northman - Battle at the Pass


After getting those Anglo-Saxons painted, I was eager to get them out on the table!  Therefore, I managed to organize a quick battle versus my Viking

Earl Eirkir received news of a Viking warband moving towards his territory after landing on the coast.  He quickly summoned his Fyrd and Thegns together to face off this threat!  He had heard that these marauders had come across the see from Hibernia and he intended on sending them back the way they had come!  

Erik Greybeard and his men had left Hibernia after a disappointing raiding season.  In fact, many of his men left and went back to their homelands.  However, those that remained were battle hardened.  They also had stout shields, chain mail, and many were equipped with the feared Dane Axe!

Forces:

We are actually using the sample forces right out of the Fury of the Northman main rulebook.  That gives an elite, compact Viking warband versus a numerically superior Anglo-saxon force. 

Anglo-Saxons


Vikings


Mission: 

This is going to be a straight-up Raven Feast, which is a standard battle.  No special objectives. but we do have a Bad Water complication.  Let's see if we remember it on the day of the battle.  

Set-up: 

Again, we used the rules right from the book in order to set-up the table.  This gave us a large single- and double-layer hill on the Viking side of the board to book end their forces.  That naturally made a pass that the Vikings would need to march through to get to Earl Eirkir's lands.  The other side was mostly open, with a forest on the Anglo-Saxon left.  

View from the Viking Deployment zone, through the pass

As usual, I will not be detailing the game turn-by-turn.  Instead, I will have a high-level overview and break it down into three phases, the Maneuver phase, the Battle Phase, and the End Phase.  I find it is much easier to focus on the fun of the game and still get the general idea across to the reader this way.  

Maneuver Phase: 

There is no fancy maneuvers as the two sides close.  

The Anglo-saxons use their superior numbers to maintain the initiative.  The left flank of skirmishers and archers forms a missile line curving towards the hills.  It is anchored by the Earl in the middle in shieldwall, and two Fryd units also in Shieldwall.  The last Fyrd unit stays in open formation on the far right edge, ready to try to flank.  

Anglo-Saxon left flank

The Vikings block up the pass.  Their right flank is their Nobles in shieldwall.  They anchor the warriors in Shieldwall.  The last element blocking the pass is the Boar's Head formation.  The Viking skirmishers are trying to sneak through the forest on the far side of the left flank hill.  

Anglo-saxons on the left, and Vikings on the right  side of the image

Battle Phase: 

The battle proper starts with a hail of arrows clattering loudly off the Viking's Nobles' shields.  Seeing this, the warriors in the Boar's Head seize the initiative from the Anglo-saxons and charge forward with a roar!  They connect with a Fryd unit, that is reinforced by their nearby allies.  There is a ferocious clash, where the Fyrd manages to stand and even repel the Boar's Head, but begins to waiver in the process.  

The Viking command breaks formation and charges the Archers, who are supported by a unit of skirmishers.  They trade blows but are less than successful at routing their lightly armed foes!  

In return, the Anglo-saxon Earl manages to lead a classic shieldwall attack into the Viking warriors, who are also in a shieldwall.  With much pushing, shoving and stabbing the Vikings fall back a few steps.  

Fyrd units by the woods engage the lurking Viking skirmishers in a close quarter fight at the edge of the woods.  It is tough terrain to fight in.  

In the center, despite being outnumbered two-to-one, the Boar's Head and Dane Axe armed Vikings manage to smash through the wavering Fyrd.  The farmers turn and flee, with the savage Vikings in hot pursuit! 

Anglo-saxon Fyrd breaks and runs from the Viking Boar's Head

The Earl continues to wear down the Viking warriors, but it is too little too late as the Viking Nobles smash the archers and skirmishers supporting them apart on their right flank.  The Anglo-saxons flee, with the Nobles in hot pursuit.  The Earl lost half of his army that round.  

The Viking Nobles cease their pursuit at the urging of their Jarl and begin battling up the hillside.  They are harried by Anglo-saxon skirmishers the whole way.  However, they give better than they get and cause the Anglo-saxons to tremble in fear.


End Phase  

The Viking Nobles manage to smash the Anglo-saxon skirmishers off the hill, but in the process, tragedy strikes!  Erik Greybeard is killed in the fighting for the hilltop!  An Anglo-saxon javelin through the eye as he bellowed commands!  

The fighting between the Viking skirmishers in the woods and the Fyrd unit is indecisive.  

Earl Eirkir manages to keep up the attack on the Viking warriors, but when they are attacked in the rear by Vikings with Dane Axes, it is all over.  His unit wavers and then flees for its life!  With that, the Anglo-saxon army breaks!  

Final Thoughts

No need to even count up the points.  My Anglo-saxon army was completely routed, despite some promising points early on.  The Viking units were all battered but none were broken. I have a small morale victory by killing the Viking warlord in battle, and that is about it! 

When the enemy army is injured across the board, but no one is broken that tells me I did a poor job of target prioritization and focusing my units on a single killing blow.  Instead, they got scattered and their hitting power diluted.  They managed to absorb the Viking assault but lost during the subsequent melees.  

Three mistakes I should have done differently.  First, I should have ignored the Viking skirmishers in the woods and used that extra Fyrd unit against the Boar's Head unit to break it early.  It survived the initial attack and was able to turn the tide in the melee.  Second, I should have let the archers go with no support and used the skirmishing units as flank charges the following turn.  Instead, the support did nothing and the second could not get in position fast enough to matter. Third I used my re-roll advantage from Ferocity Points poorly, and I should have used them to finish enemy units off. 

Oh well.  I learned a lot.  There was a reason the Vikings were such a fearsome foe.  

Until next time. 


Become a Patron and get access to all the cool stuff, a peak behind the curtain of Blood and Spectacles, and early-access to playtest games!  


You can follow Blood and Spectacles Facebook page or Instagram for more fun! 

Check out the latest publications and contact me at our Blood and Spectacles website

Or purchase all out games at the Blood and Spectacles Publishing Wargames Vault Page!    


Monday, March 10, 2025

On The Painting Desk: Anglo-Saxons are Back on the Menu!


Last year, I picked up an Anglo-saxon army from Victrix using a combination of Late Anglo-saxon, Early Anglo-saxon, and Dark Age Archers ranges.  I started by painting up the Anglo-saxon shield wall infantry.  I left off the process here: 


 I still had to do the finishing touches on these troops.  They needed a good basing and their shields done up.  One thing about shields, is it is almost like painting up another miniature!  So much of the attention will be taken up by the shields!  

Therefore, I decided to start off phase II by doing the bases!  This is a simple coat of Territorial Beige of cheap big, box acrylics.  Then, when the paint is still wet, I sprinkle in some lichen for some ground cover.  Nothing fancy and all easily sourced at your local Big Box retailer.  With bases these little plastic dudes look like this.  


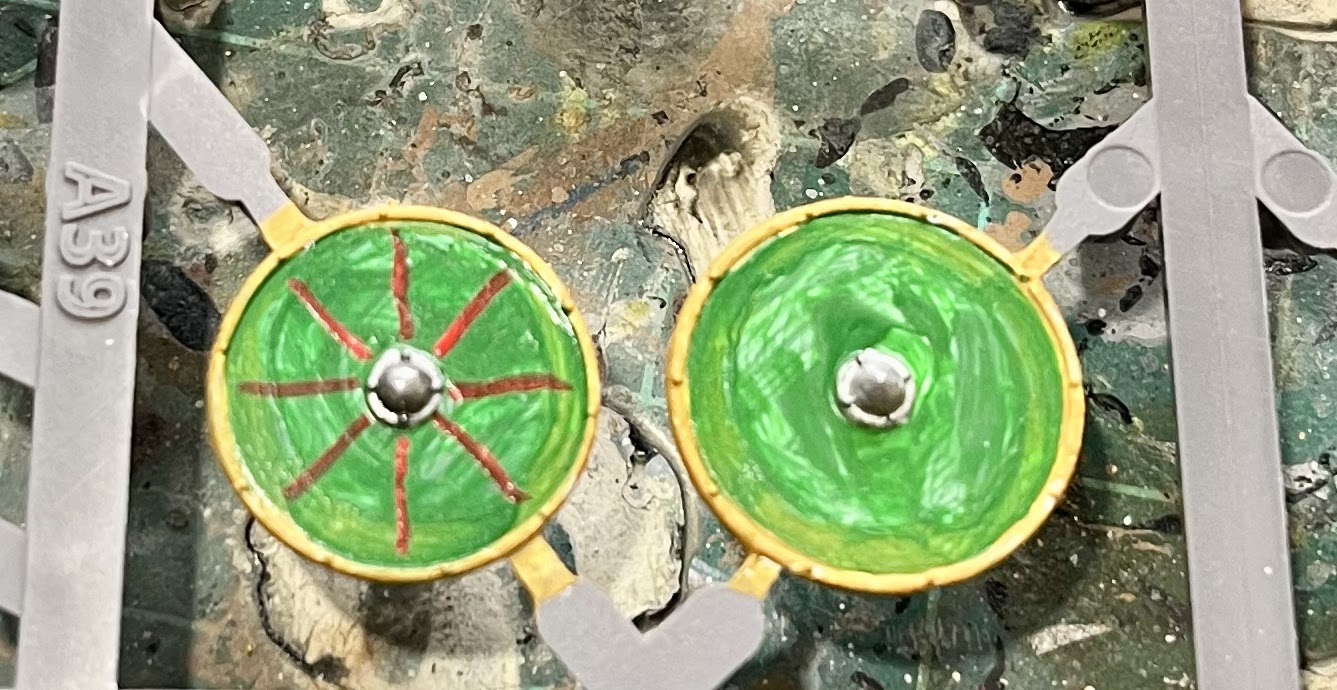
That led me to the shields.  The bloody shields.  I paint all my shields on the sprue to start with.  I find them much easier to manipulate this way.  I undercoated them with a cheap acrylic white.  Then, I start by batch painting them with some sort of wooden color like Fur Brown, Bestial Brown, Oaken wood, Desert Yellow, and Skeleton Bone.  This gives them their wooden base and frames.  From there, I give them an initial coat of white, green, blue or red.  This often takes two coats for good coverage.  Then, I paint their metal boss a metallic color.


Now comes the hard part.  Vikings shields, and Anglo-Saxon shields, tend to have quartered or other similar designs.  Those are not easy to free hand, but I am going to give it a shot.  I have done it before, and I will do it again.  Here is a quick tutorial on how to do basic Dark Age shield designs.  

First, you paint 4 to 8 lines on the face of the shield in the alternate color.  It reminds me of slicing a pie or pizza.  Yum.  Shields from the period tended to be whole colors, halved, quartered, and in eighths.  

Second, you fill in the tops and bottoms of the wedges in alternating pieces of the pie.  This informs which wedges you are going to fill in. 

Lastly, you just put paint in the wedge where it belongs.  Ta-da!  Now it is time to go eat some pie!  Only 39 more to go! 


Once you have painted all the designs, the bosses are done, and the frames are all blocked you take the final and most important step.  You slather in a Strong Tone wash to help cover up all your sins and lack of coverage!

Finally, you remove them from the sprue and attach them to the models.  Fun fact about Viking and round shields from this period is that they were carried in one-hand and had no supporting straps.  That means they were not worn on the forearm like the Kite shield.  They were held out in front in a single fist along the center axis of the shield.  They were also rather light weight and mostly protection against missile weapons unless they were overlapped for extra strength.  This allowed for a variety of tactics for individual shield usage but also shields overlapped with others reinforced and strengthen each shield for a shield wall, while keep each individual shield light and easy to carry.  They were also often slung on the back when two hands needed to be free.  

The Fyrd all ready to fight! 

 
The Earl Eirkir and his noble Thegns

On the models you can see how the shields were held-out in the fist, as opposed to strapped on the arm.  If you try the arm mounting, no one would have their shield in the proper position for fighting!  

That finishes up the shield wall infantry for my Anglo-saxon force.  40 guys batch painted.  The shields are almost like painting another half dude!  The Fyrd were all from Victrix's Early Saxon box, while the Thegns were from the late Anglo-Saxon kit.  I figured the bosses would have the best, most modern gear while the Fyrd maybe not so much. 

This army still needs 20 skirmishers and 30 archers before I call it done.  This will give me more than enough units to mix and match a bit to take on Erik Greybeard and his Viking raiders or King Errc and his Dark Age Irish using Fury of the Northman.  

Here is the infantry out on the table, formed up for battle.  


   Until next time! 


Become a Patron and get access to all the cool stuff, a peak behind the curtain of Blood and Spectacles, and early-access to playtest games!  


You can follow Blood and Spectacles Facebook page or Instagram for more fun! 

Check out the latest publications and contact me at our Blood and Spectacles website

Or purchase all out games at the Blood and Spectacles Publishing Wargames Vault Page!    


Monday, March 11, 2024

Battle Report: Fury of the Northman - Looting and Pillaging in Hibernia


Greetings faithful readers, and welcome to another Fury of the Northman battle report.  Erik Greybeard and his Victrix Vikings are once again facing off against King Ercc of the Wargames Atlantic Dark Age Irish.  

Mission:
The Vikings will be the attackers as they use the Loot and Pillage scenario against the Irish.  They will be attacking as Dusk Approaches as the complication. 

Forces: 
Since this will be a Loot and Pillage, the Vikings are allowed 10% more points then their Irish foes.  

Erik Greybeard's Vikings:
Nobles
- Shieldwall
- Boar's Head 

Warriors

Warriors
- Shieldwall

Militia
- Shieldwall

Skirmishers


King Ercc:
Warriors
- Heedless Charge
- Throwing Spears

Warband
- Heedless Charge
-Throwing Spears

Skirmishers
- Throwing Spears

Skirmishers
-Throwing Spears

Slingers
-Skirmishers

Slingers
- Skirmisher


Set-up:
Today we are using a 72MU by 48MU board.  1 MU is equal to 1 inch.  

Terrain is set-up per the rules found in the main Fury of the Northman rules and the objectives were set-up using the method outlined in the scenario. 

Square 1-3 is the Viking side, while side 4-6 is the Irish side of the board. 
  • Square 1 = Hill
  • Square 2 = Grove
  • Square 3 = 2- level hill
  • Square 4= Hill
  • Square 5 = Hill
  • Square 6 = Stone walls
Viking deployment

You can see the objectives, spread out in the form of piles of crates/chests or cattle.  They are just outside the Irish deployment zones. 

Irish deployment

I am going to break this report into three broad categories; Maneuver phase, Combat phase, and the End Phase.  I will not be detailing each move and action in detail, but try to cover key moments and decisive points of the battle in each phase.  

Maneuver Phase

Neither side was focused on subtlety or sneaking tricks.  The Irish moved up aggressively to grab their objectives, while Greybeard's Vikings pushed ahead as fast as they could.  


On the Viking side, Erik Greybeard led the attack with his nobles aiming for the center of the Irish lines and the cow on the hill.  It seemed to be only lightly protected by Skirmishers.  Once the Irish had their objectives, they took up defensive positions on hills and within their village.  They seemed content to let the Vikings come to them and were in strong positions, with good fields of fire with their slingers.  


Sensing a trap, the Viking Warriors with Shieldwall formed up.  They saw Irish Slingers lurking about the edges of a forested hill.  This slowed their advance on the Irish farming hamlet. 


Their caution was sensible, as the wily Irish popped out of cover and pelted Erik and his retinue recklessly charging across open ground.  First blood to the Irish as their slingers pelt the oncoming war chief with rocks and reduce them 1 courage.  

As we head into the 4th turn, the field looks like this: 


The Irish right has the Warriors and King Ercc ensconced in the hamlet, protecting two objectives.  The Viking militia and shieldwall oppose them.  The center has the Viking command leading the charge supported by their skirmishers, and their other warrior unit on the flank.  The Irish Slingers have stepped out to launch their attack, but they are exposed.  Behind them, the Skirmishers protect two objectives and the last Slinger unit protects an objective safely up on the top of a two-tiered hill.

Battle Phase
The Irish slingers in the center pepper Greybeard's Nobles with more sling stones.  Fed up, Greybeard and his Nobles charge forward!  However, the Irish fade back from them, leaving them disordered.  The Shieldwall followed their leaders lead, and also ends up tired and disorganized after failing to connect.  Meanwhile, the Irish try to fade away from the Viking assault.


King Ercc sees the spent Vikings ahead of him, and decides now is the time to send the invaders packing.  He charges forward heedlessly with his warriors, throwing their spears as they get stuck in!  The Irish king manages to push the Viking warriors back.  


However, the Vikings ferocity allows them to steal the initiative again, and they continue to push forward.  The Warriors on the Viking right manage to get to their objective, as the Irish skirmishers fade away from their assault.  In the center, Greybeard continues to pursue the Slingers but still can not catch them!  On the left, the Militia march into the Irish village in their shieldwall, daring the Irish to attack.      
Dusk begins to set-in, but the fighting continues to rage.   

The Irish slingers fire up-close and personal on the Viking nobles and continue to sap their courage.  However, the Nobles have gotten too close and crash into the Irish slingers this time.  They easily slaughter the Irish. Meanwhile, the Viking Warriors fight with King Ercc to a stalemate, but the Vikings are on the edge of collapse.  The other Viking warriors get to the loot the Irish were hiding, but fail to find anything of value.   

Irish skirmishers descend form the hills shouting war cries and throwing their spears.  It is too much for Erik Greybeard, and they turn to flee the battle field.  Those damned Irish seem to be everywhere, shooting and throwing spears at them!  


End Phase
The Sun was setting quickly now and it would soon be dark.  

King Ercc managed to drive off the Viking warriors he was fighting with.  However, behind him the Militia managed to loot some cattle.  


Viking skirmishers and warriors make a last ditch attack on the hill in the center, defended by Irish Skirmishers.  However, they are pushed back and the attack repelled, keeping the Irish loot safe.  


With that, the Viking straggle back into the night, their Raid complete. 

Conclusion
The Vikings managed to score and maintain 1 Loot marker for the battle!  They got to a second, but found nothing.  Routed units, the Vikings scored 4 from the Slingers, and the Irish scored 22 from the Viking units!  Wow, losing the Nobles and the Warriors was a big deal!      

Final Scores: 
Irish: 18
Vikings: -14!  

Looks like the Irish manage to win the follow-up encounter.  Their Fabian tactics worked much better in this scenario than the Cattle Raid.  If we reversed the Attacker/Defender I think the Irish would be hard pressed to prevail!   

Erik Greybeard tried to greet his warriors as they slunk back into camp that night.  They were tired, dirty, and hungry.  They grumbled muted responses to him as he hailed them.  They were discontented.  He had managed to feed them when they landed, but the lack of loot and more resistance than they expected left his men grumbling and ready to go home.  Greybeard needed to find a quick win to fill his men's bellies, pockets with gold, and some plunder to take home.  Otherwise, they might just try to settle down here with the Hibernians! 

Hope you enjoyed this battle. 

Bonus Content
I spent a bit of time clearing off some small 6mm pieces on my work desk.  I had a couple of vehicles for my Operation: Hemlock forces for a Horizon Wars-style battle in 6mm.  Plus, I can use a few of these for Aeronautica Imperialis as well.  These are all 3D printed.     

I couldn't precisely recall what colors I used for my initial forces, and therefore my Armored Bassies came-out a bit darker.  However, I recovered in time for the Hydra and Lightnings.  


The bases are just painted, nothing fancy.  I actually kept the Bassies and Hydra removable from the base so they could be lone targets or AA platforms in Aeronautica Imperialis.  I feel pretty good about the Imperial forces, but before the big battle I will need to pivot and make some Ork forces too.    

Until next time!


Become a Patron and get access to all the cool stuff, a peak behind the curtain of Blood and Spectacles, and early-access to playtest games!  


You can follow Blood and Spectacles Facebook page or Instagram for more fun! 

Check out the latest publications and contact me at our Blood and Spectacles website

Or purchase all out games at the Blood and Spectacles Publishing Wargames Vault Page!