Monday, May 30, 2022

Castles in the Sky - Indo-China Campaign Part IV- French vs. British


Welcome back to the Indo-China campaign for Castles in the Sky from Osprey Games.  In part three, the French got the drop on the British above the Kra Isthmus and gave the Royal Navy of Siam a drubbing!  It was so bad, that the Kra Isthmus became unstable and became an asset of the French!  In addition, the HMS Achilles was heavily damaged and sent to Laem Chabang for a refit and repair.  It shifted the campaign to the French leading 4 to 2.  The first force to 7 will trigger the "Final Battle" scenario.  So far, the French have the lead in that regard.

Commodore Aubre was feeling confident about his fleet and their chances.  Despite Commodore Duckworth's precarious political position with the Siamese and the British consulate, he still had command of a potent fleet in being.  It was tempting to go on the offensive, but the French Cuchinchina was still getting repaired, and the Hue was performing training maneuvers of the coast of Tourane.  Now was not the time to change his defensive strategy.  

Commodore Duckworth was on the back-foot.  His offensive strategy had bit him badly in the last week.  However, with his political capital down he needed a win.  Despite the pressure, he decided to change his strategy back to defensive.  

However, with the French hanging back he saw a chance to bombard a smuggler's harbor that was supplying the insurgents on the Kra Isthmus.  If Commodore Aubre wished to keep the insurgency moving forward, he would be forced to defend this supply point.  The French rose to the challenge, and steamed out to meet the British once more.  

We rolled up a Bombardment with the British as the attacker. There are no complications that are rolled up.  Both sides choose up to 25 Operational Value, and both sides can bring their battleships for another battleship showdown!  The French have an armor 7 ground target to defend.  

 Forces

Royal Navy of Siam

HMS Malaya- Commodore Duckworth- Command 2
Queen Elizabeth Class Battleship

HMS Archeron- Captain Manby- Command 3
Duke of Edinburgh Class Cruiser

HMS Medusa- Captain Butler- Command 2
Active Class Light Cruiser  

HMS Corsair- Commander Montgomery- Command 4
Bull Finch Class Destroyer- Torpedo

L'Aire National

Camot- Commodore Aubre- Command 4
Charles Martel Class Heavy Cruiser (Battleship)   

Tourane- Captain de Genouilily- Command 2
Descartes Class Cruiser- Drilled Crew

Tonkin- Captain de Vence- Command 2
D'Iberville Class Cruiser - Drilled Crew

Fantassin- Captain Valjean  - Command 4
Chasseur Class Destroyer- Torpedo  

Tromblom- Commander Morice- Command 2 
Chasseur Class Destroyer - Sky Mines  

Set-up: 
For today's Bombardment, we will be playing on a 48MU by 48MU board.  We determined terrain randomly using the chart in the rulebook: 

Grid 1 = No terrain
Grid 2 = No terrain
Grid 3 = Hills (Level 1)
Grid 4 = Hills (Level 1) 

We also rolled for complications and got none.   

The French place their defended position before any airships are placed.  It is 18 MU in from the French board edge, centered on their deployment zone in Grid 1 and 2.  The French can deploy 12 MU in, and the British deploy in Grid 3 and 4 and can be up to 6 MU in.  


The French can deploy up to 12 MU in from their side, and you can see them steaming in.  They are led by the Camot at Alt 4 and speed 4.  Her escort is the Tromblom matching her speed at alt 5.  Then the Tourane is at Altitude 3 and same speed.  The Fantassin is trying to cover the Tourane and the Tonkin at Alt 4, while the Tonkin is at Alt 5.  


The British are coming in on the alternate side on the British right corner, being led by Commodore Duckworth's flag on the HMS Malayan.  They are in a familiar formation with the Malayan at Altitude  and speed 4.  The HMS Medusa is covering her at Altitude 5.  The HMS Archeron is at Altitude 4, and the HMS Corsair is at Altitude 3.  They are all matching speed 4.  They can only deploy 6 MU in.       

Turn 1: 
Initiative: The British win with 3 Commands to the French 2.  They decide to go first.  

Move: 
The lead British ships begin a long, slow descent as they gain speed from dropping altitude.  The French stay on course.  Meanwhile, the rear British ships also stay on course.  

Battle: 
The distance it still too great to engage.  

End:
None

Turn 2:
Initiative: The British and French both get 3, so the British decide to maintain going first.  

Move:
The British continue their advance, with the Malayan then gives an order and creates a smokescreen around herself.  The Medusa stays with her.  In response, the Tonkin and the Fantassin begin to speed up for a torpedo attack run.  

The rear British ships stay slightly higher than their cohorts and on course.  The Camot begins a turn to place herself above the target, and the Tromblom follows suit.  They both dropped altitude to match the Malayan.  The Tourane presses ahead with no speed or altitude change.  

Battle: 
The big guns have the range, but neither side chooses to fire yet.  They decide to hold their fire for a better shot.  

End:
None

      
Turn 3: 
Initiative:  This time, teh French win with 2 to 0.  They opt to go second to let the British come to them.  

Move: 
The Archeron speeds up provide some cover fire for the Malayan.  The Tourane drops, passes beneath the Camot as she also gains speed.  

The HMS Corsair also speeds up and is providing top cover.  The Fantassin moves up and prepares to fire her torpedoes.  The Malayan drops altitude and clears her smoke, and she turns to bring the target under her broadsides.  The Medusa follows her.  

The Tonkin joins the torpedo line with the Tourane and Fantassin, all at staggered altitudes.       

The Camut turns, one altitude above the Malayan and prepares to fire on the British Battleship.  The Tromblom follows her charge to provide point defense as needed.    

Battle: 
The British have a tough choice.  Do they attack the French Battleship that is going to pepper the Malayan, or do they go for the actual target before it is too late?  The British choose to use the Corsair's torpedoes to attack the Camut, and try to put some friction on her to reduce her effectiveness.  The plan works as the Camot takes three friction from the attack, but no real damage.  However, now the French ship can not get commands and is at -1 firepower.  

After assessing the situation, the French choose to hold fire.  They do not like the odds of a misfire!  

The Malayan fires on the target, and hits it twice, but fails to damage it.  Earth is dramatically flung upwards by the barrage, but fails to cause any real damage. The Medusa also fires, but misses.  

End: 
There is only 3 Friction on the Camot, and it is easily removed.  


Turn 4: 
Initiative: The French score 2 to 1 commands, so the French elect to go first this time.  

Move:
 The Three French warships move forward, all at different altitudes and ready to barrage the Archeron with torpedoes.  The Archeron and Corsair move up to support their command ship, with the Corsair easily re-loading her tubes.  

The Malayan dangerously drops to 1 Altitude to maximize her broadside against the target.  The Camot dramatically crosses just above the Malayan and prepares to fire at point blank range! Both ships escorts stay with them, one altitude above of their charge.  


Battle: 
The French do not want to take any chances this time, and try to make a Fire for Effect command, but fail!  The Camot fires first at the Malayan.  The Camot's stern heavy batteries and starboard medium batteries jam and fail to fire!  However, the Malayan is still peppered by shells.  Causing four friction, but failing to cause damage! 

The Malayan is shaken, but fires on the target anyway!  The stern light batteries jam, but the heavies manage three hits on the target.  This time, the barrage is devastating, and reduces the target from 7 to 4 armor.  That will make it much easier to hit.  

The Archeron's Point defense gunners slap away the Tourane's torpedoes easily, leaving two Friction.  Her return fire from her main battery fails to find the mark, and promptly runs out of shells.  The Fantassin's torpedo attack fails to find the mark, as the Archeron takes out two out of 3, and the last one misses.  

The Corsair fires her torpedoes at the Tromblom.  Two are hit by Point defense, and the third strikes the ship and causes damage.  The last one misses, but he point defense of the Camot takes it out before it can attack the Battleship.  

The Tonkin fires at the Archeron, and uses a Fire for Effect command.  Two of the oncoming torpedoes at destroyed by point defenses.  However, the Fire for Effect orders worked as the last four strike the Archeron, causing three actual hits, and putting the British ship at 10 Friction! 

The Medusa also fires on the Tromblom and causes three more friction and one more hit!  


End: 
The Tromblom loses 2 armor, and the bridge was damaged in the attack. 
The Archeron is crippled by the torpedo attack!  However, she passes her Strike you Colors test, but begins to sink!  

The captain of the Tromblom is quickly revived by his bridge crew.
The Malayan re-arms her stern light battery.  
The Archeron clears her bow medium battery for action
The Camut manages to re-arm her stern heavy battery

There is 20 Friction on the board, but the two commander's roll to have 21 removed.  All friction is removed.  

Turn 5:
Initiative: Both sides score only 1 command, but the French maintain from last turn.  Again, they choose to go first.  

Move: 
The French Destroyer moves to avoid further conflict, and speeds up to 8.  The Malayan gets out from beneath the French and begins to circle the ground target.  

The Tonkin, follows the lead of the Fantassin and moves to avoid further battle.  The HMS Corsair, closes with the ground target to help finish it off with torpedoes, which they easily re-load.  

The Medusa is high enough to cross over the Camot.  Meanwhile, the Camot and the Tromblom slowly maneuver and try to turn back into the fight.  


Battle: 
Again, the French start with the Camot, and make a Fire for Effect command.  This time they are ready, and open fire on the Malayan.  The barrage causes 7 friction, and 1 actual hit!  

The Malayans bow heavy battery and light batteries are enough to destroy the French smuggler's den on the ground.  The Stern batteries fire at the Camot, and cause 1 hit and 4 Friction.  

The Tromblom launches her sky mines and they manage to attack the HMS Corsair.  The Point defense destroys 1, but a second hits the Destroyer.  Two others remain in play as a hinderance.  Return fire from the Corsair misses the French destroyer.  


The Medusa puts one more Friction on the Camot as they pass.  

The Tourane puts two friction on the crippled Archeron as they pass.  In return, The crippled Archeron still manages to cause 1 friction and a hit with her bow medium batteries.


End:
The Tourane lost 1 armor
The Corsair lost 1 armor and her Point defense weapons
Camot lost 1 armor. 
The Malayan also lost 1 armor.  

The Archeron sunk to altitude 2.   

Crews on the Corsair get their PD working again.       
The Camot gets her Medium starboard batteries working again. 

There is 17 Friction on the table. The two commanders remove it all. 

Turn 6- Final Turn
Initiative: British win 2 commands to 1.  They elect to go first.  

Move: 
The Malayan gains altitude as she tries to fly away.  The Camot does the same.  The Medusa and Tromblom follow their respective flags.  

The Corsair is still in a minefield, and manages to blast one set of mines but is hit by the other.  She takes 1 damage.  

The Other French ships are eager to disengage from the sinking Archeron.

Battle: 
The British take some parting shots at the French, but only the Medusa causes 1 friction to the Camot.  

The French are content to disengage from the battle.  


Conclusion:
The British complete their objective and destroy the French-aligned smuggler's depot.  However, it was at a cost as the HMS Archeron was crippled in the fighting.  The Camot Pre-dreadnought manages to once again tangle with a modern Queen Elizabeth class Dreadnought and come out in good shape.  However, it is clear that in a straight up fight the HMS Malayan would shred the French battleship.   

However, that tightens up the campaign to 4 for the French and 3 for the British.  It is first to 7 to trigger the final battle, and you need to be up by 2.  

Once the smuggler's depot was destroyed, there was little reason to keep fighting.  The French and British disengaged and head for safety.  This gave them the chance to repair their damage. The Malayan managed to repair her damage as she steamed back towards port.  The Corsair managed to repair 1 of 2 hits.  Meanwhile, the crew of the Archeron managed to stablize her and complete needed repairs on 2, bringing her be down 1.  

The French also had some damage to manage.   The Camot's crew manage to patch up her armor and her Medium starboard battery as well.  The Tromblom is not so lucky, and has 2 hits lost still.  The Tourane fixes her one armor loss as well.           
 
Despite winning, the French manage to keep the Kra Isthmus in a state of turmoil, and maintain control of it. 

Participants gain the following Experience:

Malayan: 9 + 6 = 15
Archeron: 7 + 3 = 10
Corsair: 4 + 2 = 6
Medusa: 4 + 2 = 6

Camot: 8 + 2 = 10
Tromblom: 2 + 3 = 5
Tourane: 11 + 1 = 12
Fantassin: 7 + 1 = 8 
Tonkin: 13 + 4 = 17

Tonkin and Tourane had both previously received experienced crew upgrades, which they did not get a chance to try this game.  Not enough commands to Re-load Ordinance after they were empty.  Only the Malayan gains a level, as the rest are at the cusp or below.  HMS Malayan gains Stoke the Engines to help it gain speed.  

The British are using Laem Chebang to repair the Achilles, so it is not available to help repair ships.  They use Phra Nakon to finish repairs on the Archeron which will take two more rounds.  That leaves the Corsair damaged going into the next battle.    

The French use two assets; the Kra Isthmus and Hanoi to repair the Tromblom.  Meanwhile, Saigon completes work on the Cuchinchina, which returns to active service after refitting and repairing.  Meanwhile, the Hue is still doing maneuvers and training off Tourane for another 2 rounds.  

The loss of the smuggler's harbor and depot was a setback to the French efforts to de-stabilize the Kra Isthmus.  However, despite the largest depot being destroyed, the rebels had enough supplies and moral to continue their struggle against the oppressive rulership of the King of Siam and the British supporting them.  Despite the loss, Commodore Aubre was still feeling confident, as he felt the Royal Navy of Siam was on the back foot.  They were reacting to counter his efforts, instead of taking the initiative themselves.  

Meanwhile, on the British side the simmering antagonism between Commodore Duckworth and Commander Montgomery of the Corsair only grew.  A furious diplomatic scramble was occurring as the two traded cables with the Foreign Office, accusing each other of sabotaging the British efforts in the region.  For now, the government was still backing Duckworth, and his recent victory only helped maintain his position.  However, the Commodore knew he needed to wrap up this business with Siam soon.    

You can pick up the rules for Castles in the Sky at the link from Osprey. 


Become a Patron and get access to all the cool stuff, a peak behind the curtain of Blood and Spectacles, and early-access to playtest games!  


You can follow Blood and Spectacles Facebook page or Instagram for more fun! 

Check out the latest publications and contact me at our Blood and Spectacles website

Or purchase all out games at the Blood and Spectacles Publishing Wargames Vault Page!

Monday, May 23, 2022

Castles in the Sky: Indo-China Campaign Part III - French vs British


Welcome back to the Indo-China campaign for Castles in the Sky from Osprey Games.  In Part II, the British tried to unsuccessfully blockade the French to stop vital repair supplies getting to them.  However, the French were able to break out from the Blockade, but at the cost of one of their destroyers exploding.  The British are in the lead with 2 Campaign points to 1.  The first team to 7 will trigger the "Final Battle" scenario.   The British decided to switch their strategy to the Offense, while the French stay on the Defensive.  

Commodore Duckworth, of the Royal Navy; grew impatient with the French recalcitrance in the region.  He decided to step-up patrols and aggressively began to probe on the borders.  However, this caused increased wear-and-tear on his air ships.  This aggressive activity forced the British to cease operations and re-supply at the neck of the Kra Isthmus and rendezvous with Siam forces there.  

French Commodore Aubre was provided intelligence on this rendezvous by his spymasters.  Aubre decided to throw caution to the wind and take the chance to strike the British with strategic surprise.  The Commodore decided to lead this attack himself in the Camot.  With haste, the French airships slipped their moorings and made steam for the Kra Isthmus across the Gulf of Thailand.

We rolled up a Surprise Attack which is a battle scenario as opposed to a Raid!  That means we can bring out the Battleships to fight!  Both sides get to choose over 25 Operational Value but can not have more than 3 points separating their total fleet costs.  The entire remaining and deployable French fleet is only 24 Operational Value, so they will all sally.  

Despite the British being on the offensive, the scenario roll dictated them to be the defender.  The French will get the drop on them this time! 

Forces

Royal Navy of Siam

HMS Malaya- Commodore Duckworth- Command 2
Queen Elizabeth Class Battleship

HMS Achilles- Captain Durham- Command 4
Warrior Class Cruiser

HMS Arrogant- Captain Knowles- Command 2
Arethusa Class Light Cruiser

HMS Medusa- Captain Butler- Command 2
Active Class Light Cruiser  

HMS Hasty- Commander Rawley- Command 2
Bull Finch Class Destroyer- Sky Mines 

That is 27 Operational Value

L'Aire National

Camot- Commodore Aubre- Command 4
Charles Martel Class Heavy Cruiser (Battleship)   

Tourane- Captain de Genouilily- Command 2
Descartes Class Cruiser

Tonkin- Captain de Vence- Command 2
D'Iberville Class Cruiser

Hue- Captain Senez- Command 2
D'Iberville Class Cruiser

Fantassin- Captain Valjean  - Command 4
Chasseur Class Destroyer- Torpedo  

Tromblom- Commander Morice- Command 2 
Chasseur Class Destroyer - Sky Mines  

Set-up
For the French Surprise Attack, we are using a 48MU by 72MU board.  We determined random terrain per the rulebook chart.  The French will be on the side with grid 1, 2, and 3, and the British will be on 4,5, and 6. 

1. Mountain (alt 3)
2. No impacting terrain
3. Hills (alt 1)
4. Hills (alt 1)
5. No impacting terrain
6. No impacting terrain

We rolled for complications, but none will be impacting our game today.  

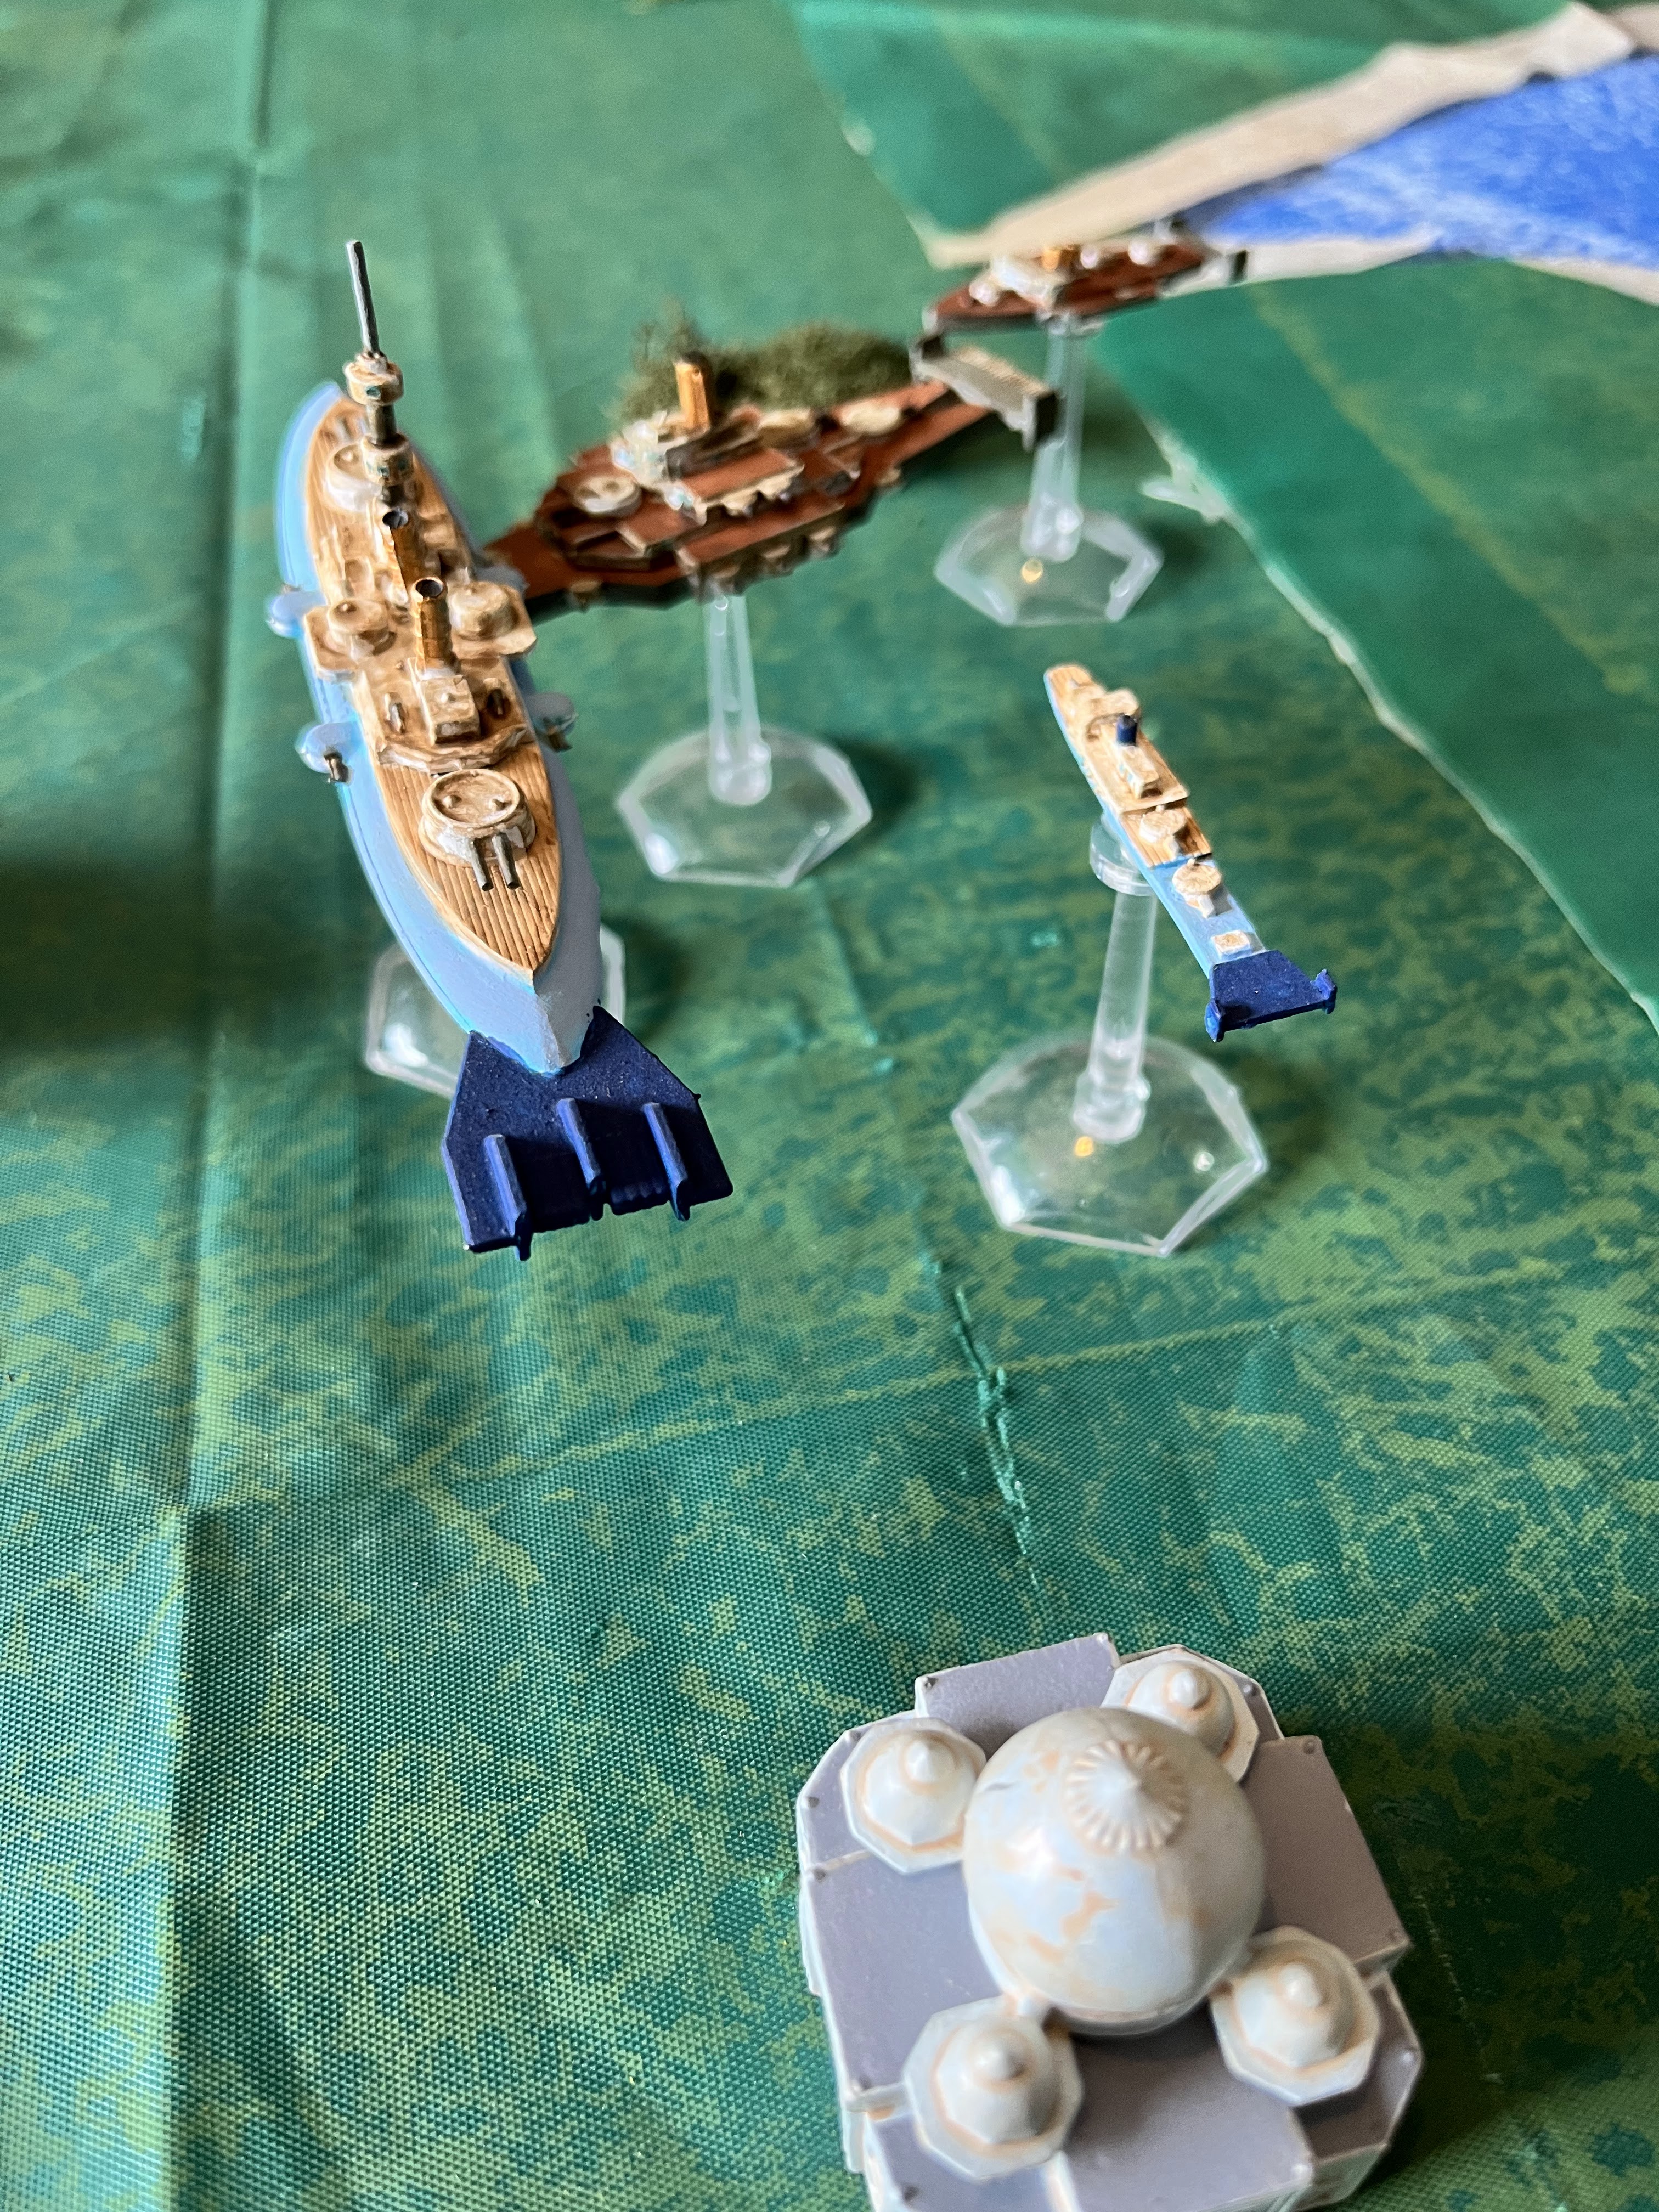
The British have to deploy in a band between 6 and 12 MU away out from their board edge.  In addition, all of their airships start the game landed and need a successful Command Check to activate, and then take-off.  Oh boy!  They try to clump up in the middle for mutual protection, but far enough away to stay mobile.  The Medusa pairs with the Malayan, and the the Hasty pairs with the Achilles.  The Arrogant is on its own as a roving gunboat.    


The French come in with the Camot leading the attack.  They are deploying in echelon with the Camot at Altitude 4 and speed 5 on the French left, escorted by the Fantassin and Tromblom bracketing them at Altitude 3 and 5 respectively and speed 5.  Then the Tourane, Tonkin, and Hue trail along beside and to the left at escalating altitudes and speed 5.     


Turn 1:   
The French score 3 commands to 2 British commands.  They choose to go first.  

Move: 
The Camot drops altitude to speed up, while the crew of the Achilles manage to power up and take-off!

The rest of the French power forward trying to get into range before the British can take-off and get to combat speeds.  

However, the British are successful at passing their command rolls, and begin to take-off.  This puts them all at speed 2, altitude 1.

Battle: 
Everyone is just out of range to open fire.  

End:
None


Turn 2: 
Both sides score 1 individual command, but the French retain the initiative and decide to move and shoot first.  

Move: 
The Camut begins a turn to try and cross the T of the HMS Malayan and avoid her broadside guns.  The Malayan makes a All Ahead Full order to double her ability to gain speed, and manages to thrash up towards the French altitude.    

The rest of the French drive forward to get the British into range.  The Destroyers maneuver to stay with the Camut and provide covering fire.  

Melee: 
The Camut checks the range, and decides to hold her fire to avoid a potential misfire due to the range.  The British do not hold back, with the Achilles and Malayan finding the range with their forward guns and hitting the Camut for two Friction.  The HMS Medusa also fires on the Tromblom and causes 1 Friction.  


The rest of the French fleet holds their fire.  

End:
There are 3 Friction on the board, and the two Commanders easily get it cleared away.  
  
Turn 3: 
This time the British win initiative with 3 Commands to 1.  They opt to move and shoot first.  

Move: 
The HMS Malayan thrashes up to Altitude 3, even with the Camut now.   

The French support cruisers continue forward to press their attack.  Meanwhile, the remaining British cruisers try to gain height and speed, mostly at Altitude 3.  

The French stay 1 band above them as the Camut and her escorts go up.  

Melee: 
The Achilles starts by firing on the Camut, but fails to find the mark.  However, the the cruiser passes an Ammo check to keep her main battery firing.  

The Camut fires for Effect on the Malayan, and manages to cause two Friction hits with her bow guns.  The British Battleship fires back and causes two Friction in return.  The French warship also fires her Air Torpedoes at the Achilles, but the combined Point Defenses of the Hasty and Achilles down them before they can hit the cruiser.    

A Torpedo barrage from the Fantassin leaves two friction on the Achilles, after her Point defense destroys 1, and a second pings loudly off the ship's armor.  

The Medusa hits the Tromblom for a point of Friction as the French close.  

The Arrogant's point defense gunners easily swat away a pair of Air Torpedoes from Tourane.    


End:
There is 11 Friction on the board.  9 of which will be removed.  The British remove 6, and the French 3.  This is enough to clear for the French, and the British decide to leave 2 on the Arrogant.  

Turn 4: 
Both sides score only 1 command a piece, and the British maintain the initiative.  They decide to move and shoot first.  

Move: The HMS Malayan gains speed, and turn to port, hoping to catch the French Camot in a close range broadside, or at least force her to maneuver to avoid it.

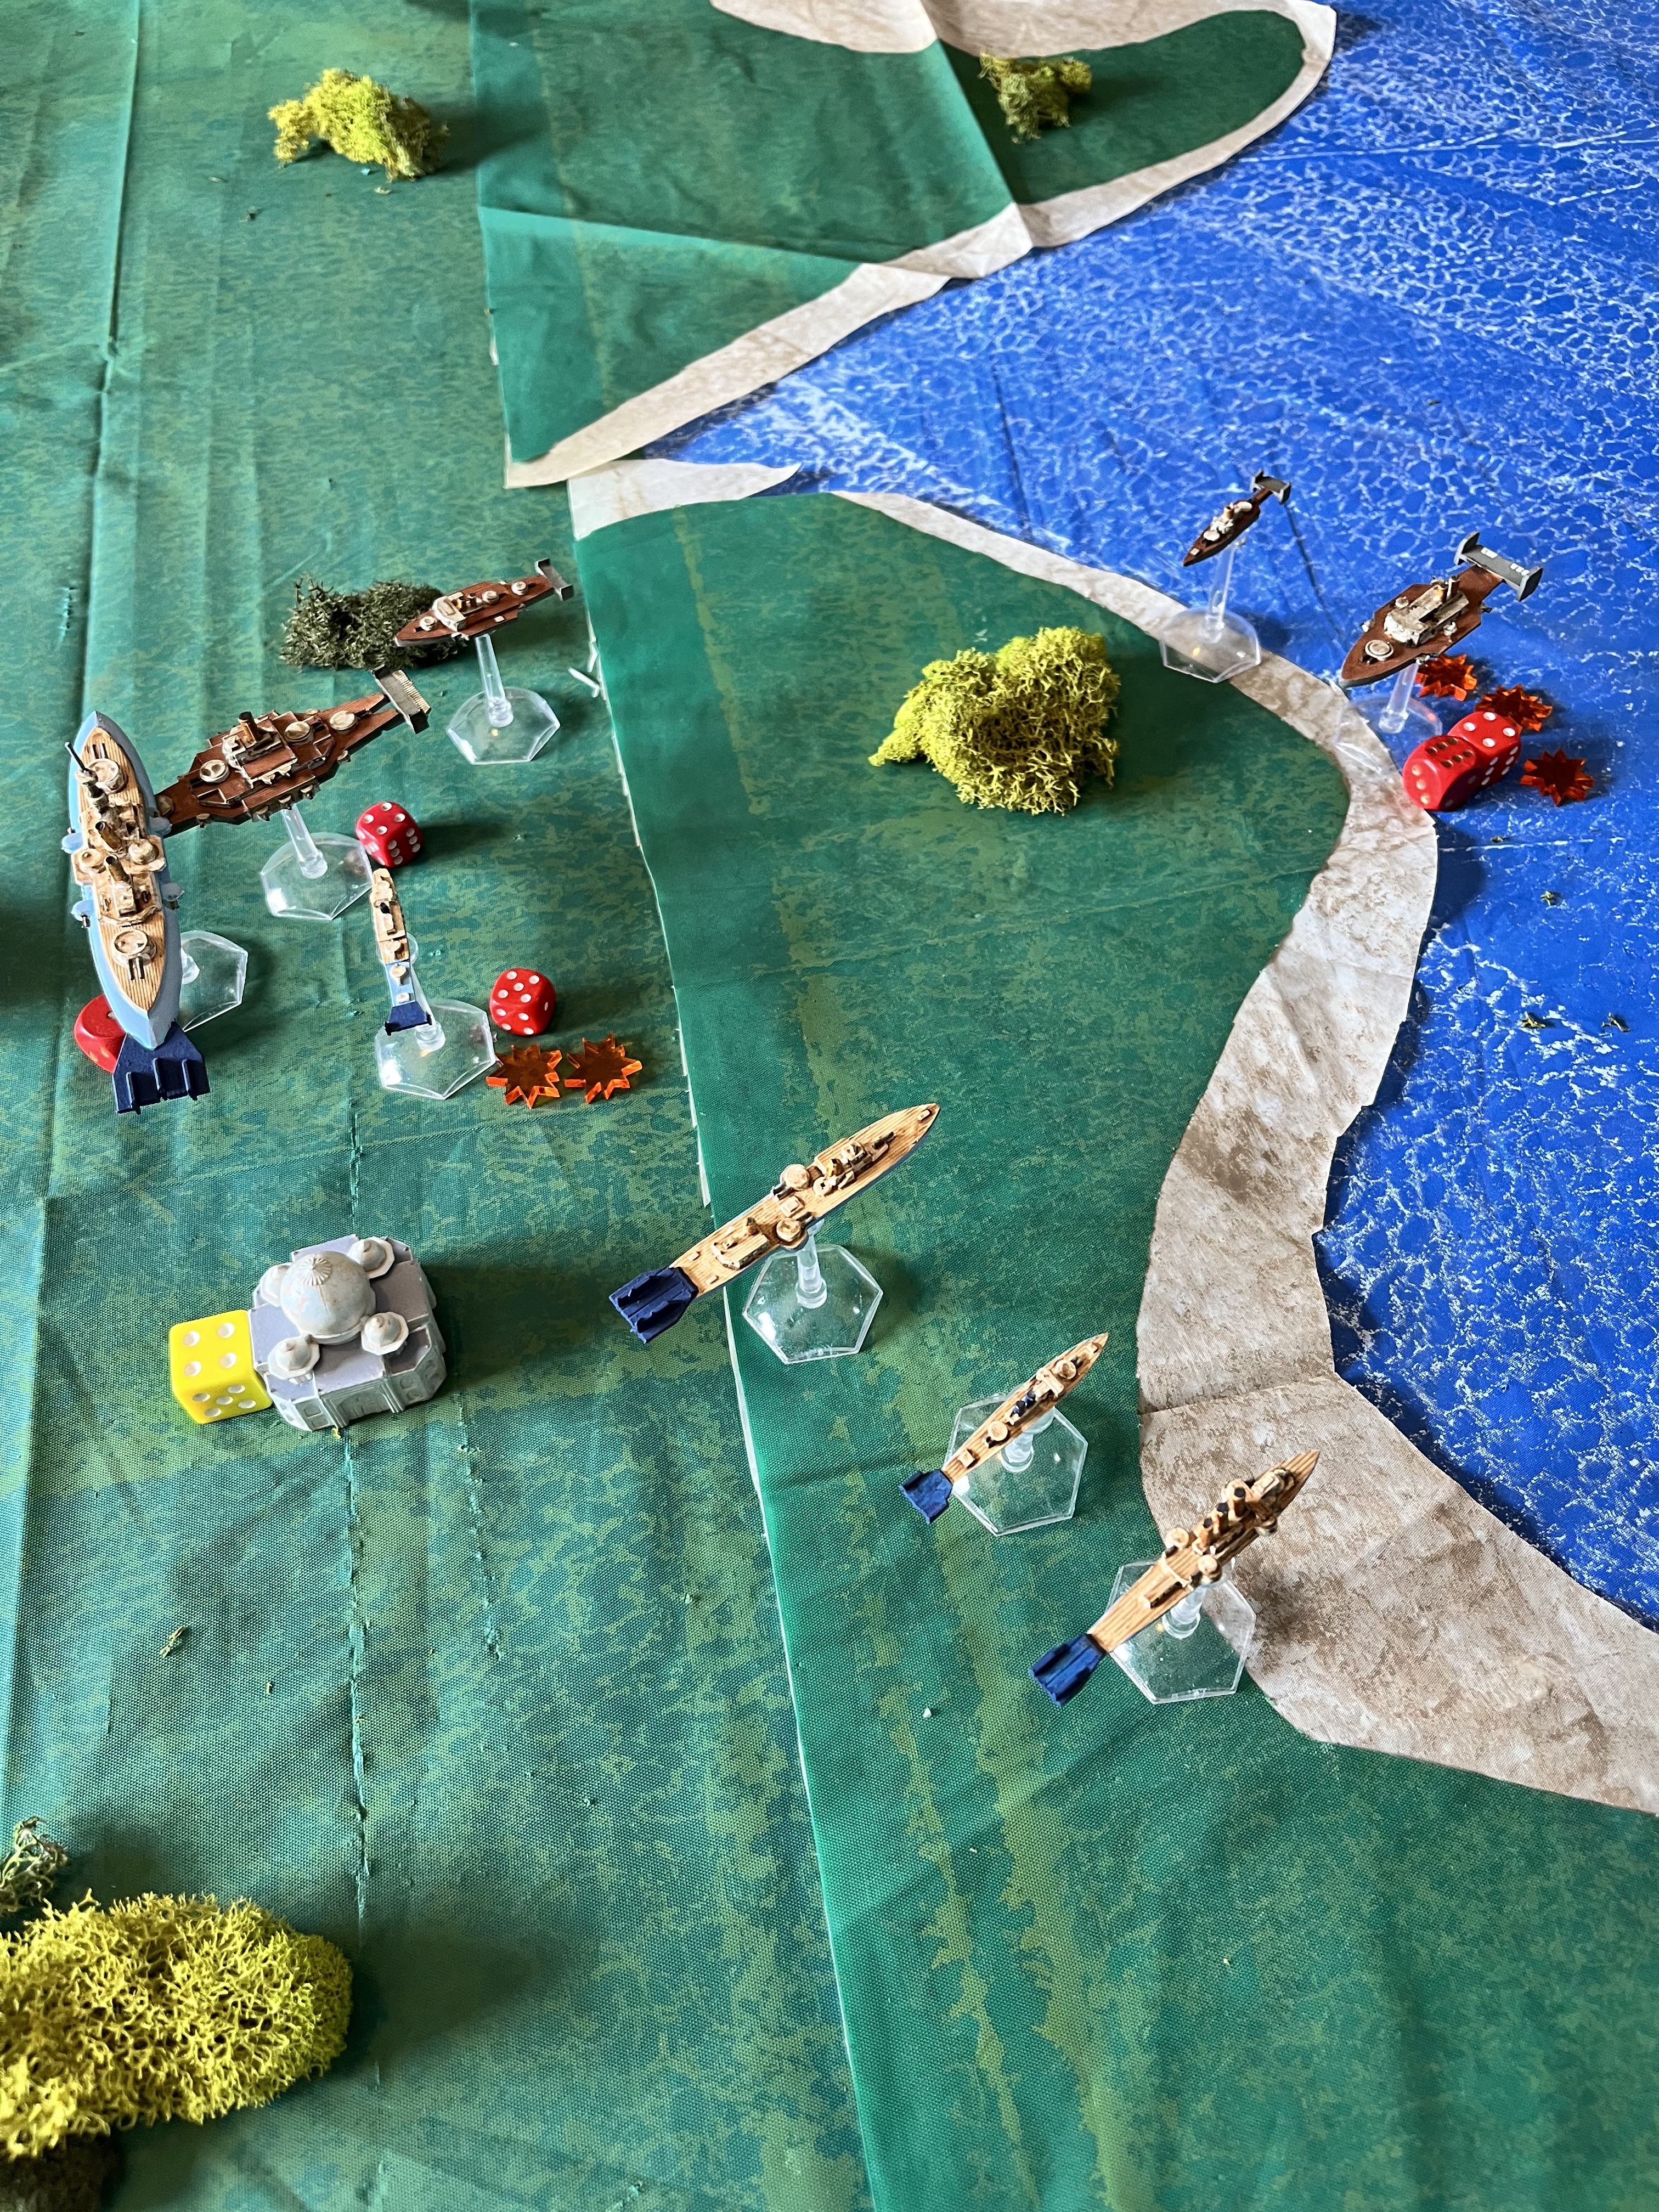
The French Tourane, Hue, and Tonkin continue to close on the floundering Arrogant, who tries to gain some altitude, but is now at minimum speed.  

The Medusa stays with the Malayan for mutual support. Meanwhile, the Tromblom buzzes the Malayan and prepares to drop her sky mines.  

The Achilles and the Hasty continue to slowly climb, while the Camot shifts to cross the Achilles T at an altitude band above her.  The Fantassin stays with the Battleship for support.  

Battle:
The HMS Malayan tries to make a Fire for Effect command, but fails to ready herself in time.  However, it was not needed as 5 of 6 dice hit.  Commodore Aubre quickly decides to use his last command to Prepare for Impact.  He successfully negates all the hits, but still has 5 Friction on his ship.  All commands have been used for this turn by both sides.  In addition, stern light battery fire failed to damage the Tromblom as the gun's ran out of ammo.   

The Tromblom drops 4 sky mines right on the Malayan.  However, the Point Defense gunners on the HMS Malayan and the HMS Medusa destroy them all with Point Defense fire.  Light battery fire from the Destroyer fails to even daze the Achilles in front of her.  

The Medusa fired on the Tourane, and landed two Friction.  Return fire from the Tourane caused two hits on the Arrogant, and two more Friction.  While the Medusa also took 2 Friction.  In addition, the Tourane's starboard medium battery jammed up due to rapid firing.    

The Achilles firs on the Camot with limited effectiveness from its forward battery. The shot causes 1 Friction.

The Tonkin fires a spread of Air Torpedoes at the Arrogant.  The British Point Defense miss the oncoming torpedoes, and three detonate against the ship.  One hits something vital beyond the armored belt.  

The Hasty fires on the Camot, causing one more friction from her light battery. The French warship is up to 7.  

The Hue fires a spread of torpedoes at the Arrogant, and the British PD gunners are ready this time, and take out two.  One more hits the ship, but fails to cause damage.  

The only ship left to fire is the Camot.  The Heavy and Medium batteries target the Achilles, while the light battery fires on the Hasty.  The Achilles takes 5 friction and the Hasty 1.  The Hasty takes 1 hit, and the Achilles takes 2.   


End: 
HMS Hasty has her screw fouled in addition to losing 1 armor. 
HMS Achilles loses two armor and has her rudder jammed.
HMS Arrogant loses three armor, starts on fire, and is crippled! 

The Arrogant starts to sink and loses 1 altitude and 1 speed. 

The HMS Arrogant strikes her colors, unable to continue the fight.  

Repair crews on the Arrogant manage to put out the fire, and the Achilles unjams her rudder.  The Malayan and the Tourane manage to unjam their batteries.  However, the HMS Hasty still has a fouled screw.  

The board has 29 Friction,  British can only remove 3, and French can only remove 5.  The British keep 11 on the Arrogant, 4 on the Malayan, and 5 on the Achilles.  The French keep 4 on the Camut. 

Turn 5: 
Both sides score 2 Commands, and the British keep the initiative.  They decide to move and shoot first.  

Move: 
The HMS Hasty slowly tries to get past the French forces, in a position to launch her sky mines.        

The Tourane turns into the main British force, but at Altitude 5.  That is two above most of the stalling British forces. 

The HMS Medusa is given leave to break formation, and she dives and speeds up, coming back around on the Camut's Starboard stern.

The Malayan and Achilles both are stalled due to Friction, so can not move.  

The Tonkin and Hue reload and turns towards the Malayan.  However, they are at Altitude 5 and 6 respectively to the British 3.     

The Camot loses Altitude to keep from stalling and gain speed.

After her mine laying run, the Tromblom scurries to get back into formation with the Camot.  The Fantassin slows to stay with her charge.  

Battle: 
The HMS Hasty unloads her mine payload at the Camot.  The French Point Defenses were caught happing, and only tagged 1 of the mines.  Two others exploded against the battleship, but did not cause damage.  The last stayed floating looking for a target.  


 The Tonkin fires a spread of torpedoes at the HMS Malayan.  Her point defenses hit 2, but three more look like they are going to hit.  The Commodore calls to Prepare for Impact, but the crew does not respond in time.  Three hit the battleship, and one manages to buckle her armor!  The first time in the campaign!  


The HMS Malayan does manage to swivel her turrets and fire at the much higher Tourane.  One manages to hit the French ship despite the height, size and speed.  The Tourane has 3 Friction and 1 hit.  

A torpedo barrage from the Hue at the Malayan only causes 2 Friction.  Most of the torpedoes simply missed the battleship.  

The Medusa hit the Camot for 1 Friction from her main gun.  

The Camot opened fire with her Broadside on the Achilles and hit her for 5 more friction and 2 hits.  In addition, her light batteries hit the Hasty for 1 Friction.  

Return fire from the Achilles hit the Camot for one Friction with her forward guns.  


End: 
The HMS Malayan is crippled by the torpedo attack! 
HMS Achilles loses 2 more armor, and starts on Fire! 
Tourane loses 1 armor.

The Malayan, Arrogant, and Achilles all lose 1 altitude and speed.  

Commodore Duckworth in the HMS Malayan decides to strike his colors!

The Achilles crew quickly puts on the fire onboard the ship.  The HMS Hasty also fixes her fouled screw.  

There is 45 Friction on the board.  The British remove 9 and the French 13.  The French clear the Camut and reduce the Arrogant down to 7.  The British clear the Hasty, and Only leave two on the Achilles.  The Malayan has 11 and the Arrogant 7. 

Turn 6: 
The British score 2 commands to 1 and keep the initiative.  They decide to move and shoot first.

Move: 
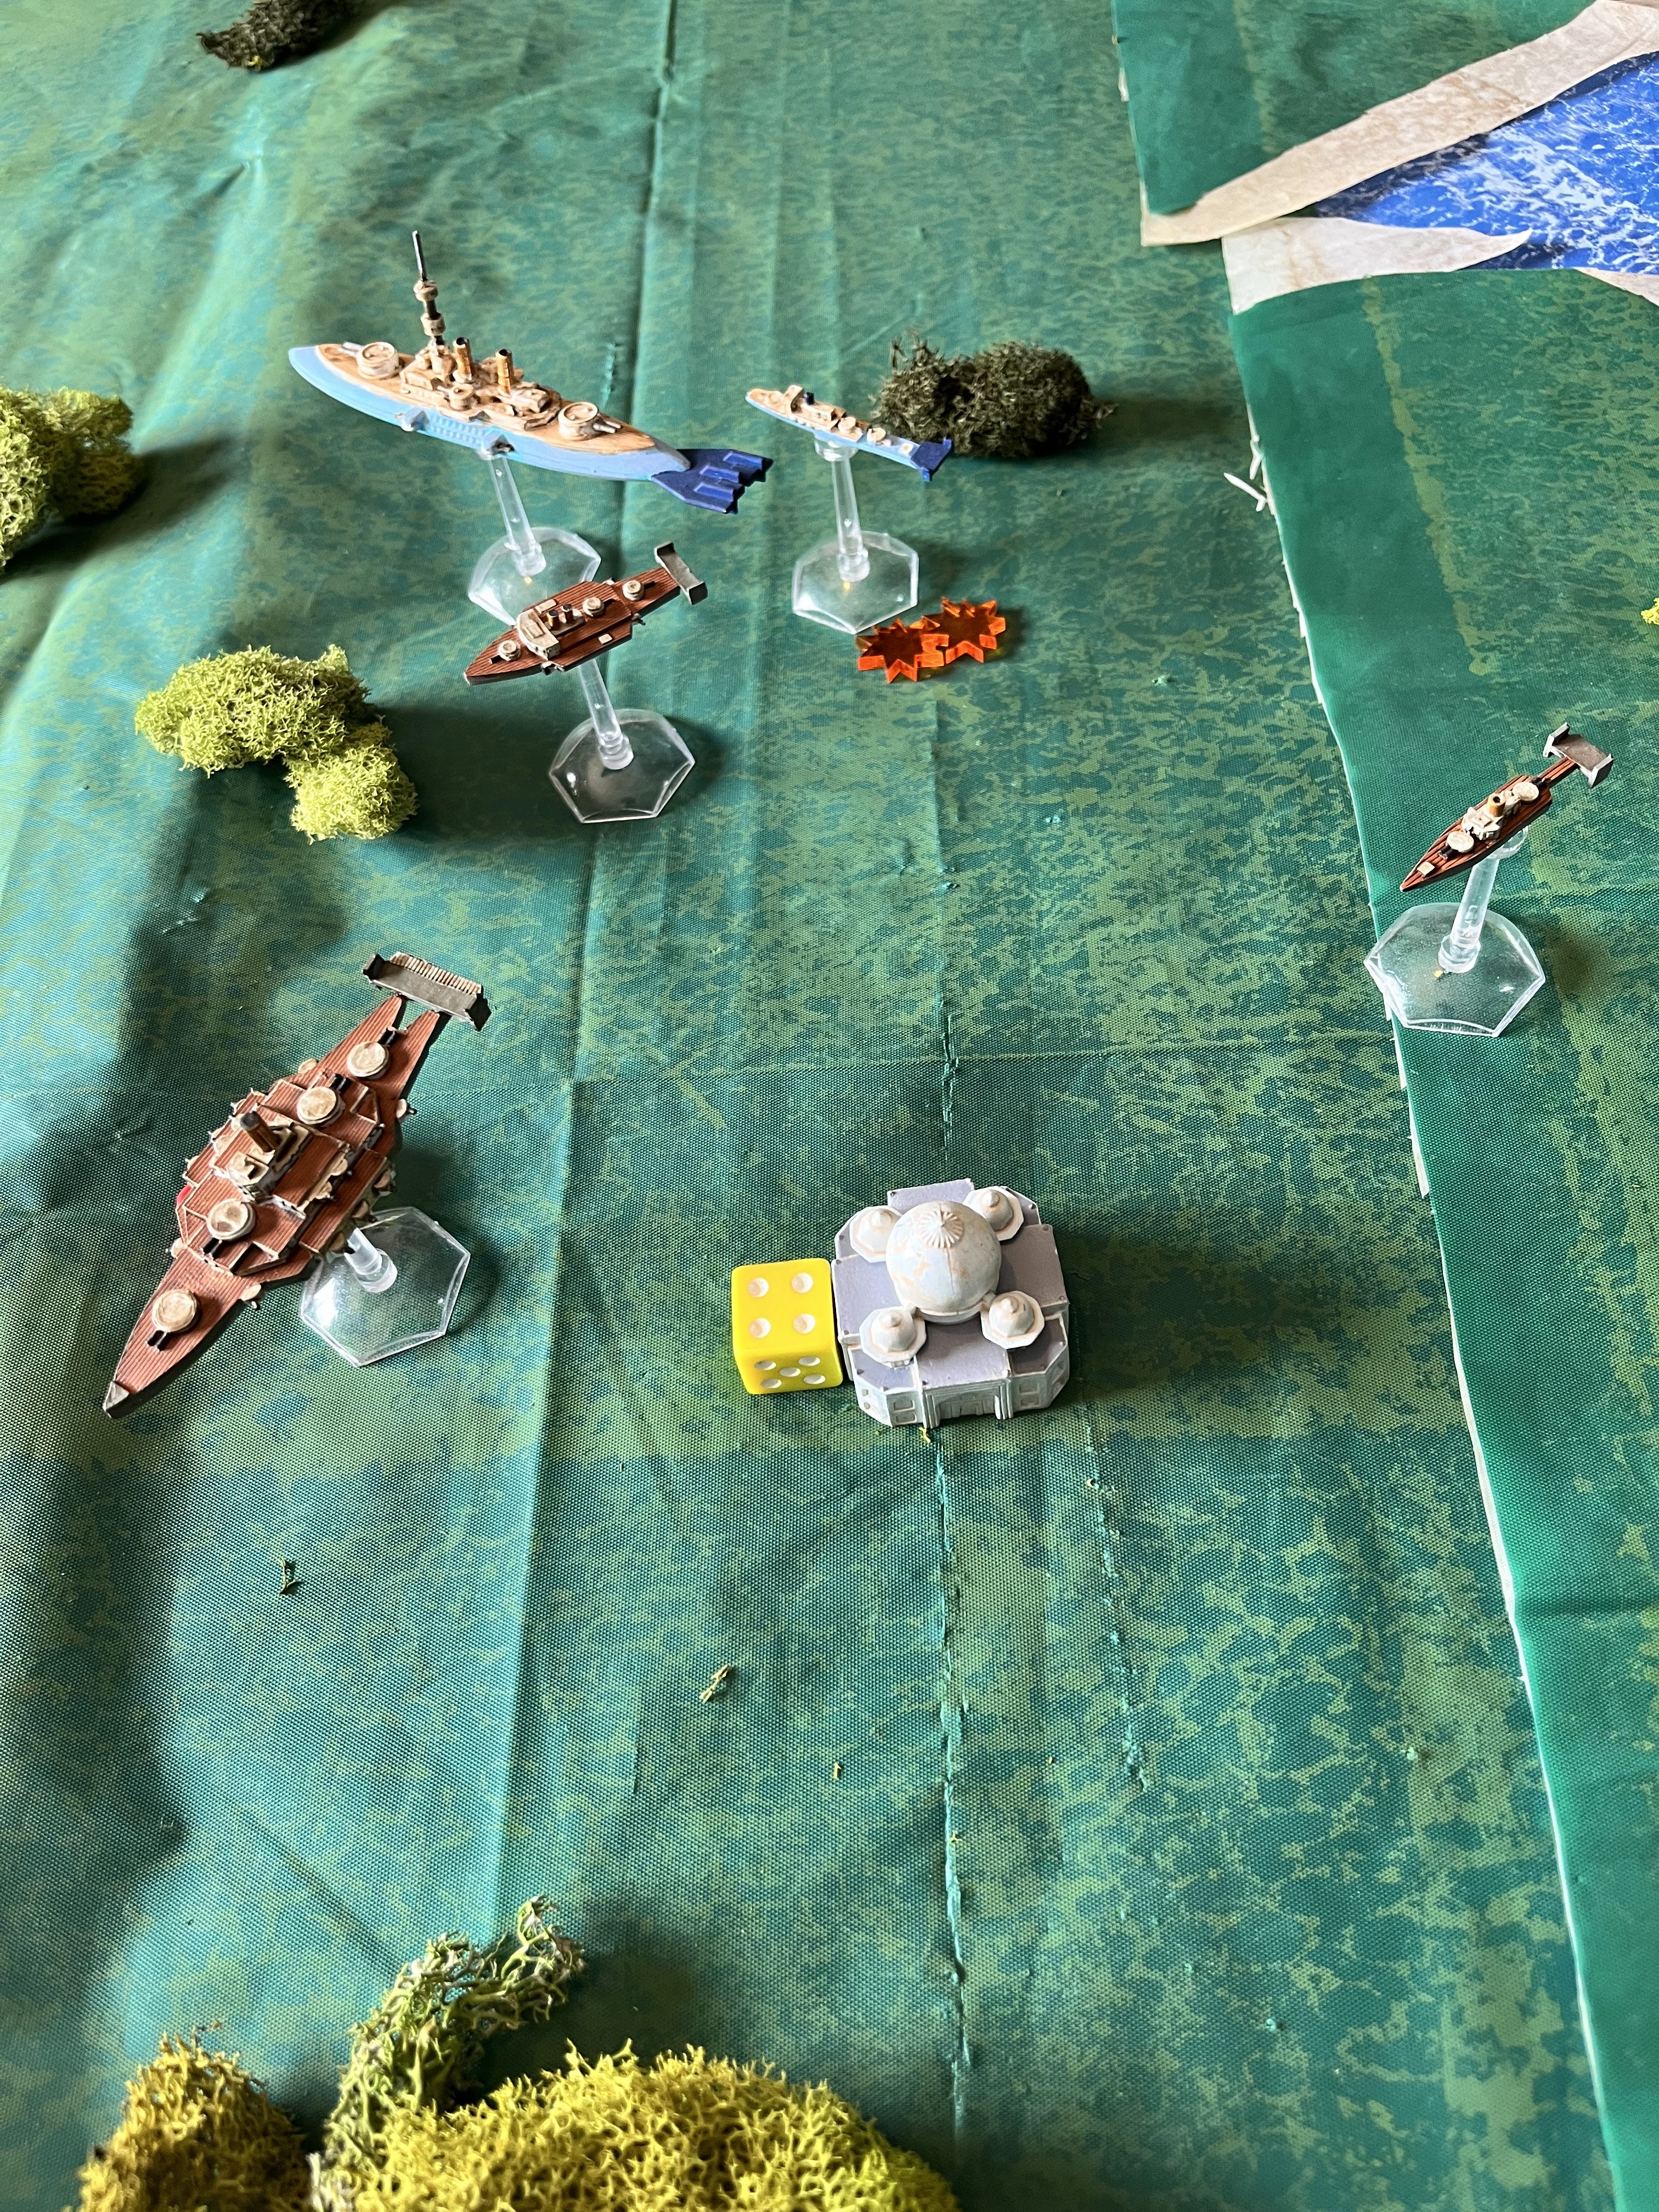
The HMS Achilles managed to restart her engines and crawl forward, but her speed was limited by the friction on her.  She could try to lose altitude to gain speed, but she was all ready dangerously low.  She stayed steady, inching forward.  

The Tourane stayed on her course, but dropped altitude.  Her overall Friction slowed her down, but she was going fast enough to avoid stalling. 

HMS Medusa went up two altitude and took two hard turns to move away from the Camot, hoping to potentially get back around to engage some of the French lighter ships.  

The Hue and Tonkin both dropped 1 altitude, but neither could reload their torpedoes this turn.  The French used all their commands to try.  They turned to head towards the HMS Medusa to intercept.  
  
HMS Hasty prepared her Sky Mines for a second launching, but sped up to try and partner with the HMS Medusa.  

The Camot had Sky Mines nearby, and the Point Defenses of her and the Fantassin made short work of them, but left some Friction on the French battleship.  She tried to speed up, but lumbered along too slow to even turn.

The Fantassin Destroyer tried to stay with the battleship, but started to inch ahead.  The Tromblom broke off from her charge and pursued the British Light Cruiser and Destroyer.  However, neither ship had their Mines or Torpedoes loaded.  

Battle: 
The HMS Medusa fires on the incoming Tonkin, and fails to Fire for Effect command check.  However, she still manages to drop 1 friction on the French ship.  The pair of D'iberville cruisers do not bother to return fire with their light batteries at the range.  

The Tourane is a bit too high to target the limping Achilles, so opts not to fire.  Instead, the Camot uses her stern turreted guns on the  damaged British cruiser. In her heavily damaged state, the big guns tear through the Achilles and cause two more damage to her. 

The HMS Achilles does have the French Battleship in her broadside, but her friction reduces her firepower further.  Her shells bounce off the battleships armored hide, causing 2 more friction on the French ship.

No one else has the proper altitude, range, or firepower to fire this turn.  

End:
The HMS Achilles has her Screw fouled twice, which causes her to stall again.  Plus, she is down to 2 Armor Point left.     
  
The HMS Malayan, Arrogant, and Achilles all drop to Altitude 1, perilously close to sinking.  

This time, the Captain of the Achilles strikes his colors.  He needs to focus on rescuing his crew and trying to save his ship instead of fighting.   

There is technically 2 turn of play left, but the British have signal their intent to give up, and the French accept their terms.  Both sides turn their attention to recovering abandoning sailors, treating the wounded, and keeping their ships afloat.  The French, content with their efforts turn back away and return to their bases to refit, re-arm, and resupply; content with their prisoners and the damage they have inflicted.  

Conclusion: 
A decisive French victory as they lost 1 Armor and inflicted 11, with three British ships striking their colors.  A humiliating defeat for the Royal Navy of Siam.  This leaves the French in control of the Campaign at 4 points to 2.  No one has reached 7 yet, but the French are ahead by 2.  The Campaign continues!

Once the shooting stopped, the crews were able to set about trying to repair their ships.  The Tourane's crew was able to manage the damage on their vessel.  The HMS Malayan was able to repair her damage.  However, the crews made progress but he HMS Hasty limped back to port with 1 Armor loss, the Achilles with 4 armor lost, and the Arrogant with 1 armor loss.  Those would need some additional Strategic asset support to fix.  

Participants gain the following experience: 

Malaya- 7 + 2 = 9
Medusa- 3 + 1 = 4
Arrogant- 0 + 1 = 1
Achilles- 3 + 1 = 4
Hasty-  0 + 1 = 1

Camot- 0 + 8 = 8
Tourane- 7 + 4 = 11
Tonkin- 7 + 6 = 13
Hue- 5 + 2 = 7
Fantassin- 5 + 2 = 7
Tromblom- 0 + 2 = 2

The Tourane and the Tonkin both earn an Experience advance.  Tourane and Tonkin both earn the Drilled Crew skill which will help them Reload to clear jams and arm torpedoes.  That will be very helpful for these French cruisers.      

Unluckily for the British, the French have managed to neutralize the Kra Isthmus with this attack!  The British no longer have it as a strategic asset, and instead a French-backed revolutionary force has de-stabilized the region enough that the King of Siam can no longer depend on them to help supply the Navy.  This gives the French 4 assets to 2 now.   

With their limited Strategic Assets, the British send the HMS Achilles to the port of Laem Chabang for full repairs, but that will put the ship out of the fight for 3 turns.  In addition, the British use Phra Nakon to finish repairs on the HMS Arrogant.  On the French side, Saigon is still working on the Cuchinchina's repairs.  The French decide to send the Hue airship to Tourane in order to drill for extra Experience.  It will be out of the fight for 3 turns!  That may have been a mistake.  Finally, the last two assets are converted into re-rolls for next game.  

Commodore Duckworth blamed his decisive loss for the Battle of Kra Isthmus on the only captain not there taking part!  His telegraph to the ambassador of Siam blamed Commander Montgomery of the HMS Corsair for allowing the French to slip pass his picket and get the drop on the re-supplying British fleet.  He left out the important details that it was his patrol patterns and aggressive pace of operations that his force had to re-supply in theatre at all.  The report was received back in London with a raised eyebrow of skepticism, but antagonism between the Commodore and the Commander grew, as Commander Montgomery accused Duckworth of cowardice for striking his colors so quickly.

Meanwhile, Admiral Aubre was more than satisfied with the results of his operation.  He had managed to gain tactical surprise and it had paid off.  The British fleet had been unable to gain enough speed and altitude in time to successfully fend off his attack.  They were in a shambles, and he suspected they would need to request reinforcements from London to carry-on.  His old Battleship had proven more than a match for the newer British dreadnought style airship.  Despite his victory, the French commander was not ready to go on the full offensive yet.  His second most powerful ships was still being repaired after his first encounter with the British.  Caution and waiting for an opportunity to strike would be his watch word.  However, the Indochina Newspapers were hailing him as a hero, and that word had a nice ring to it.  

You can pick up the rules for Castles in the Sky at the link from Osprey. 


Become a Patron and get access to all the cool stuff, a peak behind the curtain of Blood and Spectacles, and early-access to playtest games!  


You can follow Blood and Spectacles Facebook page or Instagram for more fun! 

Check out the latest publications and contact me at our Blood and Spectacles website

Or purchase all out games at the Blood and Spectacles Publishing Wargames Vault Page!

Monday, May 16, 2022

On the Painting Desk- Dark Age Irish are Done (Insert Clever Title Here)


One of the key goals for 2022 was to order and complete painting a Wargames Atlantic Dark Age Irish army.  This was to act as an opposition force for my Victrix Vikings that I painted in 2021.  The idea was to use these two forces to help with the marketing and post-production work for a new game system for Viking Age warfare called Fury of the Northman.  This game is based on the Men of Bronze engine and therefore uses armies of similar size.  

In this case, the Dark Age Irish army was supposed to have about 6 units so about 60 models, and include two units of warriors, two units of slingers, and two units of skirmishers.  The focus of this force is greater mobility and firepower than my Viking force.  

In my last post, you got to see some progress on the Skirmishers and Slingers.  There, I also broke down the colors I used with my Armypainter Paints. For brushes, I used basic, big-box purchased brushes.  So, with that let's get into the pretty pictures! 

Here we have the finished Skirmisher units.  The Irish army in miniature format is famous for a few things, including Irish Wolfhounds in battle.  Personally, I think their actually use in battle is VASTLY overstated in wargaming, but it is a fun flavorful unit that makes the army distinctly Irish.  The Wargame Atlantic sprue comes with several of the "Good Boyz" so I figured I might as well use them! 


I also avoided giving the Skirmishers shields for the most part, as I figured those would limited their ability to move quickly and easily through the brush.  This is also the unit I put the most "shirtless" models in, as I also assumed the poorest members of the community would end up here in the army.  


For basing, I used a cheap acrylic paint from a big box retailer, globbed it on heavy with a cheap brush, over the hardware purchased washer, and then sprinkled it with left-over lichen/moss found at the bottom of my terrain storage box.  No need to waste it after all! 

Now, onto the Slingers and how they turned out once I based them.....


and then the other unit of slingers......

Not much to say about these guys.  They have a mix of slingers and just guys throwing rocks.  Or I guess charitably you could say they were there to re-load the slings.  I prefer to think they are just throwing the rocks.

The, the warriors....


 All the shields are hand painted, because I did not buy transfers.  I had forgotten how much I disliked painting shields, so it was a good thing only two units of warriors had them, plus a couple other here and there for unit leaders.  I base panted half Oak Brown, and the other half Leather Brown.  I then used a combination of Monster Brown, Desert Yellow, and Army Green.  The white white ones are Mummies' Robes while the red one is Rust Red.  I then used the same colors on contrasting backgrounds to make the symbols and marks.  Finally, I gave them all a Strong Tone wash.  I tried to paint them all on the sprue, and that made it a lot easier.  After cutting them out and gluing them to the warrior, I had to touch up the contact points with the shield's base color. 

Here is the warrior unit with their Chieftain to lead the force.....

Unlike the Viking army I built earlier, the Dark Age Irish do not make use of the Shieldwall.  Therefore, they will mostly be acting in dispersed, Open Order units.  They did not need to rank up as tightly.  The Chieftain I wanted to have some more vibrant colors and an all metal shield to help him stand out a bit.  

Here is the full army together....


I look forward to these guys hitting the table and fighting against the Viking raiders in the coming weeks and months.  I still want to add two more forces to my Dark Age armies, the first is a Anglo-Saxon army because it is iconic to the era.  The second is an Arab force because I am enamored with the historical Battle of Talyata where the Vikings and Arabs fought an engagement.  Plus, it would be a big departure from my other Dark Age armies.

Here's a preview of some Vikings vs. Dark Age Irish action!   


  You can see the rules on the Blood and Spectacles Wargame Vault page to find Fury of the Northman  

In addition to finishing the Dark Age Irish, I also finished up painting my Corinthian War alliance fleet for Poseidon's Warriors.  It is 2 units of 5 fast trireme from Athens, and 15 cataphract triremes from Corinth.  


Next up, I need to 3D print 25 more Spartan cataphract Triremes for the opposing forces.  I look forward to launching a Corinthian War campaign using land and sea battles soon!   

You can follow Blood and Spectacles Facebook page for more fun: https://m.facebook.com/pg/BloodandSpectacles/posts/?ref=bookmarks&mt_nav=0


Or our website:

Or our Messageboard:

Or our Wargames Vault Page: