Monday, October 31, 2022

Battle Report: Under the Martian Yoke - Searching for Scraps


Welcome back to my Solo campaign for the survival horror game Under the Martian YokeThis game is currently available on the Blood and Spectacles Wargame Vault Page.  It can be played solo, co-op, or Versus and any combination in-between!   

Under the Martian Yoke is set after Orson Welles' broadcast of War of the Worlds.  In this game, this was no hoax; but an actual news broadcast.  The Martian invasion has laid waste to the East Coast of the United States, and only a handful of survivors are left.  It is up to them to make it back to survive as long as they can!  If they survive long enough, they might escape out from Under the Martian Yoke!

Annie looked up from the tattered and worn Bible she had found in the farmhouse.  She and her fellow survivors had been using the place as a hide-out, its inhabitants long gone.  Where they ended up, was anyone's guess?  Perhaps they had been vaporized by a heat ray, choked to death on Black Dust, dissolved by Green Gas, or perhaps they were still out there somewhere hungry and thirsty?  

"We still got some canned peaches from Shyville if your hungry?" 

Annie had found Luke hiding here in the Farmhouse when she and Tommy stumbled across it.  Luke hadn't been alone.  Some slick wily named John was here with him.  Luke seemed the decent sort, but she did not trust John as far as she could throw him.  The good book had warned her about people like John.   

Annie reached out and took the can from Luke's hand.  The labelled was faded, and partially torn off.  On the front was a drawing of a happy housewife grinning like a fool and holding aloft a Georgia peach.  Annie pulled out a can opener from her apron, and with a newly practiced ease tore into the can.  

John wandered into the room, "Maybe we should head back to Shyville and see if we can find more supplies?  Your gun's still out of ammo Luke?" 

"Yup.  Shyville's too red though." 

"Huh. Well, there has to be somewhere else we can get some eats?" 

Timmy's little voice squeaked up, "I was lookin' for Martians and I saw another farmhouse out yonder,  Not too far.  Maybe there?" 

"We could scoot out there and back in no time.  Maybe they got some ammo for ya' Luke?"

"I reckon' so." 

Annie nodded along.  She wanted to stay put, hide, and take comfort in prayer.  However, what she wanted was no longer important.  They had to keep food, water, and supplies up.  Unlike the Israelites, she did not expect Mana to appear from the heavens to sustain them.... not unless it was canned.  
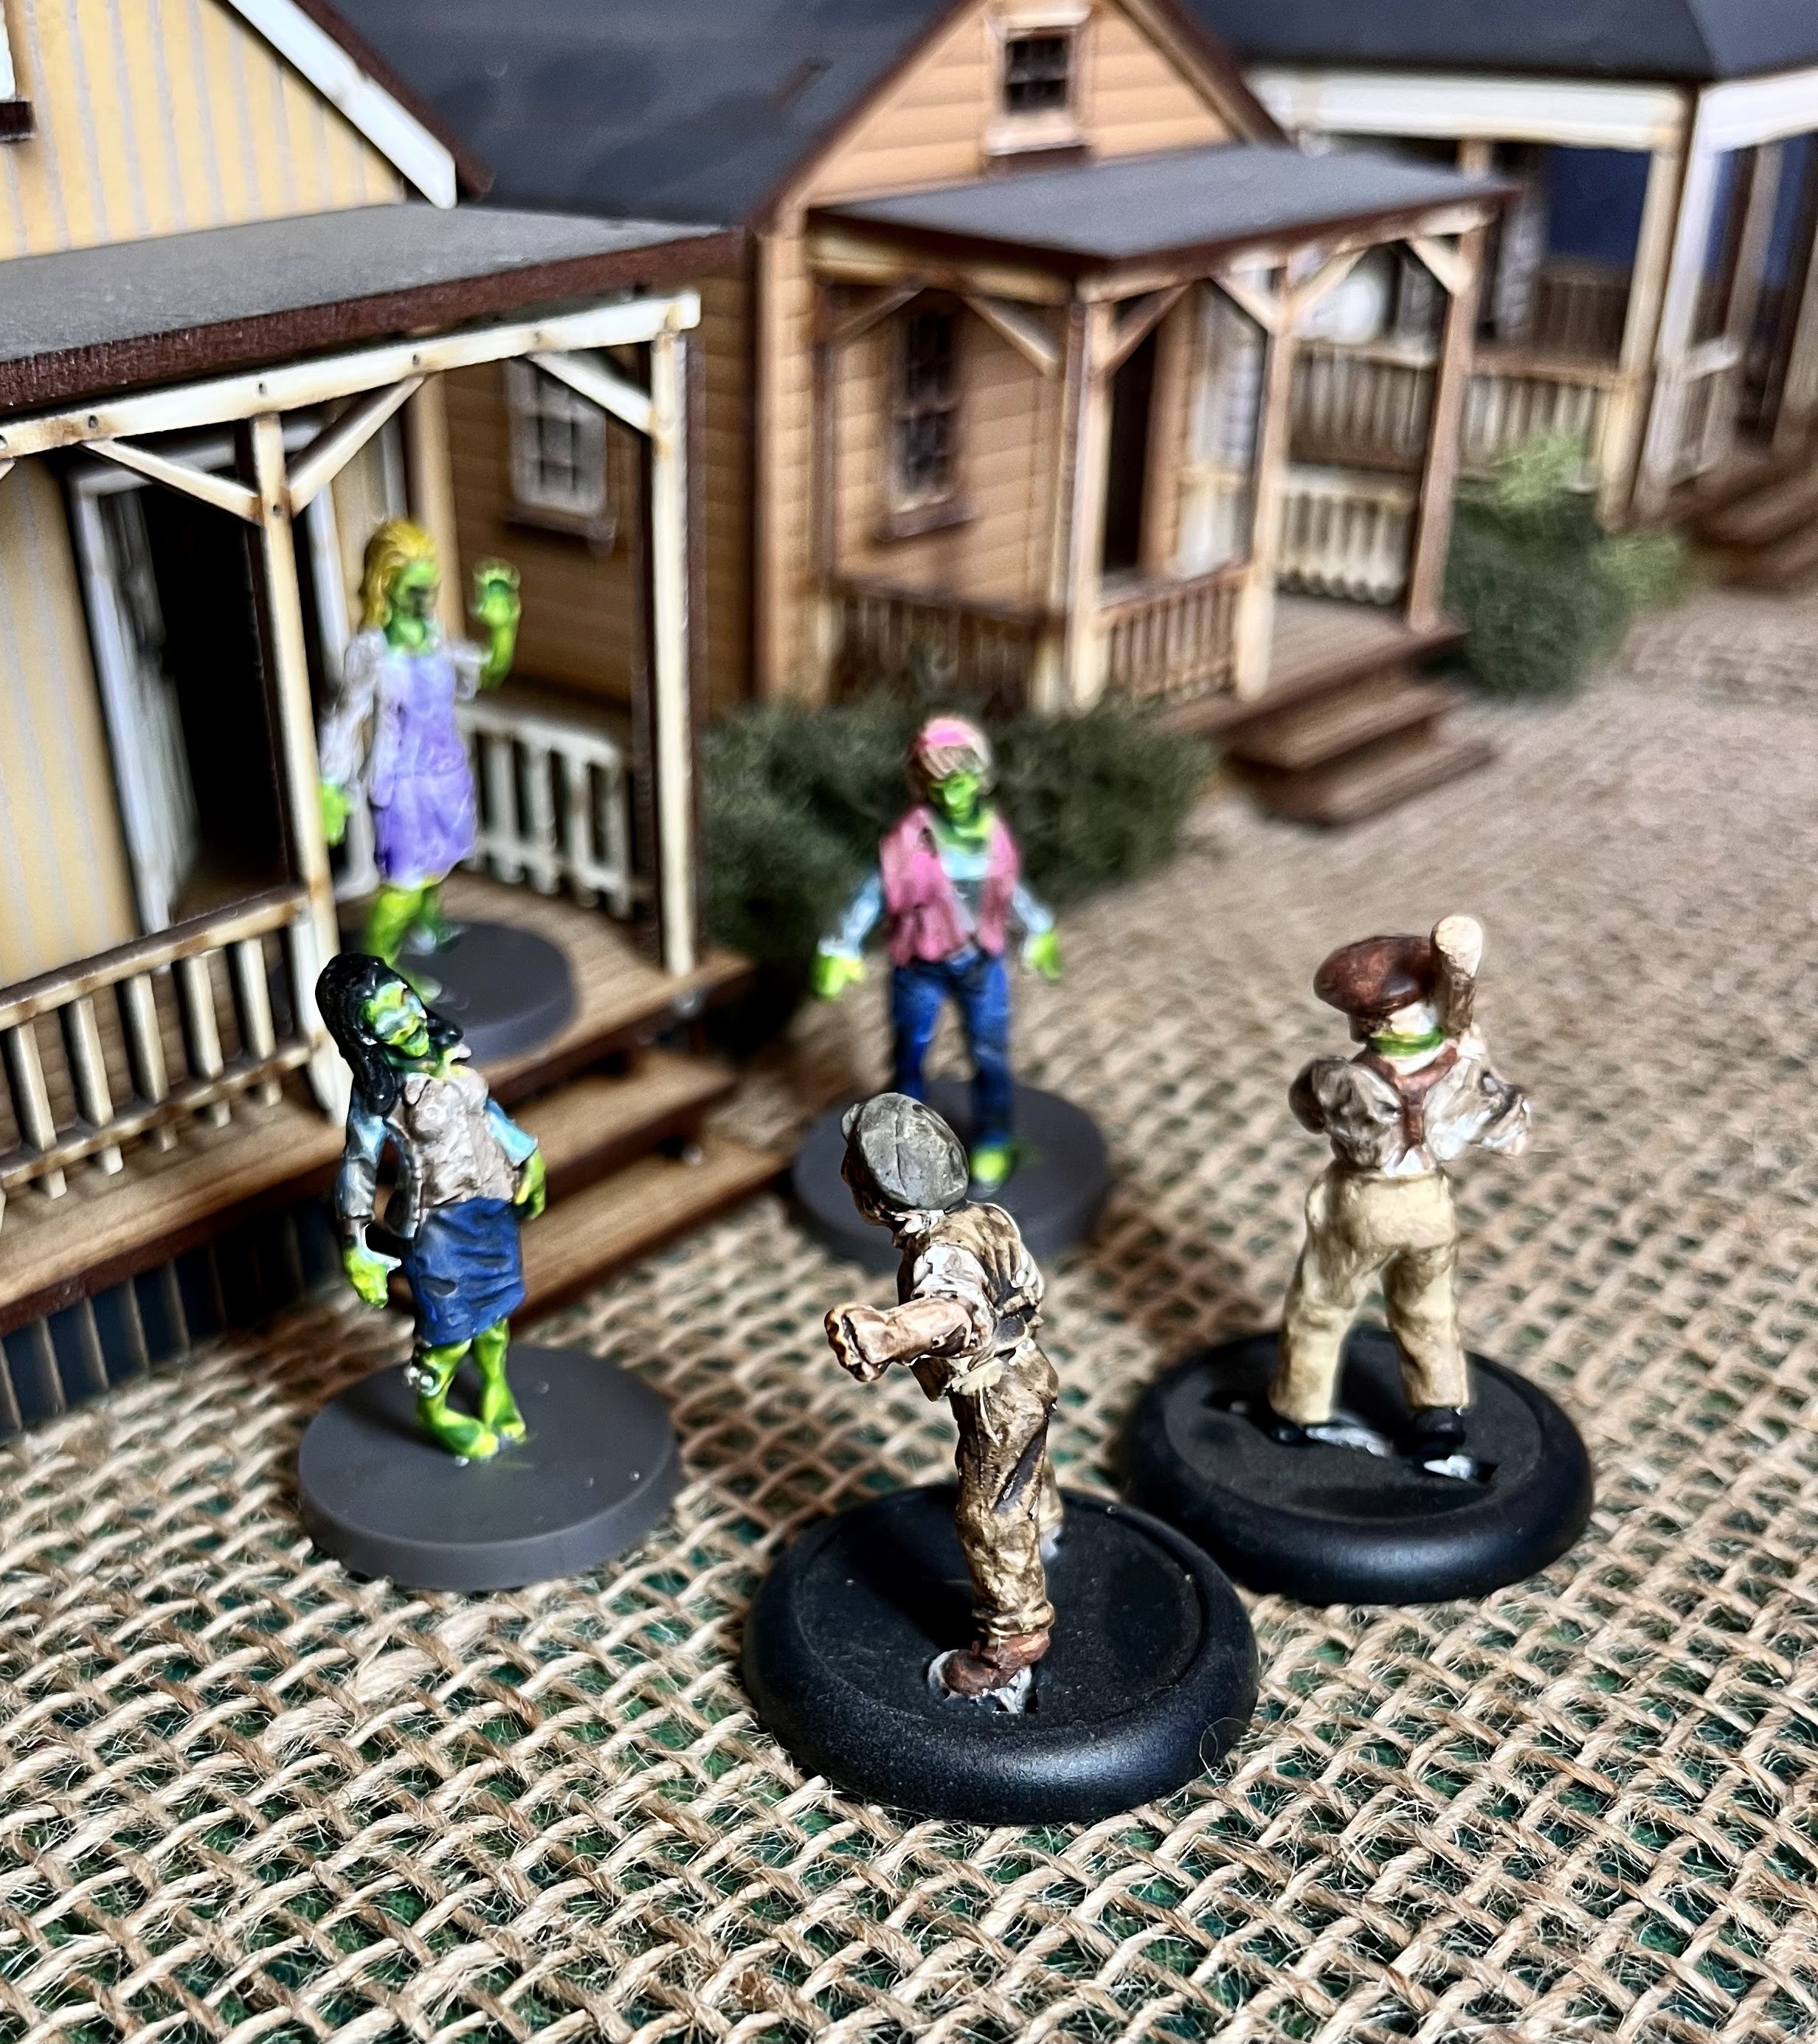
Survivor Band
In today's battle we have the following 4 survivors.  All survivor bands start with only 4 members.  Most humans were killed or horribly injured in the initial Martian assault, so small bands of survivors are all that is left.   

On the left is Handsome John.  He is a criminal archetype and survived by running for the hills when things went south.   

Activation    Aimed    Suppression    Fight    Brawn    Brains    Nerve
5+/2                6+        3+                    4+        8+            9+        7+
Cool Customer
- Pistol, Knife, Canteen of Alcohol
- Duck and Weave- Shooting attacks have a -1 TN when he has moved. 

Next is Tommy Wilkins.  He is just a kid, and survived when a building collapsed on his family.  He managed to dig his way out, but no one else did.  

Activation    Aimed    Suppression    Fight    Brawn    Brains    Nerve
3+/2             9+                8+               6+          4+        7+          5+
Pitter Patter of little feet, Fear of Enclosed Spaces
- Improvised Fight weapon, Satchel, Good Shoes

The lady is Annie.  Annie McCall is a devout believer, trying to process what exactly is going on.  She was part of an ambushed evacuation, and forced to flee.  

Activation    Aimed    Suppression    Fight    Brawn    Brains    Nerve
6+/2              7+            5+                   9+        8+          4+         3+
Pray, +3 Experience
- Pistol, Map, Bandages, and Knife

Last up is Luke Goodson, the leader of this little band of survivors.  He survived when he was suddenly knocked unconscious.  

Activation    Aimed    Suppression    Fight    Brawn    Brains    Nerve
5+/2              7+           6+                    4+       8+           9+        3+      
Do As I Say, Do Not Be Afraid
- Knife,  Canteen of Water, Flares
- Revolver is out of ammo and left at Hide-out

Scenario
The survivors were able to see another farmhouse in the distance that they could walk to easily.  Hopefully, their would be some scraps left over, but they might also be Martian traps.  

This scenario has 5 loot markers randomly placed on the board.  When a survivor picks up a marker, you roll a 10.  On an even it is Loot that can be picked up.  On an Odd it is a Martian Trap!  A Trap brings on a Martian foe within 6 MU.  

The objective is to gather as much loot as you can before you are forced to scatter, all go unconscious and possibly dead, or the danger level gets too high.  

Set-up
The area to be searched for scraps is a lone farmhouse at the end of a dusty roadway.  Next to it is a weed choked ruined out-building.  There is a nearby dying field, and a barren orchard.  There is also a small pond in the area.  There are 5 loot markers scattered randomly from the center of the board.  


The board itself is 36MU by 36MU.  1 MU equals 1 inch in today's scenario.  There are no Martian foes starting on the board.  The survivors decide to deploy on the west side, near the destroyed out-building.  Annie and Tommy stick together, while John and Luke stay together on the opposite corner.  They start 6 MU in from the deployment edge.   

The group also decided to set off just before dusk, and arrive at their destination at dusk.  However, poor timing also means that bad weather has rolled into town with wind, rain, and thunder.  This automatically starts the danger at 11! That stinks! 

Turn 1 - Danger 11 Yellow
Annie skulks across the gap between the out-building and the house, and takes some cover.  Tommy gets to the edge, and tries to activate again to run, but fails! That Yellow Danger level starting strikes! Handsome John moves to a corner and covers one of the markers with his pistol.  Luke runs ahead, and then tries to activate again.  He barely succeeds and grabs the first loot marker.  It is a 3, so real loot and not a Martian monster! 


Danger Phase:
The current Danger Score is 13, and the dice roll for new dangers comes up 22.  No new threats yet!  

End Phase: 
None

Turn 2- Danger 13 Yellow
The sun is beginning to set now, and Line-of-Sight is reduced to 30 MU.  

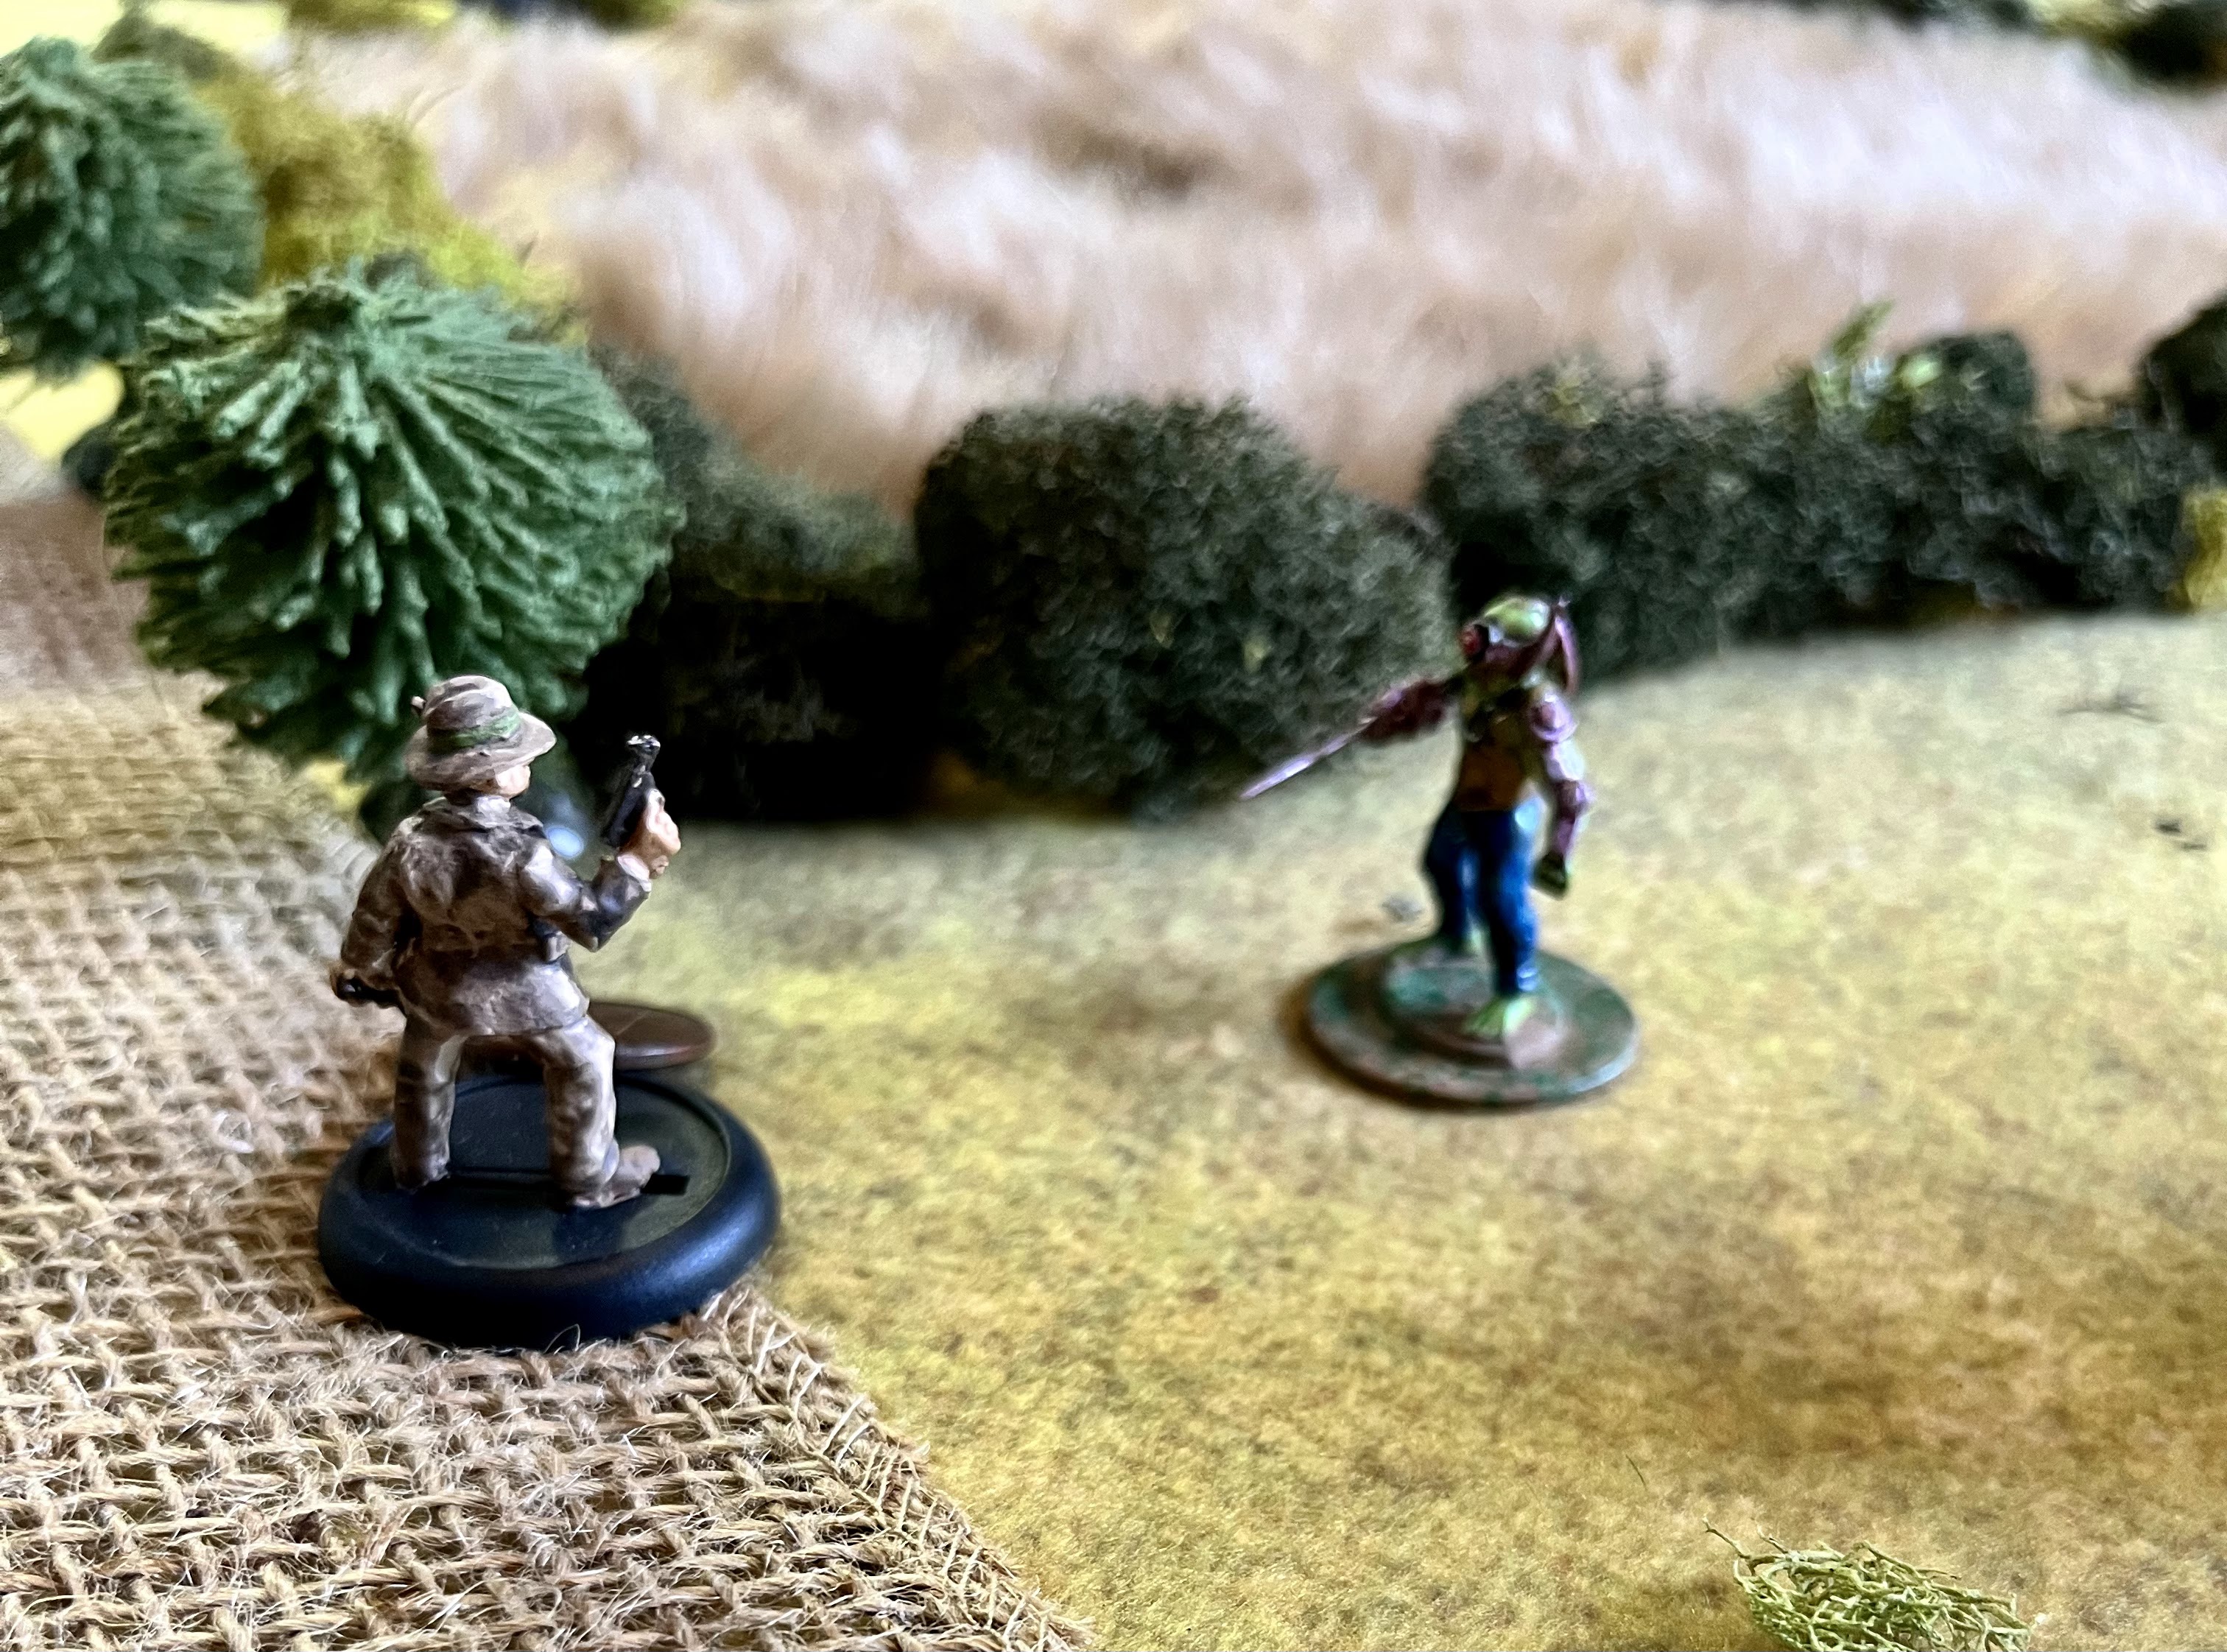
Luke runs across to the road, and tries to pick-up another loot marker.  It is Even, so this time it is a Martian Trap!  A Gunner unburies itself from near the pond!  

Handsome John sees it dig it's way out and must make a Fear test!  He barely passes, and decides to take careful aim.  He knows he needs to shoot to kill that monstrosity!  However, he fails his second activation test instead of firing.  His fear got to him! 

Tommy makes a run for another loot marker, but fails his second activation test to try and get to it!  That is very unlike him. 

Annie moves onto the porch of the house, trying to get an angle on the new foe while covering Tommy.  She has line-of-sight, but decides not to risk a second activation this time.  

Danger:
The Gunner mindlessly fires at Luke, and the survivor fails his suppression test!  He immediately drops prone to avoid getting hit further!  He is suppressed by the shooting.  

The Danger Level is 15, and the dice roll is 8.  A new danger arrives!  This time, a Rabid arrives on the board.  It starts heading towards Handsome John, unconcerned about the pond between them.  


End: 
Luke decides it is time to Get UP!  He passes his fear test and gets to his feet.  

The criteria for a Scatter are not met.... yet! 

Turn 3 - Yellow 15
This time Line-of-sight is 24 MU as the sun sets! 

Handsome John aims and tries to fire again.  He fails again! 

Tommy moves up and grabs some loot, and the roll is a 3.  It is real loot!  This time, he passes his second activation and runs for the board edge! 

Luke skulks towards the last loot marker, but fails to get to it.  He tries to activate again, but fails! 

Annie takes careful aim, and fires on the Gunner, but misses.  

Danger: 
The Rabid tries to make a Dynamic action test to get across the pond, but fails. 

The Gunner sees Luke up and moving, and fires again at the target.  This time the shots go wide enough where Luke is unphased.  

The Danger level is at 18, and the dice come up....16.  More Martian menaces appear! Three wild dogs appear by the edge of the field and begin to move towards the house Annie is at.


End: 
Scatter is not triggered. 

Turn 4- Danger 18- Yellow
The sun is setting fast, and the Line-of-sight is only 18 now. 

Luke grabs the last loot marker, but it is another Martian trap! This time a Butcher digs its way out of the ground!  


Handsome John just starts shooting!  It isn't quite enough to take down the Gunner by overflowing pins to damage.  Both his activations have been spent.  

Tommy manages to run off the board with his loot.  


Annie moves to follow Tommy, but fails to activate for her second activation.  

Danger:
The Danger Level is at 20, but the dice come up 24!  A short reprieve! 

The Gunner fires on Luke, who is forced to duck down, but avoids being suppressed.  Good thing as that Butcher would have probably caught up to him if he had been pinned! 

The Rabid passes its Dynamic movement test and wades across the pond towards Handsome John.  

The wild dogs charge recklessly towards Annie, while the Butcher slowly shambles towards Luke.  


End: 
The survivors can choose to scatter if they wish.  However, there is a chance they will lose the Loot that Luke has.  There is no more Loot on the board, so the Humans decide now is a good time to Scatter! 

Luke drops his loot as he high tails it away!  


Conclusion: 
Our plucky band of survivors managed to fall back through the wind, the rain, and the ensuing darkness to get under cover at their farmhouse.  No injuries again. 

Wow, there were a lot of bad guys out there.  I managed to escape just before things got serious.  My shooting was completely ineffective, but thankfully so was their shooting.  Luke got the worst of it, but thanks to his high Nerve ability managed to weather most of it and escape.  I was lucky no one got hurt or suppressed so I have the full crew for post-game procedures.   

Post- Game Sequence: 
Luckily, all my survivors managed to make it out of there alive, unharmed, and unsuppressed.  That means no Psychological or Serious Injury this time.  However, Timmy got off the board with 1 Loot, so let's see what it was: 

- 4 Food
- 3 Water 

That will help us keep our stash up! 

Experience looks like this:
Handsome John- 3 + 1 = 4
Annie McCall- 7 + 1 = 8
Tommy Wilkins - 4 + 4 = 8
Luke Goodson - 7 + 1 = 8

No upgrades this time.  We barely got out of there alive, and didn't get to do much else.  

That leads to the survivors assigning jobs for the post-game.  Tommy will scout for Martians, John and Annie will go scavenge, and Luke will try to Repair his pistol.  

The bad weather and darkness seem to have thrown the Martians off the trail.  The Farmhouse is secure.  Meanwhile, Luke tries to fix his revolver but it is beyond his ability.  In retrospect, I should of had someone with a better Brains stat try this, and sent Luke scouting. 

Annie finds a dark hole beneath a wrecked garage.  She steals herself and lowers herself into the hole, and finds a old hidey hole for bootleggers!  It has a variety of items stored inside including: 

- 7 Food
- 9 Water
- 2 Scrap
- Extra Ammo for her Pistol

John comes across the twisted remains of a burned out tank and a barricade, the last stand of some soldiers.  They are no where to be found.  A distant clank causes terror to fill John, as he imagines a Martian tripod closing in.  He grabs what he can and runs for it, gathering up only 1 useful piece of scrap.  

The band goes into the Depravation stage with a decent amount of stash and gear.  To keep the band away from depravation they need 8 food, 8 water, and 4 scrap.  Thankfully, they have what they need to keep going.  When all is said and done their stash is:   
 
- 11 Food
- 14 Water
- 2 Scrap

They are in pretty good shape, as long as no one gets hurt, they should be set for a few more days. They are still down a revolver that they failed to replace.  

Thunder shook the house.  Annie bolted up, but caught herself before she screamed.  Terrible visions flashed in her head, but she shook them clear.  

She looked around the darkened room.  She was not alone.  Luke was there, sawing logs and blissfully unaware of the storm.  Tommy was also curled up under a make-shift blanket made from an old sack.  It had taken Annie two hours to calm him enough to sleep.  

John was sitting at the small table across the room.  He had his pistol in his hand, and Annie could see him visibly shaking.  She slowly got up and took a few tentative steps towards him, clearly in his line of sight. 

"John?" 

He did not respond.  Annie closed the distance over what felt like an hour, slowly putting one foot in front of the next.  In an instant that took a lifetime, she was at the table.  Carefully, she placed her hand over John's.  It was sweaty and cold.  At this distance, she could see perspiration beaded across his forehead.  

"It's okay John.  Everything is fine.  Just a storm." 

She slowly and carefully slipped his hand off the grip of his gun.  With effort, he slowly turned his head at her.  In the darkness, a pale moon beam shone through a boarded up window, and gleamed off his teeth, as his lips slowly curled into a rictus grin. Thunder shook the room.  

"Annie?" 

Check out the Blood and Spectacles Wargame Vault page for your copy of Under the Martian Yoke


Become a Patron and get access to all the cool stuff, a peak behind the curtain of Blood and Spectacles, and early-access to playtest games!  


You can follow Blood and Spectacles Facebook page or Instagram for more fun! 

Check out the latest publications and contact me at our Blood and Spectacles website

Or purchase all out games at the Blood and Spectacles Publishing Wargames Vault Page!          


Monday, October 24, 2022

Role-Playing Game Design - Rules-Light Horror


You, my loyal reader, know that I like to dabble in all sorts of game design.  My primary focus has been in wargames, but that is not the only type of games I have worked on.  I have built card games, board games, and other simple games for my own amusement as well.  One area I have commented on previously and actively play is Role-playing Games (RPGs).

I actually started my RPG journey before my wargame journey.  I learned how to play "Red Box" D&D from a friend's dad; a Lutheran pastor.  I picked up all the boxed sets from a little bookstore in the local strip mall, the only strip mall within a day's bike ride!  From there, I managed to scrap and scrape together the basic AD&D books, the Buck Rogers RPG, and the TSR Marvel Super Heroes game.  As a teen, I played a lot of West End Games D6 Star Wars and Shadowrun.  Many of the books have been lost to time, and I still lament the loss of my Masters edition boxed set.  Shortly there after, an ad in Dragon magazine sucked me into the world of Warhammer and I have managed to juggle my two RPG and Wargame hobbies every since.  

Now that I am older, having regular RPG nights and/or Wargame nights is much easier.  I was able to get into a local RPG session much easier than I was able to get into the wargaming community!  The wargaming scene had a number of starts and stops.  Meanwhile, I have had a long running RPG group with a dedicated weekly game night, that was only interrupted by COVID, but has since re-grouped after vaccines became widely available.  

The re-engagement with this group has rekindled my interest in RPGs.  Thanks to this group I have been able to play and run a few more modern games such as Dune, Lasers and Feelings, Monster of the Week, Those Dark Places, and more.  The group is primarily a Dungeons and Dragons 5e group, but we are not averse to spreading our wings a bit!  Thankfully, we have several people who are capable of being game masters as well as players too!  

All of this regular activity has led me to be interested in designing and playing RPGs.  Today, I want to share a simple rules-lite game I built for running a horror themed one-shot.  

Before you begin to play, it is important that you set the appropriate ground rules for your players, this is a horror game after all.  Therefore, some of the themes are vulnerability, insanity, hopelessness, and bad things happening to good people.  Horror could include supernatural, alien, or human behavior that violates normal taboos.  Therefore, before you play make sure that you understand where your players draw the line, and make sure not to go so far as to ruin the fun for any of your players.  That said, they maybe the 'heroes' in the game, but in Horror heroes die, or worse have to pay a terrible cost.   

So, with the appropriate guidelines set for the players, let's take a look at the brief rules of the game. 


A Lite Game of Horror   

Key Mechanics
  • Roll a d6 and add your character's attribute to it
  • 7+ is a partial success, and an 8+ is a success, 12 is a critical success.
  • Relevant Occupation is a +2, Hobby is a +1, Weakness is a -1 and Terror is a -2.  The player is encouraged to make a case for why these modifiers apply, but ultimately it is up to the GM when to use these mods. 
  • Relevant equipment is +1.  The player is encouraged to make a case for why these modifiers apply, but ultimately it is up to the GM when to use these mods. 
  • If one player helps another player, the acting player can roll twice and chose the highest score to apply
A partial success is something that appears successful at first, but all may not be as it seems.  The GM may choose to reverse the success or add a complication based on the success.  For example, you may successfully open a sealed door, but the noise is loud enough to alert someone to your presence. 

A Critical Success results in the player earning more than what they initially were trying to do.  This could be an additional benefit narrated by the player but approved by the GM.  If it is an attack, all damage is doubled.  For example, a player scores a critical success to open a sealed door, but a critical allows them to open it and then choose to also re-lock it behind them.  

Attributes
·       Class- Social standing, charm, and wit
·       Brains- Perception, speed of thought, and learning
·       Brawn- Physical abilities such as strength, endurance, stamina
·       Reflex- Speed, hand eye coordination, and agility

 o   Brains + Brawn/2 round down = Nerve which is used to resolve Insanity Checks

o   Class = Used for Acquisition tests, also +1 equipment for each point of Class over 1.

o   Reflex = Initiative for actions when timing matters

o   Insanity = Brains Attribute level

o   Wounds = Brawn Attribute level

You have 1, 2, 3, and 4 to allocate across these four areas with no duplicates in an attribute.   

Insanity 

If a player is asked to make a Nerve test, roll a 1d6 and add the character's Nerve.  If failed, they have an episode.  If succeeded, the PC is fine.  Every time you Fail a Nerve test, the PC lose 1 sanity and are subject to an episode.  

In addition, as you lose your grip on sanity, you can ask the GM one close ended question about the situation.  The GM must answer as truthfully as they can.  Example questions could be: 

  • Is Mr. X the killer?
  • Can this thing be harmed by fire? 
  • Is this book related to a cult?  

If a character loses all their sanity, they are catatonic for the rest of the game.  After the game, your character is clinically insane for the rest of their life. 

 ·       Episodes

If an episode occurs due to a failed Nerve check, roll 1d6 and consult the chart below:

1-  Shaking.  You experience uncontrollable shaking, and must re-roll Reflex rolls and choose the worst. 

2-   Fatigue.  You are suddenly very, very tired. All brawn rolls are re-rolled and you must choose the worst outcome. 

3-   Brain Reeling.  You have a hard time focusing.  All Brains tests must be re-rolled with the worst outcome being chosen. 

4-   Rigid.  You are rooted to the spot, unable to take your eyes off what caused the episode until is removed, or you are removed from it.  After the episode, you must re-roll all Class tests and choose the worst outcome. 

5-   Catatonia.  You fall to the floor, unable to move or act for 1d6 minutes.  After you recover, all Nerve tests must be re-rolled and the worse outcome chosen. 

6-   Insane fear and violence.  You must escape the source of the episode at all costs.  You will flee, and fight anyone who stands in your way.  Once away from the source of the episode, you will suffer catatonia as above.  

Combat

If a character loses all their wounds, they go to unconscious and possibly dead. 

At the start of combat, all players make a Reflex roll and tell the GM the number.  Actions take place from highest number to lowest.  Enemies always act at 7, but after players that score a 7.  If there is a tie between players, the players decide who they want to go first.       

-          Melee is d6 + Brawn = success or not

-          Ranged is d6 + Reflex = success or not

These same checks are used when attacked, with success avoiding damage and failure leading to damage.  Failure typically causes 1 wound loss.  

Each hit causes 1 physical wound, with +1 wounds for appropriate equipment.  A critical causes double wounds.  

Enemies have as many wounds as the GM wants, but humans should have between 1-4, and horror based creatures should not have more than the total parties starting Wounds.


Design Philosophy

That's all the rules!  As I built these simple rules, I had a few major ideas driving them.  The first, and most important element of the design is that I believe the "only rule that matters" in an RPG is how to determine success and failure for the players.  Everything else is fluff.  Therefore, if you are trying to make a Rules-Lite system, the focus has to be on this core question; how does a player know they have succeeded/failed?  Therefore, the most ink is spilled on this question. 

Typically, the answer is a combination of skills, abilities, and equipment.  I stripped these elements down to the barest of essentials. 

Beyond that, I also wanted a game where GM Decisions were important BUT the GM role never had to make a single dice roll.  All dice rolling was intended to be done by the players, with the GM interpreting results of player declared actions based on the results.  To me, the power of GM is the signature element of a RPG, and is the best feature.  It is not a bug, and the GMs role to make decisions and interpret results should be expansive in an RPG.         

You will also notice, that the game will be shaped by failure as much as success!  The threshold for a partial success is 7+.  You are rolling a d6, so your best attribute will have a range of 5 to 10 while your worst will have a 1 to 7.  This makes using your Hobby, Occupation, and equipment critically important.  In addition, your Terror, weakness, or an episode will make it extremely hard for you to succeed.  The more Episodes you have, the more you will death spiral on attribute tests without careful use of modifiers.    

Finally, this game was designed to have quick build characters.  There are two reasons for this.  The first is that it is a one-shot, so we will likely not use them again.  Speed to build was critical.  Secondly, in a horror game characters tend to die, so quick character creation makes it easy to replace them.  That said, the Occupation/Hobby and Weakness/Terror system and simple attributes will easily give players a quick sense of the character so they can dive in quickly.  This system also rewards Role-playing the character and provides in game support for doing so.  Simple yet deep enough. 

The rules are also time period agnostic, so these games could be modern, set in the past, in a fantasy world, or sci-fi.  The choices is yours!  Our game happened to be set in the Catskill Mountains of New York state in 1890, but they could have been in our D&D world, on a space station, modern day Cuba, etc.  These could also use minis and maps, but works just fine as theatre of the mind.    


Going Beyond the One-Shot 

Finally, the rules above are intended to be played as a One-shot.  If you wanted a campaign, experience rules would be easy to add.  For every wound and insanity you lose, you gain 1 experience..... if you survive the game without going to 0 wounds/insanity.  If you do not survive you make no gains.  If you go to 0 Insanity/Wounds you can survive but at the cost of taking a new weakness/terror or losing equipment.           

You can then use experience to increase an Ability for a new level x4 (i.e. going from Class 1 to Class 2 would cost 8), for every 10 you could buy a single re-roll to use as needed, use 10 to make a new acquisition test for some equipment out of game, or buy a new Hobby/remove a Weakness for 10; with Occupations/Terrors costing 25.     

Conclusion

The Death Spiral was by design!  This is a horror game, and the cost of success is great.  In the one-shot we played, of four characters; 1 died of injury, 2 went insane, and the last one had to flee into the winter wilderness while everything burned down around them!  This was all part of the big finale.  That is how horror games should end.    

That said, the idea behind horror games is that characters are caught up in things they can not truly handle and that is beyond their ability.  Therefore, the rules are designed to reflect ordinary folks going against extra-ordinary circumstances.  In addition, they give the players leeway to role-play for benefits and make decisions and the GM the space to apply complications, determine results and make rulings.  

If you give them a try, let me know what you think! 


Become a Patron and get access to all the cool stuff, a peak behind the curtain of Blood and Spectacles, and early-access to playtest games!  


You can follow Blood and Spectacles Facebook page or Instagram for more fun! 

Check out the latest publications and contact me at our Blood and Spectacles website

Or purchase all out games at the Blood and Spectacles Publishing Wargames Vault Page!

Monday, October 17, 2022

On The Painting Desk: Persians for the Ionian Revolt


One of my long running goals for 2022 was to release a supplement for the Ionian Revolt for Men of Bronze onto the Wargame Vault.  I have a similar supplement called Hercules Abroad that greatly expands the Greek world across the Mediterranean and adds more armies and supplements.  I also have a similar supplement for Wars of the Republic called Revolt! that focuses on the 3rd Servile War.  

Before Men of Bronze was released, I wrote up an article and campaign to play the Ionian Revolt for Wargames, Soldiers, and Sailors.  However, due to a lack of a Persian army for photographing, the article was not published.  Instead, I did a piece on the Battle of Delium instead.  However, I still had my notes and what I wrote for the Ionian Revolt.  

It was these notes and this article that would form the basis of the Ionian Revolt supplement.  In addition, the Ionian Revolt seemed like an ideal venue to take a closer look at the Persian Empire lines-of-battle, and revisit some of their non-Greek foes as well.  

However, in order for any of that to happen I needed to get over one big hurdle.  I needed a Persian Army! This had thwarted my initial article and at the time, there were not any great plastic models available.  However, time moves on and now we have not 1 but 2 ranges of plastic Persians to choose from!  

The first is from Wargames Atlantic.  I used this company for my Dark Age Irish, and was very happy with the results.  I was able to make an army of 6 units with only two boxes,  They also painted up easily, and were very affordable.  The sets are great for making infantry and archers, but their are no cavalry available.  However, you could easily make the sample Line-of-battle list for Persians from the Men of Bronze book with these models.  

The other plastic Persian army is from Victrix Limited.  This company has provided the bulk of my Greek, Macedonian, Viking and Roman forces in 28mm in the past.  I have really appreciated the level of detail and pricing of these sculpts.  The range also has a wider variety of forces from unarmored infantry, armored/unarmored archers, and light and heavy cavalry.  Since cavalry was a big part of Persian armies, it made sense to go with Victrix this time around. 

Therefore, I was off to their website, where I ordered the miniatures I wanted, and a handful of transfers to "bling-up" a few of the front rank models.  As always shipping was quick and well-tracked.  However, it was NOT cheap to ship.  That said, I compared the costs with some American distributors and the costs were in line.  However, since I wanted some transfers, and they are only available via the Victrix store; it made sense to order direct this time.  I got my Persians shipped all the way across the pond in about two weeks!  Pretty fast really.  


There it is, in all its glory.  In total it is about 120+ minis.  In the end, I want the army to have 2 units of light cavalry, 1 unit of heavy cavalry, 3 units of archers, 2 units of drilled infantry, and 2 units of light infantry/skirmishers.  Plus, the Ionian Revolt supplement has some alternate lines-of-battle with some interesting twists on the core Men of Bronze rules I would like to exploit with these models too.  

When I painted my Vikings, I batch painted all of them in one go.  That was about 60 models.  I do not normally do that, and I do not think I will be doing it with this army!  This time, I plan to take it on a unit-by-unit basis instead.  So, the first step is to get my first few units to paint assembled and base coated in white.  For basing, I am single basing using metal washers, as that gives the model a bit of heft and easily allows different formations.  Also, single based allows me to use them in different games as needed as well.   

I started with some unarmored and armored infantry forces to get me started.  I assembled 40 Persian foot soldiers.  I decided to make 2 units of Psiloi (or skirmishers) armed with javelins and no shields.  I also made a unit of Warband/Irregular infantry with hand weapons and shields.  The last unit was armored so I decided to make them a unit of the famed "Immortals" or "Apple Bearers" with linothroax and hoplon style shields to get started.  I figured painting a group of 40 or so soldiers to get me going would be a good start.  Plus, with two units without shields I would see results fast!  

Once assembled, I undercoated them all by brush with a cheap, big-box retail store bought white.  


Once they were undercoated, I faced my first challenge.  I like to paint from the lowest level upwards.  So I always start with the flesh tones.  For the Greeks and the Romans, I used Tanned Flesh for the majority of the troops.  I was unsure if I should do the same for the Persians?  Ultimately, I decided to a couple different skin tones for the Persians as they had a I diverse army from a variety of places.  I used a few different colors across the four units including Tanned Flesh, Fur Brown, and Monster Brown.  

That is what I painted first, and it was nice to paint figures wearing trousers!  Not so many calves and knees to paint!   


After the skin, I turned to start on the clothing, and the first step was to paint all of their shoes in Monster Brown.  Then, I turned to their trousers and used a Skeleton Bone, Desert Yellow, Demonic Yellow, and Dry Rust and alternated in every fourth soldier.  Later, I will decide if I want to go back and add some patterns, but probably not! 

Then, something really odd happened.  I typically batch paint all their tunics and keep working up.  However, this time I focused on the elite infantry first.  This is not my usual method at all!  I typically kept them until somewhere in the middle or towards the end of the process.  I painted them up as a reward to myself after the rank-and-file of the army was done!  Not this time.  I think I focused on them, because they had more layers than the other unarmored troops I was working on?  

I painted their undertunics Grimoire Purple, and their armored "skirts" in Pure Red.  Then, their armor was done in Greedy Gold.  The belts and trim were done in Voidshield Blue.  The shoulder pads were done in Matte White.  Next the weapons were painted with black hafts and Greedy Gold blades and butt spikes.  I had no idea what was happening, as I did not go back and work on the Irregular Infantry or Psiloi at all!


  Unlike the rest of the force, I decided that these elite infantry would look uniform in color scheme.  They would all match!  I rationalized it with it would make them look more like the elite, and their losses easily replaced and hidden with a similar uniform provided by the Great King!  I seriously doubt that this was how it was done, but I was on a roll now!  

Beards and hair was done with Ash Grey, Dark Stone, and Fur Brown.  Their headgear was a bit of a bear to paint, but I went with more Grimoire Purple.  I paused to consider the officers cloak/jacket and I quickly painted it with a Alien Blood purple to make it stand out and blend in with the rest of the units purple gear.  Then a Light Tone wash to finish it all off.  Within a matter of nights the base models for the Immortals were done.....


  The next day, I picked up the Immortals with a sense of urgency.  The first unit for the Persian force was almost done!  I decided to give them all Hoplon shields and bow cases too.  After all, the Immortals were noted for being armed with bows as well as spears and shields.  The shields were Greedy Gold and I used Little Big Man Transfers on the front.  The back was Skeleton Bone, Leather Brown strap, and Voidshield Blue tassels.  The bow cases were a pain to paint, as I decided to make them Grimoire Purple, with Voidshield Blue trim.  Then they also got a nice Light Tone wash.  

I attached the final pieces to the models.  Then, I based them all.  I used my traditional method of a cheap brown latex paint from a Big Box retailer, and then sprinkling left-over moss and clump foliage from the corners of its storage box.  This would match all the basing on the Greek armies as well.  

With shields, bow cases, and bases done; we had the first Persian unit ready for the table top!  


 I was so excited, I ran out and set them up for a bit of a glamour shot against some Greek hoplites.  You can see the difference between the look of both sides....


Well, I hope you like them.  Are they historically accurate to the Immortals during the Greco-Persian or Ionian Revolt?  Heck no!  However, they will look good on the table and visually be different from other Persian infantry types.  In wargaming, that is an important factor too.  

Well, 1 unit down and 3 units left from the first batch, and then something like 2 more drilled infantry units (at least 1 with sparabara), 3 Archer units, and 3 cavalry units to complete this Persian army.  Looking at it that way.... Yikes.  That is a lot of painting.  Onto the irregular infantry and Psiloi next.... maybe?  

I also finally finished printing and painting up my second fleet for Poseidon's Warriors form Osprey Games in the Wargaming Series.  I now have enough little triremes for two sides, and that may come in handy when I go to play the Ionian Revolt, as some of the key battles were naval battles!  


These were designed by a guy named Capt. Ahab on Thingiverse.  You can find them to paint up there.  I now have 50 triremes between the two fleets.  These are all the cataphract style, and could represent my Persians in Ionia, or other Greeks foes in later wars.  More importantly, getting these two fleets printed and painted was one of my main goals for 2022.  Three down and two to go?  Maybe if I am lucky I can make all my goals?  

Onwards!   


Become a Patron and get access to all the cool stuff, a peak behind the curtain of Blood and Spectacles, and early-access to playtest games!  


You can follow Blood and Spectacles Facebook page or Instagram for more fun! 

Check out the latest publications and contact me at our Blood and Spectacles website

Or purchase all out games at the Blood and Spectacles Publishing Wargames Vault Page!


Monday, October 10, 2022

Battle Report: Aeronautica Imperialis v1- Operation: Hemlock


It has been a long time since I have played any battles for Operation: Hemlock at all!  Here is a quick recap of where we are at with the campaign.  This is Aeronautica Imperialis V.1 by Forgeworld.   

Here is a summary of where Operation: Hemlock left off.  The Orks of Da' Deff Islands on the planet of Ammoriss have been a thorn in the side of Imperial authorities for too long.  After the Battle of Ammoriss an influx of Orks to the planet made the situation untenable.  Operation: Hemlock is a joint effort by local PDF forces and off-world Imperial forces.  

The Orks had initial success as they managed to launch an attack on the nearby island of Baron's Rest from their base in the "Green Zone".  However, their initial thrust there was thwarted by PDF troops near Camp Hope(less).  Ork reinforcements by sea have mostly been stymied by the Ammoriss Naval PDF.  

The superior logistics of the Imperial and Ammoriss war machine has paid off as the troops in Da' Deff  Islands have been well supplied despite the best efforts of Ork subs.  The only bright spot for the Orks has been their relative dominance in keeping Imperials from getting air superiority in the Islands.  The Orks have had localized success by landing troops and managing to take-over various oil rigs and platforms on the approaches to Da' Deff Islands.  This puts them in position to hamper those supply lines from the air.  

With local defeats mounting, Warboss Skarbash has been withdrawing and fortifying his position in the Green Zone, the most heavily infested island in Da' Deff Islands.  His best chance is to gain air superiority and he therefore has been devoting his resources from building warships to building fightaz and Bombaz, and getting more Air Boyz.  This has not gone over well with all of his boyz.   

That brings us to today's battle: 

Gorerippa squinted down at the blue expanse stretching out below him.  It was tough to see where the Oomie ships were, they were pretty tiny on this vast blue desert.  He kept his eyes down, while his boss scanned the sky looking for bogeys.  The spotterz had called out a wake sighting, so there was a good chance a straggler transport ship was about.  

His radio crackled and hissed to life, "Red Toof Boyz.... sighted an Oomie transport at...... 11 o'clock low." 

Gorerippa turned his head and used a free hand to shade his eyes from the sun.  Yup, out there was a ship.  Small at this height and distance.  Da Boss plane turned, and Gorerippa followed suit to stay with him.  He checked his weapons, and tapped his fuel gauge to make sure he could get there.  Everything looked good.  

As they approached the target, it must have seen them as it started to zig-zag to be harder to hit.  It's white wake marker slashing here and there across the ocean. 

Da Boss grunted across the radio, "Red Toof Boyz, we gotta sink dat boat.  Gorerippa, stay on me.  The rest of yuze, watch out.  Oomie fightaz are about." 

Gorerippa clicked twice to acknowledge.  Da Boss pushed his plane forward, and Gorerippa followed suit.  Then, the radio sputtered again, "We got Oomiez coming in hot, up top." 

A quick glance up and he saw him racing across the sky.  They were going to mix it up before they would get to the ship.  Looks like this was going to be turning into a scrap.      

Forces: 
As a note, many of the Aeronautica Imperialis aircraft I use are scratch built affairs that I sculpted by hand with various materials.  My "collection" fell into the grey area between when Forgeworld was supporting the game with releases, and the invention of 3D printing.  Therefore, most of the stuff on display was lovingly created by me with stats built for various "Narrative Campaigns" on the old Airspace Forum between editions and after the death of the Specialist Games range. 

This mission will use the following forces.

Air PDF
3 PDF Sentinel Fighters
2 PDF Sentry w/skystrikes

Ork Air Waaagh!
2 Waaaagh! Bommaz
2 Ork Fightaz

Mission:
Today we will be playing a Ship Attack mission, with the target being a freighter.  The Orks are trying to sink it while the Imperials need to defend it. The freighter was separated from their convoy due to engine problems, and now it must survive the Ork air attack in order to make it to port. 

The Imperial Freighter is a 4 hit ground target that is armed with a single Hydra mounted on it.  It has 4 hits.   If it is destroyed, it will explode in a 2d6 radius to deadly effect to any aircraft in the area. 

Set-up: 
The freighter is placed 18 inches in from the Imperial short board edge and 12 inches in from the long board edge.  The Imperial aircraft are placed in two groups on the short board edge.  The Sentry group is mid-altitude and full speed coming for the freighter.  The Sentinels are coming in fast and high to the freighter's starboard.    


The Orks are coming in on the center of their board edge, 6 inches in.  They are all at Mid-altitude and coming in at mid-speeds.  They are not trying to be canny on their approach vectors.  


Turn 1: 
Initiative: Imperial PDF

The Sentry's break off with a High Rolling turn after they got one look at the Dakka heading their way.  The Orks press forward, not bothering to disguise their movements, after all they know they have enough forward dakka to snowplow any enemy planes away.  The PDF seem to have learned some lessons from previous engagements and try to move to the edges.


Turn 2: 
Initiative: Imperial PDF

The PDF Sentinels stay in a tight cluster as they approach up the edge, on the freighter's starboard side.  The Orks start to spread out across the board, to try and ensure someone gets through.  The Sentry's see this and turn back into the fight, but lower than the Ork craft. 


Turn 3: 
Initiative: Imperial PDF

The Sentry's move up the center of the board, and raise up to meet the Ork threat.  Fighta 1 and Fighta 2 move forward to meet the challenge.  Meanwhile, Waaagh! Bommer 1 tries to scoot to the outside edge away from the PDF.  The Sentinels turn in and dive, and Waaagh! Bommer 1 manages to time his turn to dive in just under them and out of the line of fire! 


Shooting:
Sentry 1 and 2 get a weapon's lock on Fighta 1 and go weapon's hot.  A pair of skystrikes wing out from the PDF planes at long range, and both are good.  The fighta explodes in a fireball at long range!  The Ork  pilot never had a chance to eject! 


Turn 3:
Initiative: Orks

Despite losing a fighta, the Orks press onward.  They seem to have managed to get past the initial PDF fighter screen, and close in on the target.  Sentry 2 turns hard but can not quite get to Waagh! Bommer 2.  The Sentinels also bank sharply and drop altitude, but the Orks may have slipped past.  

Shooting: 
The Orks have no real targets.  

The Hydra on the freighter opens fire on Waaagh! Bommer 1, but fails to dissuade the Ork from pressing the attack.  


Turn 4:
Initiative: Imperial PDF

Sentry 2 again fails to get a bead on Waaagh! Bommer 2 as it presses in on the target.  Sentry 1 is also out of position.  Meanwhile, Waaagh! Bommer 1 flies over the target and prepares to drop their bombs.  The Sentinel squadron drops in on Waaagh! Bommer 2's tail in a conga line, as Fighta 2 does a wing over to get some shots at the oncoming PDF Sentinels. 


Shooting: 
Sentinel 1 opens fire, and fails to damage Waaagh! Bommer 2 as stubber rounds tear throw the plane.  

Waaagh! Bommer 1 drops its wing bombs and causes 2 damaging hits on the freighter.  It begins to take on water and flounder.  

The Hydra on the Freighter opens fire, and manages to blast Waaagh! Bommer 2 out of the sky with a spray of shells!  The pilot is also killed in the spray of fire!  

Big Shoota shells from Fighta 2 tear across Sentinel 1, but the little planes jinks and weaves to avoid them.  

Sentinel 2 causes Waaagh! Bommer 1 to blow smoke as Stubber shells tear into the plane.  

Turn 5: Disengagement Turn
Initiative: Imperial PDF

Waaagh! Bommer 1 drops to the hard deck with a power dive and guns his engine to disengage.  He did his job!

The Sentinels slide slip as they jet past the freighter they were defending.  

Fighta 2 turns in quick to try to get a passing shot, but finds itself in the sights of Sentry 1.  

Shooting: 
Sentry 1 stitches up the side of Fighta 2, and causes him to blow smoke.  

Fighta 2 is just out of the angle for a shot at Sentry 2.  

The defense Hydra on the freighter also takes some parting shots at Fighta 2, but only further prove to the Ork pilot that it is time to head for home! 


Conclusion: 
The Ammoriss Air PDF finally wrack up a win against the Ork Air Waaagh! that doesn't count as a pyrrhic victory.  This time, it was pretty decisive as the Orks lost two aircraft, and has the remaining two damaged, and failed to sink the target.  The MVP was the .... Hydra defense platform on the Freighter itself.  That crew was on fire today! 

Overall, the Orks out maneuvered me in the opening phase, but I did manage to not lose aircraft on the approach.  Once they got settled in to attack the target, it became much easier to get a bead on the Orks.  Especially since I also had them out numbered.  I could go where I needed to be.  

If the Orks would have been able to put the extra weapon load outs on the Waaagh! Bommers, I have a feeling that freighter would be a smoking wreck right now.  Oh well.  Just another sign that the Ork logistics are buckling under Imperial pressure.  

It had clearly been a while since my opponent and I had played AI v1.  We were both a bit rusty on the mechanics and flying in general.  However, it came back to use soon enough as we flew much better in the last few turns than the opening turns.  Such a simple, yet elegant game with a ton of tactical depth and decision making.  I love it soooo much.     
  
Killagrin checked his rearview as he rocketed away from the scene.  The big boat was smoking bad, but was not sinking.  Small black dots swarmed around it like buzzer squigs around a grot.  His plane was  much lighter now that he had dropped his bombs, and even over the big bloo, he could sense that he was going as fast as his bird could go. 

He reached down and toggled the radio, "Killagrin to Gorerippa.... you up 'ere still?"  The radio just crackled back in silence.  He gave it a good whack and tried to raise Gorerippa again.   Again, no response.  

Killagrin shook his head.  Looks like it was time to scrounge up another wing-ork.      


Become a Patron and get access to all the cool stuff, a peak behind the curtain of Blood and Spectacles, and early-access to playtest games!  


You can follow Blood and Spectacles Facebook page or Instagram for more fun! 

Check out the latest publications and contact me at our Blood and Spectacles website

Or purchase all out games at the Blood and Spectacles Publishing Wargames Vault Page!