Monday, April 26, 2021

On The Painting Table: Early Republican Romans- Romans are Done, Onto more Romans!


2021 was the year of the Romans.  With Wars of the Republic coming out in November or so of this year, I needed an army!  This army has been being built over the course of the year, and now it is finished.  At the end of my last post, all that was left was the shields.

I left off with a question.  Sometime during the Second Samnite War the Romans adopted the new Triplex Acies formation to replace their older "Greek" style phalanx army.  The triplex Acies did not use a line of men, but instead a checkerboard like approach to the battlefield in three lines.  This allowed the Romans to feed in fresh troops at the point of contact in a way that other armies could not.  

In addition, the basic unit of the army changed into the maniple, which was a group of 100 to 80 men (on paper).  The maniple allowed greater flexibility and maneuver in the hilly and rocky terrain found in the Samnite homelands.  The phalanx formation could not match this flexibility in rough terrain and therefore the Samnite had managed to thwart the Roman armies.  The Maniple system was designed to help the Romans to come to grips with the Samnites hit-and-run style.  

At this time, the Roman army was still composed of freeman farmers who supplied their own equipment.  Often times, when you look at Roman armies, there is a shocking amount of uniformity in Republican Roman forces.  This makes sense in the days of Marius and after.  At this point the armies' ranks were opened and the state provided standardized equipment.  However, in the Second Samnite War, this was not true.  Therefore, it made sense to me that the Romans would have a more..... unique approach as they were all providing for themselves.  I decided that they would not have matching tunics or shields at all!  In addition, I decided to use no shield transfers at this time either.  

Here it is all based and with shields.....


In the fore is the Skirmish line of the poorest Romans.  The last to get the spoils of war, but with those spoils they can upgrade with the equipment to be Heavy Infantry and fight in the bulk of the Triplex Acies.  The Skirmishers would screen the Roman's as they formed into battle line, act as scouts, and harass the enemy upon approach.  

Skirmishers out! 


Next in line would the first line to fight in actual melee.  Young men and farmers who could afford the equipment to be infantry.  They were formed into the Hastati.  They were equipped with the large body protecting shields, pilum for throwing, the Gladius short sword, and various marks of helmet and armor.  


More Hastati....


Backing up the Hastati would be the more experienced soldiers.  The had won spoils of their own and survived their tenure as Hastati.  These men were more reliable in combat and acted as a second line reserve force.  If the Hastati were pushed back, they would naturally fill the gaps that appeared with experience and discipline.  These were the Principes.

The eagle eyed among you probably noticed that all my Hastati were using their Pilums, while the Principes were using their Gladius. 


Finally, the most experienced men were saved for the last line of defense.  The Triarri were armed with spears and shields similar to the older Hoplite style of the pre-Triplex Acies kin.  They could set their shields together and form a hoplite style wall of shields accentuated by spears.  They were the final and stiffest line in the Roman army.  They were expected to hold the line where the other layers had failed.  

I mixed in Greek Hoplite gear to give them a very early Triarri look, perhaps with their old Hoplite gear from the First and early Second Samnite War?  I also did some converting to make sure they all had double Greaves, as opposed to a single. 


With that, the army is done, and it is well before November!  Expect to see these guys on the battlefield soon taking on Greek and Successor rivals first, and who knows who else! 

I have all ready started working on a "later" Triplex Acies army for a more "professional" looking force of Republican Romans.  They will all be wearing Lorica Hamata (Chain Mail) and have a much more uniform appearance and style to them.  I could swap out the Triarri or Principes in Hamata with the Hastati in Pectoral Armor freely to create a more "mixed" look as well.  I could also sprinkle some of these Hamata clad soldiers into this army for flavor, or combine them into one larger army as Romans and Allies at a later date.  

Here is a preview of that force.  It will essentially be a duplicate in organization to this one.  Plus I have 1 unit of wolf-pelt clad Velites constructed to paint up as well.     

Finally, I used some kit bashing of Greek Hoplites, Spartans, Republican Romans, Greek Light Cavalry, Vikings, and other Victrix kits to make enough models to swap my Early Republican Roman Triarri into an Etruscan unit for Wars of the Republic or Men of Bronze.  

I added two "hoplites" with Javelins and two with axes.  When sprinkled in this gives them the unique "disruption" aspect that holds true to the early Etruscan methods of warfare.  Both Javelins and Axes were used to try and disrupt the enemy Phalanx formation before the inevitable clash.  During the push of the shields, a disrupted enemy unit was more likely to break.  These "additions" were phased out in later Etruscan armies.  

I might have enough left over Triarri, Hoplite, and other parts to build a few more early Etruscan units for a full force?  I am not sure, but that will have to wait until AFTER I get those Hamata clad Romans together.  They would fit well in a full Etruscan force, allied with Samnites, and even sprinkled in with Carthaginian forces.  We will have to see what happens. 

The Romans are complete!  Long live the Romans!  Onto the Hamata Romans now.....  


You can follow Blood and Spectacles Facebook page for more fun: https://m.facebook.com/pg/BloodandSpectacles/posts/?ref=bookmarks&mt_nav=0

Or our website:

Or our Messageboard:

Or our Wargames Vault Page:

Blood and Spectacles Wargames Vault Page      


Monday, April 19, 2021

Battle Report: Classic Battletech- Ambush on Mundos


I have had the Battletech 25th Anniversary box set sitting on my shelf for a long time.  I remember getting it, reading the rules, and then deciding that Battletech just wasn't the game for me.  I was a bit daunted by all the lore, the Mech builds, hex maps, the old-school mechanics and the very knowledgeable and passionate community itself.  In truth, I was not "in love" with the mech designs or the mechanics.  Therefore, I painted some mechs and used them in other games instead!  The boxed set sat on the shelf and collected dust.  I was not convinced I wanted to take the plunge into another "Life style" game like 40K had been. 

Then, one day out of the blue, my daughter and I pulled it down off the shelf and decided to give it a go.  She didn't know anything about it, and I didn't remember much about it either.  I pulled out the Quick Start rules and gave it a read.  The rules focused exclusively on the basics (so no Heat, Crits, Pilot Checks, etc), and even had some special "beginner" Mech record sheets.  We set-up for the initial Green Training Scenario.        


This pit an Enforcer vs. a Hunchback on a relatively flat map with some woods on each side.  My daughter played aggressively with the Enforcer, as I hung back behind some woods.  She did some damage closing, but I let her approach.  Then, I burst around the edge of the woods and pummeled her at close range with all my weapons.  I blew the arm straight off the Enforcer, and it was all down hill from there.  We chased each other around the board a bit, before I finally destroyed her.  Her hits ended up mostly scattered across my mech, while mine pretty consistently hit her in the right arm/torso until it transferred over into her Center Torso.  

To be honest, it really wasn't that much fun.  There were not enough decisions, too many dice rolls, and we spent more time calculating mods and filling in bubbles then actually playing the game.  Plus, one-on-one meant there were no synergies and we were at the whims of the dice.  It was a game of stacking or unstacking mods. 

Despite this, we decided that I would go back and read the fuller intro rules and come back and try again with a few more mechs.  I went off and read up and did my homework.  I skipped the fluff and what not and just focused on the rules.  Therefore, this battle will just be an extension of my previous Mech games that used other rules.  


****************************************************************

Polanksi's Lancers were contracted to harass operations on the Planet of Mundos.  The primary export was timber and wood products.  Therefore, the Lancers were focused on attacking executives, storage facilities, and other infrastructure.  Their employer Lacstar Inc, was in negotiations to purchase the timber rights from the VolSaab Corporation, and any disruption to supply would cause the stock price to drop.  This would make buying the rights much easier.  

VolSaab was wise to such actions. Therefore, they had contracted out to two mercenary units to operate on Mundos to help protect their investment and get the best sale price of the rights.  The Rose Guard and Thor's Hammers were providing security on Mundos.  

Careful recon by Polanski's Lancers allowed them to map multiple patrol routes taken by Thor's Hammers.  The Hammers adjusted their routes regularly, but eventually an algorithmic analysis allowed the Lancers to predict likely paths of travel.  The Manager-Commander of the 14th Uhlans of the Lancers decided to try and set an ambush for the Hammers patrol using this intel.  

Forces:

Polanski's Lancers- 14th "Uhlans"

  1. Quickdraw
  2. Enforcer
  3. Hermes II
  4. Trebuchet
Thor's Hammers- Elements of the 3rd "Hard Strikers"
  1. Dragon
  2. Hunchback
  3. Zeus

 All pilots will be assumed to have Pilot Ratings of 5.  I could not find in the rules where it dictated starting or how to generate starting Pilot Ratings.

Both of us got our Mech record sheets ready, our quick play sheets, pencils, and our own sets of dice.  The Introductory rulebook was handy and ready to play.   

Mission:

Today's battle will be a straight forward fight to the death.  Units that leave the board will be considered retreating and destroyed.  Otherwise, the normal rules apply.  

Set-up: 

I will be using Hex Map #2, the same one we used for the Green Training Scenario.  Pretty much flat with some light and heavy woods on both sides.  

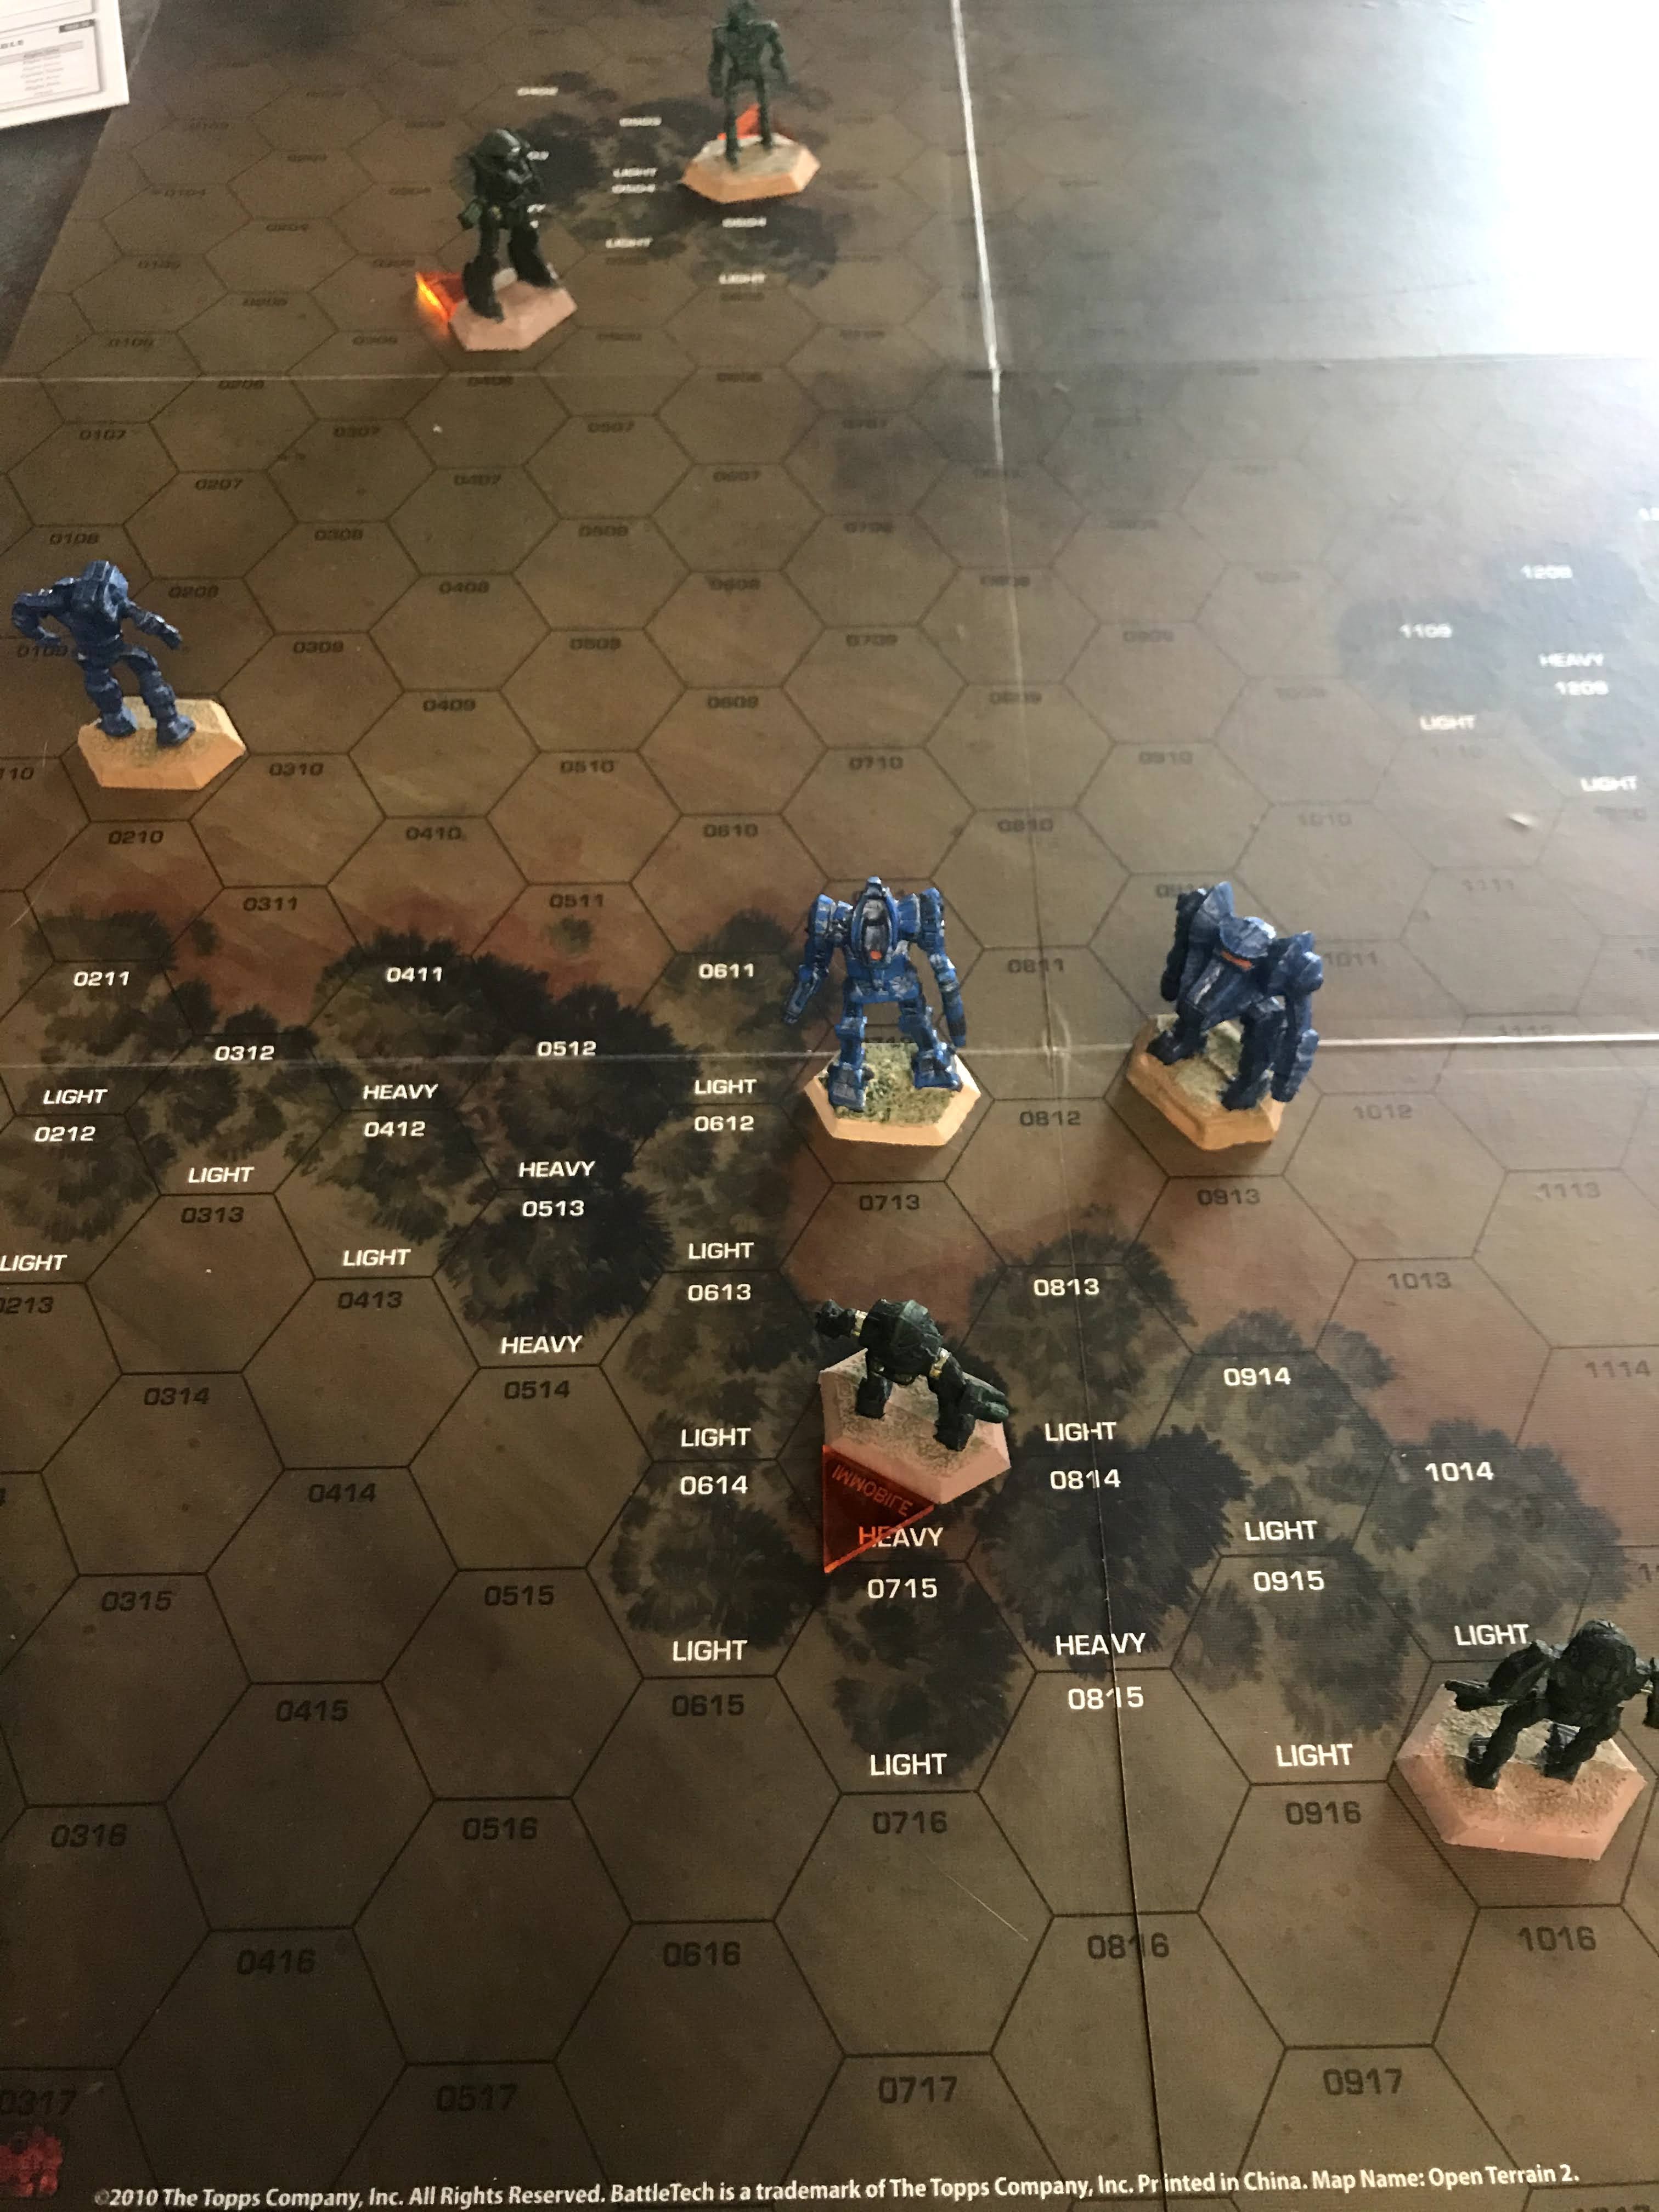
Dragon is placed in the center with the Hunchback and the Zeus within 3 hexes of it.  The Lancers can be placed anywhere behind the tree lines, on either side of the board.  We assume that the Mechs were prone, but have successfully stood up to begin the attack.  

Hard to see what is what but he blue are: Hunchback, Dragon and Zeus
The Green are Quickdraw, Enforcer, Trebuchet, and then the Hermes at the other woods

Turn 1:

Initiative:  

Since Lancers are on the attack, we decided let them move and then shoot first this turn.  We will go back to normal initiative going forward.    

Movement: 

The Lancers all move closer to their targets.  The Quickdraw begins to move around the wood, while the Enforcer and Trebuchet try to move through it.  The Hermes skirts the woods.  

The Hunchback eagerly moves to get the angle on the Quickdraw and use his Auto-cannon 20.  The Dragon turns and marches at the Trebuchet emerging from the woods.  Finally, the Zeus moves to cover the center.  

Shooting: 

The Hermes uses his Auto-cannon and hits the LRM 10 detonating the left torso of the Dragon and causing extensive damage when all the ammo detonated!  Ouch!  Looking back, we probably should have applied the damage to the internal instead of the armor, but first game problems right.

The Quickdraws Medium Lasers also thwack into the left torso and center torso of the Hunchbacks armor and blew off a heat sink as well.  We definitely did not use the Crit table right on this result, but there it is.  The Enforcer is still too deep in the woods, while the Trebuchet fails to hit the targets with his lasers. 

The Hammer's respond.  The Hunchback rails the Quickdraw with his Auto-cannon and demolishes the right torso of the mech and bleeds over to the center.  However, the Hunchback raised his heat to around 15.  The Dragon also pings armor off the lightly armored Trebuchet.     

Heat: 

At this point, we also had a question about how to use Heat Sinks.  I have a feeling the Introductory Rulebook was a copy/paste job out of other Battletech books as some of the sections do not have proper headings, and other parts do not flow very smoothly between paragraphs.  Anyway, it looks like they work automatically during the Heat phase. 

We had been keeping track of it as we went along as well to make the Heat phase easier to recall.  


Turn 2: 

Initiative:

The Lancers win initiative, so the Hammers will move and shoot first.  

Move:

The Hunchback rushed the Quickdraw.  The Dragon pivoted and walked forward a bit to try and challenge the Trebuchet and Hermes.  The Zeus covered the treeline.  

Meanwhile, the Quickdraw fell back to make space for his LRMs against the Hunchback.  The Enforcer "jumped" to try and move beyond the Hunchback as well.  The Trebuchet also fell back into a covered firing position.  The Hermes darted forward past the larger Dragon and Zeus.  

Shooting: 

The Hammers have limited shots.  The Hunchback tags the retreating Quickdraw with his Medium Lasers, and damages its left shoulder.  Sniping from the Zeus at the Trebuchet misses due to the tree cover. 

The Quickdraw returns fire with a full LRM burst and Medium laser barrage at the Hunchback.  The salvo impacts into the Hunchback's right arm, and mangles it.  It has 1 armor point left.  The Trebuchet also fires a barrage of LRMs at the Dragon.  One barrage misses, but the other connects with its right leg, mangling the armor there, and causing damage to the right foot actuator and upper leg accuator.  

No one else has shots this turn.  

Heat: 

Everyone is able to sink back to 0, but the Trebuchet and the Quickdraw both have 1 Heat. 


Turn 3:

Initiative: 

The Hammers beat the Lancers this time.  Lancers move and shoot first. 

Move: 

The Lancers do a lot of running.  The Quickdraw runs back into the woods away from the Hunchback.  The Enforcer runs to try and get behind the Zeus by the smaller woods.  The Hermes joins him there.  The Trebuchet stays put and prepares their lasers.  

The Hammers see their chance and the Dragon and the Zeus close in on the Quickdraw, trying to isolate it.  The Hunchback turns to cover their rear.  

Shooting:

The Quickdraw pours Medium Laser fire into the Dragon, hitting it in the Torso multiple times and in the empty ammo for the LRM 10.  However, a Gyro is also hit in the attack.  

The Enforcer uses its Auto-cannon and hits the Hunchback in the right arm.  At this point, we also realized we are doing Internal Damage wrong.  In the Quick Play rules, once armor was depleted it moved to the next location.  In the real rules, you blow off the armor, and then go to the Internal Damage before moving on.  Woops!  Too late now! 

The Trebuchet uses its lasers on the Dragon, and blasts through the armor on its right leg to cause internal damage.  Meanwhile, the Hermes uses the Auto-cannon and snipes the Zeus in the head and takes out its life support system!  Ouch! 

The Hunchback fires on the Enforcer and shreds its right arm with the Auto-cannon, and manages to tag the left arm and cause critical damage that disables the Laser there!  Ouch again! That leaves the enforcer almost weapon less. 

The Dragon missed its shots at the Quickdraw due to the other mechs speed and the heavy Woods.  The Zeus however landed hits to the center and left torso with the Large laser and Medium laser, but no Crits.    

Heat: 

Everyone gets to go to 0 Heat, except the Hunchback who is at 2. 


 Turn 4:

Initiative: 

Hammer's win. 

Move: 

The Enforcer jumps behind the tree line for cover.  Meanwhile, the Quickdraw scrambles away from the two Hammer mechs.  The Trebuchet stands firm.

The Zeus and Dragon get ready to shoot it out with the two lighter mechs.  

Shooting: 

The Lancer shooting is mostly ineffectual.  The Dragon and Zeus both lose a bit of armor, but are fully functional.  

The Hunchback targets the Hermes.  Despite the Heavy Wood, the lasers and Auto-cannon tear into the small mech.  It's engine takes a hit and its left arm is completely blown off! 

The Dragon and Zeus also chip away at the Trebuchet and Quickdraw.  

Heat:

The Hunchback is still at 2.


Turn 5: 

Initiative:

Hammers win again! 

Move: 

The various lighter Lancers try to breakaway and converge on the Hunchback with multiple targets of opportunity, but also multiple return shots.  The other Hammers just turn and try to target the Lancers that ran past.  

Shooting: 

The Hermes, Trebuchet, and Enforcer all open fire on the Hunchback, and all miss.  The Quickdraw elects not to take a shot. 

The Hunchback fires everything at the Enforcer, and hits it in the left arm and torso.  The lower arm actuator is damaged, and two heat sinks are blown off.  Thankfully, the auto-cannon missed.  

The Zeus targets the Hermes with everything and pours firepower into it.  The LRMs blast apart the left torso of the Mech.  In addition, the Auto-cannon hits the right arm and freezes its shoulder and blows off the medium laser! 

The Dragon also plinks away at the Trebuchet.  

Heat: 

The Zeus has 1 and the Hunchback has 4.


Turn 6: 

Initiative: 

Lancers win! 

Move: 

The Hammers withdraw back to a triangle of firepower, while the Lancers try to converge their fire on the Hunchback.  

Shoot:

The Hunchback just peels off armor, and misses with his Auto-cannon on the Enforcer.  However, the Enforcer loses another Heat Sink.   

The Dragon manages an engine hit on the Trebuchet!  The Zeus peels off a good chunk of center torso armor off the Quickdraw as well. 

The Quickdraws Laser barrage on the Hunchback destroys the medium laser on the Hunch's left arm.  The Enforcer misses, and the Trebuchet hits him in the torso on each side.  The Hermes uses the last of his ammo on his only remaining weapon to peel armor off the center of the Hunchback.  

Heat: 

The Hunchback is at 4 Heat.


Turn 7: 

Initiative: 

Hammers win.  Lancers move and shoot first.  

Move: 

The Quickdraw moves up for a closer firing lane.  The Hermes also runs up to the Hunchback, as I decide to try out the Physical attack rules!  After all, the little guy has no weapons left!  The Zeus and Dragon move out a bit wider for better firing. 

Shooting:

 The Quickdraw fires on the Hunchback, peeling off armor on his left.  However, the SRMs miss.  The Enforcer hits the Hunch in the left leg, peeling off armor.  Finally, the trebuchet fires on the right arm, and causes some internal damage and injury to the shoulder joint.  

The Hunch's small laser hits the Hermes in the leg, but the auto-cannon misses.  The medium laser on the right arm also misses due to the bad shoulder joint. 

The Dragon plasters the Trebuchet in the central torso with the last auto-cannon rounds and its lasers.  It causes a second engine hit, and a Gyro hit.   

The Zeus hits the Quickdraw in the right arm and messes up the shoulder.  Plus, he peels off some leg armor.  There are no crits.  

Physical:

The Hermes runs up and smashes into the Hunchback.  The big machines stagger around to gain their balance but stay upright.  However, the Hermes has no more center torso armor left, but the Hunchback has its right arm smashed off, and takes an engine hit!    

Heat:

Most units can return to 0 heat.  Even the Hunchback and Hermes.  Not being able to shoot makes heat management pretty easy. 


Turn 7: 

Initiative:

Hammers win, so Lances move and shoot first. 

Move: 

The Lancers turn to face their foes where they can.  The Dragon tries to move in on the Trebuchet for a Charge attack, but the damage to its right leg finally is too much, and the machine falls to the ground.  It further damages the leg and is prone.  

The Zeus backs up into the woods for some cover.  

Shoot: 

The Trebuchet and Quickdraw fire on their enemy mechs, peeling off armor.  

The Zeus returns fire on the Quickdraw, causing an engine hit.  The center of the Quickdraw is also in tatters. 

The Hunchback unloads on close range at the Hermes ripping into it with its Auto-cannon.  Its engine takes a hit, but the little machine is still in it!  It's center torso is shredded.           

Physical:

The little Hermes kicks the Hunchback in the left leg and damages its hip, peels off armor, and destroys a couple of heat sinks.  The Hermes can not punch as it has no left arm left, and the right arm has a bad shoulder.  

The Hunchback responds by punching the Hermes with its left arm, and hitting it in the leg.  


Turn 8: 

Initiative: 

Hammers win again.  

Move: 

The Hermes backs away from the Hunchback, who is then immediately engaged in a Death from Above Attack by the Enforcer.  The Quickdraw backs away, but he is pursued by the Zeus.  

The Dragon pulls himself up, and charges into the Trebuchet.      

Shoot: 

The Enforcer and Hunchback exchange fire as they approach!  They peel armor off each other.  The Trebuchet also peels armor off the prone Dragon.  

The Zeus fires on the Hermes and misses.  

Physical: 

The Enforcer lands and crushes the armor off the head of the Hunchback, and causes an engine hit.  However, the Enforcer also falls prone, losing armor.  The Hunchback tries to kick it, but misses.  

The Dragon charges into the Trebuchet and crushes it's engine.  The machine falls down, lifeless as the pilot struggles pointlessly at the controls.  In exchange, the Dragon's right leg finally gives out and the machine falls over prone again.  The right leg it totaled. 

Heat: 

Again, Heat is all under control.  


Turn 9:

Initiative: 

Hammer win.  

Move: 

The Hermes turns and flees.  The Quickdraw stays still, and the Enforcer gets up.  The Zeus moves to engage the Quickdraw in min range of his Auto-cannon.  The Dragon is prone. 

Shooting: 

The Enforcer manages to blast a Gyro on the Hunchback.  The Quickdraw scuffs up the paint on the Zeus.  

The Hunchback and Dragon blow both arms off the Enforcer in a fusillade of lasers and auto-cannon fire.  The Zeus also manages to blast the Center torso of the Quickdraw completely open.  The next shots will be critical hits!  

Physical: 

The Enforcer kicks the Hunchback, considering he has no arms! He kicks the Hunch in the left leg, and it looks pretty weak.  In return, the Enforcer is punched in the left torso and sparks fly as there is no armor left there.  

Heat: 

The Hunch has 1 heat. 


Turn 10: 

Initiative:

Lancers win this time.  

Move: 

The Zeus moves up expecting the Quickdraw to flee backwards.  The Hunch stays put. 

The Quickdraw does flee backwards to stay in short range of his lasers though.  

Shoot: 

The Zeus opens fire on the Quickdraw and blows its left arm clean off!  The return fire is minimal.  The Quickdraws return fire is also ineffective.    

The Hunch uses its last Auto-cannon ammo on the Enforcer up close and riddles him with shots in the torso.  The small lasers also exchange inconclusive blasts.

Physical: 

The Enforcer fails to kick the Hunchback.  However, the Hunchback does land a punch that wrecks the armor on the Enforcers head.  

Heat: 

The Hunch is up to 2 heat.         


Conclusion:

With that, the Uhlans send the surrender codes to their foes over the universal Merc frequency.  They are done here after 1 Mech getting cored, and the rest all taking severe damage.  By the Mercenary Code, details are arranged and the proper protocols followed for the surviving pilots to be picked-up, and the remaining mech to withdraw.  The fallen Uhlan Trebuchet is maintained as a prize by Thor's Hammers.  

Four and a half hours later, we have a conclusion.  Granted, we had to look up a lot of rules as we went, and we pointlessly jockeyed around shooting.  Clearly, we should have just closed and started throwing kicks and punches instead!  

Eventually, Thor's Hammers won! 

Uhlans- 6 Engine Hits

Hammers- 2 Engine Hits 

Final Results for the 14th Uhlans of Polanski's Lancers

Final sheets for the Strong Hammers of Thor's Hammers- Today's winners

Final Thoughts:

Yup, this confirms that Classic Battletech is not the game for me.  There was two much dice rolling and bubble filling in with not enough actual effect.  The decision making I found rather limited, as you mostly just stood there and tried to pound on the enemy.  Heat didn't become much of a factor to limit my decision making either.  I was typically able to do all the moving and shooting I wanted and I had enough Heat Sinks to take care of it.  

Mechs can take a ton of hits and shrug them off, especially if the shots are dispersed across the Mech rather than concentrated.  Even concentrated shots still took forever to actually DO something.  There were the occasional lucky hits, but not enough to actually influence the game, unless a weapon got destroyed.  Most critical hits just resulted in more annoying "Pilot Check" dice rolls or more Mods for me to remember and apply. 

My physical attacks were more powerful than my shooting attacks.  Therefore, I will just close in the next games, I will just close the distance via walking until I get close enough to kick, punch, or charge someone to death.  The boards are small enough where the game will be an inevitable brawl in the middle.  That does not feel very Big Mech to me, but what do I know?  Shooting almost seems pointless.    

I can see why this would be popular in some quarters as all the mods and options make the game appear to have tactical depth.  Honestly, I am not sure it is a very tactical game either as it seemed like standing still and blasting or getting up and kicking seemed like easy choices.  However, it does have a lot of potential for "Strategic" choice in the form of a bucket load of unit types and list building and a lot of opportunity to look for the "optimized" mechs and mech combos.  I am coming to realize that these "strategic" choices are highly valued in the wargaming community and perhaps to a very vocal minority is even MORE important than tactical choices.  However, I am pretty sure I do not know what people like to play so I am probably completely wrong.  

Overall, it was a bit of a frustrating game and frankly did not engage me in the game play.  By Turn 4, I was ready to call it a game even though there was no decisive result at that point.  It wasn't until turn 7 or so when things became interesting with damage levels, physical attacks, and falling over.  The long, slow, slog of the game did not appeal to me.  I could get a similar result with a different game system in about 1 to 2 hours instead.


You can follow Blood and Spectacles Facebook page for more fun: https://m.facebook.com/pg/BloodandSpectacles/posts/?ref=bookmarks&mt_nav=0


Or our website:

Or our Messageboard:

Or our Wargames Vault Page:

https://www.wargamevault.com/browse.php?keywords=blood+and+spectacles&x=0&y=0&author=&artist=&pfrom=&pto=    


Monday, April 12, 2021

Battle Report: Blucher- The French Empire Strikes Back!


I always start these games with the following caveat:  I know NOTHING about the Napoleonic Wars.  In fact, about the only thing I know comes from reading Sharpe!  However, every wargamer eventually ends up doing something with them because the era is just too darn compelling not too!  Blucher is my window into this world of wargaming because it abstracts the tactics due to the level of play it is, and it can be used with cards.  Everyone knows I love Paper Templates!  

After the border clash with the Prussians, the French have decided to go on offensive!  They crushed the Prussians so badly, that they did not expect them to get much of an army together in the area.  For the most part, they were right and they marched in Prussian territory looting and living off the land.  However, the Prussians were quickly shuttling troops from elsewhere to resist them, and it was only a handful of weeks before another Prussian force was in the field to oppose the French.  After a series of maneuvers, the two sides met for battle once more.  

Nice and generic intro for this game! 

Forces: 

This time, we agreed to 18 French units in 3 corps, vs. 21 Prussian units also in 3 Corps.  Like last time, we went with randomly assigned forces!  We took the cards from the 100 Days campaign box and shuffled them up.  We then drew the forces out of the deck randomly.  Therefore, we will get some pretty unusual Corps composition with some strange units in them!  You can not always fight with the army you want, but the one you have instead! 

Prussians

1st Corp:  

  1. Infantry Regiment #22
  2. Infantry Regiment #23
  3. Infantry regiment #24
  4. 6th Kurmarsk Landwehr
  5. 4th Silesian Landwehr
  6. Schwerin Light Cavalry
  7. Foot artillery
2nd Corp: 
  1. Infantry Regiment #18
  2. Infantry regiment #28
  3. Sohr Light Cavalry
  4. Thumen Light Cavalry
  5. 1st Kurmarsk Landwehr
  6. Horse Artillery
  7. Heavy Artillery
3rd Corp:
  1. Infantry Regiment #6
  2. Infantry Regiment #10
  3. Infantry Regiment #29
  4. 2nd Silesian Landwehr
  5. 3rd Silesian Landwehr
  6. 2nd Kurmarsk Landwehr
  7. 5th Westphalian Landwehr
This Prussian force seems to be pretty infantry heavy, with a decent backbone of regular units.  Should be good for breaking through the French lines! 

French

1st Corp: 
  1. 2/14 Toussaint
  2. Horse Artillery
  3. 2/Grenadiers
  4. 1/11 Dufour
  5. Horse Artillery
  6. 2/12 Schaeffer
2nd Corp: 
  1. 1/Grenadiers
  2. Maurin Light Cavalry
  3. Horse Artillery
  4. 2/2 Aulard
  5. 2/10 Dupeyroux
  6. 2/9 Jamin
3rd Corp:
  1. 1/12 Rome
  2. 1/1 Quiot
  3. 2/8 Corsin
  4. Guard Foot Artillery
  5. Heavy Artillery
  6. 2/13 Desprez
In fine French tradition, they seem to have the advantage in artillery.  Plus, the two grenadier units will give them a stiff backbone to the force!  

Mission

Both armies have two objective markers in the enemies back field. 

In addition, they are looking to break the enemy force by reaching their respective break points in lost units.  The Prussians break at 10, and the French at 9 Units.  

Set-up
Like last time, the French are on the West side of the board, while the Prussians are on the East.  Between them is a valley, and both armies are stationed amongst the hills and heights.  In the center of the valley is a copse of trees.  

The Prussian objective is to the Northwest behind the French left, and to the Southwest beyond the hills.  The French is behind the Prussian center, and one to the Northwest on the bluffs.  

The armies are placed in their "blind" state, so it is hard to tell who is what, and where they are at set-up.  I forgot to take pictures before the game started!  Woops!  

The Game
There are potentially 30 turns to the game, so I will not detail every turn.  Instead, I will try to document the flow of the battle as it progresses from morning, to mid-day, to afternoon, and into the evening.

The French forces moving up looked a bit thin compared to the Prussian forces.  However, the French looked strong in the Center, while the Prussians looked thin there.  French Horse Artillery range ahead of main force.  By mid-day, the French horse artillery has the range and position.  They begin counter-battery fire on the Prussian Heavy Artillery.  The battle has truly begun! 

Closest to camera is the Prussian Right flank


The Prussian guns are no longer silent, but the batteries on the Prussian left target a French infantry regiment instead of the French guns.  On the left the Prussians continue to advance, with their formation taking on an echelon approach across the line.  The French and Prussian guns exchange fire.  

Prussian Center

Early in the mid-day, the French advance hesitates as they redress their lines.  Poor command means very little movement occurs as they re-shuffle.  This gives the Prussian guns more time to pound the center and the French right.  The Prussian Left moves into musketry range.  
Prussian Left

Just before Mid-day, the French Horse Artillery in the Center manage to break a Prussian Horse Artillery unit opposite them, and force them to withdraw.  However, French musketry proves lack luster at the point of the Prussian attack.  The Prussians are mush more effective there, and the Prussian Foot artillery breaks a French Horse Artillery unit.  Meanwhile, Landwehr units moves to put the French attack in the center into a cul-de-sac of pain. 

Prussian Center

As Mid-day approaches the afternoon, Musketry fire erupts across the Prussian Left (French Right) and Center as the infantry exchange a brisk fire.  The Prussian Regiment #24 is repulsed in an assault against the battered 2/10 Dupreyoux.  Meanwhile, a charge on the French far right pushes back the Landwehr there, and the light cavalry on the flanks engage indecisively.  French Grenadiers march from reserve and take the heights near the Prussian Objective on the French right.  The French Left also moves to engage the Landwehr on that flank.  

Prussian Left

The 4th Silesian Landwehr is withdrawn from the Prussian left, leaving a bit of gap to be filled by the 6th Kurmark Landwehr.  The Prussian Foot artillery is also withdrawn as they were low on ammo. The frontline French forces are starting to see some heavy casualties building up.  

Prussian Left

The Prussian attack on the Left is barely being held off by the thin line of French defenders.  The French light cavalry manages to see off the Prussians in vicious close combat.  However, the French attack in the center looks to be stopped, as the Infantry Regiment #28 routs the 1/11 Dafour with a charge and the 2nd Kurmask Landwehr obliterates the 2/12 Schaeffer with overwhelming firepower!  

Prussian Center


In the middle of the Afternoon, Prussian Light Cavalry came from reserve and quickly moved through the gaps in the Prussian Left and Prussian Center.  They moved to threaten the French Heavy Artillery and towards one of the Prussian objectives behind the heights on the left flank.  

Gap between the Prussian Left and Center

Late Afternoon is tough for the Prussians as they lose 3 units.  The French on the Prussian left are holding, and the right is collapsing.  However, the Center is holding, except for a French grenadiers unit pushing through to the French objective!  On the Prussian left the Infantry Regiment #23 finally forces 2/10 Dupreyoux to withdraw from the field.  In addition, Thunen's light cavalry is repulsed by the Heavy Artillery in an assault!  Both sides need only lose two more units to lose the game! 

View across the front, with the Prussian Left in the foreground


It is early evening, and the battle is on the brink.  The Light Cavalry from both forces managed to secure an Objective.  However, the 2/Grenadiers are being bogged down from reaching their objective by 1st Kurmask Landwehr.  The Infantry regiment #22 manages to break through the 2/2 Alulard on the Prussian left, but they are in bad shape.  Both sides are 1 unit away from breaking, and the Prussian Light Cavalry is threatening the final objective.  
Prussian Center and Right

By Mid-evening, the Prussians have had enough!  They withdraw from the field, just outside of their last objective.  The 1/Grenadiers blasted Infantry Regiment #22 off the field with a well-timed close range volley of musketry.  With the Prussian left obliterated, the center weakening, and the Prussian Right also under heavy attack, the troops had enough a decided the fight was over.  

Prussian Left


Conclusion:

French narrowly win!  The Prussians were beating down the door to their last objective, and the French were only 1 Unit away from breaking.  Some well timed withdrawals kept them going at the end and denied me the last Unit I needed to win.  

Prussians
Withdrew- 3 Units
Broken- 9 Units

French
Withdrew- 7 Units
Broken- 6 Units  

So close!   As the Prussians, I really thought my Light Cavalry blitz through the gap was going to be the game winner.  1 more turn and it would have been!  In retrospect, I should have withdrawn on the Left flank sooner.  You can see by the Withdrawn count that I was very aggressive with my units today, and ultimately that is what cost me the game.  I guess I was confident as I was outnumbering the French and had a higher Break Point.   

Today, we went 26 turns!  Almost the whole game length before we reached a decision.  I am sure we are not playing everything 100% right, but we are having a good time doing it!  Those damn French are a tough nut to crack!  The Grenadiers were amazing and in my mind were decisive units.  My Landwehr did their job for the most part, but let me down on the Prussian left, but did great in the Center. 

Overall, I look forward to playing again.               


You can follow Blood and Spectacles Facebook page for more fun: https://m.facebook.com/pg/BloodandSpectacles/posts/?ref=bookmarks&mt_nav=0


Or our website:

Or our Messageboard:

Or our Wargames Vault Page:


Monday, April 5, 2021

Battle Report: Castles in the Sky- Big Trouble in Indo-China


The French Foreign Ministry decided that their colony in Indo-China had an excellent strategic positions via-a-vis the British interests in the South China Sea.  Despite the advent of Airships, the South China Sea was still one of the busiest trading routes in the world.  Both air and naval ships travelled through the area carrying valuable cargos.  

In addition, the area saw a regional war in 1893 that allowed the French to gain further territorial concessions from Siam.  However, the Siam Government had appealed to the British for aid.  At the time, the British left it a local matter between Siam and France.  However, if an opportunity arose like that again, the French government was not so certain the British would not intervene.

Therefore, the French Government decided to send the French Airship to their base at Tourane (Da Nang) in Indo-China.  The old Pre-dreadnought Battle Ship the Camot was sent on station.  A battleship class airship in the area, even a pre-Dreadnought build, was a definite escalation of military might in the region.  

Such a move made the British Colonial office very nervous.  A Colonial official in Australia partnered with Captain Trilby in the South China Sea and devised a scheme to ambush the Camot en route to its new station.  Their goal was to force the Camot to return to France for drydock and repairs.  They used the Siam government as a cover for their operation and flagged their vessels deliberately to obscure the actual attackers. 

Mission: 

Today, instead of randomly rolling up a mission.  We decided to play the Raiders scenario from the rule book.  This is a scenario that had caused issues during play testing, and that I completely re-wrote.  Therefore, I was eager to try it out to see if the changes made it more competitive. 

In this mission, the British forces are trying to cripple, sink or destroy the Camot via any means necessary.  They score extra points for damage done to the French Battleship.  The French are trying to drive off the attackers. 

Forces: 

L'Aire National

Camot- Captain Aubre- Command 4

Charles Martel Class Heavy Cruiser    

Tourane- Captain de Genouilily- Command 2

Descartes Class Cruiser

Fantassin- Captain Valjean  - Command 4

Chasseur Class Destroyer  

Rapier- Captain Sault  - Command 3

Chasseur Class Destroyer


Royal Navy (of Siam?)

HMS Archeron- Commodore Trilby- Command 2

Duke of Edinburgh Class Cruiser

HMS Bellerophon- Captain  De Selby- Command 3

Warrior Class Cruiser

HMS Medusa- Captain Butler- Command 2

Active Class Light Cruiser

HMS Lancer- Captain Montejoy- Command 4

Bull Finch Class Destroyer

HMS Corsair- Captain Montgomery- Command 4

Bull Finch Class Destroyer

Set-up: 

This battle will be played on a 48 x 48 MU board where 1 MU equals 1 inch.  It will primarily take place over water.  We used the normal terrain and complication generator in the main rules to determine additional details.  

In this battle there will be no Complications.  

For terrain we generated two island with low hills (alt 1) on the north side of the board.  On the South side we have two features with no impact on play.  

The French will be on the west side of the board.  The British take the opposite side.  

The French Battleship is coming in the center flanked by the two destroyers.  The Camot is at Alt 4 going speed 3.  The two Destroyers are matching speed and at 3 and 5 respectively.  The Tourane is to the North at speed 3 and alt 7.  They signal the approach of the enemy forces to the rest of the fleet.

The British are in line abreast.  From North to South it is the HMS Archeron, HMS Bellerophon, HMS Medusa, HMS Lancer, and HMS Corsair spread across the edge.  They are at speed 4 to start.  Archeron is at the highest altitude at 6, then 5, 4, 3, and 2 respectively afterwards to try and cover the board with firepower.  

In my last couple of reports, I used dice to acts as markers and tokens.  This game, I am doing something different and going with 0 on table tracking components.  Instead, both sides are documenting on a normal piece of notebook paper to see if we run into any complications using that method.   

I foolishly forgot to take the pictures of our initial deployments.  

Turn 1: 

The British score 2 success on 4 command dice, versus 1 French success on 6 dice.  The British choose to let the French move first.  

Move:  

The Tourane moves down a level and speeds up, but turns away from the fight.  The British and French fleet plow straight ahead. 

Battle: 

None, no one has the range.  

End:

No activity yet.  Still maneuvering. 

Turn 2:

British again win with 3 to 1 successes.  Again, they allow the French to move first.  

Move:

Again, both sides keep moving forward.  No one seems willing to turn away first in this game of chicken.  However, the French speed up to 4.

Battle:

The rang is closing fast, but not there yet.  

 End:

No activity needed .... yet. 


Turn 3: 

1 British success to the French 0.  The French have 6 dice! Again, the British let the French go first. 

Move:

 Finally, as the French keep moving forward, the British blink.  They realize that the HMS Medusa is heading straight for a French Battleship.  The Medusa, Bellerophone and Archeron begin to make a left turn.  The Archeron also drops down to Alt 5.  

The French Touranes turns into the fight again, with the Archeron ahead, but two levels below her.      

Battle: 

The Camot begins the battle with a barrage of Heavy Battery fire at the Medusa.  They also fire a full spread of Air Torpedoes to help clear a path.  A heavy Shell bounces off the light Cruisers armor, while her Point defense destroy to incoming Torpedoes.  A third also bounces off her armor, leaving her with 3 Friction.  

The Archeron chooses to Fire For Effect, and the Command test is successful.  Three shells ring off the French Battleship's armor, and cause 1 Friction. 

The Tourane fires her bow Air Torpedoes at the Archeron.  The British Point Defense misses them, but they streak by past the target and fail to explode.  

HMS Corsair had started to dart ahead of the British line, and targets the Rapier with a Torpedo Barrage.  1 is destroyed by Point defense, but a second hits the superstructure of the ship and causes 1 hit!  The return French barrage causes 1 Friction and 2 Hits on the HMS Corsair.    

The Fantassin fires on the Bellerphone with Air Torpedoes.  The British Point Defense removes 1, but the rest miss.  1 Friction on the British cruiser. 

HMS Lancer also fires on the Rapier, but Point Defense takes out two, 1 misses, and a third fails to cause damage.  However, the French Destroyer now has 5 friction. 

End:

The Rapier loses a point of armor.  The Corsair has their screw fouled and then... disaster strikes as an air torpedo detonated near exposed gun powder, which led to a change reaction and the little ship explodes in a 1 MU radius.  All hands are lost and that gives the British a big set back. 

No repairs or Strike your Colors tests needed. 

The British have 7 Friction and is forced to leave 1 on the Bellerophone.  The French have 6, and the French admiral easily removes it. 


Turn 4:

The French finally win with 3 successes to the British 2.  The French choose to go first.

Move: 

The HMS Lancer tries to reload her torps. which with Command 4 they easily do.  They also gain altitude two levels to try to gain safer firing position.  

The French keep plowing forward, and forcing the British to react.  Both French Destroyers also reload Torps.  

The HMS Medusa successfully crash dives to Alt 1 and speeds up to 7 to avoid the Battleship.  

The British Cruisers make for the Camot to try to get firepower on her and slow her down.  

Battle:

The lead French Destroyer, the Fantassissin fires her reloaded torpedoes at the HMS Bellerophon.  The Point Defense smack one away, but a second hits and causes damage,  The third flat out misses. 

The HMS Lancer and the Rapier also exchange Torpedo fire again.  This leaves 3 Friction on the Lance, and 2 Friction and a Hit on the Rapier.  The HMS Medusa is out of position to help the weight of fire this turn.      

The Archeron opens fire on the Camot.  She lands enough hits to cause a Friction point with her forward guns.  However, nothing gets through the Battleships thick armor.  

In return, Captain Aubre calls for the Camot to fire for effect on the Archeron who is just in her Port arc, allowing for a full broadside.  The gunner's eagerly follow their Captain's orders.  The target is on class smaller, 1 altitude higher, and with a friction marker so the firepower is reduced by 3 dice per battery.  Still, 6 dice with re-rolls is nothing to sneeze at.  Thanks to the Command, the batteries aim is true and the British cruiser takes 2 Friction and 1 penetrating hit!              

The HMS Bellerophon returns fire, but misses due to friction and altitude.  However, she passes her Ammo check and can keep using her main forward guns.  

Finally, the Tourane's captain chooses not to fire as the range is just a bit too far at the altitude difference.  The shot has little chance of hitting and a higher chance of causing an ammo failure.  

End: 

The Rapier loses another Hull armor point, bringing her down to 4.  The Archeron also loses a Hull armor point.  The Bellerophon loses 1 Hull and her rudder is jammed. 

The French had 4 Friction, so easily remove it. The British had 7, but also manage to remove it with a solid roll.


Turn 5: 

The French have 3 successes to the British 2.  The French chose to go first again.

Move: 

The Fantassin re-loads her torpedoes and moves ahead without deviating from her course.  

Meanwhile, the HMS Medusa comes up two altitude levels and tries to circle back behind the French fleet.  

The Camot steams forward to follow her escort destroyer as the HMS Archeron drops 1 altitude to move in behind the French Battleship.  

The Rapier drops to Altitude 3 which causes her to speed up, but she is still in a position to help ward off air torpedoes from the Camot.  

The HMS Lancer makes a 90 degree turn and cuts across above the Archeron, looking to circle back into the fight.  She re-loads her Torps.         

The HMS Bellerophon has a jammed rudder so can not change course.  She is right above the Camot's decks and ready to cross above her at Alt 5 compare to the French ship at Alt 4. That will be a brisk exchange.  

The Tourane increases speed and heads into the mix.    

Battle: 

Captain Aubre decides to Fire for Effect on the HMS Bellerophon.  The skilled captain easily passes the test, and uses the last French Command to do so.  7 potential hits out of 8 possible, so 2 Friction.  Before the French roll, the Captain of the Bellerophon has a choice, should he Prepare for Impact and limit his return shooting and the best chance to damage the French Battleship or should he take it and see what happens?  He all ready has two friction and an Altitude difference reducing his firepower.  He decides to Prepare for Impact!  Despite Preparing for Impact, the Bellerophon takes four hits.  Ouch!  

The Bellerophon has no shots back due to friction and other factors taking his Firepower below 0.  That leaves the Archeron, who is at the same altitude as the Camot.  The guns boom out, and cause 4 potential hits, but none manage to sneak past the French armor.  The Light Batteries also manage to pepper her and together they cause 2 Friction.  

The Touranes tries to fire its Medium batteries at the HMS Lancer, but a flaw in the cartridges cause the guns to misfire.  They are jammed until repaired. 

Fire from the rising HMS Medusa manages to put another Friction point on the Camot.  

The HMS Lancer fires a spread of Torpedoes at the Tourane, but her Point Defense is ready and takes out two of the torps and the other two miss. 

There is no other shooting.


End:

The HMS Bellerophon took too much of a battering from the Camot and explodes!  She has a 4 MU blast radius.  It is enough to hit the Camot, HMS Archeron, and HMS Lancer!  The Lancer takes 1 hit and loses 1 armor and jams her rudder.  The Archeron avoids damage, but takes a friction point.  The Camot is also undamaged, but takes Friction point.  Ouch! 

Friction, the British have 1 and the French 5.  Both sides can easily clear it.  

For Damage, the Tourane fails to fix her powder issue on her Medium Batteries.  

Turn 6- Final Turn:  

Both sides score 1 command success, and the French maintain the initiative.  They decide to go first again.  

Move: 

The Camot finally slowly begins to change course to try and keep the British cruiser in her Broadside.  In response, the Archeron goes lower and tries to speed away. 

The French destroyers stay in formation with the Camot.  The HMS Medusa speeds up and falls into formation with the Archeron.  

The HMS Lancer has not rudder, so decides to drop to get below the Tourane.  Which they easily manage.  

The Tourane falls in with the Camot in a trailing and above escort position. 


Battle:

The Camot fires a parting Broadside at the trailing HMS Medusa and manages a hit to add insult to injury! 

The British do not bother returning fire and just try to high tail it away.

End: 

The HMS medusa loses 1 Hull armor to the parting shot.  Now all the British ships took damage from the encounter.  

Conclusion: 

French victory! The British failed to even dent the French battleship.

British lost 16 armor, with 2 ships exploding like fireworks! 

French lost 2 Armor on the Fantassin destroyer.  

Captain Aubre and the Camot made port at Tourane with no further incident.  The balance of power in the region had just been shifted with the arrival of the French Battleship.  The French Foreign Office did not even bother logging an official complaint since the engagement had been so one sides.  The single French sailor's death was written off as a training accident instead.  

For the British, the loss of the Bellerophon and Corsair were a more significant matter.  Captain Trilby was formally charged with dereliction of duty and summarily drummed out of the Royal Navy for his stunt.  It had cost the Royal Navy too dearly for the admiralty to do otherwise.  Meanwhile, the loss of the two air ships was listed as an accident in official records.  

The entire affair was brushed under the rug in an effort to cover up the reality.  Meanwhile, the British  admiralty began to lay plans to send their own battleships into the region to restore the balance of power in the South China Sea.  

I re-wrote this scenario to try and make it more competitive, but I didn't even get a chance to try the new victory conditions out.  The British got pasted!  A quick glance could make a person think that Battleships are overpowered!  However, a closer inspection reveals the truth.  

1. My opponent's ships were never up to the challenge.  The Duke of Edinburgh class of cruisers has a lot of Firepower dice, but their power is not high.  The Duke of Edinburgh class is way better at taking out other cruisers and escorts.  That was not how it got used.  

The only ship that could really scratch the Camot was the Bellerophon, once a point of armor got peeled off, the other ships could have easily piled on, but never peeling that first point off the French Battleship was the key.  

2. Poor flying.  The Bellerophon was never in a great position to try and get that first key hit.  This was due to a poorly timed turn and weak initial set-up.  My Skumgrod had planned to pivot and cross the T of my French squadron as it approached.  Then, the British propensity of guns could go to work.  They never successfully made the turn or crossed the T.  The way the line was initially formed put the far too weak light cruiser right in the French Battleship's path.  That was a receipt for disaster.  

3. My Skumgrod got bogged down in a duel with my Destroyers instead of using his Torpedoes to put Friction markers on the Camot.  This would have slowed her down, allowed for the crossing of her T, and disrupted her shooting.  The extra Point Defense offered by my Destroyers made him feel that torpedoes fired at the Camot would be a waste of time.  

4. My skumgrod let me get Broadsides to bear on his key ship when I could put a Fire for Effect Command on it.  Once the Bellerophon was out of the picture, he had no chance.  

5. Finally, my French commander was too good!  Combined with two escorts for extra command dice allowed me to dictate the flow of the battle.  His British commander was not good enough to consistently counter it in the mid and late game when he needed it.

So the battle really came down to poor strategic decisions, some poor tactical flying, and some bad luck.  After all, I blew up 2 British ships.  That requires a box cars damage roll.  Like I said a combination of factors made sure my Skumgrod did not get a chance to test the new Victory conditions for the Raiders scenario. 

Meanwhile, my strategy was simple.  I planned to motor across the board and drive a wedge through his forces.   Then I want to use the Descates cruiser to try and bracket the enemy cruisers and hit them on both sides.  I never really did a good job with the bracketing, but it all worked out for me in the end.   


You can follow Blood and Spectacles Facebook page for more fun: https://m.facebook.com/pg/BloodandSpectacles/posts/?ref=bookmarks&mt_nav=0

Or our website:

Or our Messageboard:

Or our Wargames Vault Page:

https://www.wargamevault.com/browse.php?keywords=blood+and+spectacles&x=0&y=0&author=&artist=&pfrom=&pto=