Showing posts with label Victrix. Show all posts

Monday, December 22, 2025

Men of Bronze- Italiotes


The information below is an extract from the Hercules Abroad supplement that can be found on the Wargame Vault.  This post has been sitting in my draft box for a long time, but as I have been working on the Carthaginian supplement Rise and Fall I might as well send it out into the wild now.  Merry Christmas!  

***********************************  

As we continue to expand the world of the Ancient Greeks, it is natural to expand westward into Magna Graecia.  This was a series of loosely affiliated Greek colonies located in Sicily and southern Italy.  This Diaspora was often attributed to the Greeks following in the footsteps of the "Journeys of Hercules".  This mythology was used to justify their expansion, colonization, and infringing on indigenous people's territory.  

We all ready have a list for Syracuse and the City-States of Sicily.  However, Magna Graecia had a vague definition and also included the Southern coastal regions of Italy.  These colonies existed before and during the rise of Rome on the Peninsula, and eventually were rivals to her growth.  The area of Southern Italy was ill suited for traditional Greek hoplite battle, so local variations were required in the military habits of the Greeks who found themselves there.  


This area began to see extensive Greek settlement in the 8th and 7th centuries BCE.  These colonists brought their Greek culture with them such as the idea of an independent City-state, religious traditions, and trade with their homeland.  These Hellenic cities became vital power houses in the region and began to fuse the native Italic cultures with Greek cultural practices as well.  

These Italic-Greek city-states eventually formed their own league for mutual support, trade, and protection against the neighboring Oscan tribes and other Greek rivals in 430 BCE.  This was known as the Italiote League and was controlled by the city of Tarentine in the late 5th century.  

How They Fought

As usual, nothing is known precisely about how the City-States of the Italiote League fought.  We can make some assumption based on how their founding city-states fought, and how rival Italic tribes fought as well.  In addition, there were some military trends in the Hellenistic World that would impact the Italiotes as well.     

Of course, the foundational unit of any Greek city-state army was going to be the Phalanx composed of the land-owning freemen farmers of the nearby lands.  They had the status to buy their own equipment and assemble for drill with their peers.  The Hoplite warriors in Magna Graecia was similar to their brothers elsewhere.  However, the terrain and conditions of Southern Italy were not conducive to the normal Hoplite tactics.  

Native Italic tribes tended to be lighter armored and more mobile than their Hoplite neighbors.  Hit-and-Run attacks and cattle raids were the de facto fighting style of the local tribes.  In this fighting style, speed, mobility, and lighter weapons were critical.  Distance fighting with Javelins was also a common feature.  

Therefore, the Greek colonists to the region needed to meet these needs of warfare.  To do so, Hoplites tended to avoid the use of the panoply and instead used a lighter, native garb that featured bronze pectoral armor plates in the front and rear.  In addition, their head ware tended to be open in the front allowing greater visibility and allow a greater field of vision.  Greaves were often reduced to a single leg or discarded to reduce weight and increase the soldiers ability to pursue or evade.  Indeed, the Hoplite of Italian Magna Graecia was a much lighter and nimbler foe than the heavily armed shock troops of the Greek Peninsula.    


In addition to the lighter hoplites the Italic Greeks made extensive use of Peltasts and Psiloi. These were used to supplement the infantry.  They could provide covering fire for the advance, or screen the other troops.  These were frequently mercenaries or poorer members of the city-state, much like Greece. The javelin was the favored missile weapon of the region.    

The Italiotes made great use of Light Cavalry.   These were designed as a skirmisher based force that utilized javelins and missile weapons, but also had small shields and curved swords for melee combat.  They were an excellent pursuit and scouting force.  This type of light cavalry was frequently referred to as Tarentine Cavalry, even though they were not necessarily native to the city of Tarentum.  It was in reference to the style of skirmish cavalry that was being referenced.  

The final element of an Italiote force would also be made up of Greek mercenaries.  These would fit the more standard Hoplite, heavy infantry role in an Italiote force.  They could form a solid core of heavy infantry.  

Italiote Army List

Armed with the information above, we can start to piece together an army list for the soldiers of the Italiote League or its member city-states.  The bulk of the infantry will most likely be composed of Light Hoplites to represent their lighter panoply and more mobile style of fighting.  This will be supplemented by good Peltast and Psiloi options as the Javelin was a popular weapon in Italian conflicts.

The Cavalry should be Light Cavalry, but the melee ability and skirmisher nature can not be discounted.  Therefore, I am going to add the following Option for the Tarentine Cavalry forces.  

Tarentine Cavalry - 8 Points

Move    Attack    Armor    Courage    Discipline

12BW    4            1            4                2

Shoot: 2 (6BW) 

Special: Evade, Pursue, Move and Shoot

This differentiates them from standard Greek Light Cavalry that focused more on skirmishing, missile fire, and pursuit.  Now, you have a Light Cavalry unit that had enough Melee capability to challenge other Light Cavalry, Peltasts, Warband Infantry, and Psiloi.  However, they are still no match for dedicated Heavy Cavalry, Elites, or Drilled units.  


Italiote Line of Battle

Use the following lists to build your historical forces for the Italiote League or other Itallic-Greek forces. The Lines of Battle help to choose the appropriate units for your historical forces. These are sample lists and there to provide a flavor of potential forces. Players can always modify these lists as they see fit

Each Line of Battle will have an entry with a number. The number indicates the limit of that Unit you can take in the army. If an entry says 1+ your army must have at least one of these units in it. If it is 0+ any number of that unit may be taken. If a Unit is not on the list, it can not be chosen.

Italiotes

1+ Light Hoplites

0+ Peltasts

0-4 Psiloi

0-4 Tarentine or Cavalry

0-1 Drilled Hoplites

0-1 Archers/Slingers

The list above gives access to regular Light Cavalry or you can use the upgraded Tarentine Cavalry provided in the rules.  In addition, the bulk of the force will be Light Hoplites to match the subtle differences between mainland Greece and their Italic colonies on the table.  

Sample Army Lists

Below you can see an example force for the Italiote Greek City-States.  It is built to the 38 point standard and is composed of 6 units.  

2 Light Hoplites

2 Tarentine Cavalry

1 Peltast

1 Psiloi 


Battle of the Elloporus

Most of the warfare of the Italiote League was between fellow Greek City-states and the nearby Latin, Oscan, and Samnite tribes.  However, the threat from Sicily by the Tyrant Dionysus I was a primary concern.  Some scholars speculate that the rise of Dionysus the I of Syracuse was the prime motivation for creating the Italiote League.  Therefore, eventually the rivalry between Syracuse and the Italiote League would come to a head.  This inevitable clash happened in 389 BCE.  

Unsurprisingly, we know little of the actual events of the battle.  We know that it was fought, and that Syracuse won the battle.  The armies were probably in the 15 to 25K range on both sides.  Sources also indicate the battle was fought in the toe of Italy near the Stilaro River.  That pretty much summarizes what little we know of the battle.  

To put it in perspective, this battle took place during the 3rd Sicilian War.  In the same year, the Spartan King Aegislaus II was crossing the Gulf of Corinth to attack the Arcananians.  Athens is getting involved with Rhodes and taking control of the Hellespont under the command of Thrasybulus.  Military activity across Greece and Sicily was common during this time period.    

Of course, situations like these allow for a wargame to fill in the blanks.  We don't know much about the battle strategy, tactics, or terrain.  We also know next to nothing about the forces involved.  Therefore, whatever we choose to do is as accurate as anyone else chooses to do! 

Forces

For this battle, we will be using the Syracuse list and the Italiote League Lists.  Neither of these can be found in the Men of Bronze rulebook itself.  Both lists can be found in the Hercules Abroad supplement on the Wargame Vault.

Italiote League    

2 Light Hoplites

2 Tarentine Cavalry

1 Peltast

1 Psiloi 

Syracuse of Dionysus I

2 Militia Hoplites

1 Cavalry

2 Archers

1 Peltast

Since we know nothing about this battle, we can safely use any lists we want.  I have opted to use the sample Lines of Battle provided for both forces up to 38 points.  

Set-up

We know so little about the Battle of Elleporus, that it seems like just about ANY scenario from the main Men of Bronze rulebook could be used.  However, I feel that the Set Piece Battle scenario maybe the best and safest option.  

The game should take place on a 72 BW by 48 BW board.  The only set feature would be a river traveling along one flank of the battle, probably with the deepest edge being no more than 8 BW in from either short edge.  This could be Difficult, Dangerous, or Impassable terrain depending on how restricting you want the terrain to be.  After placing the river,  I would recommend deploying terrain in the remaining sections of the board and rolling for complications as normal.  The Set-Piece Battle scenario should be a good guide.  

Special Rules

Again, since we know so little about the battle, its prelude, and what occurred we can use any complications that we wish!  No special rules are needed for this battle and the normal process for generating Complications should be sufficient. 

Victory

Again, we know so little that special Victory conditions do not seem to be necessary.  Instead, the Victory Conditions for a Set-Piece Battle should be sufficient.  

However, feel free to add any spice you want to the battle.  For example, the Italiotes could be trying to kill Dionysus I once and for all, and their Victory Condition could be routing the Unit he is in.  If successful, the Italiote wins.  If Dionysus I unit is not routed, then the Syracusans win.  Your choice really! 


Final Thoughts

The Italiote Greek City-States act as an interesting bridge between the world of the Romans and the world of the Greeks.  Since the Italic-Greek City-States began their life in the 8th and 7th Centuries that leaves a lot of time for them to clash with their fellow Greeks such as Athenian Marines or colonists new to the region.  They can also clash with the Barbarian tribe lists, or some of the lists from Hercules Abroad such as the Carthaginians, Syracusan/Sicilian Greeks, or the Etruscans.  There are always no shortage of opponents to fight in the ancient world! 

I think I am starting to wrap-up the world of the Greeks for Men of Bronze.  I have covered a variety of different regions and cultures far beyond Mainland Greece now.  The full list can be found below.  If I go too much further and deeper, I will be into the Roman period which will be covered in Osprey's  Wars of the RepublicNo need to to do that, since it is fully compatible with Men of Bronze

You can get all of the updated materials including a FAQ, Campaign rules, and Lines-of-Battle in the Men of Bronze Supplement: Hercules Abroad.


You can follow Blood and Spectacles Facebook page for more fun: https://m.facebook.com/pg/BloodandSpectacles/posts/?ref=bookmarks&mt_nav=0

Or our website:

Or our Messageboard:

Or our Wargames Vault Page:


Monday, June 2, 2025

Wargame Design: Odin's Ravens: Viking Age Bad Boys


You know what really speeds up the wargame design process?  Two things: 

1. Having an existing set of rules to build off

2. Having the miniatures for photos in your collection

Both of those details can be the difference between finishing a game in 1-3 years, versus finishing in 5 years.  For me, post-production is the longest part.  That is where those two points really help out.  Post-production involves making sure the game works as intended and getting all the parts to publish together.  Those parts take the longest amount of time in the whole process.  

If you all ready have a set of rules to work off of, then you know the game mostly works.  It really speeds up the process if you don't have to test the 4Ms, just the chrome.  You probably recall the Play-testing process, well building off an existing game cuts the first couple layers of play-testing off.  

The second point is self-explanatory.  Most miniature wargamers have a pile of shame they are painting through.  Buying, building, and painting models takes times and money.  If you all ready have the models in your collection then you can go straight to the photography stage, that alone can save a year in the production pipeline!  

So, that brings us to today's game: 


Odin's Ravens is a model-vs-model skirmish game with a narrative campaign element added to it. As the sub-title implies the game is focused on Norse warbands with a Hero, a Second, and up to 8 other soldiers.  The game can be played as a straight historical game, or with mythological elements added into it.  

Like all my games, Odin's Ravens is scale and model agnostic.  I did this by using generic measurement units with no fixed scale.  This way it works with 15mm, 28mm, 54mm, or other scales.  All models are individually based because this is a model-vs-model game.  There is no fixed time or ground scale, as is my design preference.  The game can be played on just about any playing surface thanks to the adjustable size of an MU, but typically plays on a 36-48MU square.     

This game can be played as a Versus game, Solo, or Co-op.  There is a simple Narrative Campaign added so warbands can evolve and grow based on your Heroes Legend.  There is myth magic, mythological monsters you can fight, mythical gear to find, and several special solo/co-op only scenarios.  

Taking on a troll

The game is trying to answer the problem of Melee Yahtzee and how to add Tactical Gameplay to a melee heavy game.  In addition, it is trying to capture the idea of Heroes being heroic and special, but not game breakers.  These are all tough needles to thread.  So, how does this game do it?  

Here are a couple key features of gameplay to keep in mind: 

  1. It uses facing as a tactical component to gameplay
  2. Outnumbering plays a critical roll in combat
  3. Winning a combat can do more than just causing damage, sometimes causing damage is not the best option so you have to decide what to do
  4. Melee does not lock you, as there are several ways to escape melee
  5. Heroes have more dice and activations than soldiers    
In addition, there are about 6 Versus scenarios, and 6 different methods for deployment and 3 special Solo/Co-op scenarios.  This gives the game a lot of replayability with different tactical set-ups.  In addition, Heroes, Seconds, and Soldiers can also have a variety of set load-outs.  Each hero also has a special ability granted by his god to make him a worthy hero to follow.    

A hero and his loyal warband of followers

The astute observer will notice something right away.  This is not a new game!  It is a reskin of my popular Greek Mythology game; Homer's Heroes: Bronze Age Bad Boys.  The core gameplay is the same and uses the same core mechanics.  The Chrome has been modified to fit a Norse setting.  For example, chariots have been removed from the game.  Instead, I have replaced it with the chance to have a mounted soldier, Hero, or Second and updated the Mounted rules accordingly.  I have also changed some of the weapons and load-outs to better match Viking warfare compared to Greek Homeric combat.  

Most of the miniatures in the book came from my existing collection.  Thanks to my Viking Age rules Fury of the Northman; I have a decent sized selection of Vikings and Dark Age warriors to choose my Odin's Ravens from.  My monsters came from my rather larger selection of HeroQuest and Reaper models.  That made post-production on these rules a snap!  

When I started the year, this game was not even on my radar.  I had toyed around with some expansions of the Homer's Heroes concepts, but it wasn't until early this year when I started working on this particular version of the game.  Maybe I will expand the core game further into new periods and eras?  Got any suggestions?  

Final Thoughts

The first step to being a game designer is to create your game and get it out there for others.  From there, they get easier and easier.  The first one is the hardest because you are building it all from scratch.  Once you have the first, you have a set of templates to build your next one.  

To get more games to market, it is easiest if you: 

1. Build off of your existing designs

2. Use miniatures and art you all ready have in your collection

The more games you make, the easier it gets to make more of them!      

If you like Vikings, you like Skirmish games, or you like Homer's Heroes: Bronze Age Bad Boys then you will probably enjoy recreating the Norse epics and sagas with this game.  You can find Odin's Ravens now on Bloodandspectacles.com.  


Become a Patron and get access to all the cool stuff, a peak behind the curtain of Blood and Spectacles, and early-access to playtest games!  


You can follow Blood and Spectacles Facebook page or Instagram for more fun! 

Check out the latest publications and contact me at our Blood and Spectacles website

Or purchase all out games at the Blood and Spectacles Publishing Wargames Vault Page!    


Monday, March 10, 2025

On The Painting Desk: Anglo-Saxons are Back on the Menu!


Last year, I picked up an Anglo-saxon army from Victrix using a combination of Late Anglo-saxon, Early Anglo-saxon, and Dark Age Archers ranges.  I started by painting up the Anglo-saxon shield wall infantry.  I left off the process here: 


 I still had to do the finishing touches on these troops.  They needed a good basing and their shields done up.  One thing about shields, is it is almost like painting up another miniature!  So much of the attention will be taken up by the shields!  

Therefore, I decided to start off phase II by doing the bases!  This is a simple coat of Territorial Beige of cheap big, box acrylics.  Then, when the paint is still wet, I sprinkle in some lichen for some ground cover.  Nothing fancy and all easily sourced at your local Big Box retailer.  With bases these little plastic dudes look like this.  


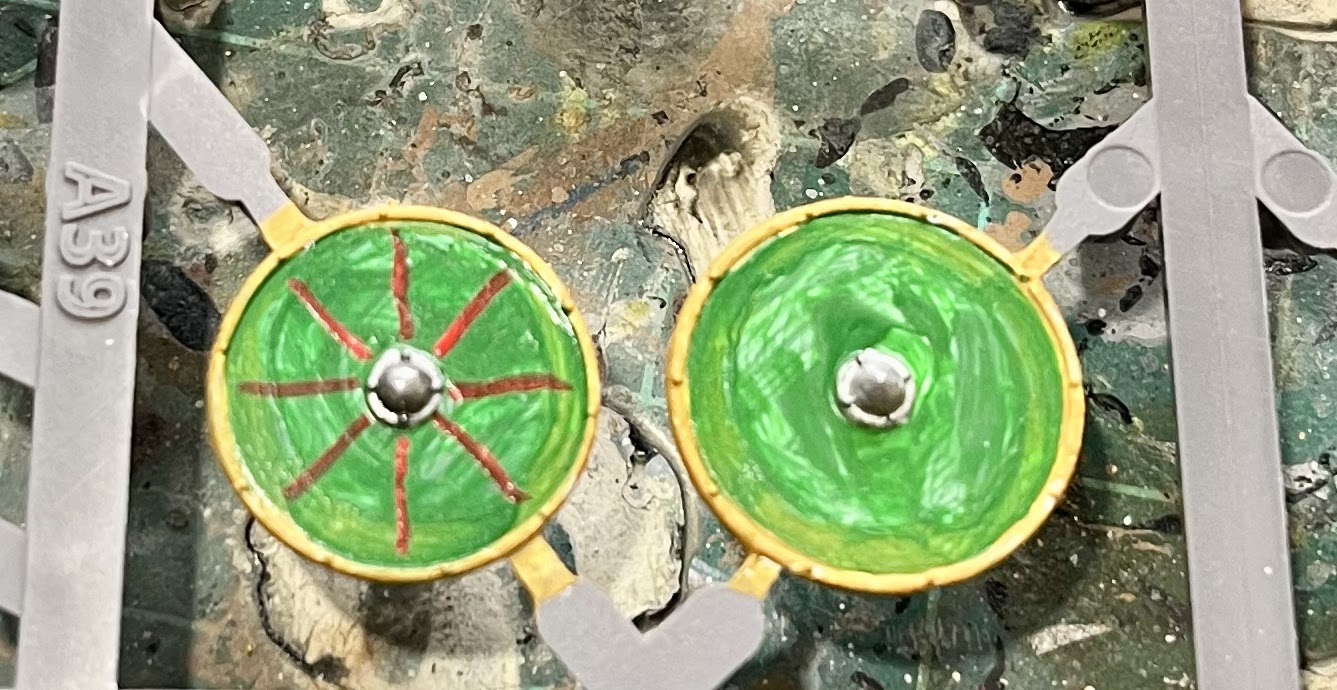
That led me to the shields.  The bloody shields.  I paint all my shields on the sprue to start with.  I find them much easier to manipulate this way.  I undercoated them with a cheap acrylic white.  Then, I start by batch painting them with some sort of wooden color like Fur Brown, Bestial Brown, Oaken wood, Desert Yellow, and Skeleton Bone.  This gives them their wooden base and frames.  From there, I give them an initial coat of white, green, blue or red.  This often takes two coats for good coverage.  Then, I paint their metal boss a metallic color.


Now comes the hard part.  Vikings shields, and Anglo-Saxon shields, tend to have quartered or other similar designs.  Those are not easy to free hand, but I am going to give it a shot.  I have done it before, and I will do it again.  Here is a quick tutorial on how to do basic Dark Age shield designs.  

First, you paint 4 to 8 lines on the face of the shield in the alternate color.  It reminds me of slicing a pie or pizza.  Yum.  Shields from the period tended to be whole colors, halved, quartered, and in eighths.  

Second, you fill in the tops and bottoms of the wedges in alternating pieces of the pie.  This informs which wedges you are going to fill in. 

Lastly, you just put paint in the wedge where it belongs.  Ta-da!  Now it is time to go eat some pie!  Only 39 more to go! 


Once you have painted all the designs, the bosses are done, and the frames are all blocked you take the final and most important step.  You slather in a Strong Tone wash to help cover up all your sins and lack of coverage!

Finally, you remove them from the sprue and attach them to the models.  Fun fact about Viking and round shields from this period is that they were carried in one-hand and had no supporting straps.  That means they were not worn on the forearm like the Kite shield.  They were held out in front in a single fist along the center axis of the shield.  They were also rather light weight and mostly protection against missile weapons unless they were overlapped for extra strength.  This allowed for a variety of tactics for individual shield usage but also shields overlapped with others reinforced and strengthen each shield for a shield wall, while keep each individual shield light and easy to carry.  They were also often slung on the back when two hands needed to be free.  

The Fyrd all ready to fight! 

 
The Earl Eirkir and his noble Thegns

On the models you can see how the shields were held-out in the fist, as opposed to strapped on the arm.  If you try the arm mounting, no one would have their shield in the proper position for fighting!  

That finishes up the shield wall infantry for my Anglo-saxon force.  40 guys batch painted.  The shields are almost like painting another half dude!  The Fyrd were all from Victrix's Early Saxon box, while the Thegns were from the late Anglo-Saxon kit.  I figured the bosses would have the best, most modern gear while the Fyrd maybe not so much. 

This army still needs 20 skirmishers and 30 archers before I call it done.  This will give me more than enough units to mix and match a bit to take on Erik Greybeard and his Viking raiders or King Errc and his Dark Age Irish using Fury of the Northman.  

Here is the infantry out on the table, formed up for battle.  


   Until next time! 


Become a Patron and get access to all the cool stuff, a peak behind the curtain of Blood and Spectacles, and early-access to playtest games!  


You can follow Blood and Spectacles Facebook page or Instagram for more fun! 

Check out the latest publications and contact me at our Blood and Spectacles website

Or purchase all out games at the Blood and Spectacles Publishing Wargames Vault Page!    


Monday, February 24, 2025

On The Painting Desk: Anglo-Saxon Shieldwall for Fury of the Northman


The first big painting project of 2025.  I am working on an Anglo-Saxon army for Fury of the Northman.  I picked up the miniatures for it in 2024 but did not get the time to work on it back then.  However, it is winter time and there is no better time to paint a big project than now.  I am using a combination of Victrix kits, the Late Anglo-Saxons, the Early Anglo-Saxons, and the Dark Age Archers kit for this army.  The army will look like this: 

  • 1 Unit of Shieldwall Nobles as Thegns from the Late Anglo-Saxon kits
  • 3 Units of Shieldwall Militia as Fyrd from the Early Anglo-Saxon kits
  • 2 Units of skirmishers/irregulars from a mix of Early and Late Anglo-Saxon kits
  • 3 Units of Archers from the Dark Age Archer kits
That is enough for an army plus some swappable extras to play against my Dark Age Irish and my Viking force.  That will allow a pretty decent campaign mix.  Still thinking about a Muslim army for this period too. 


I decided to get started on the Shieldwall infantry first.  That is the heart of most armies in the Viking Age isn't it?  Well...... no..... but it is for this one!  I have been spoiled by all those Heroquest models because I forgot what a pain it is to actually assemble your models!  That really slowed me down.  However, I soon had the 40 shieldwall models all assembled and put on washers.  Then, before painting I of course gave them an undercoat of Grey Seer.  

Before I got started, I decided I was NOT going to be using Speedpaints on these guys.  All of my other Historical models I use the base coat and a wash method.  So these fit in, I decided I wanted to do the same with this army.  Therefore, after spray undercoating it was time to start batch painting.  

Here is a quick look at my batch painting technique.  I have obviously batch painted a few armies in my time, so I think I have a decent technique down for it.  First thing I do, is paint all of their flesh and all of their shoes/boots.  I typically use three different colors for their footwear.  


From there, I start painting from the lowest layer up.  Typically, that is the pants!  I decide on the various colors of pants I want, then I start to break them up into smaller groups, so that each unit will only have one or two guys with the same color pants.  


I then, do the same thing with the next layer.  In this case, it was going to be the leggings.  I typically use the same colors I just make sure a guy with that color pants doesn't get the same color leggings.  I then make one last mix up for their tunics.  I tend to do the same thing but with fewer colors and larger batches for all the colors as I move up the model, so belts, hafts, armor/helms, etc.  You may have also noticed that I keep all the shields off, I paint those on the sprue separately and add them just before basing.  

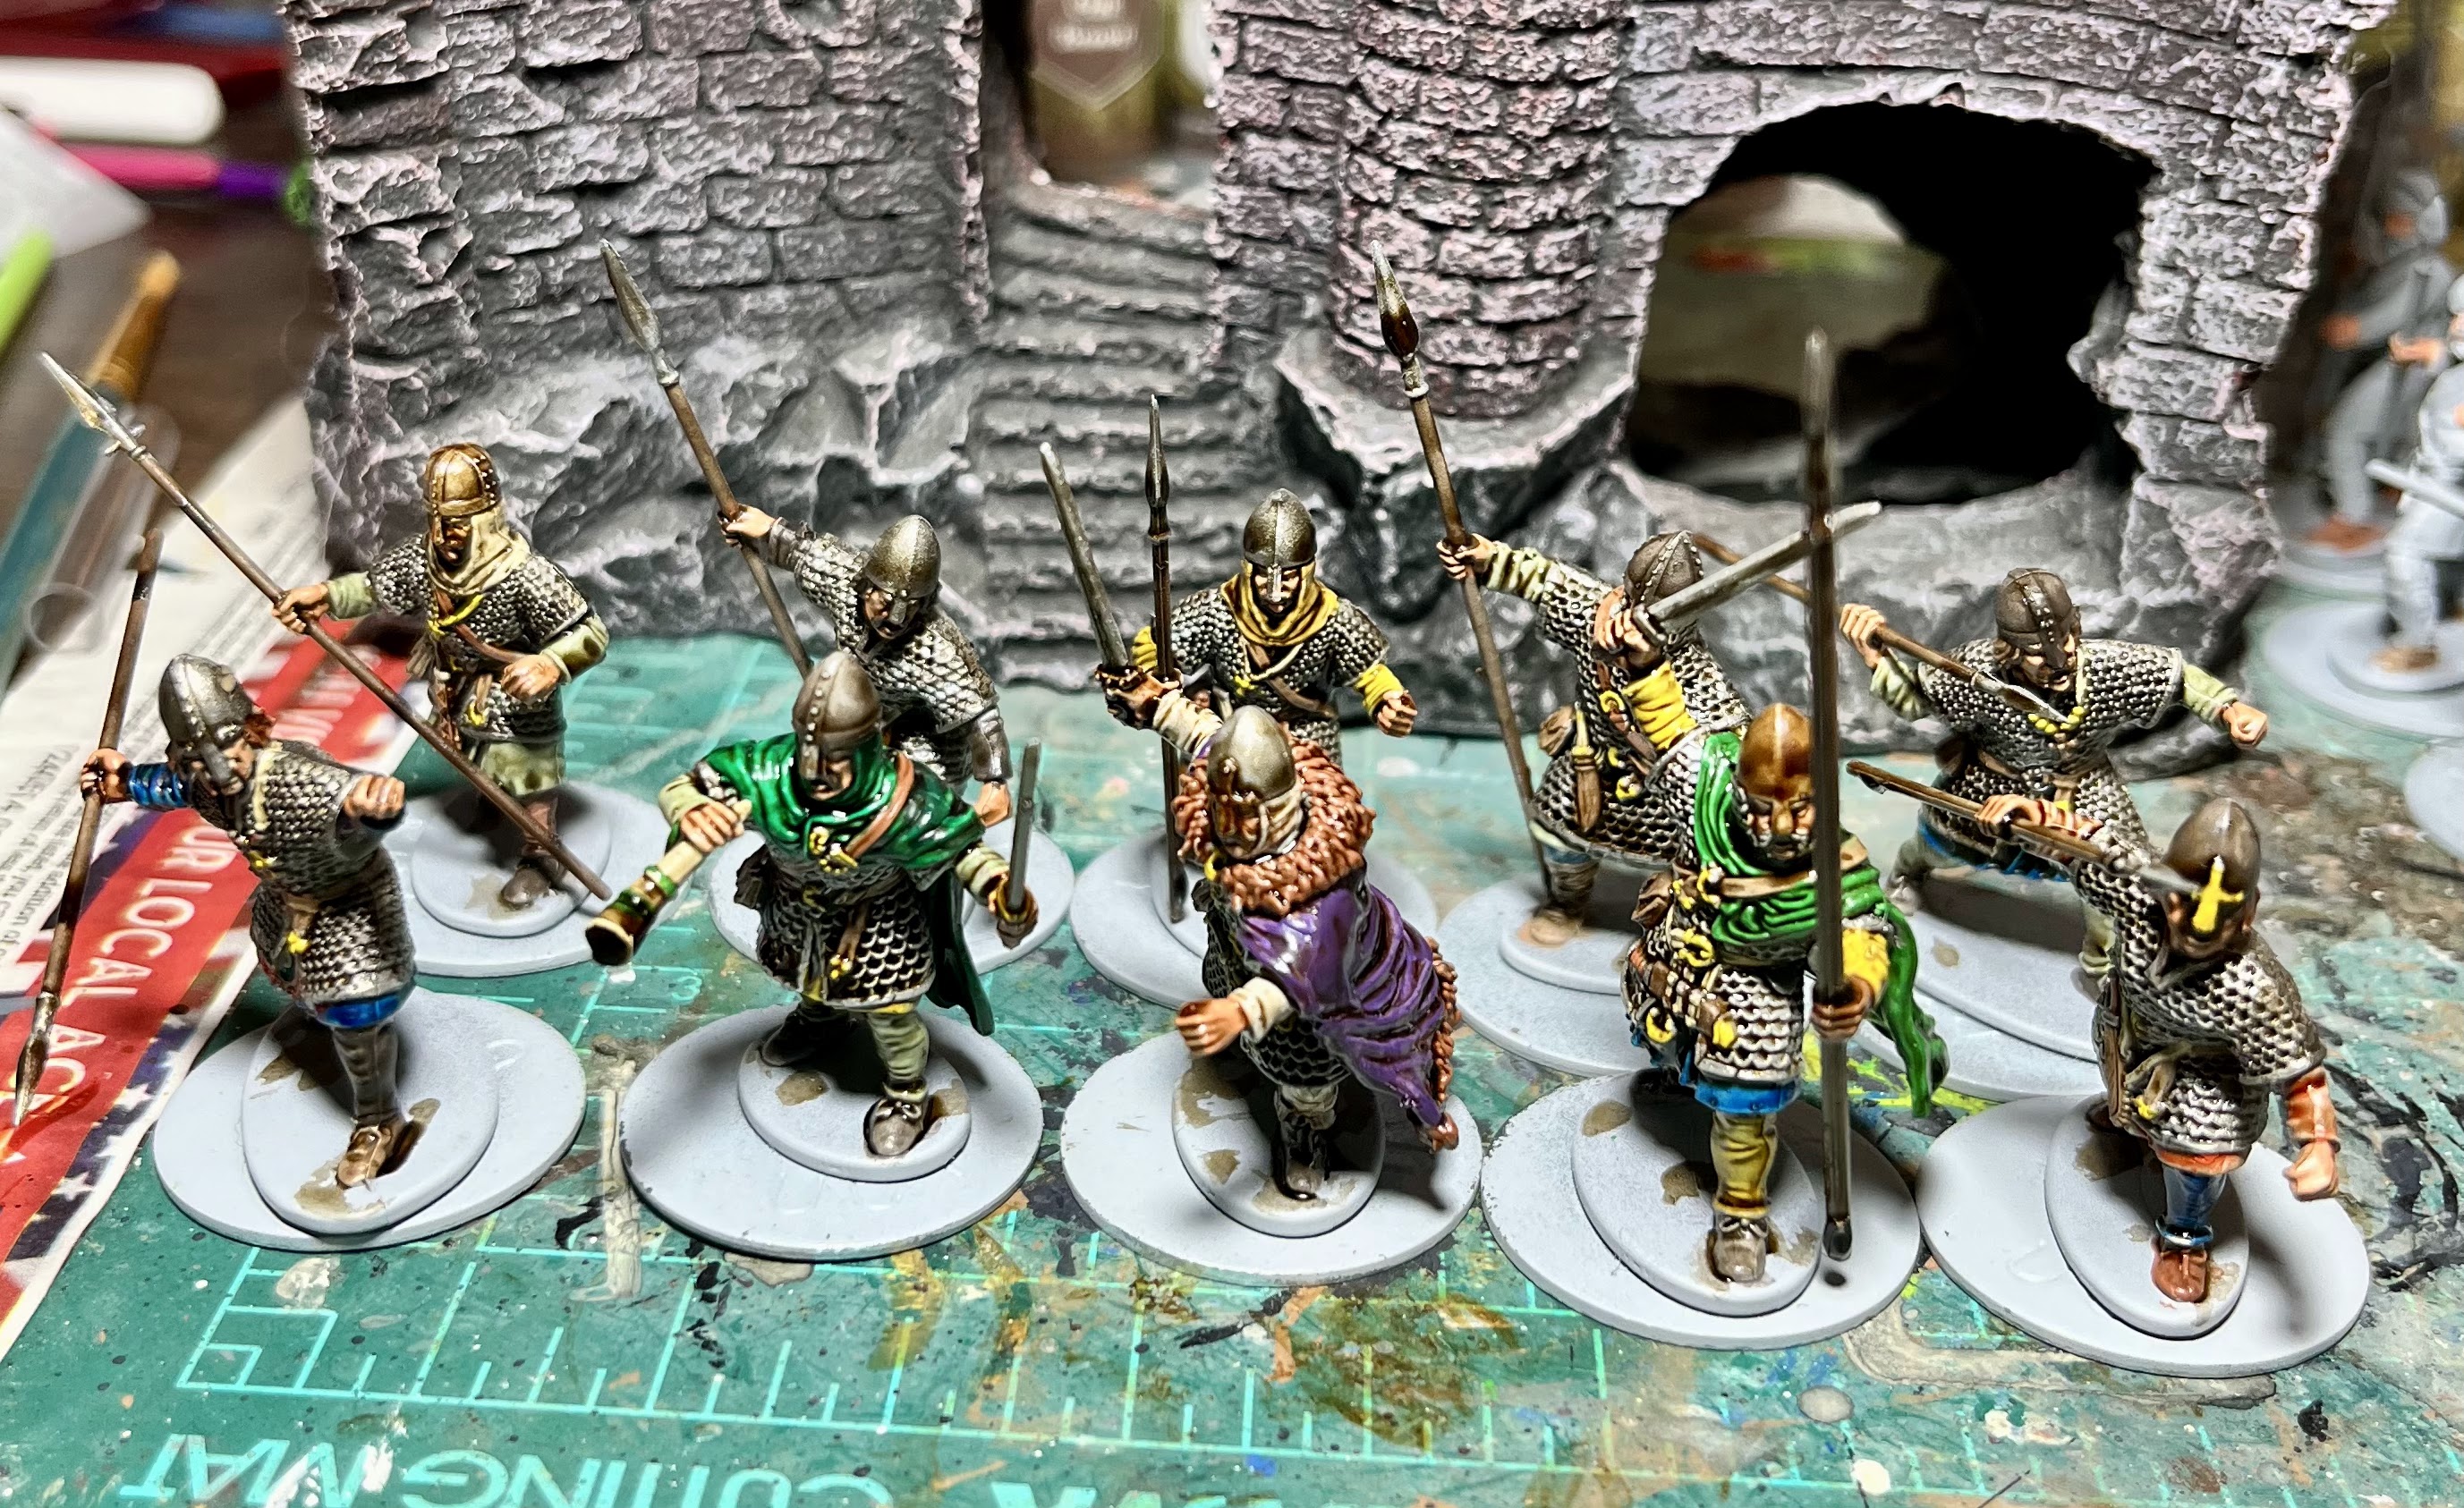
Of course, I got a bit impatient and spent some time away from the Fyrd, and focused on the Thegns and got them done the fastest of all the Shieldwall infantry..... woops......


All that chainmail was just begging for me to finish it off.  Afterall, they look so... unfinished... in all that gun metal and polished silver.  I couldn't let that stand!  I finished the base colors with a nice coat of Strong Tone wash. The guy in the purple cloak is supposed to be my Earl.  I like to give my officers purple..... it is a hang-over from my ancients painting.  Any excuse to use purple am I right!  Like the Fyrd, I will be painting the shields and adding them last.  

With a small hit of Dopamine to help me get to the end, I went back to working on batch painting the Fyrd with my tried and true method.  I mean, it is only 30 of them right!  The biggest "batch" to batch painting with these guys will be their tunics.  I mean, these look super comfy and I am hoping one day they come back in style!  It is basically a really long and flowing shirt belted around the hips?  I would wear that.  


Look, it's the Power Rangers: Dark Ages!  Go, go Power Rangers!  Here the Fyrd are about half finished.  From here, it is about painting up the belts, pouches and gear that they are all wearing.  This is mostly Skeleton Bone, Dessert Yellow, Leather Brown, and Fur Brown.  Again, each model typically uses two different gear colors to mix it up.  Since I use those colors on their tunics (or are they tabards?) you have to make sure you don't make the belt and gear the same color as the clothing.  Easy to do when batch painting.  

It is always amazing to me how "finished" a model becomes when you paint their weapons.  I could have a full unit painted, but not their weapons and it would look like I still had a ton left to do!  Since they are spears, I mixed it up with different colors on the hafts using the same colors as their belts.  Then, I painted up all the metal, including helmets, buckles, spear points with a variety of Plate Mail, Gun Metal, Bronze, and a few Metallic Speedpaints for variety.  Once again, hair color was one of my favorite parts using a some yellow, and orange, but mostly ash grey, dark stone, fur brown, and monster brown.  The base colors were all in place! 


The last step to finishing the basics on these guys was a nice Strong Tone wash using my Armypainter washes.  The Strong Tone is black based and it works well with Chain Mail and armored minis.  These guys are not wearing chain, but I used it on the Nobles.  I felt like if I switched to a Light or Soft Tone they would not blend in as well.  Those tones are sepia based.  So, with some trepidation I hit them with the Strong Tone......


Oh yeah, that darkened them up.  However the blend in pretty good with the leader squad.  The only left to do is to base them and get their shields painted.  Man, I hate painting shields, but especially Dark Age shields.  You can see how it went last time with my Vikings, but you will have to see how these turn out.  

Painting these 40 guys to this level took me about 4 days of work, spread over a couple weeks of time, a few colors here and there.  I rarely get to just sit down and paint for 3 days straight!  Most of my painting projects I pack up in between sessions, but these guys just sat on the desk and waited pateintly.  I do not think I would enjoy just sitting down and painting all day!  I tend to do a color or two, get up, do something else for a bit, and then come back to it.  

Next up, I will go over the shields and start in on the Skirmishers and Archers.  Probably another batch of 30-50 guys.  Until next time! 

Bonus Content! 

I managed to go down and play some of the new edition of Kill Team with the True Crit Gaming Guild.  I took the Hand of the Archon out to play since it had an actual Kill Team box and I hoped the rules were still current.  No idea still, but my opponent was nice enough to let me use what I had.  


I honestly only picked up on a few differences compared to the last edition.  Of course, the missions changed, some of the keyword rules changes a bit, assets changed, and the way Conceal/Engage worked changed a bit.  They also ditched the stupid shapes instead of numbers thing.  However, it seemed to play pretty much the same after that.  However, it is also possible that I never knew the old rules well enough to notice the differences!  


This was a classic battle of dwarves vs. elves, as my friend took the new League of Votann Scavengers for their list.  I couldn't tell you too much about them, except they seemed to be a close ranged team.  They had shotguns and a lot of pistols and CC dudes.  I had them pretty well shot up, and managed to out flank them.  We scored points by being in the enemy control zones and deployment zones.  They had some resourceful tricks, but ultimately the Dark Eldar were nastier this time.  


I saw the Hivestorm box at the store, but ultimately I doubt I will pick it up unless I come into some sort of windfall.  I really do not need two new Kill Teams when I all ready have more than I will probably use!  Plus, I am not sure the rules changes are enough where I feel like I need the update to the newest edition in order to keep engaging with it on a casual level.  

Until next time!  


Become a Patron and get access to all the cool stuff, a peak behind the curtain of Blood and Spectacles, and early-access to playtest games!  


You can follow Blood and Spectacles Facebook page or Instagram for more fun! 

Check out the latest publications and contact me at our Blood and Spectacles website

Or purchase all out games at the Blood and Spectacles Publishing Wargames Vault Page!        


Monday, January 13, 2025

Wargame Design: The Corinthian War - Men of Bronze Supplement


Find the new supplement here!

Honestly, this was really unexpected.  One day, I was thinking about the trouble I was having moving some games forward.  I was having challenges getting words on the page.  I kept hitting internal road blocks, despite working my usual system.  I was getting frustrated, and my output was suffering.  

I am not even sure what happened, but I decided I needed to pivot.  What I was doing was not working.  I don't even recall the conscious thoughts that led to this supplement for Men of Bronze/Wars of the Republic to happen, but once I pivoted and started working on it..... well..... it poured itself onto the page in a matter of days.  This was not on my "To Do" list at the end of last year, so to see it now is a surprise to me as it is to anyone else.  Writing can be weird sometimes.


What is it?

The Corinthian War is a supplement for use with Men of Bronze/Wars of the Republic that were published as part of the Osprey Wargaming Series of games.  This is the 4th supplement I have done for those rules the others being: 

This one focuses on the historical Greek campaign known as The Corinthian War.  This took place about 10 years after the end of the Peloponnesian War, and after the famous March of the Ten Thousand.  The details of the Corinthian War are documents by Xenophon in his work Hellenica.  There is also additional material in Plutarch's Lives and the works of Diodorus Siculus.  

The supplement focuses on re-creating the historical battles of The Corinthian War on the tabletop.  In this way, it is similar to The Ionian Revolt supplement.  Like  The Ionian Revolt this campaign was a combined arms, Land and Sea affair.  It involved a variety of Greek City-States backed by Persia in overthrowing the military power of Sparta.  Therefore, it had a wide cast of interesting characters, unit types, and miniatures that I could use from my collection.  The campaign also had traditional big hoplite battles, ambush actions, raids, and a variety of scenarios to make wargaming it a blast!   


What is in it?    

This supplement is a condensed work of about 25 pages.  This includes the following: 

  • A Brief History
  • Some Line of Battle modifications
  • The main Campaign
  • Optional campaign scenarios
Total there are about 10 scenarios and a very brief way to score the campaign for a result.  This includes a Naval battle scenario, a Coastal Raid scenario, a Strong Point scenario, and some more traditional scenarios.  The Line of Battle modifications add Freed Helots and Athenian Marines as unit types that did not really exist before.  Spartan King Agesilaus II gets his own Line of Battle as well.  

Artwork has a few miniatures that I have painted from Victrix, some cool artifacts from the period, and a snazzy map!  


Where do I get it? 

Of course, you will want a copy of Men of Bronze/Wars of the Republic first.  You can get those wherever Osprey Books are sold.  

If you happen to be one of my Patrons on Patreon, you all ready have it!  I provided it to all my paying Patrons back in December as an early Christmas gift.

If you aren't a Patron (Tsk, tsk!) then you can get it now on my Blood and Spectacles Wargame Vault page.  

Thank you for your support!  I put all the profits I make back into the business of wargaming!  That means more wargames, more RPGs, and more content for you to enjoy on my blog, Social Media feeds, and my Patreon.      

Find the new supplement here!    

Until next time! 


Become a Patron and get access to all the cool stuff, a peak behind the curtain of Blood and Spectacles, and early-access to playtest games!  


You can follow Blood and Spectacles Facebook page or Instagram for more fun! 

Check out the latest publications and contact me at our Blood and Spectacles website

Or purchase all out games at the Blood and Spectacles Publishing Wargames Vault Page!                


Monday, March 11, 2024

Battle Report: Fury of the Northman - Looting and Pillaging in Hibernia


Greetings faithful readers, and welcome to another Fury of the Northman battle report.  Erik Greybeard and his Victrix Vikings are once again facing off against King Ercc of the Wargames Atlantic Dark Age Irish.  

Mission:
The Vikings will be the attackers as they use the Loot and Pillage scenario against the Irish.  They will be attacking as Dusk Approaches as the complication. 

Forces: 
Since this will be a Loot and Pillage, the Vikings are allowed 10% more points then their Irish foes.  

Erik Greybeard's Vikings:
Nobles
- Shieldwall
- Boar's Head 

Warriors

Warriors
- Shieldwall

Militia
- Shieldwall

Skirmishers


King Ercc:
Warriors
- Heedless Charge
- Throwing Spears

Warband
- Heedless Charge
-Throwing Spears

Skirmishers
- Throwing Spears

Skirmishers
-Throwing Spears

Slingers
-Skirmishers

Slingers
- Skirmisher


Set-up:
Today we are using a 72MU by 48MU board.  1 MU is equal to 1 inch.  

Terrain is set-up per the rules found in the main Fury of the Northman rules and the objectives were set-up using the method outlined in the scenario. 

Square 1-3 is the Viking side, while side 4-6 is the Irish side of the board. 
  • Square 1 = Hill
  • Square 2 = Grove
  • Square 3 = 2- level hill
  • Square 4= Hill
  • Square 5 = Hill
  • Square 6 = Stone walls
Viking deployment

You can see the objectives, spread out in the form of piles of crates/chests or cattle.  They are just outside the Irish deployment zones. 

Irish deployment

I am going to break this report into three broad categories; Maneuver phase, Combat phase, and the End Phase.  I will not be detailing each move and action in detail, but try to cover key moments and decisive points of the battle in each phase.  

Maneuver Phase

Neither side was focused on subtlety or sneaking tricks.  The Irish moved up aggressively to grab their objectives, while Greybeard's Vikings pushed ahead as fast as they could.  


On the Viking side, Erik Greybeard led the attack with his nobles aiming for the center of the Irish lines and the cow on the hill.  It seemed to be only lightly protected by Skirmishers.  Once the Irish had their objectives, they took up defensive positions on hills and within their village.  They seemed content to let the Vikings come to them and were in strong positions, with good fields of fire with their slingers.  


Sensing a trap, the Viking Warriors with Shieldwall formed up.  They saw Irish Slingers lurking about the edges of a forested hill.  This slowed their advance on the Irish farming hamlet. 


Their caution was sensible, as the wily Irish popped out of cover and pelted Erik and his retinue recklessly charging across open ground.  First blood to the Irish as their slingers pelt the oncoming war chief with rocks and reduce them 1 courage.  

As we head into the 4th turn, the field looks like this: 


The Irish right has the Warriors and King Ercc ensconced in the hamlet, protecting two objectives.  The Viking militia and shieldwall oppose them.  The center has the Viking command leading the charge supported by their skirmishers, and their other warrior unit on the flank.  The Irish Slingers have stepped out to launch their attack, but they are exposed.  Behind them, the Skirmishers protect two objectives and the last Slinger unit protects an objective safely up on the top of a two-tiered hill.

Battle Phase
The Irish slingers in the center pepper Greybeard's Nobles with more sling stones.  Fed up, Greybeard and his Nobles charge forward!  However, the Irish fade back from them, leaving them disordered.  The Shieldwall followed their leaders lead, and also ends up tired and disorganized after failing to connect.  Meanwhile, the Irish try to fade away from the Viking assault.


King Ercc sees the spent Vikings ahead of him, and decides now is the time to send the invaders packing.  He charges forward heedlessly with his warriors, throwing their spears as they get stuck in!  The Irish king manages to push the Viking warriors back.  


However, the Vikings ferocity allows them to steal the initiative again, and they continue to push forward.  The Warriors on the Viking right manage to get to their objective, as the Irish skirmishers fade away from their assault.  In the center, Greybeard continues to pursue the Slingers but still can not catch them!  On the left, the Militia march into the Irish village in their shieldwall, daring the Irish to attack.      
Dusk begins to set-in, but the fighting continues to rage.   

The Irish slingers fire up-close and personal on the Viking nobles and continue to sap their courage.  However, the Nobles have gotten too close and crash into the Irish slingers this time.  They easily slaughter the Irish. Meanwhile, the Viking Warriors fight with King Ercc to a stalemate, but the Vikings are on the edge of collapse.  The other Viking warriors get to the loot the Irish were hiding, but fail to find anything of value.   

Irish skirmishers descend form the hills shouting war cries and throwing their spears.  It is too much for Erik Greybeard, and they turn to flee the battle field.  Those damned Irish seem to be everywhere, shooting and throwing spears at them!  


End Phase
The Sun was setting quickly now and it would soon be dark.  

King Ercc managed to drive off the Viking warriors he was fighting with.  However, behind him the Militia managed to loot some cattle.  


Viking skirmishers and warriors make a last ditch attack on the hill in the center, defended by Irish Skirmishers.  However, they are pushed back and the attack repelled, keeping the Irish loot safe.  


With that, the Viking straggle back into the night, their Raid complete. 

Conclusion
The Vikings managed to score and maintain 1 Loot marker for the battle!  They got to a second, but found nothing.  Routed units, the Vikings scored 4 from the Slingers, and the Irish scored 22 from the Viking units!  Wow, losing the Nobles and the Warriors was a big deal!      

Final Scores: 
Irish: 18
Vikings: -14!  

Looks like the Irish manage to win the follow-up encounter.  Their Fabian tactics worked much better in this scenario than the Cattle Raid.  If we reversed the Attacker/Defender I think the Irish would be hard pressed to prevail!   

Erik Greybeard tried to greet his warriors as they slunk back into camp that night.  They were tired, dirty, and hungry.  They grumbled muted responses to him as he hailed them.  They were discontented.  He had managed to feed them when they landed, but the lack of loot and more resistance than they expected left his men grumbling and ready to go home.  Greybeard needed to find a quick win to fill his men's bellies, pockets with gold, and some plunder to take home.  Otherwise, they might just try to settle down here with the Hibernians! 

Hope you enjoyed this battle. 

Bonus Content
I spent a bit of time clearing off some small 6mm pieces on my work desk.  I had a couple of vehicles for my Operation: Hemlock forces for a Horizon Wars-style battle in 6mm.  Plus, I can use a few of these for Aeronautica Imperialis as well.  These are all 3D printed.     

I couldn't precisely recall what colors I used for my initial forces, and therefore my Armored Bassies came-out a bit darker.  However, I recovered in time for the Hydra and Lightnings.  


The bases are just painted, nothing fancy.  I actually kept the Bassies and Hydra removable from the base so they could be lone targets or AA platforms in Aeronautica Imperialis.  I feel pretty good about the Imperial forces, but before the big battle I will need to pivot and make some Ork forces too.    

Until next time!


Become a Patron and get access to all the cool stuff, a peak behind the curtain of Blood and Spectacles, and early-access to playtest games!  


You can follow Blood and Spectacles Facebook page or Instagram for more fun! 

Check out the latest publications and contact me at our Blood and Spectacles website

Or purchase all out games at the Blood and Spectacles Publishing Wargames Vault Page!