Monday, September 26, 2022

Battle Report: Fury of the Northman - Cattle Raid in Hibernia


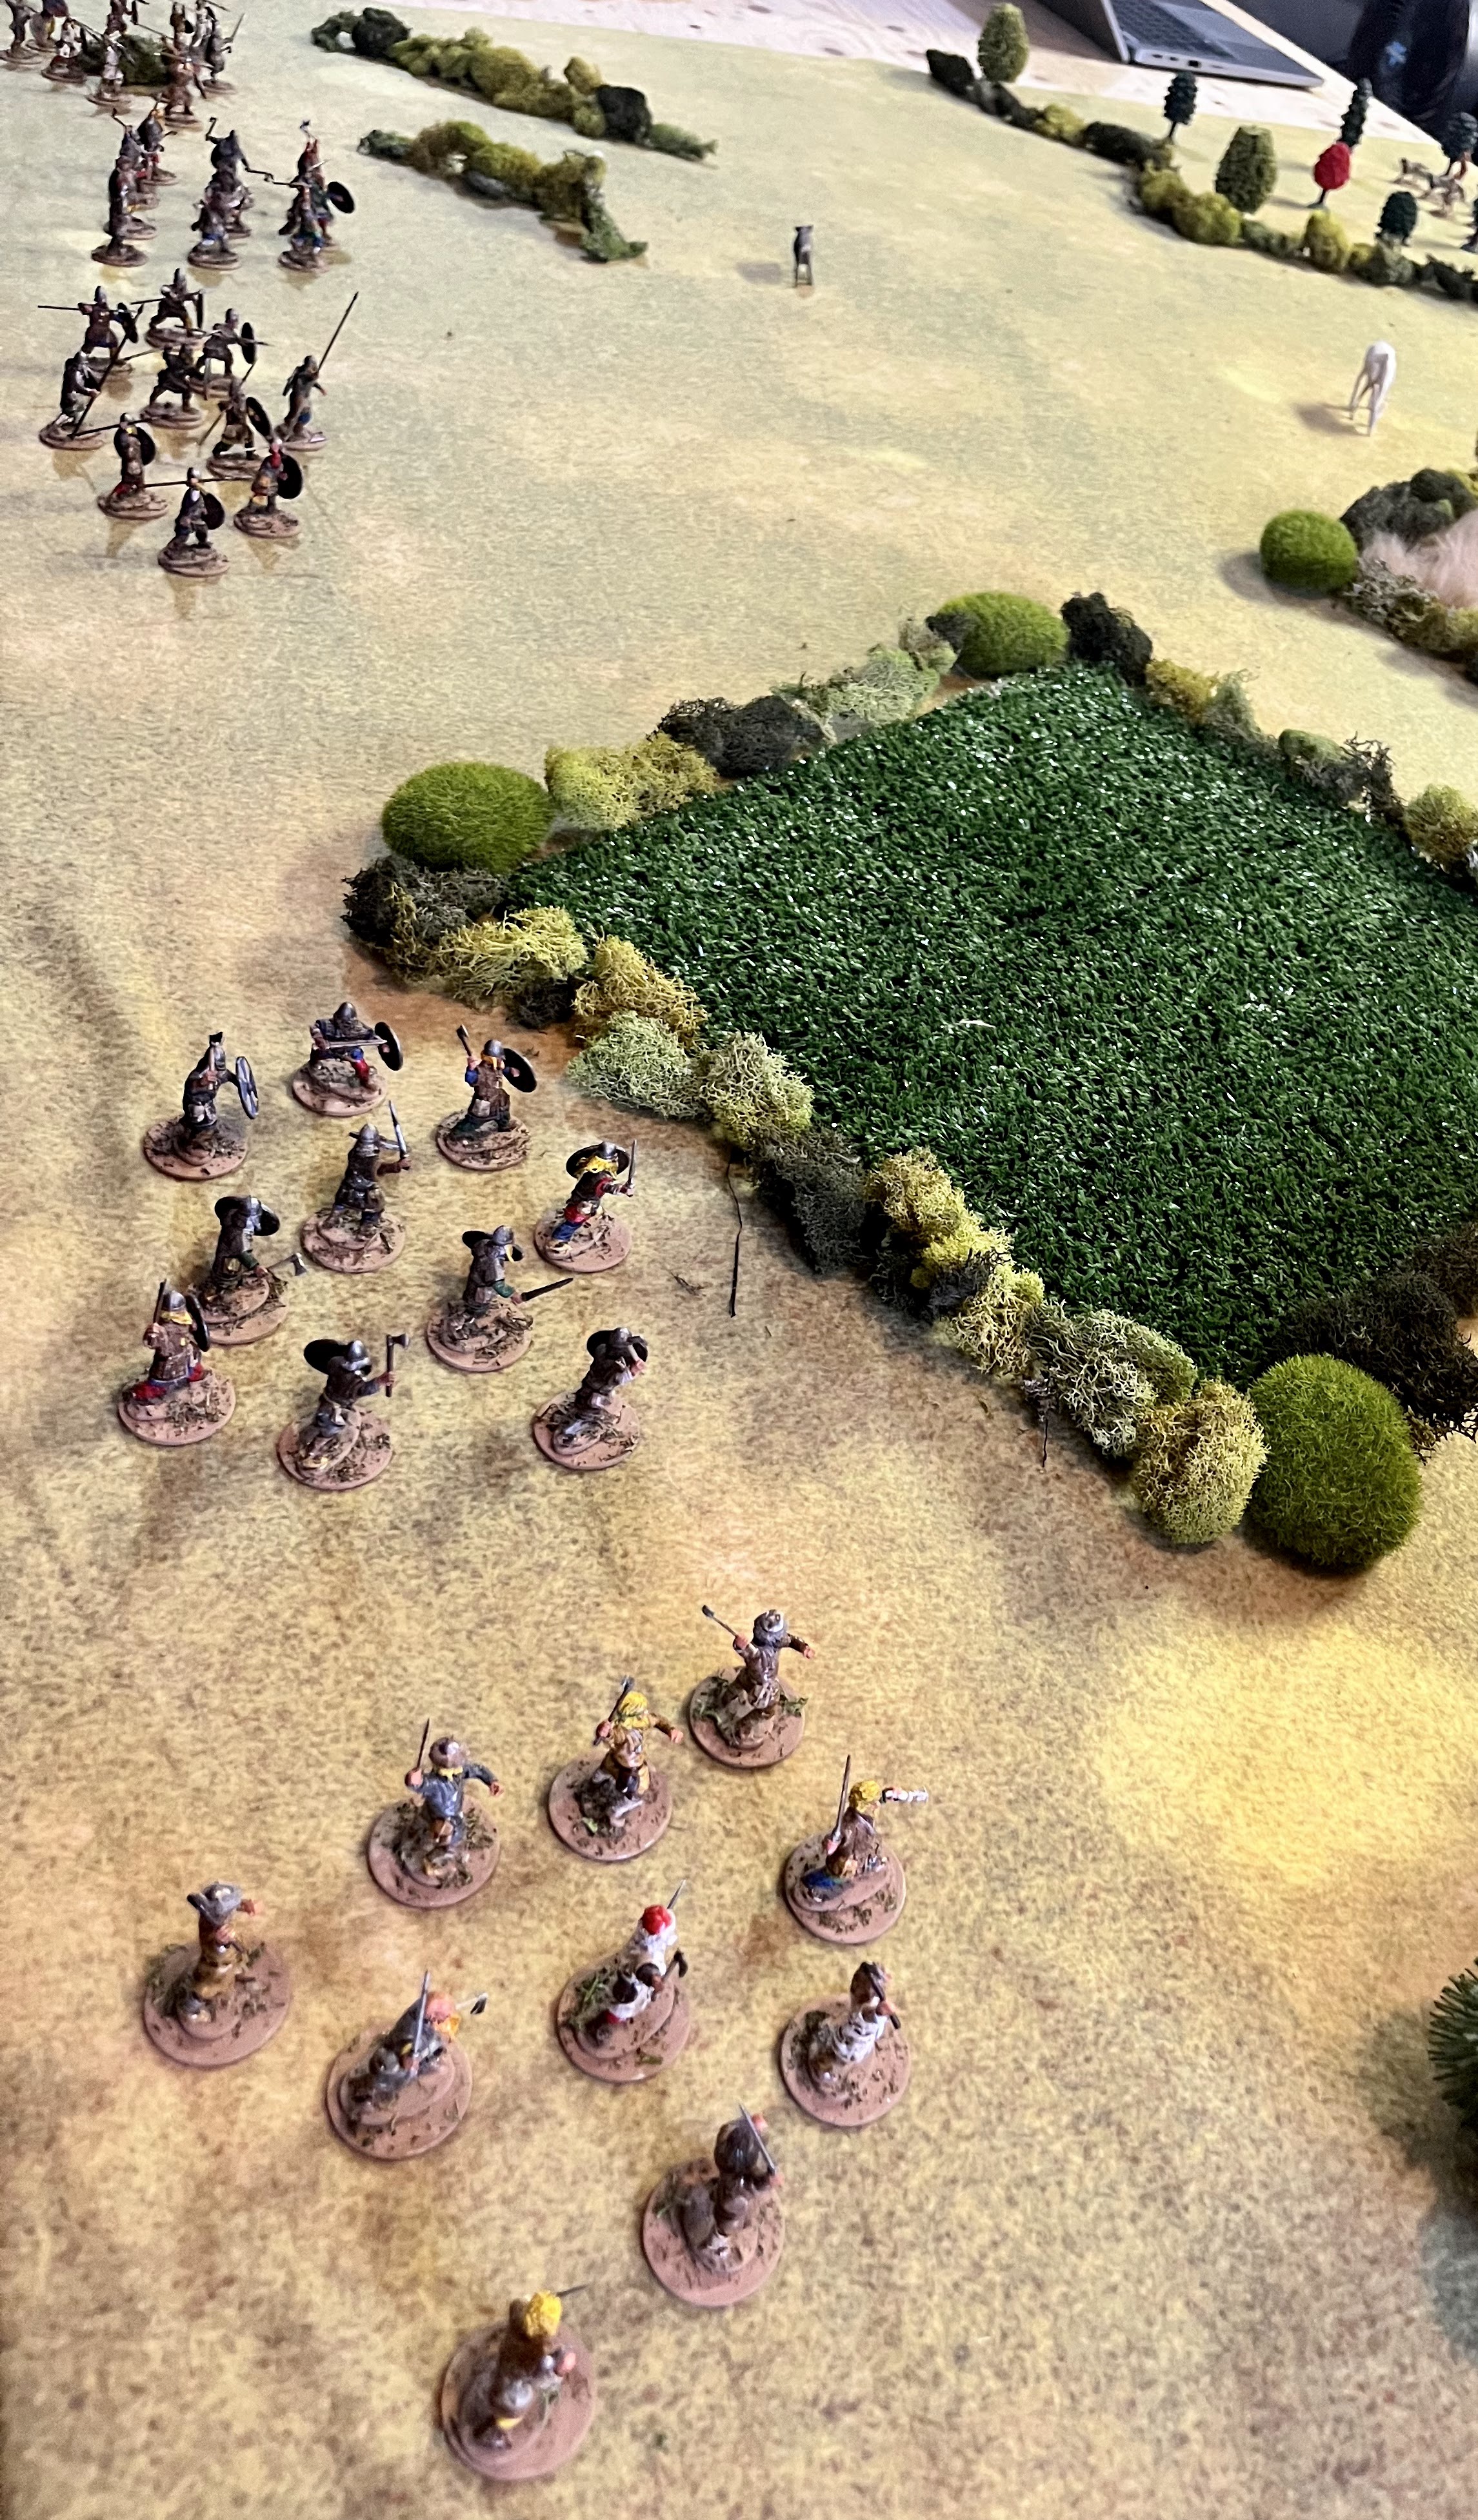
Hello faithful readers!   Today, we will be delving into the Fury of the Northman rules as I take my Victrix Vikings out against my Wargames Atlantic Hibernian Irish.  

Erik Greybeard had heard the tales and seen the wealthy himself.  These islands had loot, and his fellows had told him how soft the brown frocked defenders had been.  It was incredulous to hear that they were unarmed, and had all that gold sitting around!  It was too good to pass up.  

He gathered enough of his kinsmen to buy a few ships, and they had set sail.  It had been several days of wet, grey, and rainy weather but they finally found land.  The routes he had been told about were true!  His men pulled up into a cove, and found a beach to disembark on.  

The first order of business would be to find food for his men.  They were tired of the dried fish and fruit, and the barreled water.  They wanted something fresh to dine on.  He heard the bellow of a cow in the distance and his mouth watered.  His men looked expectantly up into the dark woods and rolling hills.  

Of course, the approach of his ships had been seen.  The shepherds ran back to the local village and told the chief of the newcomers.  He sent runners to the other nearby hamlets, and soon the local king had gathered the men folk to defend their lands.  King Ercc went forth to meet the invaders.   

Mission:
The Vikings will be the attackers as they go on a Cattle Raid against the Irish.  They will be attacking as Dusk Approaches as the complication. 

Forces: 
Since this will be a Cattle Raid, the Vikings are allowed 10% more points then their Irish foes.  

Erik Greybeard's Vikings:
Nobles
- Shieldwall
- Boar's Head 

Warriors

Warriors
- Shieldwall

Militia
- Shieldwall

Skirmishers

King Ercc:
Warriors
- Heedless Charge
- Throwing Spears

Warband
- Heedless Charge
-Throwing Spears

Skirmishers
- Throwing Spears

Skirmishers
-Throwing Spears

Slingers
-Skirmishers

Slingers
- Skirmisher

Set-up:
Today we are using a 72MU by 48MU board.  1 MU is equal to 1 inch.  

Per the rules for the Cattle Raid, we rolled up 4 cattle to be herded up and taken off the board.  Both players can deploy two cattle, at least 18MU in from the board edge, and 6 MU from any other cattle. 

In addition, we placed terrain per the rules.  We split the board up into a grid with 6 spaces.  We then rolled off per the chart.  

Grid 1= 1 Level Hill
Grid 2= Difficult Terrain (Field) 
Grid 3= Hedges and bushes
Grid 4 = No terrain
Grid 5= Difficult Terrain (Field) 
Grid 6= Difficult Terrain (Woods)

Both sides place their cattle.   

The Vikings choose to deploy on Grids 1-3.  The two sides take turns deploying a unit until the following deployments are set.  
Irish from left to right: 
Slingers, Warband, Warriors, Skirmishers, Slingers, Skirmishers

The Vikings from right to left:
Skirmishers, Warriors, Warriors, Nobles, Militia

Turn 1: 
As dusk approaches, both commanders gather their Ferocity Points.  Greybeard chooses to spend 4, while Ercc chooses to spend 3.  Greybeard goes first.  

Both sides rapidly rush forward to try and get their hands on the livestock.  The Viking Skirmishers spend the last Ferocity Point to move unimpeded by hill and field.  Their warriors comrades lag behind in the field.  The Irish are content to watch the rest of the Viking force move forward. 

With the baying of hounds, the Irish move forward, their skirmishers and slingers pushing out ahead.  The warriors seem content to deal with the left most cattle.  

The sun does not begin to set yet. 

Irish skirmishers move through a field

Turn 2: 
Both commanders again collect their Ferocity Points.  The Irish choose to bid 4, and the vikings bid 3.  This time the Irish go first.  

The Vikings watch as the Irish manage to leap forward and collect 2 cattle early.  The Slingers on the Irish right secure 1, and the King himself secures another.  

Irish slingers secure a cow, but can they hold it? 


Viking skirmishers secure one of the Cattle on the Irish left.  However, they are left exposed to do so, and there Warrior back-ups are lagging in the field.  Meanwhile, Greybeard and his nobles switch into the Boar's Head as they approach a cow.  The Militia and Warriors move up to support them in open order.  
Viking skirmishers secure a cow, and want to begin to escort it off the board

With the roll of a 6, the sun will begin to set! Dusk has begun! 

Turn 3: 
Both commanders again collect their Ferocity Points.  Greybeard spends 1, while King Ercc spends 3 to go first.  

The Irish slingers around the cattle open fire on Greybeard, but due to dusk they find that they no longer can get a good look at the target.  They are too far in the setting sun!  The same issue hampers the Irish slingers on the opposite side of the board when they go to Shoot at the Viking skirmishers.  

At this point, Greybeard attempts to interrupt.  However, he fails to take command and the Irish stay in control of the initiative.  

Irish warband attempt to drive off the Viking skirmishers

With that, the Irish warband commit a heedless charge into the Viking skirmishers.  The Irish warband loses two courage, and starts to waver.  They push the skirmishers back 2 MU and manage to drive off the skirmishers and secure their cattle.  However, Viking warriors are lurking nearby in the field. 

Greybeard again tries to take control, but loses to the Irish on the roll-off.  Irish skirmishers on the far right dash forward  and get between the Greybeard and his nobles and the Irish slingers with the cattle.  Meanwhile, on the opposite side, King Ercc and his warriors move up inbetween the fields.  

The Irish cede control of the initiative to the Vikings.  Eric Greybeard and his Nobles cahrge recklessly forward and clip the Irish skirmishers, as King Ercc and hoped.  The Irish are pushed back 1 MU, and turned around to flee for their lives!

Behind the Nobles, the militia Vikings grab a cow and circle around it to protect it.  The Viking Hirdmen move up to cover the gap between the fields, and form a Shield wall.  The last group of warriors struggles through the field towards their objective.  

End:
The Viking Skirmishers and a unit of Irish Skirmishers are removed from the battle as they rout.  The Irish units that see their comrades flee, pay it no heed.  Meanwhile, the warriors in the field begin to waver from seeing their skirmishers flee from the attacking Irish.  

Turn 4: Final Turn
This will be the final turn as night begins to fall.  Both King's gather their Ferocity Points, with both armies down a unit.  The gives the Irish 5 and the Vikings 4.  Eric Greybeard bids 2, and King Ercc bids 3.  The Irish will be going first again! 

The Irish slingers covering the cattle fire at the oncoming Nobles, who shrug it off by sheltering behind their shields.  King Ercc spends a Ferocity Point to rally his warband from wavering, and fallback away from the Vikings.  The rest of the Irish hold their positions, and turn control of the board back to the Vikings.  

The Viking militia fall back towards their camp with their prize, but they will not be fast enough to leave the board.  

In frustration, Eric Greybeard's Boar's Head smashes into the Irish Slingers by the cow.  The slingers do not stand a chance, and are easily routed.  The Nobles take command of the cow, but are stuck in the middle of the board. 

The vikings in the field manage to secure a third cow, but will not have enough time to get it to a board edge.  

End: 
The Irish slingers flee for their lives, and that leaves the Irish down 6 points, or about 25%.  However, no Irish units are in a position to see them flee, so no wavering checks are needed.  However, at 25% losses,  each Irish unit needs to take a Collapse Test.  The last Irish skirmisher unit flees the board in terror.  The rest hold steady.  

Conclusion: 
This one goes down to the points, as there is no clear winner!  

The Vikings eliminated 8 points worth of Units, but scored no points to cattle.  They lost a 2 point skirmisher unit, so they have a total of 6 points.  

The Irish have 2 points for destroying the Viking skirmishers, and 2 points for retaining 1 Cattle.  However, they lost 8 points of units and end the game with -4 points. 

The Vikings manage to drive away the Irish far enough, that they can get their captured cattle back to camp in the darkness.  However, behind every tree or shrub they pass, they can sense the angry eyes of the Irish on their backs.   By securing some cattle, Eric Greybeard is able to keep his men's bellies full, and the successful battle keeps their spirits high.  With the measure of the Irish defenders taken, Eric Greybeard was eager to raid further inland.  

Well, I guess King Ercc should have challenged those Viking Warriors in the field for control of the Cattle after all.  I was afraid of having to take a late game Collapse Test from a routed unit, and I ended up needing to anyway!  I am not sure challenging the cow by the field would have made a difference.  I also should have not used my skirmisher unit as a speed bump on those Nobles.  

In hindsight, I should have placed my two cows in difficult terrain, and then used my enhanced ability to skirmish to get there faster, and the terrain to help bolster my weaker armor, or to sally out of.  This would have hindered some of the Vikings biggest advantages, armor and formations.  In addition, the Dusk Approaches complication changed the dynamics of the game a lot by minimizing the effectiveness of my shooting, but also reducing the games length!  That really changed the normal rhythm and added a sense of urgency to the whole thing.  

Well, lessons learned on how to play the lighter, skirmishing focused force for next time!  


Become a Patron and get access to all the cool stuff, a peak behind the curtain of Blood and Spectacles, and early-access to playtest games!  


You can follow Blood and Spectacles Facebook page or Instagram for more fun! 

Check out the latest publications and contact me at our Blood and Spectacles website

Or purchase all out games at the Blood and Spectacles Publishing Wargames Vault Page!
As you can see, this has been a pretty busy year so far.     


Monday, September 19, 2022

Wargame Design: Fury of the Northman

One of my Wargame Design goals for 2022 was to publish a new historical rule set to the Blood and Spectacles page on the Wargame Vault.  My previous historical works include Men of Bronze and Wars of the Republic for Osprey Games.  The fundamentals of these games form a great basis for most pre-gunpowder historical time periods, with a few tweaks.  My first attempt to tweak these rules to a different time frame is to modify them into the Viking Age.  


As I tackle these rules, there are a few key concepts and ideas that I wanted to capture:

1. Scale and model agnostic
2. Use the Men of Bronze core rules as a base
3. Capture the Unique aspects of Viking Age warfare

Scale and Model Agnostic
There is a wide variety of Vikings and Viking Age ranges out there for folks to buy.  I want this game to be able to accommodate a wide variety of miniatures and scales.  I want players to bring their existing armies and models to the table and be able to use them.  Plus, the game does not make use of basing conventions, so you can use single based, multi-based, etc.  

This was easy to do, as both Men of Bronze and Wars of the Republic are both scale and model agnostic.  The game uses Measurement Units as a generic unit of measure.  As always, these can be modified to fit the scale of your minis and the size of your play area.  It is left up to the players to determine the specific distance of a Measurement Unit.  


Use the Men of Bronze Core Rules as a Base
The core rules for Men of Bronze is focused on Greek Phalanx combat, and that seemed like an easy transition to the Viking style of Shieldwall combat.  The basic mechanics are very similar: 

  1. Opposed dice pool tests to determine combat results
  2. No model removal
  3. Resource management for command and control
  4. Special formations for combat benefits
  5. Actions are resolved as they happen
  6. Support troops as force multipliers
  7. Emphasis of melee over missiles
  8. Big battles and small armies
All of these mechanics are tried and true.  They drive meaningful choices for the players.  In addition, they are designed to keep the players engaged so they can react to each others moves by stealing initiative.  This leads to a dynamic, fast moving, and engaging game.  


Capture the Unique Aspects of  Viking Age Warfare
Viking Age warfare had many unique aspects to it.  The key part was modifying the Viking Age units and selection process to reflect those of the time period.  There were a variety of cultures and fighting styles in the Viking Age.  They ranged from the various Norse kingdoms, European kingdoms, Gallic tribes, Iberian kingdoms, and even Muslim forces.  All of them had unique traditions and fighting styles.  

Despite all of these different military traditions and fighting styles, the game captures them into broad and easy categories.  Then, special rules are feathered in to allow for unique aspects of the combat forces to be represented fully.  Army selection is quick and easy.  This allows a broad representation or units and troops with a simple, abstracted system.  

The game includes lists for:

  • Viking, Swedes, Norwegians, and Danes
  • Anglo-Saxons, Franks, Slavs, and Rus
  • Iberians and Muslims 
  • Irish, Scots, Welsh
  • and more
It includes such core units as: 

  • Nobles, Warriors, and Militia
  • Shield Walls
  • Berserkers
  • Heavy and light Cavalry
  • Skirmishers
  • Archers and slingers
  • and more
In addition, unique Raid scenarios were created to give a sense of the nature of Viking Age warfare.  There are also several historical scenarios based on actual Viking battles.  These raids can also be connected into a linked series of battles with the enclosed Campaign rules.  


Conclusion
Hopefully that gives you a feel for Fury of the Northman.  If you all ready have a Viking or a force from the Viking Age you can use them with these rules.  In addition, if you have enjoyed Men of Bronze or Wars of the Republic, you will enjoy these rules.  If you have an interest in Viking Age warfare, you will enjoy these rules.  If you like a good, fast play game that features small armies for big battles; you will enjoy these rules.            

I expect to continue to build historical games based on these same design criteria and base mechanics, but these are the first.  Let me know what you think!  


Become a Patron and get access to all the cool stuff, a peak behind the curtain of Blood and Spectacles, and early-access to playtest games!  


You can follow Blood and Spectacles Facebook page or Instagram for more fun! 

Check out the latest publications and contact me at our Blood and Spectacles website

Or purchase all out games at the Blood and Spectacles Publishing Wargames Vault Page!
  

Monday, September 12, 2022

Battle Report: White Star/Red Star - CAP near Taejon, July 1950


July 19th, 1950 the USAF sought to establish air superiority against the invading communist forces.  This was know as the Air Battle of Korea.  At this stage in the war, the USAF was using a combination of piston and jet engine aircraft for this mission.  The primary opponents were the North Korean air force using propeller driven late WWII era aircraft.  

On July 19th, F-80's from the 5th air force took on advanced elements of the North Korean Air Force.  They engaged in a dogfight near Taejon.  In the engagement, the F-80s managed to down 3 enemy Yaks.   

I am super excited to get my Tumbling Dice miniatures out on the table to see how they look and feel on the table! 

Mission:
We used the rules from the book to determine the Sortie for today and came up with a Combat Air Patrol in clear weather.  This is a simple scenario to kill the other sides planes.  

Forces:
We have decided to use the North Koreans and USAF lists.  

USAF
3 F-80 Shooting Stars 
- Experienced pilots


North Koreans
4 Yak - 9 Franks
- 3 Rookie Pilot
- 1 Experienced Pilot


Set-up:
This games starts off with both players undetected.  There is also no need for terrain, but we added some for the look.  

The game is taking place on a 86 x 86 MU board.  1 MU is equal to 1/2 and inch.  

Two of the Yaks are connected as wing-men.  Everyone else is individuals in this furball. 

For reference, if a plane has no stand, it is at low altitude, stand is combat, and on top of a dice on a stand it is High altitude.  

Turn 1: 
Detection:
No one is detected this turn, so no planes enter play yet.  

Turn 2: 
Detection: 
No aircraft detected by either side still.  This is eating into the games turn limit, and allowing planes to deploy further in on the board once detection occurs. 

Turn 3: 
 Detection: 
Nothing. All pilots are still scanning the skies. 

Turn 4: 
Detection: 
The F-80's are spotted, and need to be deployed on the table.  Since it is the 4th turn, they can be deployed up to 24 MU in.  

The F-80's deploy with two at combat altitude and 1 at High.  They re moving diagonally across the board.

Rookie: 
The lead F-80 makes a 45 degree turn and heads towards the village.  The second stays high and straight, while the third makes a 20 degree turn and turns towards the village too. 


Experienced: 
The USAF continue to move.

Ace:
They all move straight, as they are Experienced pilots and can not make moves in this phase.  

Turn 5: 
This time, the USAF sees the North Korean Yaks.  The North Koreans can deploy up to 30 MU in from their board edge.  

The Yaks put their Rookie pair forward, going across the board to try and lure the USAF after them.  The other two are further back, with the last rookie at High altitude. 


Rookie: 
The North Koreans have to start moving planes first, since they have more of them.  Both sides begin to turn into the attack, looking like they are setting up to go head-to-head.  No one changes altitude. 

Experienced: 
The USAF have more Experienced planes and move first. The paired North Koreans have to move together as a pair, since they are a wing-man team.  

The USAF moves to bypass the rookie bait, and head for the North Korean Experienced pilot.  Both sides close the distance, and get ready to fire.  

Ace:
Neither side has any Aces, so the North Koreas move first.  All pilots can only go straight, and not change altitude.  They also can not shoot in this phase.    


Turn 6: 
Detection:
There are no more planes to detect, so this phase is no longer needed going forward. 

Rookie: 
The tailing Yak at high altitude banks 45 degrees to try and set-up against the high F-80.  Meanwhile, the Rookie pair turn at 20 degrees to dissuade the high F-80 from dropping down altitude. 

The Experienced North Korean Pilot and one of the F-80's are going head-to-head.  the North Korean fires, but the range is far enough for the USAF pilot to maneuver around the incoming fire. However, the North Korean pilot kept ammo in the hoppers for another pass with a disciplined burst.

The lead F-80 just misses the angle on the North Korean experienced pilot and can not fire.  The other F-80 is lined up after avoiding the incoming fire, and opens up a return burst.  The North Korean dodges the long range burst as well.  The USAF pilot also has ammo remaining. 


Experienced: 
This time, the USAF has the advantage as they have more experienced pilots.  The F-80 presses home the head-to-head attack on the experienced North Korean pilot, and this time is able to bring him down with a burst.  However, it was a long burst and the F-80's guns go dry.  He will want to break-off and away.  First kill to the USAF! 


The other North Korean pilots can not maneuver, as they are all rookies.  Instead, they go straight.  The High F-80 stays high and turns in to go over the Rookie pair.  Meanwhile, the F-80 leader turns back into the furball. 

Ace: 
No one can maneuver, so they all go straight! 

Turn 7: 
Rookie: 
The Rookie pair dive down to low altitude and make to break-off.  The F-80 that is out of ammo also turns away to break-off.  

The High Altitude North Korean Rookie sees a USAF F-80 bearing down, so he turns into the attack and fires.  However, he fails to hit the mark.  The incoming F-80 returns the favor.  However, he also misses.  Neither plane is out of ammo yet.  


The lead F-80 tries to duck in and cut-off the Rookie North Korean if he tries to break away or go lower.  

Experienced: 
The USAF F-80 fires on the Rookie Yak-9 pilot, who manages to dodge the shots.  The two aircraft race past each other.  Both with ammo remaining.  

The lead F-80 stays at combat altitude, incase the higher Yak dives.  

Ace: 
Everyone goes straight! 

Turn 8: 
Rookie: 
Everyone is faffing about and trying to regain position.  

Experienced: 
The F-80s still in the fight are using their superior speed and skill to get back in on the Yaks, cutting off their turning radius.      

Ace: 
Straight again! 

The F-80 that is out of ammo manages to disengage from the fight and head for home with 1 Kill to their record.  


Turn 9: 
Rookie: 
Lead F-80 is still 1 altitude level above his prey as they try to flee.  The last rookie Yak drops to combat altitude, hoping for a chance on the F-80 leader.  The last F-80 is still turning back into the scrum and at high altitude. 

Experienced:
The F-80s both dive.  However, the Lead F-80 can not get the angle on the pair of Rookie North Korean pilots.  However, their higher altitude pal also has no shot. 

Ace:
Straight ahead! 


Turn 10: 
Rookie: 
The North Koreans go first as they have more planes.  The rear Yak dives, but can not get a shot off.  

The second F-80 is still too high, but gets ready to cut-off the last North Korean aircraft.  

The Rookie pair try to cut in under the attacking Lead F-80, but he manages to fire a burst and take out the tailing plane.  The USAF pilots still has ammo.  


Experienced:
With 1 Kill under his belt, the lead F-80 breaks off from the fight and disengages off the board.  The second F-80 dives at the fleeing rookie Yaks, but misses the angle. 

The last Yak also has no shots, but does not have the skill to try a shot anyway. 

Ace:
They all fly straight. 

Turn 11- Disengagement Turn
With all three phases, the last planes can easily disengage off the board.  

Conclusion:
The USAF F-80s of the 5th Air Force managed to disengage with no losses, and 2 Kills to their record.  A successful day in the Air Battle of Korea

A couple observations from this battle.  Typically, I use 1 MU = 1 inch.  The shorter MU slowed the game down a bit, but allowed more maneuver.  With 1 MU is 1 inch, the game would have lasted closer to 6 or 7 turns instead and the action would have occurred much faster.  I think I will use the 1 MU = 1 inch going forward.  The shorter distance also made the aircraft feel slower as well.  

As the North Korean player, I was too aggressive with my Experienced pilot and when he was knocked down I did not have much to respond with.  My hopes for a draw fizzled when one of my Rookie wing-men got shot down.  Then, it was all about avoiding losing more planes and getting out alive! 

The faster Jets and skill of the American pilots played a part in the battle.  It was this advantages that allowed them to shoot my Experienced pilot down, and bag a Rookie.  A historically accurate result in this engagement.  


Become a Patron and get access to all the cool stuff, a peak behind the curtain of Blood and Spectacles, and early-access to playtest games!  


You can follow Blood and Spectacles Facebook page or Instagram for more fun! 

Check out the latest publications and contact me at our Blood and Spectacles website

Or purchase all out games at the Blood and Spectacles Publishing Wargames Vault Page! 


Monday, September 5, 2022

Wargame Design: White Star/Red Star


I have been working on a Korean Air War game for a while.  You can now find it on the Blood and Spectacles Wargame Vault page, and it is called White Star/Red Star.  The kernel of White Star/Red Star game were two main objectives: 

  1. How to model this "transition" period between WWII and Modern air warfare?
  2. How to reduce the complexity of flying for the player to focus on the wargame?
As many people know, I am a big fan of Aeronautica Imperialis as it gives a lot of tactical depth with simple rules.  The easy solution would have been to simply re-skin one of my favorite rules systems and make Korean War profiles for it!  However, that did not solve the fundamental challenges I wanted to focus on.  Even AI, you spend a lot of time simply flying your planes, and that was an area I wanted to explore simplifying.  

Therefore, I had a few different objectives as I built these rules: 

1. Simplify flying and assume that all pilots know how to fly, the player do not have to
2. Use action economy to differentiate pilot skill
3. Make detection a key component of the game
4. Finish games quick while including critical player decision making
5. Represent the key tactical challenges and aircraft of the Korean Air War
6. Scale and Model agnostic

Let's take a look at how I went about tackling these objectives then.


Simplify the Flying
At this stage, I made a number of abstractions to make flying easier on the player.  The rules first assume that the pilots all know the basics of flying.  They are skilled enough to not crash and keep the craft from stalling and the like.  Therefore, since the Pilot is doing the flying, the player is more concerned about where the plane will go in relation to the other planes on the board.  

1. All planes are assumed to be going at combat speed.  There are no speed adjustments to track.
2. Altitude is simplified to 3 levels only.  You can change altitude or turn in an activation, not both
3. Turns are simplified into basic categories; 20 degree, 45 degree, 90 degree, and 180 degree

These simple mechanics allow the player to put the planes where they want in relation to their fellows quickly and easily.  


Use Action Economy to Differentiate Pilots
Sure, all pilots know how to fly but some are simply better at flying than others.  Only a handful have the killer instinct it takes to become an Ace pilot.  What is the difference between a rookie pilot, an experienced pilot, or an Ace?  

In White Star/Red Star pilot skill level is differentiated by Action economy.  All pilots can participate in the Rookie phase, where they move and shoot using alternating activation as normal.  In the Experience Phase, Experienced and Ace pilots can move and shoot normally.  Rookies can only fly straight.  Meanwhile, in the Ace Phase only Ace pilots can move and shoot normally.  Everyone else just flies straight.  These escalating activations give Aces the edge in out-flying and acting compared to their lesser peers.  

In addition, when a pilot can initiate a turn action differs based on their skill level.  Rookies have the most limited window of action.  Experienced pilots have more latitude to change course.  Meanwhile, Aces can initiate turns freely.  It is also important to remember, that a pilot can either change altitude in an activation or turn.  With the stacking Phases, Aces will be able to make this choice three times as often as a Rookie.  


Make Detection a Key Component of the Game
Often times, the difference between living and dying in air combat is knowing the enemy is around.  The majority of kills occur on an unsuspecting target.  Therefore, detection is a critical and often overlooked component of air combat.  

To reflect this, deployment in this game is a bit unique.  Each turn, both sides make a detection role and compare it to the profiles of the enemy aircraft.  If the detection roll is successful for certain aircraft, they can be placed on the board anywhere in the deployment zone, at any facing and altitude.  If failed, the planes are not deployed.  It is easier to detect big multi-engine bombers than small prop planes.  

Every turn, the potential deployment zone is extended.  Therefore, the longer it takes to be detected the further onto the board the plane can be deployed.  As the turns go by, the detection roll gets easier as the forces close.  In playtesting, it was possible for planes to start detected coming in on the tail of an enemy plane!  However, such results were not common. 

Finish Games Quick and Focus on Critical Decisions
One of the key components to assist this was to make dice rolling quick and easy.  A pilot can roll 1 dice per their level of skill; rookies roll 1, experienced pilots 2, and Aces 3.  Success was always a 4+ and most rolls are opposed.  Therefore, whoever scores the most 4+ will win most rolls.  Modifiers take the form of +/- dice to the roll.  Therefore, this unified mechanic makes resolution easy.  

In addition, the game has a maximum number of turns and a disengagement level.  This made sure games did not drag out since a long dogfight during the Korean War lasted 5 minutes at most.  I wanted resolution of the wargame to align closer to actual dogfight times.  Most games are completed in less than 1 hour from beginning to end, with some being as short as 15 minutes.  

As for critical decisions, the dice modifiers are based on range and angle of attack.  In addition, the game has relatively narrow firing arcs so maneuver matters.  In addition, there is an Ammo roll when you take shots so you have to weigh the risk of running out of ammo against the chance of hitting before you roll the dice.  This makes players focus on the critical decisions and trying to get high-probability shots rather than fishing for lucky hits.       


Represent Key Tactical Decisions and Aircraft of the Era
Unlike World War II dogfight, Korean War dogfights between Jets was often vertical rather than horizontal.  The game tries to mimic this by giving the aircraft of the time stats that match the performance of the aircraft.  MIGS were great at climbing, so have benefits to climbing.  Sabres were great at diving, and this is reflected in the rules.  As planes decide to turn or change altitude, it immediately changes how far they can go in that activation based on the type of plane it is.  Since the LA-11 Fang was a poor climber, it suffers a greater loss of speed as it goes up, and it is applied immediately for that activation only.  

The rules also include how to use wingmen and wingman tactics directly.  Instead of acting independently, the wingmen operate together and perform the exact same maneuvers.  If the wing leader goes up 1 altitude, so does the wingman.  If the wing leader turns 20 degrees, so does the wingman.  They work together for good or for ill.   

Scale and Model Agnostic
Like all my games, I wanted it to be scale and model agnostic.  Korean War aircraft models come in all different scales from 1/1200 up to 1/48!  This system can accommodate any size aircraft you want to use and any space you have.  This is because the game uses generic measurement units that can be the equivalent to any measurement you want based on the play area and models you have.  Larger models and a small table may demand smaller MUs, while small scale and large tables could use larger.  

Also, measurements are from the center of the model, and firing arcs are wingtip to wingtip (or a circle depending).  Therefore, as long as aircraft are the same scale then they will be using the same mechanics for firing arcs and measurements.  Therefore, you can use whatever you want to play.  


Conclusion
This game went together pretty fast compared to my usual efforts.  I think I only worked on this one for 2 years!  However, it got more playtesting than my games normally get due to how quick it plays! Despite the "quick" turnaround, this game went through at least 4 major revisions, mostly to the action economy and detection.  

I am really proud of this game.  It focuses on what I want it to focus on, and I think handles air combat in a unique and innovative way.  The game was so easy, even novice wargamers were picking it up and grasping the tactics of the period right away.  I hope you enjoy them!

If you want to pick up White Star/Red Star at the Blood and Spectacles Wargame Vault page.         


Become a Patron and get access to all the cool stuff, a peak behind the curtain of Blood and Spectacles, and early-access to playtest games!  


You can follow Blood and Spectacles Facebook page or Instagram for more fun! 

Check out the latest publications and contact me at our Blood and Spectacles website

Or purchase all out games at the Blood and Spectacles Publishing Wargames Vault Page!


Thursday, September 1, 2022

Warhammer Kill Team: Event in Northwest Wyoming/Billing Montana Area


 I think the sign says it all! 

October 15th, 1-4 PM 
Gestalt Studios
440 W Park St.
Powell, WY

We will be playing the latest edition of Warhammer 40K Kill Team.  No experience necessary!  Miniatures, terrain, and tables will be provided!  Veteran players are encouraged to bring their own Kill Teams and rosters as well.  
  • If you are part of a local wargaming group in the area, we look forward to meeting you! 
  • If you are just wargaming curious, we look forward to meeting you!  
  • If you are returning wargamer, we look forward to meeting you!  
  • If you are a role-player who wants to see the roots of the hobby, we look forward to meeting you!  
  • If you are a Cos-player who wants to see some cool looking miniatures for future reference, we look forward to meeting you! 
  • If you play Collectible Card Games and who is using the other tables, we look forward to meeting you! 
  • If you are a board gamer who loves games with figures and want to see more figures, we look forward to meeting you! 
  • If you are an artist who wants to see how we paint these 28-32mm miniatures, we look forward to meeting you! 
  • If you are a bored Northwest College student looking for something to do on a Saturday, we look forward to meeting you!    
  • If you are a traveler passing through the area and want to see a unique event, we look forward to meeting you!
  • If you want a copy of Men of Bronze, Wars of the Republic, or Castles in the Sky signed, I look forward to meeting you! 
  • If you want a great cup of coffee and some art supplies from Gestalt Studios, we look forward to meeting you!  
  • If you are a Buffalo, please stay in Yellowstone!   
All are welcome!  I look forward to meeting you!  


Become a Patron and get access to all the cool stuff, a peak behind the curtain of Blood and Spectacles, and early-access to playtest games!  


You can follow Blood and Spectacles Facebook page or Instagram for more fun! 

Check out the latest publications and contact me at our Blood and Spectacles website

Or purchase all out games at the Blood and Spectacles Publishing Wargames Vault Page!