Herodotus tells us
a great deal about the Ionian Revolt.
Ionia was Greek colonies along the coast and edges of Turkey that had
been captured and absorbed into the Persian Empire around 540 B.C.E. In 499 B.C.E the Tyrant of Miletus,
Aristagoras; failed to capture the island of Naxos. This left him in a bad political position
with his Persian overlords. In a
desperate bid, he decided to stir revolt amongst his people against the
Persians. This led many other local
cities to cast off their Persian based Tyrants and replace them with
Democracies.
The Ionian Revolt
had initial success in 498 B.C.E. when the allied Greek forces (including
Athens, Eretria, and Ionians) managed to successfully attack Sardis. Sardis was the seat of a Persian Satrap and
one of the personal enemies of Aristagoras.
However, this minor victory was soon off-set by the Battle of Ephesus
where Persian cavalry chased down and defeated the Greek forces.
Despite the loss,
the revolt spread further. It spread to
the Hellespont and Propontis. The city
of the Carians also joined the revolt.
In addition, Cyprus also revolted.
Persian rule was in danger across the region, it was only a matter of
time before the might of the Persian army would respond.
In 497 B.C.E., The
Persian King had three generals appointed to put down the revolt. The three Persians (Daurises, Hymaees, and
Otanes) divided the area into three partitions and attacked. Their attacks spread across the region. The battles and sieges for this period are
largely unknown, with only a few details of the battles coming down to us from
archeology and Herodotus.
Today’s battle will
be one of those lost battles. Hymaees
marched to the Propontis and attacked the city of Cius. Historically, he took the city. However, no details remain. Below I will be fighting a battle between the
Persian general Hymaees and the defenders of the City of Cius. For the purposes of this battle, the citizen
militia has come out of the city to fight off the Persian force.
The Forces
No details remain for the fall of the city of Cius. We only know that Hymaees took the city with
his army while his fellow Persians attacked in other areas. Therefore, I will be using some standard
armies from the Greek and Persian lists.
The exact details of the true armies are not available.
Greeks
3 Militia Hoplites
2 Peltasts
1 Archer Unit
1 Psiloi
Persians
3 Archer Units
3 Drilled Infantry Unit
1 Psiloi
This is equal points in the system and should prove an
interesting game.
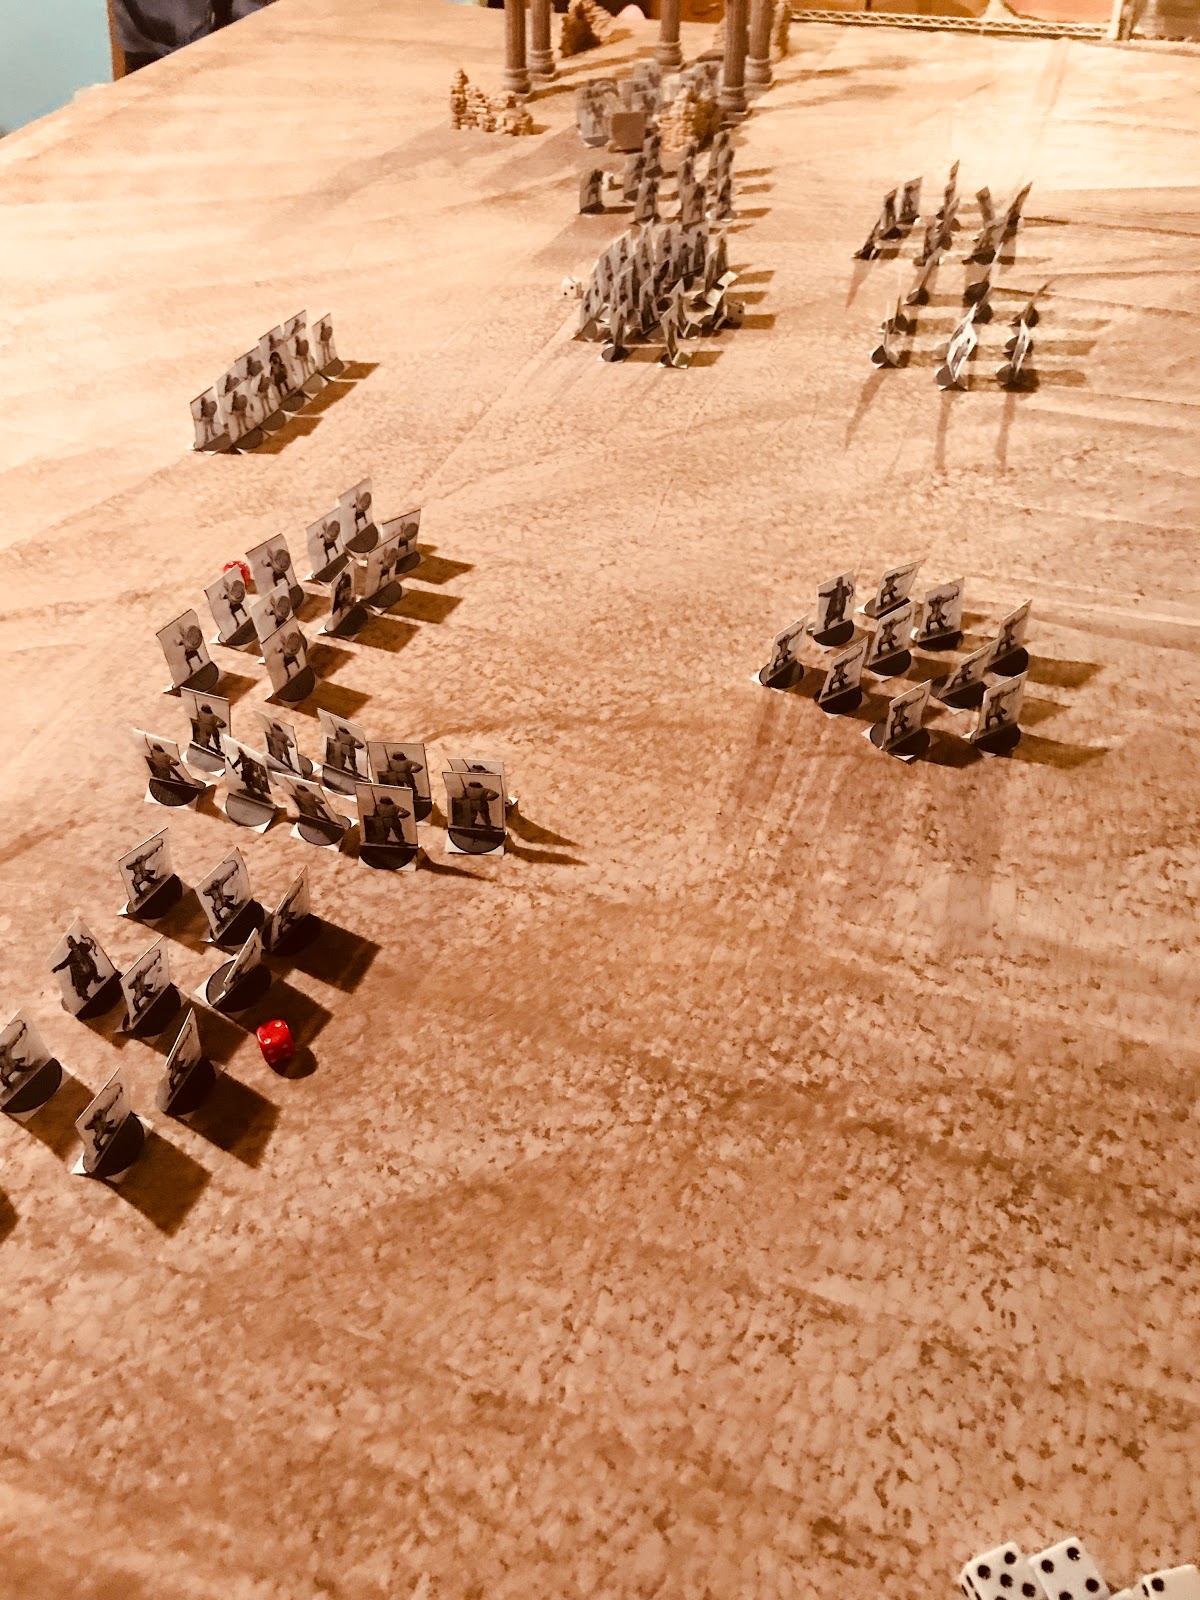
Deployment
This battle will be on a 6x4 board with both forces
deployed on the long table edges.
The
Greeks on the North side with the Persians coming from the South.
The Western edge of the battlefield is
anchored on a river.
The Eastern edge
has the ruins of a temple sacked by the marauding Persian recon troops.
The river is Dangerous terrain while the temple
is Difficult.
 |
| Greeks to the Left |
The Greeks of Cius to the North have anchored there right
flank to the river. They deployed across
the battlefield in a battle line 6 base widths in. From right to left the units are; psiloi,
archers, the 3 militia hoplites in phalanx are the core, then the 2 peltast
units deployed across from the temple.
The Persians face off against the Greeks also anchoring their left flank
on the river banks. They are deployed
alternating archers and drilled infantry, with the Persian right being anchored
by Psiloi light troops across from the temple.
 |
| Persians to the Right.... caught in the middle with you |
Turn 1:
Both sides begin with 7 Arête Points. That means no one will have an Arête Point
advantage to begin with. The Persians
bid 3, while the Greeks bid only 2. The
Greeks wish to hold back and possibly use their Move and Shoot abilities later
in the turn.
The Drilled Infantry by the temple race forward to try
and get the better ground. Seeing the
Persian strategy, the Greeks decide to try to interrupt to get their Peltasts
moving to the temple and try to beat the Persians there. The Greeks win the roll-off. Some Greek Peltasts rush forward towards the
temple ruins. The Persians challenge for
initiative using an Arête Point, and this time they win it back. The Persian psiloi move ahead. The Greeks again use Arete to try to steal
initiative back from the Persians in the race to the temple. They win the roll-off again.
 |
| Peltasts make for the Ruined Temple |
With their key units on the left in position, the
Persians decide to let the Greeks continue to see how their battle plan
unfolds. The Greeks press forward their
full moves across the front. This leaves
the light troops slightly out in front of the Hoplite center. The Greeks wanted to use their Arête Points
to move and shoot, but the Persians letting them maintain the initiative has
left them without targets.
The Persian forces also move forward. Their archers begin to pull ahead of the
infantry, causing a slight checkerboarding of their lines. However, they have no units to Move and Shoot
with either.
Turn 2:
Both sides still maintain 7 Arête Points. Both sides consider their initiative
bids. The Persians do not think they can
beat the Greek Peltasts into the ruined temple but if they get their first,
they will be hard to drive out. The
Greeks bid 3, and the Persians 2 this time.
 |
| The two sides close in- Greeks Left, Persians Right |
As expected, the Greek Peltasts get to the temple and use
an Arête Point to Skirmish through the difficult terrain. The second Greek Peltast unit follows on the
outside of the temple, but since they touch the terrain they must spend an
Arête Point to skirmish. However, they
are still considered in cover. The Greek
player pauses to see if the Persians will interrupt, but they decline the bait.
The Ionian commander now feels confident that his left
flank is secure in the temple. His right
begins to castle up, with is archers moving forward to engage the Persian
archers next turn, while the Hoplites approach.
The Persian holds his Arête Points for potential
re-rolls. The Persian archers on the
left and center move forward to get in a shooting duel with the Greek archers
next turn. The Drilled Infantry stay
ready to support them if they get charged.
The far right begin to refuse their flank, and try to draw the Peltasts
out of the temple to attack.
Turn 3:
This turn will probably have first blood. Both sides have 7 Arête Points, and choose
their bids. Persians bid 3, and the
Greeks 2. The Greeks think they can use
Move and Shoot this turn and hold a few back.
The Persians want to use their Archers first.
Since units can move, shoot, or fight; the Persian
archers in the center start the shooting.
The initial Persian barrage reduces the Greek Archers 4 Courage!
They are turned around to rout!
Seeing this, the Greek player decides to try
to interrupt and get some revenge!
The
Greeks lose the roll-off, and the Persians keep the initiative.
 |
| Greek on the Left, Persians the Right |
The Persian Archers on the right open fire at the Psiloi
by the river. The second barrage is not
as effective as the first and the Psiloi are reduced 1 Courage, and pass their
Discipline check. The rest of the turn,
the Persians simply re-dress their lines.
The Greeks take over, and immediately the psiloi on the
Greek right charge the archers on the Greek right. This takes 1 Arete Point, and the Persians
spend 1 to Evade. The psiloi spend 1
more to pursue. And catch the
archers. The two units both take 1
Courage loss in the melee, but the Persians spend 1 Arete Point to re-roll a
Discipline Dice and pass the check.
The Greek Peltasts spend the last Arête Points to
skirmish through the ruins. However,
they can not move and shoot due to having no Arête points left to do so. Two phalanxes press forward, whiel the third
is hampered by the Greek Archers.
In the End Phase, the Greek Archers flee the field and
force the Militia Phalanx behind them to pass a Collapse test. The Phalanx passes.
Turn 4:
The Greeks get 6 Arete Points and the Persians 7. The Persians bid 3 Arete to Greek 3. The two sides must roll-off! The Greeks win.
The Greeks start by having the left most Militia Hoplite
Phalanx charge the Persian Drilled Infantry.
However, the Persians use an Arête Point to counter-charge! The two units clash in the center of the
board, and the Militia loses 1 Courage, to the Drilled Infantry 2. They are both at 3. Both sides pass the Discipline check. The Persians are pushed back 1 bw.
The Persians decide to steal the initiative with an Arête
Point, and win the roll-off. The Persian
Archers on the right fire into the oncoming
Peltasts and reduce them 1 Courage.
The Persian psiloi also attack them, but fail to cause any wounds with
their javelins.
On the left flank, Drilled Infantry charge in to support
the Persian archers with the Psiloi. The
combat is brutal and short. The Archers
lose 1 more courage and begin to waver, but the Greek Psiloi is destroyed
utterly.
The Persian Archers in the center and the Drilled
Infantry on the right reposition themselves to avoid charges and support the
attack.
The right most Greek unit declares a charge at the flank
of the Persian Drilled Infantry.
However, it fails to come into contact with them!
This leaves them in Open Formation and
wavering!
 |
| Woops! |
Greek Peltasts in the temple fling javelins at the
Persian Psiloi, and reduce them 2 Courage and wavering. The others struggle out of temple grounds and
fire at the Persian Psiloi as well, causing them to route.
In the End Phase, the Persian Psiloi and Greek Psiloi
fled the field. No one failed a collapse
check.
Turn 5:
Ionian Greeks get 5 Arête Points to the Persian 6. The Persians bid 4 to the Greek 2.
 |
| Greeks to the Left, Persians to the Right |
The Persians immediately declare a charge from their
drilled infantry on the wavering Militia Hoplites. One of the advantages of being an Open Order
unit is the maneuverability, and it pays off here as they pivot and
charge. The attack is pretty powerful,
and reduces the Ionians to 2 Courage, and the Persian Infantry to 4.
The Greeks then manage to steal the initiative and
declare a charge on the Persian archers with the Peltasts. The nearby Persian Drilled infantry decide to
support with a flank attack. Both units
are reduced to 1 Courage, and this could sweep up the Persian Drilled Infantry
now, since there was not a decisive victory.
The Greeks use their last Arête Point to move the second
Peltast unit from the ruins. The center
Greek and Persian melee has no decisive results.
Turn 6:
Both sides get their arête Points at Greek 5 and Persian
6.
The Greeks bid 2, while the Persians
bid 0.
 |
| Greeks to the Left, Persians on the Right |
The Center Greek phalanx, breaks into open formation, and
joins the melee on the Greek right.
Despite the help, things did not go the Greek way, as both sides lose a
point of Courage, leaving the Greeks unit at 1 Courage! The Persians try to steal the initiative,
but fail.
The Greek Peltasts charge into the center melee! Here things go better for the Greeks, and the
Persians use two re-rolls to Reduce the Greeks to Courage 2, while they have 1
left!
The big melee on the right reduces both units to 0
Courage,a nd the Greeks lose a Skirmisher unit, to the Persians Drilled
Infantry and Archers.
The wavering Persian archers is rallied back to
normal. Both units declare a charge into
different scrums to help support next turn.
On the left, it does nothing.
However, the charge into the center melee reduces the Greeks to 1
Courage!
Turn 7:
Like ancient battles are likely to do, they have devolved
into 2 big scrums in the center.
Neither
side bids any Arête to go first.
They
want they re-rolls instead, both have 4.
 |
| Two big Scrums and everyone is all mixed up! |
The Persians on their left flank taking on the Open Order
Greek militia hoplites with archers manage to crush them! They are routed. In the center, both Greeks and Persian flee
the field at 0 Courage.
That left the batter Persians on the left flank masters
of the field of battle.
! unit of
Drilled Infantry at 2 Courage, and 1 Unit of Archers at 2 Courage.
 |
| All that remains... |
Conclusion:
Today, I wanted to make sure that Archers were a viable
choice and that an Archer heavy force could defeat Hoplites. Doing the math, the Hoplites would have armor
3, and Archers have 4 shoot dice, so it would be tough for them to scratch the
Hoplites. The Ionian Revolt seemed like
a good place to start as it was Greeks vs. Persians.
My findings were that the Archers are better matched up
against auxiliary troops, and then used to bolster the Drilled Infantry in
combat as a support unit. By using
clever placement and effort, you could use the archers for Flank Charges and support. The other way around, with infantry
supporting the archers did not work as well.
A situation where an archer unit was facing off against a Hoplite unit
would be a severe mismatch for the archers, even at range as they would only
get 1 shot before being charged. Elite
and Drilled Hoplites would be an even more hopeless situation.
Another finding, one of the key things to recall in the
game is that a unit can only shoot, move, or fight. Therefore, if you choose a unit to fight they
can only do it once. If other people
join the battle after the initial unit has fought, the rules are not 100% clear
on how to handle that. That is something
I will need to edit before May.
I am still not finding Unit Collapse being an issue like
I expected it to be. Most units, even
Discipline 2 can pass the Collapse test.
However, placing the test after Arête Points are discarded reduce the
impact of re-rolls to the result. That
is good.
Overall, this was another historical battle where the
Persians won. The key moment was the
failed charge by the Militia Hoplites that forced them into open order and
wavering. That was the key engagement of
the battle and swung it to the Persians.
With their field force destroyed, and
Persian reinforcements closing in the City of Cius wisely surrendered. Propontis was secured and Hymaees prepared to
support his fellow general’s in crushing the Greek revolt in Ionia.