Showing posts with label Green Army Men. Show all posts

Monday, February 24, 2020

Wargaming on a Budget- Making a Board Look Good


For many years, my wargaming had a very strict budget.  In many ways this was a blessing as it forced me to focus on what I needed and wanted to accomplish in the hobby.  I couldn't do it all.  heck, I could barely do it at all.  Therefore, I had to focus on what I needed to do to make a game playable.  Often times, that included making rules, using paper templates, and figuring out how to make my own models.  Heck, even toys were often pressed into service.

 Of course, something that sets wargaming apart from board gaming, card gaming, role-playing games, and video gaming is the table itself.  A big draw is the visuals and the "spectacle" of a good battlefield.  This aspect could really make or break a good battle.  Today, I want to break down how to make decent terrain cheaply and easily.  Thankfully, it doesn't even require much effort!

A good gaming set-up is based around the following segments.  You need a table.  From there you need a gaming mat to cover it.  Then you need terrain pieces.  That's it.  You have a decent table.  We will be looking at this issue from various levels. 

The Gaming Table
Depending on the game you play, the typical play area is anywhere from 3'x3' to 8' by 6'.  That can be a lot of space that many people just do not have.  The cheapest solution I have found for creating a good baseline gaming table is to go to a big-box retailer and purchase two card tables and put a piece of plywood over it, go to a big box retailer and get three 2'x4' folding tables, or to just gut it out and build the table yourself out of plywood and lumber.  I have done all three.

Now, if you have an existing table, the easiest method is to buy a piece of lumber and throw is on top of the table when you need it.  Most places will cut a piece of plywood down to size, but larger boards maybe subject to a bit of warping in the center, so I prefer MDF.  MDF is heavier though so that maybe an issue.  A board like this can run you $10 US to $25 depending on the quality.  When not in use, you flip the board off and slide it behind the couch, entertainment center, or other suitable out of the way place. 
Two tables pushed together

You can use a variety of item to build makeshift boards.  I use some NSF wire racks and a pair of old closet doors for my table.   It provides storage underneath and a flat surface on top. Virtually anyway you can get four "legs" or supports and a flat surface will work.  Found materials or cheap items from a Thrift store work great for this method.

For a long time, I used 4 folding plastic tables that were roughly 2' x 4" and set them up together.  These were very portable and easy to carry, pack away, or travel with.  They are a bit more expensive as new ones from a Big Box retailer will probably run you over $100.  However, I was able to scout out my first set at a local Thrift shop for about $20 total to make a 8' x 4' board.  Another source can be local churches, libraries, halls hat are upgrading their inventory or garage sales.                   

In a real pinch, I just skip the table and go straight to the floor.  Typically, this is completely free!  As I get older, this option keeps getting tougher.

The floor

Gaming Mats
A Gaming Mat is simply a cover you put over a table to make it look like something other than a table.  There are many nice neoprene or foam ones with fancy designs printed on them.  Very nice, but pricey!  There are much easier and cheaper ways to get a gaming mat.

I find the easiest way to make a gaming mat is to go to the local Big Box store and get the following items:

1. A plastic table cloth of a suitable color
2. A sponge roller from the hardware department
3. A Quart of paint that is a contrast color to the table cloth
4. A place you can pour some paint for the roller

This will run you about $15-20 US.

Snow Mat
You then spread out the tablecloth on a flat surface.  Typically, these table clothes cover about 8' x 4" pretty easy.  You pour the paint, and then you use the sponge roller.  Just roll the alternate color across the surface of the table cloth.  You normally have left over paint that you can store to paint up terrain later.  You then leave it to dry over night.

General purpose Green Mat
I have made deserts, water, snow, "urban", and other exotic terrain types using this method.  They store very easily by folding them up and putting them on a shelf or in a plastic container.  They are also very light and easy to move from place to place.  You can even use multiple layers to help create simple terrain effects such as islands, rivers, swamps, etc.
Using various Mats and cutting to create a ocean, beach, and land

Of course, this is not the only way to make a good play surface to go on top of your table.  Another easy, and relatively cheap method is to go to your local Big Box retailer and take a stroll down their fabric section.  There, you can find pre-printed, light fabrics that can be cut to size for your table.  These range from various forms a camouflage, to black, to other patterns.  They can be more expensive then a cheap, plastic table cloth but they tend to be slightly more durable. 

Fabric
There is a third and final method.  This is the most expensive, but allows for the most "modular" of the gaming surfaces.  It is also the heaviest and hardest to store.  Go to your local hardware store and get a box of Vinyl tiles that are 1' x 1' in size.  You then apply a base coat f paint, and sponge a couple of similar yet contrasting colors and you are all set.

Vinyl tiles

Terrain 
On top of your nice game mat goes the terrain.  This is what your little armies of toy soldiers will be maneuvering around to achieve their objectives.  It is always nice to have an assortment of basic terrain to make use of to act as objectives and obstacles.  Some of the basics include a river, ponds, trees, shrubs, and hills.  With a good selection of these natural terrain items you can have a good looking table.  Thankfully, each of these can be cheap to make.  

Hills
If you are using a fabric or tablecloth game mat, hills are relatively easy to make.  You simply put a stack of books underneath the mat.  Boom!  Instant hills with semi-sloping sides for a more realistic look.  They are not always easy to balance minis on, but they look very naturalistic. 

Books under a cloth

Another easy way to make hills is to get some card board, cut it to a group of identical sizes, stack them up, masking tape the sides of them to seal the open edges, and then paint them up.  This can be cumbersome as it can take several layers of cardboard to get a suitable depth.

Layered Cardboard Hill

A second easy method is to gets pieces of styrofoam from the floral section of your Big Box retailer.  You can often cut them to size with a bread knife heated on a burner.  Be careful, it is hot!  You can then paint it up with left over latex paint from your game mat.  

Styrofoam Hills
Stack them for height

Rivers and Ponds
If you happen to make a water board table cloth mat, you can cut the extra 2 feet or so off and into lake and pond strips for use on your table.  That makes it really quick and easy!  However, if you do not have that option, I also recommend taking a look at the fabric section of your Big Box retailer for suitable gauze or light fabric.  I recommend making strips of about 8 inches long that can overlap to connect.  
Lake front property
To really make a river stick, line the edges with loose moss.  It really makes it pop and represents the shrubs and woods at the edge of any water feature.    
A fabric body of water

Shrubs and Fields
Most Big Box retailers have a craft section that sell fake flowers.  In that aisle, you will frequently be able to find a bag of loose clump moss for centerpieces and floral decorations.  They run between $3 to $5 US.  Buy 1 to 3 bags of this in various colors.  This moss makes amazing shrubs and scatter terrain.  They also do a great job "outlining" larger terrain pieces such as woods, rivers, or fields to act as a board.  it allows you to make "area terrain" very easily.  If you buy nothing else on this list, BUY THIS! 

Often, in the Fabric section of the same Big Box store you can find Faux Fur.   This makes great fields.  It often comes in square patches, that you can use as is or cut into smaller patches or strips.  When combined with the moss, it can make an excellent looking field.   

Faux Fur field with moss border
For hedges, I also recommend you go to the cleaning solution aisle.  There you will find packs of multi-colored sponges.  Often, there are a number of green sponges in the pack.  They cost about $3 to $8 US.  Buy a pack or two.  Once home, take out the green ones, and then use a scissors or knife to cut them into long thin strips.  You now have some hedges or hedge rows.


Trees
In the arts and crafts aisle of your local Big Box retailer, you will find packages of pipe cleaners.  If you can find black ones, that is great; but any color will do.  If you take 3 to 5 pipe cleaners you can twist them around each other to make a solid trunk, and then use the off shoots at the bottom to create a branch system at the top, and a root system at the bottom.  Then paint them brown.  The easiest way is to dip them into a can of latex house paint, but spray paint or brush paint works too.  Once dry, you can use white glue to attach clumps of moss for foliage.  These make great trees.


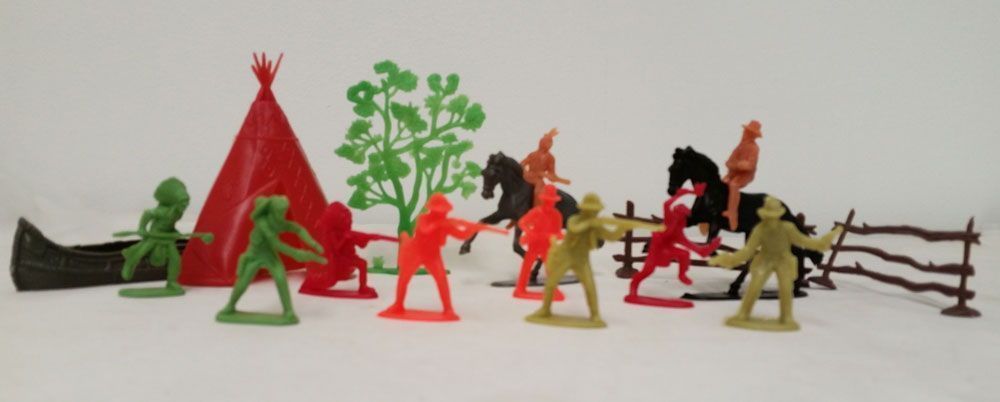
In addition, you can often find toy tubes of plastic toys int he Toy section of the Big Box retailer.  These are about $8-$12 depending.  They have a variety of small trees of various types.  I recommend two tubes, but you can make due with a single tube in a pinch.  Set them out on the table, and then outline the grove of trees with moss.  You now have a area terrain forest with 0 work on your part. 

Toy trees and moss for a grove
     
Dirt Roads
We again take a trip to the floral aisle.  Down this aisle, you will find a roll of burlap.  It will be far to long if you roll out the whole roll.  However, you have more than enough to make a couple of cross roads.  You can cut it to any desired length, and even cross it with ease.  If you also line the road with moss and rocks it will help it stand out even further.  This roll of burlap costs between $5-$8 US.

Burlap road with moss shrubs 

Buildings
These are by far the most challenging piece of terrain to make.  The easiest method is to get cardboard boxes of a size you like, spray paint them a base color, dry brush a contrast with a big ugly brush, and then print color images of windows and doors to glue on them.  Not a method I have used, but I have seen some amazing Super-hero and Mecha tables using this method. 

Typically, I actually build them out of cardboard.  Cut them to the shapes I want and templates I want and then glue them together.  I use masking tape to seal the edges and then you can hit them with spray paint for a quick finish.  Some spray paint even comes with texture now to make it even better.

Sadly, I never did finish painting this
The final method to create quick buildings is to find ready made interesting shapes and just put them on the table.  These can be electrical boxes, packaging, containers, what ever you come across!  The novel shape will often be good enough to make it work.

Novel shapes = Futuristic! 

Cardboard packing walls
Random Bits
Scatter terrain is also a very important part of wargame tables.  Things like barrels, boxes, crates, dumpsters, pillars, bushes, etc.  Crates and boxes can easily be made by stacking card board strips together and sealing the edges with masking tape, or cardstock off-shoots.  You can also make paper templates that you fold up and glue together as well.
PVC and cardboard crates in the background

Another great source is the local pet shop, toy store, or post-Christmas clearance bin.  You can find all sorts of goodies such as ruins, sand bag pits, walls, trees, etc.  These cost a bit more but can often serve to add a bit of spice to the table.   
Post- Christmas walls for a snow battle

Columns from a pet store for aquariums

Final Thoughts
Your local Big Box retailer is an easy way to make a nice selection of terrain for your wargames on the cheap.  Most of it is also relatively easy to construct or requires no special skills on your part.  You can make very nice, effective, portable tables for less than $50 US and about 2-10 hours of work (not including dry time).  To me that is a great way to make your money and time budgets last!

If you do nothing else from this article, go to the local Big Box retailer, go to the craft section with the fake flowers, and buy at least 1 bag of clump Moss and Lichen!  It will raise your terrain game 100%!

Give it a try and let me know some of your best finds in the comments.


Monday, July 8, 2019

Wargame Design: High Noon: Plastic Men, Steel Resolve

At my local grocery store, they have a small section to sell toys to the little sprogs.  It is 4 lonely feet mixed in with the sugary cereals.  A perfect place to ambush an unsuspecting parent!  In this forsaken section of toys, they had a bag of plastic cowboys and Indians.  It had been a long time since I had seen a bag of these toys.  I managed to resist buying them for several visits, but eventually my willpower cracked and in a moment of weakness I bought them.


As many of my long time readers will know, I love using toys for my wargames.  Of course, my first though was to use them for some Wild West themed game like Legends of the Old West, Dead Man's Hand, Fistful of Lead, or Dracula's America.  I had been toying with the idea of a Weird Wild West game myself for a long time.  I never actually got it down on paper, and eventually that game morphed into Turf War instead.  However, here I was with a nice set of multi-colored cowboys and Indians with no game to call home.

When I showed my family what madness I had wrought, my daughter was quick to solve the problem.  She asked if I was going to make another dexterity game with them!  Genius!  

I had first been introduced to the ideas and mechanics with the Z-man game Flick'em UP!  At first I had been skeptical.  However, after playing several games with players of all skill level and ages I was won over by the concept.  I had successfully used dexterity combat mechanics to make games before.  You can see the successful results in Total CARnage and Green Army Men: Plastic Men, Steel Resolve .  At that point, I decided that this rule set was going to join the Plastic Men, Steel Resolve family of games.  


So, the big question was how to make it a unique experience.  It was clear it would still use the WYSIWYG (What You See Is What You Get) mechanics of my other dexterity games.  I still wanted the flick and flip mechanics too.  Finally, I also had dice "coin shifting" for different weapons lethality.  These were all features of Green Army Men: Plastic Men, Steel Resolve as well.  

Most of the flavor came from a few sources:  

1. Unique weaponry- The Wild West was well known for a few key weapon systems; the revolver and the lever action rifle.  Of course, those were not the only weapons.  The question was how to make them unique.  This was done by adding special rules not present in Green Army Men: Plastic Men, Steel Resolve   

         
2. Scenario Design- The flavor of the Wild West needs custom scenarios like stage coach robberies, jail breaks, showdowns at high noon, etc.  

3. Horses and Wagons- Riding horses and wagons was a key part of the Wild West.  Without horses, you loose the flavor of the period.  Therefore, there are rules for mounted models too! 

From Chick's Discount Saddlery
With those key elements identified, it was time to put the new rules together.  Thankfully, I was able to build off of an existing framework.  However, a revolver in the this Wild West game ended up working very differently than a pistol in Green Army Men: Plastic Men, Steel Resolve .  In addition, this new game had twice as many scenarios to play than its predecessors.  High Noon: Plastic Men, Steel Resolve was born.  


You can find this game (along with my other works) at my Wargames Vault page here: https://www.wargamevault.com/browse/pub/11064/Blood-and-Spectacles-Publishing

Here is a quick start of a Battle Report to get a feel for game play: 

Black and Blue Bart and his gang of outlaws were trying to scout out a watering hole.  They came across a band of Native Americans.  The Indian war party recognized the outlaw, and decided to try and hunt him and his posse of outlaws down for the bounty.  

Forces

Black and Blue Bart and his Boys
1 Two Pistols
1 Pistol
2 Lever action rifles

Indian War Party
Knife and Shield
Spear
Spear and Shield
Shotgun
Long Rifle

Forces were selected by dividing the toys up by color.  Then reaching into the bag and pulling out random figures and using what they were armed with.  Simple.  

Set-up
The board was set-up on a 4x3 table with a desert mat.  We then placed four pieces of random stuff I had within arms reach.  Terrain is 1 for 1 in this game so What You See Is What You Get (WYSIWYG).  If you have Wild West themed terrain that is great, but it is not needed.  

Mission
We looked at the three pages of scenarios and we decided to do a basic Rootin' Tootin' shoot-out.

Turn 1
The coin flip let's the Cowboys go first.  Bart moves up with his two pistols and shoots ineffectively.  He is countered by the knife wielding indian going up the center as a distraction.  An outlaw rifleman runs forward and fires at a spear men, but misses.    


A second spear men moves up and a well aimed throw puts the Outlaw out of the game.  First blood to the War Party.  

However, the second rifle armed Outlaw stands still and fires across the board.  Since he stood still, he can take two shots with a lever action rifle.  His second shot finds its mark despite the distance!  The Indian spear man goes down and is out of the game.  

  
The Long rifle and Shotgun Native Americans move up the flank, while a pistol armed outlaw tries to cover the center of the board.  

That ends Turn 1 with both sides using alternating activation to move and shoot, shoot and move, or to simply shoot.  Not moving let's some weapons fire more often.  

So, that should give you a general feel for the game play.  Now you can decide if it is a game for you.  You can find this game (along with my other works) at my Wargames Vault page here: 


Monday, May 20, 2019

Battle Report: Combat! Starring Vic Morrow- Co-op Play


It is surprising the number of times I play and lose games against my wife and against my daughter. I have been playing and designing wargames much longer than they have. Yet somehow, they still consistently beat me. I would say the ratio is 60:40 in their favor. Therefore, I finally figured out a way to not lose. I decided to play a Co-op game with them!


The game we decided to give a go was Combat! Starring Vic Morrow. This is a game I designed in homage to the old (mostly) black-and-white television show of the same name. Therefore, it is set in World War II; but with a twist. It is not designed to be super realistic, but to adhere to the tropes of TV war shows. The game has player-vs-player, Player-vs- AI, and Co-op game modes. In Co-op the player can take control of a number of cast members form the show and play against Decision tree opponents and randomized enemies.

Somewhere west of Paris, the American forces were pushing the Germans closer to the French capital. However, the fighting was fierce and the American troops had to bleed for every mile. 2nd Lt. Hanley was tasked with escorting an Army Air Corp observer into German territory to determine the effect and extent of the night time bombing raid carried out by the British RAF.

This was a mission that would require speed to succeed. However, Lt. Hanley knew he would also need to back-up his speed with firepower to bust through enemy lines. He surveyed the squad and called Sgt. Saunders and Private Kirby to his side.

We decided to pick cast members from the show. In this case, I played Lt. Hanley, my daughter was Sgt. Saunders, and my wife was Kirby.

Forces

2nd Lt. Hanley- Star
Rifle, Pistol, Knife, Grenades

Sgt. Saunders- Star
Tommy Gun, Knife

Pvt. Kirby- Cast
Browning Automatic Rifle, Knife

1 Army Air Corp Observer- Co-star
Pistol, Knife

vs.

Randomized German Stooges!
-Based on the Ratings of the Combat! Cast members we choose, we would face off against about 7 Combat Markers of unknown enemies.

For this game, we used some of my (in)famous green army men to take the game for a spin.

Mission:
The mission was randomly generated, and it was to escort the Army Air Corp Observer across the board. He had to leave the opposite table edge. Lt. Hanley decided to escort the Observer himself.

Set-up:
The board will be a 4 by 4 board for today's battle. There was a road across the board, a hill, and several fields. A stream cut across the corner of the far side. The Combat! Markers were scattered in cover all over the board. Kirby was on the right flank, Sgt. Saunders in the center, and Lt. Hanley and the Observer on the left.

Normally, I have pretty detailed batreps for the games I play, but this one did not work that way. I was busy trying to help my family through the game. Therefore, I only have the general idea of what happened.

The Game
Kirby cut across the field in front of him and found a German soldier with a rifle on the other side. He took a shot at Lt. Hanley and forced him to take cover. However, Saunders moved up and Tommy Gunned him down.

As Hanley and the Observer went up over the hill, they revealed a German with a sub-machine gun. He opened fire on Saunders, but missed. Lt. Hanley tried to get the drop on him, but missed. The German was pinned from the shooting. Eventually, Saunders scuttled over and traded shots with the German while Hanley and the Observer hurried past. Eventually, Saunders managed to gun the plucky German down.

As Kirby approached the road, he was jumped by three German soldiers. They fired wildly and missed him, and Kirby kept his cool and fired back. 1 went down. Things looked bad for Kirby until Lt. Hanley tossed a grenade into the German position and took them all out.


The group scurried across the road, but a group of German soldiers appeared from a nearby field. Saunders drew his knife and charge into their ranks to keep them from attacking Lt. Hanley and the Observer. This kept them distracted as the wildly defended themselves against the Sergeant.

Lt. Hanley and the Observer rushed ahead to bypass the German's in the field but turned the corner and came face-to-face with a German NCO. He fired a quick burst from his sub-machine gun and rushed Lt. Hanley. The Lt. Dropped his rifle and tried to pull his pistol but was too slow. The German NCO bowled him over with his momentum and proceeded to stomp Lt. Hanley into unconsciousness.
 

Lt. Hanley was lucky that Kirby was covering the flank because he turned and fired, taking the German NCO out. Kirby rushed forward and took control of the Observer who had hunkered down into cover.

Saunders was battered but he eventually took out the three Germans he was tussling with. That's why he was the star of the show! He moved up to support Kirby and the Observer. Kirby grabbed Lt. Hanley and slung up over his shoulder. The small group then managed to bypass the last German patrols and make it into German held territory.

Mission a success.

Conclusion:
Eventually, the small group made it to the target area. 2nd Lt. Hanley had recovered enough to take care of himself, but he was nursing a swell goose egg on his forehead. After getting past the frontlines, German activity thinned out and they had made good time.

The four of them huddled in the bushes, as the Observer pulled out his camera and started snapping pictures. Then, he eagerly jotted notes with a grease pencil into a small pad. After about 60 minutes of traversing around the demolished rail yard, the team took cover in a small french bard for the night.

We'll wait here until dawn, and then head back to our own lines.” 2nd Lt. Hanley ordered, “Did you get what you needed?”

The observer tapped his notepad, “All right here. Are you feeling okay Lt.?”

He's had worse,” Kirby chirped in.

Nothing a relaxing walk in the French coutnryside tomorrow won't cure,” grinned Sgt. Saunders.

Music swells and roll credits.

The mission was successful, but not without some tight spots and daring do! My wife immediately noticed that the “Stars” of the show had more opportunity to act and complete objectives than the Extras and Cast Members. Through the adventure we used all the little things that make this ruleset somewhat unique such as extending Screentime for more actions, suppression fire, aimed fire, pinning, Star Power to re-roll a dice, and Plot armor to take more than one hit. I wish we would have thought of using the First Aid action on Lt. Hanley.... Oh well!

Overall, the AI decision tree worked even if it did feel a bit roll heavy on occasion. Also, the activation process using multiple, collaborating players as opposed to Axis vs. Allies was a little bit more challenging. It required us to decide as a group who was going to use Screentime next. Finally, I may have deployed the Combat! Markers incorrectly as I placed them in cover randomly around the board instead of by the letter of the rules. This allowed us to bypass a couple. Despite these minor quibbles, the game worked just fine as a cooperative battle.

My family said they would play again as they prefer co-op games instead of versus games all the time. That means, some of my future design work may try to cater to this preference. Can anyone point out other fun co-operative miniature rules?

Monday, April 2, 2018

Random: Green Army Men- Kill'em All and Destroy the Objective

My daughter and I had some time to kill after work and we decideded to play Green Army Men: Plastic Men, Steel ResolveThe games is very simple to set-up and play and we managed to play 2 game sin about 20 minutes.  Then, it was time to go and our busy life was back in full swing!

I didn't keep careful notes of all the events, but I did keep track of some highlights.

Forces:
Choosing armies was really easy.  I asked if she wanted to be green, grey, or tan soldiers.  She opted for grey and I opted for green.  We then reached into the bucket and pulled out 5 guys a piece and looked at what they were armed with.

Team Grey:
1 Sub-machine gun armed soldier
1 Grenade armed soldier
2 Rifle armed soldiers
1 kneeling rifle armed soldier

Team Green:
1 Sub-machine gun armed soldier
1 Bayonet and rifle armed soldier (Man I hate that pose!)
2 Rifle armed soldiers
1 Shotgun armed soldier

Overall, it was a good mix of weaponry types to try out.

Deployment:
We set-up in alternate corners of the table.  For terrain we placed a stapler, tape dispenser, a coffe mug, and a disposable coffee cup.  We were playing on a  standard sized table so probably 3 feet by 2.5 feet.

The Battles:
With that, we played a Kill'em All scenario first.  We just wanted to get familiar witht he game and the basic mechanics.  It took us very little time as the game is very intuitive.  One thing that happened a few times in this game is that the movement penny flick would hit a guy.  Per the rules, that would take out both players models!  It actually ended up as a draw because the two final guys ran into each other during movement!


The second battle was a Destroy the Objectie mission.  We used a big cardboard coffee cup for the objective.  I was the attacker and managed to reduce the Objective down 5 hits.  However, I ultimately lost as all of my guys were killed.  The final guy was taken out by a direct hit froma  grenade the knocked him over.  Ouch!


Here are a bunch of random pictures for that battle too.

Final Thoughts:
That was quick, brutal, and fun.  I look forward to playing it again, and I am sure it will be a hit with my family over Easter holiday.

You can pick up a copy for yourself at the Wargame Vault here!

Monday, March 26, 2018

Wargame Design: Green Army Men: Plastic Men, Steel Resolve- Dexterity Based Combat

Around Christams 2016, my family holiday was playing a lot of Flick'em Up! by Z-man Games with my family and their kids.  This was an eye-opening .  We were having tons of fun and flicking stuff all over the place.  The next year in 2017, we played a ton of Total CARnage.  This was a car combat game based on flick and dexterity mechanics after playing Flick'em Up!  Again, a great time was had by all!

Right afterwards my daughter challenged me to make another dexterity based game, but using plastic, green army men.  She wanted it ready by Christmas 2017.  Well, I didn't hit her deadline but I did get it done for her!

I present to you; Green Army Men: Plastic Men, Steel Resolve
 

The goal of this game were the following:

1. Create a game using plastic Army Men
2. Resolve all actions using Dexterity based resolution
3. 1:1 Terrain
4. "What You See Is What You Get" gameplay
5. No specialized wargaming components
6. Simple and basic resolution
7. Use only found materials
8. Fast, simple, and furious games
9. A game for almost any age or experience level


This is intended to be a simple and straight forward ruleset for playing dexterity based wargames with newcomers to the wargaming hobby.  Instead of the usual tools of the trade like Dice, Rulers, Miniatures, Scenery, etc. it is intended to use everyday items and found materials to play fun, fast, and tactically challenging games using found items and ordinary plastic toy soldiers.  The rules are scale and model neutral and dispenses with the usual concepts of ground and time scale and other intricacies.


I started wargaming when I was a youngster, about 10 years old.  However, I frequently did not have the scratch to buy “real” metal models.  Therefore, I used what I had.  What I had was lots of cheap, plastic toy army men mostly made in Taiwan, Korea, and China.  Soon, I was using those to stand in for more formalize models to fight battles with the early rulesets I could get my hands on; including the works of Featherstone and Grant from my local library.  Ever since those days, I have yearned to build a game that only uses plastic army soldiers.  

I look forward to hearing about your adventures on the kitchen table (or anywhere really) of battle with your plastic army men.

You will be able to find this game at the Wargames Vault here.