Thursday, March 30, 2017

Castles in the Sky- Balkan Uprising Campaign- Patrol near Elli

Salonica has fallen, but the ground campaign has begun to turn into a grind.  The Turkish defense has been stiffening with each step the Balkan League troops take.  Ottoman forces have been coming across the Aegean to bolster the defenses, and the Balkan League must find a way to stop this flow of fresh troops. 

The Balkan League forces have a new admiral after the death of Admiral Senyavin at Salonica.  He was killed when his flagship the Poltova exploded during a short range gunnery duel with the Ottoman flagship.  The new Admiral Pavel Ivanov is not deterred by the drubbing his fleet took above Salonica and orders a fresh Offensive into the Aegean (Admiral Ivanov has a Command rating of 1?  Gulp!) .  Admiral Al Reis of the Ottoman League force is also confident after destroying so many Russian ships aligned with the Balkan League.  He also orders his forces back on the Offensive, despite failing to breakthrough at Salonica leading to the loss of the city. 

Both forces have begun to fan out across the Aegean.  The Balkan League is trying to capture and destroy troop ships, while the Ottoman League is trying to stop these attempts. 


Per the rules for Campaigns, both sides choose Offensive strategies.  Admiral Ivanov rolls up a Patrol mission where the Balkan League is the attacker.  This will be a 6 turn engagement with any classes of ship up to 25 Armor points. 

Forces

Balkan League
To ease pressure on Russian assets, Admiral Ivanov has ordered the allied ships to take a stronger role in these Aegean patrols. 

French:
Brennus                                               Captain: Theo Aube                        Command: 4
Class: Charles Martel                      Category: Heavy Cruiser                               Armor: 8

Primauguet                                        Captain: Jean de Vienne                               Command: 4
Class: D’iberville                               Category: Cruiser                             Armor: 7

Greek:
Georgios Averoff                             Captain:  Sofoklis Dousmanis                    Command: 3
Class: Vettor Pisani                          Category: Armored Cruiser                          Armor: 8

Total= 23 Armor Points

Ottoman League
Prince Eugen                                      Captain: Anton von Sterneck                      Command: 2
Class: Tegethoff                                 Category: Battleship                                       Armor: 9             

Bravo                                                    Captain:  Anton Pock                                      Command: 4
Class: Huszar                                      Category: Destroyer                                       Armor: 6

Volta                                                     Captain: Ludwig Brommy                              Command: 1
Class: Huszar                                      Category: Destroyer                                       Armor: 6

Total= 21 Armor Points

Looks like a rematch between the Prince Eugene and the Brennus from Salonica!
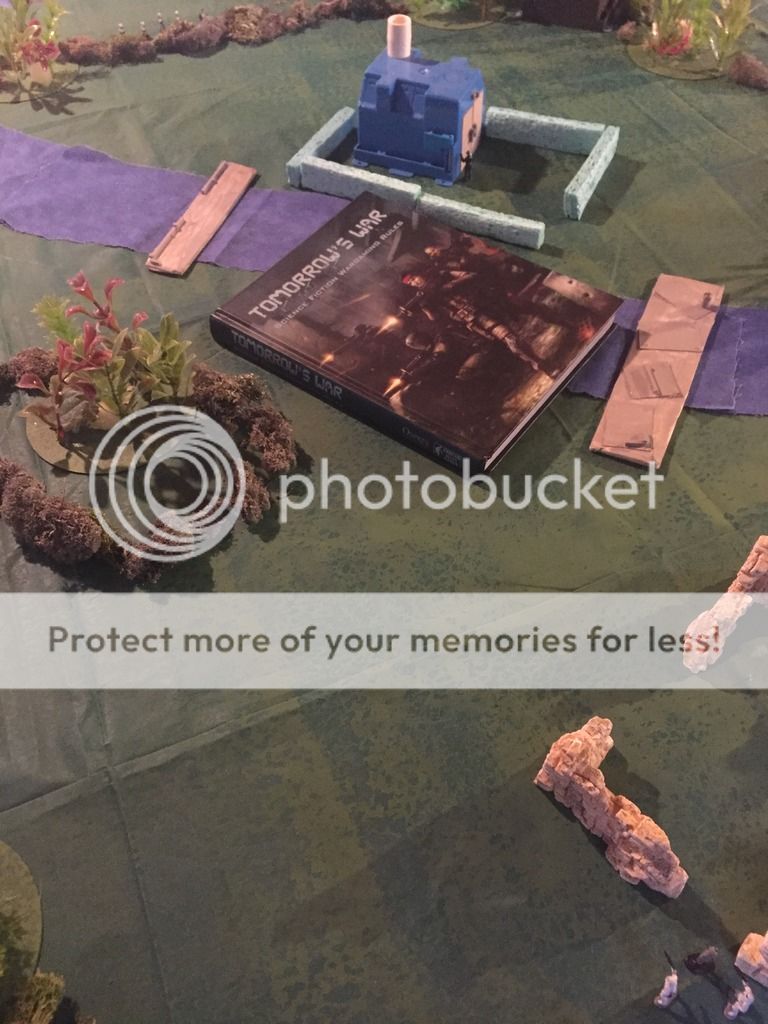
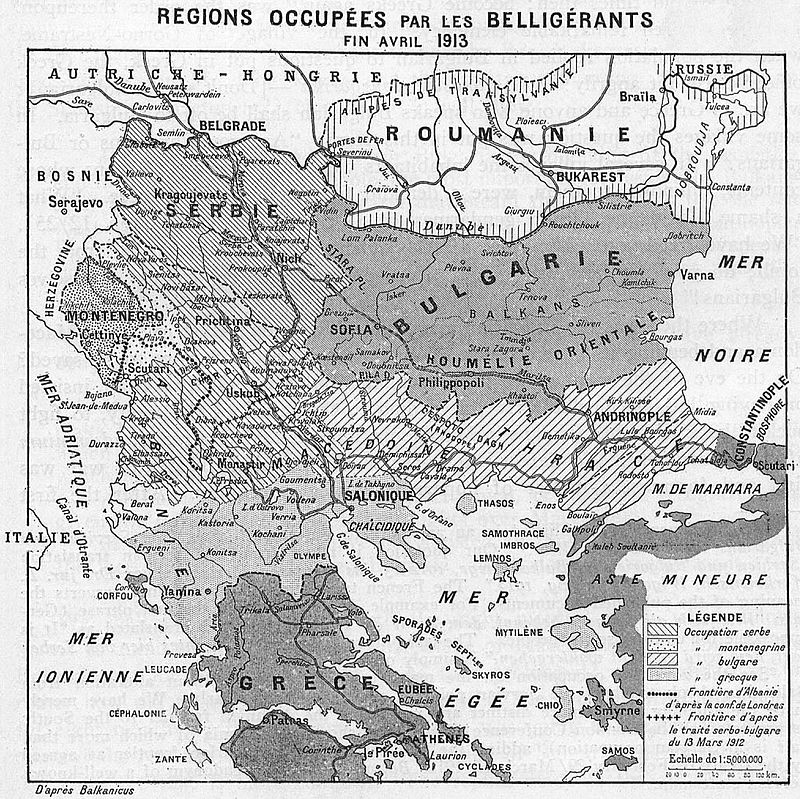
Mission:
This battle takes place south of Thasos but north of Lemnos in the Aegean Sea.  The Balkan Fleet is attempting to locate any troop ships on route to the mainland, while the Ottoman League forces are attempting to locate and eliminate any Balkan League ships in the area. 

This battle will be a relatively straight forward affair with both sides trying to eliminate the other as they come across the enemy.  There are no complications and the battle will take place on a 4x4 table. The fleet with the most Armor points left after 6 turns is the winner.    

The Brennus is the Balkan Command ship, while the Prince Eugene is the Ottoman League flagship.  No ships are in squadron.       

Set-up:
The Austro-Hungarians are in the center of the table with the Prince Eugene leading the two destroyers.  They are all going speed 3 and at mid-altitudes.  The French are coming on from the North side at speed 5 and mid-altitudes as well.

Turn 1:
Initiative: The Balkan League wins with 3 successes to 2.  They decide to go first. 

Movement:
The Primaugaut stays low, slows down and heads forward to use her air torpedoes.  The Brennus and the Georgios Averoff split towards opposite edges to try and get the Austrio-Hungrians into a kill zone between their broadsides. 

The two Austrian destroyers race forward and didge down to screen the Prince Eugene from the expected Torpedo barrage from the French cruiser.  I was unsure how to play this, should the Prince Eugene just try to take the barrage and have the Destroyers race off to attack a target or try to screen the bigger ship?  This time, I decided to try and screen and see what happens. 

Battle:
The Georgios puts a burst on the Bravo, while the Brennus locks-on.  The gun batteries fire and hit the Bravo twice and cause another burst. 

The Primaugaut fires a brace of 6 forward air torpedoes at the Prince Eugene despite the Destroyers trying to screen her, they can not intercept the torpedoes.  The Prince Eugene’s point defense systems take out one, and three more slam into the ship’s armored belt and fail to cause damage.  Two other harmlessly miss and detonate. 

The Austro-Hungarian destroyers hold fire.  However, the Prince Eugene fires its main batteries at the Brennus and fail to hit due to burst and elevation differences.  Ammo is good.  They also fire a brace of 4 air torpedoes at the Brennus.  The French Point Defense takes out one, and the other three streak across the ship’s bow and miss. 


End:
The Bravo takes two hits, and its screw is fouled! 

The Austro-Hungarians remove the Bursts from the Pirnce Eugene and the Balkan League removes it from the Brennus.

Turn 2:
Initiative: French earn 2 successes, and the Austrians earn 1.  The French decide to go second and see what the Austro-Hungarians have in mind. 

Movement:
The Austro-Hungarian fleet began to wheel slowly to the west, the Volta leading the way.  The Volta decided to blow smoke, while the Prince Eugene re-loaded her ordinance.    

The Georgios Averoff slowed to stay in front of the Austro-Hungarian fleet and keep them in her broadside arc.  The Primaugaut dived to stay out of the way and reloaded ordinance, while the Brennus moved to engage the Prince Eugene in a Broadside duel. 

Shooting:
The Volta and Bravo both fired their light batteries at the Greek ship, but missed. 

The Prince Eugene fired her bow Air Torpedoes at the Primaugaut trying to get below the fleet.  Two are destroyed by point defense, one misses, and the last one bounces off the ship’s armor and explodes harmlessly. 

The Prince Eugene’s big batteries fire on the Brennus.  The French ship is shocked as the Austrians roll 9 hits!  The French captain hurriedly orders a Brace to try and save his ship from a pounding!  Say good-bye to that gunnery duel.  The Brennus makes 4 Brace saves!  Remarkably, only one hit manages to get past the Heavy Cruiser’s armor.

In reply, the Brennus returns fire but only inflicts 3 bursts as the shells bounce off the Prince Eugene’s armor.  The Georgios Averoff puts a single burst on the Volta. 


End:
The hit in the Brennus only peels away some armored plate. 

The Balkan League removes the bursts off the Brennus and one from the Primaugaut.  The Austro-Hungarians remove the bursts from the Prince Eugene and the Volta. 

The bravo can not repair as she still has two bursts on her. 

Turn 3:
Initiative:  Balkan League 2 and Austrians 1.  The French decide to go first this time. 

Movement:
The Balkan League continues their circling maneuver.  However, the Austro-Hungarians will have none of it.  The Destroyers stoke their boilers and rapidly speed-up to break through the Balkan League line.  The Prince Eugene decides to put up a smokescreen to help protect herself as she slowly builds up steam to escape. 

Shooting:
The Greeks are not eager to let the damaged Bravo go so easily so they lock-on and fire at the destroyer at short range.  Two more bursts and a hit on the Austrian Destroyer. 

The Brennus also locks-on and fires with her broadside at the Prince Eugene.  The Smokescreen provides little protection as the Heavy shells strike home.  However, at the range they are at, none of them find a weak spot on the Austro-Hungarian ship. 
The return fire from the shrouded Prince Eugene manages to put a burst on the Georgios and the Brennus.         
          
End:
The Bravo loses another point of armor. 

After Burst removal, the Prince Eugene is the only ship with one left. 

The Bravo manages to repair her screw! 

Turn 4:
Initiative: Balkan League wins with 4 successes and the Austrians 1. 

Movement:
The Brennus successfully Comes About in an attempt to pursue the fleeing Austrian Battleship.  The other Balkan League ships do the same.  However, the Austrians are content to flee the battle, the Destroyers look like they will escape next turn, with the Prince Eugene trudging along behind. 

Shooting:
None of the Balkan League ships have the range to damage the Prince Eugene, so are hold their fire to avoid Ammo checks. 

The Prince Eugene does not feel the same way, and fires on the Georgios Averoff with a broadside.  They even lock-on.  The Greeks Brace.  The result of the fire is two bursts and a hit! 


End:
The Austrians shot managed to jam the rudder on the Greek armored Cruiser. 

All bursts are removed. 

Turn 5:
Initiative: Austrians win with 1 success and Balkan League have none! Austrians elect to move first. 

Movement:
The Destroyers escape off the board.  The Captain of the Austrian Battleship is satisfied with the range and uses a Come to New Heading order to turn back into the fight!  Seeing this, the Balkan League fleet tries to stay out of the field of the guns with the Greek’s going up one altitude band and the Brennus going down one.  Perhaps the tables have turned? 

Shooting:
At long range, the Prince Eugene manages to put one more hit on the Brennus!  The French Heavy Cruiser takes the punishment and holds fire with her own guns, the range being too great to cause damage.

End:
The Brennus loses another Armor Point. 

The Greeks repair their damaged Rudder. 


Turn 6: Final Turn
Initiative: French score 2, and the Austrians 0. French decide to go second. 

Movement:
The Austrians are content to steam ahead.  The Brennus dives to go below the field of the Prince Eugene’s guns while the Georgios Averoff is content to scoot away.  The Primaugaut sneaks up behind the Prince Eugene for a torpedo attack using a Come About special order.    

Shooting:
The Prince Eugene fires at long range on the Greeks, but misses.  The ammo roll is passed. 

The captain of the Primaugaut lined up to fire his burst of torpedoes.  However, since the Primaugaut had to use a Come About order the torpedoes may not be fired this turn.    

End:
No bursts need to be removed, and no one needs a repair roll. 


Conclusion:
The battle forced the Turkish command to hesitate and begin to re-think their strategy in the Aegean.  Instead of sending their troopships across in loose groups, they instead decided to launch a coordinated attack on the island of Thasos.  They began to marshal their air and naval assets for the attack.  Meanwhile, the new Balkan Admiral was buoyed by the success of his offensive strategy and began to lay the groundwork for his next offensive.    

The Balkan League and the Ottoman League bash at each other above the Aegean.  Both sides lost 3 Armor Points, so the Balkan League scores a narrow win since they started with a couple more armor points.  It was up to the Austrians to land a few more decisive blows.  However, I was more concerned about getting out of the kill zone than causing damage. 

I am unsure if it was wise to move my Destroyers so aggressively the first turn.  If I hadn’t the Prince Eugene would have taken the brunt of the Balkan attack, and probably weathered it fine.  However, At Salonica I had seen how powerful the initial torpedo barrage had been and wanted to avoid that fate for the Prince Eugene.  In the end, it didn’t really matter and the Bravo took a pasting it may have been able to avoid with speed. 

In addition, I grabbed the two Austrian destroyers for my list hoping to have some torpedo snipers of my own, but was disappointed when I realized that the Huszar class is armed with Air Mines instead.  I didn’t really get a chance to use them this game.  The French D’iberville class cruiser’s air torpedoes were terrifying to me since I knew they could effectively snipe my larger battleship and not endanger herself to my guns.  I am lucky she couldn’t give me that parting barrage in the final turn.  I am very happy with how the Prince Eugene performed in the battle, doing the brunt of the work and shrugging off the heavy guns of the Brennus.
        
Campaign Stuff
The Ottoman League is still in the lead with 3 Campaign Points to 1.  This time, the Balkan League holds onto the point.  They have now won two of the last 3 battles, but barely. 

Damage:
The crew of the Bravo manages to repair 1 armor point, bringing her to 4.  They then use two of 4 Strategic Assets to repair the rest back to 6 armor. 

The Brennus repairs 1 armor with crew, and 1 with a Strategic Asset back to full armor. 
The Georgios Averoff’s crew repairs her back to full armor.

The ottoman’s Bank their remaining Assets to give them a bank of 7, while the Balkan league has a bank of 1.

Experience
Bravo= +1 (5)
Volta= +1
Prince Eugene= +4 (8)

Brennus= +2 (4)
Primauguat= +2 (8)
Georgios Averoff= +5

No ships earn enough for an experience upgrade. 

The Balkan League’s successes on the ground maybe short lived as the Ottoman league’s success in the air is causing concern among the Balkan Command.  Admiral Al-Reis has begun to plan operation to fortify and secure the ottoman position on Thasos to allow the Ottoman troops a safe haven and assault point to the mainland.  Such a move would put the Balkan League’s latest gains in peril and secure the ottoman’s a chance to grow their reinforcements in Europe.    


In the meantime, Admiral Ivanov was pleased with the French efforts in the Aegean and has begun to plan his own operation towards the Dardenelles.  Captain Aube and his staff find such a maneuver to be fool-hardy, but the Russian Admiral will not be dissuaded so close to fulfilling Russian ambition in the region.  Only a few weeks into the Uprising, and the decisive battle still looms in the future.  

Tuesday, March 28, 2017

Wargame Design: The False Granularity of the D20

The use of dice as random number generators is a pretty common feature of wargames.  Therefore, designers often spend a great deal of time thinking about, utilizing, and rolling dice.  Lately, d20’s and d10’s have been all the range over the humble d6.  The main reason is the range of possible results on a larger dice rather than a smaller dice.  Before proceeding, let me preface this by saying that I am not a huge stats/probability guy, but this is the bit I have gleaned along the way.    

The question is what method of using dice is best?  In truth, it is a trick question.  The best dice method is the one that does what you want it to do! 

I see many games moving towards the d20 as the dice of choice, such popular games as Frostgrave and Rogue Stars are good examples.  The designers claim this allows them more room to add granularity through modifiers to the results of the roll.  You have 1-20 options instead of 1-10, 1-12, or 1-6.  That seems intuitive enough.  However, is it ture and is it desirable?  


The D20
Let’s take a look at the standard probability of the roll of a d20.  When you roll it you have a 5% chance of scoring any individual number on the roll.  So, if you needed to roll a 14, the chance is a 5% chance.  If you make it a success matrix you add up the 5% of each number above the target number to get the probability.  Therefore, if we are looking for a 14+ the probability is 30% or so.  In Rogue Stars you can initially activate on a 9+ when you roll 3d20, so you have a chance of rolling an initial activation of 55%. 

So, what happens when you add modifiers and success tests?  Well, it is pretty simple.  Every modifier on a d20 adds 5% so if you need to roll a 14+ and have a +2 modifier then you have a 40% chance of hitting the target number.  Essentially, each modifier is only 5%.  So, these little modifiers do give you a level of granularity. 


 Now, take a game like Frostgrave as an example.  In this game, you use a d20 for an opposed test.  If both players roll simultaneously and have no modifiers, what is the chance that one player will beat another?  There is no way to tell, it is literally the roll of a dice as anyone number can be hit on a 5%.  The chances of beating your opponent in uncontrollable and has no level of prediction.  The controllability of the result only comes into play with modifiers.  So, let’s pretend that player A has a +6 modifier and player B only has a +2.  Player A has a 20% chance of winning.  Here is how, Player A’s modifiers are +30% and Player B has +10% which equals a difference of 20%.  In essence, in Frostgrave, there is very little player control over who will win these opposed rolls.  Therefore, you get the granularity of results but the granularity doesn’t lead to any appreciable performance difference between models.    

The Double D10
Now, if you are a statistician or need to be involved with probability much you have probably heard of something called a Bell Curve.  Most sets measurements will eventually conform to a Bell Curve if they have a normal distribution.  A Bell Curve simple has tapered ends with the end results being less likely occur than the middle numbers.  This is important to understand as a given result becomes easier to “predict” or “control” when the number distribution of results falls on a Bell Curve.  

Individual d20 rolls do not fall on a Bell Curve, any result is just as likely to occur.  The results of rolls on a 2d10 are going to fall on a Bell Curve.  By falling on a Bell Curve, the results of the dice can be more predictable or controlled by the designer. 

https://glimmsworkshop.com/2011/08/22/core-mechanics-randomization/
As you can see, you start to weed out the more extreme outlying results, with a more likely occurrence at the center of the Bell Curve.  It is no longer a straight 5% calculation; instead changes such as modifiers are on a sliding scale, with results that bring you closer to the middle having a proportionate impact on the results.  If a 2d10 has the average score of 11 of 10% as opposed to a 5% for a d20.  If you go to the extreme edges the chance of scoring a 2 or 20 is just 1% instead of 5%. 

If you are using 2d10 versus a Target number for success, your chance will vary more by the difficulty of the task.  So, if you need a 14+ you have a chance of 28% chance.  If your target number was 9+ it would be 72%.     

So, let’s pretend that Frostgrave used a 2d10 mechanism instead of a d20 system.  If Player A and Player B fights with the highest number winning both players still have the same chance of winning, as they are both just as likely as the other to roll higher than the other.  However, the range of results will probably be less extreme, and the chances to drawn combats more likely.  Both players have the same chance to get a result.    

Now, let’s pretend that Player A has the same +6 while Player B has a +2.  What do you think will happen?  Well, due to the curve of the distribution the exact percentage change is harder to calculate, but the average distribution means the player with the highest modifier will most likely win.  Each modifier is not a given +5% like in a flat distribution but is instead proportional to the change on the Bell Curve.  This method actually allows a player slightly more control of a potential dice result if they understand the Bell Curve.                    

Final Thoughts

The primary reason designers want a d20 is to create granularity.  The Granularity of the d20 is false.  Instead, it leads to a more chaotic system.  In a game using a multi-dice system I can be confident that a modifier of +/-1 will have an impact on the game.  The same can not be said of the flat distribution of a  single dice.  Therefore, multi-dice mechanics leads to greater granularity than a straight d20.  The granularity of the d20 is a false promise for game designers.                 

Friday, March 24, 2017

Aquanautica Imperialis- Battle Report- Blockade Run off Da Deff Islandz

The orders from Vice Admiral Travers had been brief and to the point:

"Reliable Class Cruiser Warhorse, proceed to coordinates 456Beta-Epsilon. Accompany Faithful class escort squadron Dagger 456. This squadron will mine the harbor. Protect from Ork vessels." 

It was too bad for Captain Brahn that the Orks had chosen the exact same time to try and make a break from the Deff Islands, and they were planning on using the very same harbor he was trying to mine. 

Captain Brahn watched the ugly Ork ships plodding there way through the narrows in an attempt to make open ocean. They were wreathed in smoke and ash. Their bows plowed through the waves, smashing the ocean aside. The small green forms of Ork and gretchin crew could be seen scampering around the deck. 

Captain Brahn lowered his Monoscope. The orks were an affront to his sense of nautical pride. By rights, those tubs shouldn't even be able to float much less sail. 

"Clear for actions," the Captain snapped. "I don't want one of those getting out alive." 

Klaxons began to wail all over the Warhorse as crewmen scrambled to their battle stations. 

+++++++++++++++++++++++++++++++++++++++++++++++++++++++++++++++++

Scenario: Blockade Run

Attacker: Orks- 750

Big Dakka Boat- Smokescreen, Nobs, Ram- Toofsmasha
2 Drilla Killaz- RuffnTumble
5 Gun Tubz- Grutz Raiderz

1 Sneaky Git- Badknife
2 Grot Subs- Runty and Smallfry

Defender: AN- 400

Reliable Class Cruiser- Warhorse
2 Faithful Escorts- Dagger 456

Board Size: 4x4

Posted Image

Ork battle line
Posted Image

Imperial battle line
Posted Image

The battlespace
Posted Image

++++++++++++++++++++++++++++++++++++++++++++++++++++++++++++++++ 

Turn 1-

Initiative: Orks win

The ork surface fleet decides to Waaagh! in an attempt to make speed off the board. The force stays line abreast as it moves forward. 

The Warhorse turns towards the Ork battle line! The escorts attempt to complete their mining mission. 

Posted Image

The Badknife and Smallfry come to firing depth in the open ocean ahead of the Imperial battle line. They prepare to scatter the Oomie formation with torpedoes. 

Posted Image

Battle: 
Toofsmasha activates and trains its weapons on the Warhorse. The Ork craft had gone all ahead full, so her firepower will be halved and can not launch Ordinance. The Reliable waits, expecting to unload a Broadside into the Xeno craft, bracing would reduce the power of the attack. As a result a single shell smashes through her deck armor reducing the Warhorse to 7DP.

The Warhorse activates. Her Forward macro-cannons open up on the approaching Gun Tubz. Despite their small size, the firepower is deadly accurate. Two are reduced to smoking hulks, while one's armor saves it from a near miss. A third Gun Tub is sent to the bottom be a torpedo hit from the Reliable's bow tubes. All three of the damaged Gun Tubz received critical hits and sank immediately. The stern batteries swivel to starboard, and fire on the Drilla Killa squadron. One saves, but the other is turned to floating wreckage. 

The two remaining Gun Tubz are eager for vengeance, but the Reliable is just out of range of their heavy guns. Their smaller, but longer range deck guns miss. 

The Faithfuls dutifully drop their mines behind them, but they do not have any other shots. 

Drilla Killa activates, but has no target. 

Badknife activates, and fires a torpedo spread towards the direction of the Imperils. Grot Sub 1 decides to hold fire until he is in a better position.

Posted Image

End Phase
The torpedoes from the Sneaky Gitz just come into contact with the Reliable. The ships PD destroys two of the torpedoes, but the remaining two ram home. Despite bracing, one manages to cause considerable damage. The Reliable is reduced to 6 DP

The AN Torpedo races harmlessly into the shallows. 

The hulked DrillaKilla drifts into the path of its squadron mate. 

Mines drift towards the orks.

Wake marker removal: 1 Imp, 4 Ork, all wake removed. 

Turn 2

Initiative: Imperials win

Movement: 
Reliable moves into the Gun Tub formation. 

Gun Tubz cannot Waaagh! Without hitting mines or other escorts. They move forward and attempt to parallel the Faithfuls. 

Faithfuls, the escorts see the threat of the Ork Gun Tubz and veer away. 

Big Dakka Boat goes All Ahead Full, and blasts through a set of mines. His speed is sufficient to allow him to pass without being struck by the exploding devices. 

The last Drilla Killa collides with his drifting comrade, and the two ships sink beneath the waves. 

Sneaky Gitz and Grot Sub1 move closer to the Imp Escorts. The second Grot Sub fails to appear. 

Posted Image

Battle:
Faithful's activate. Fail to Reload Ordinance. They fire on the Big Dakka Boat with their turreted cannons to port. They miss. 

Gun Tubz activate. The Faithful's are out of range of their heavy gunz. They miss with their lighter weaponry. 

Reliable Activates. 1 Gun Tub is in the rear arc, and another is in the port arc. The Reliable brings all of her weapons to bear. The Tubz fail to Brace. Both are turned into wreckage. 

The Big Dakka Boat activates, but it was going All Ahead Full. The Starboard weapon battery attempt to target the Faithfuls. They Miss. 

Sneaky Gitz Activates and re-loads Ordinance. It fires a blast of Torpedoes in to the Imperial escorts. Only one of the four locks on in time, and hits the rear escort. The Faithfuls fail to Brace, and the rear one is destroyed by a torpedo. 

Grot Sub Activates and fires a torpedo at the remaining Faithful. It falls short, for now. 

Posted Image

End Phase
The Sneaky Gitz remaining torps streak by in front of the Big Dakka boat. 

The torp from the Grot Sub is destroyed by the Faithful's PD. 

Two sets of Mines drifts into the Big Dakka Boat. The kroozaz PD misses, and the a mine finds a weak spot in her armor and detonates. The Big Dakka Boat suffers 1 DP (9DP)and receives critical damage to her screw. Her speed is reduced by 2 inches! Worse the Mines remain in play to strike again! 

The Hulks of the Gun Tubz and Faithful 2 drift harmlessly. The faithful explodes. 

The Grot repair crews aboard the Big Dakka Boat quickly get the screw fixed. 

Wake: Imps 1, Orks 1. Imps remove one touching the Faithful. Orks remove wake from exploded Faithful.

Turn 3

Initiative: Imps Win

Movement: 
Reliable realizes he could be way out of position, and Tries to Come to a New Heading, but fails. 

Big Dakka Boat. However, there is still the matter of two Mine markers to deal with. Pd detonates one marker. Second fails to cause damage. However, the Krooza can not Waaagh!due to the wake marker. 
She steams ahead. Next turn will take her to safety. 

Faithful 1 moves. She cuts across in front of the Ork Krooza to position herself to launch mines into its path. This puts her at great personal risk.

Grot Sub starts heading for the board edge and safety.

The Sneaky Gitz sails away into the safety of the open ocean. 

Posted Image

Battle: 
Faithful activates. Reloads Ordinance and drops mines in front og Big Dakka Boat. Fire from its deck gun goes wide. PD destroys one. Neither of the other two cause damage. 

Big Dakka Boat goes next. The Port cannons fire on the Faithful, but fail to find their mark. 

Reliable fires. The Big Dakka Boat is in the cruiser's starboard broadside arc and moving away. However, it moved quickly. The Ork ship is close to moving out of range. The Ork goes on Brace for Impact. Three shells slam home, and two do significant damage to the Ork ship. It is reduced from 9DP to 7 DP. 

There is no other shooting this turn. 

Posted Image

End Phase:
Mines drift around. One batch drifts right through the Big Dakka Boat, but fails to detonate. 

Ork torpedoes head off the board. 

The two remaining Gun Tub hulks drift, 

Wake Markers: Ork 5, Imp 5- All are removed. 

Turn 4

Initiative: Orks win

Movement: 
Big Dakka Boat goes All Ahead Full! This makes them touch some Mines, but the PD removed the threat. The Krooza leaves the board. 

Reliable: Come to New Heading. The ship comes about and starts to steam back out of the channel and towards open ocean. 

Grot Sub 1: Leaves the board. 

Faithful: Goes straight towards the nearest board edge. 

Grot Sub 2: fails to come into play. 

Battle:
Nothing. 

End: 
Mines drift. 

Gun Tubz Drift. 

+++++++++++++++++++++++++++++++++++++++++++++++++++++++++++++++++++

Results:
Orks get 11 DP off the board and lose 8 DP. Per the rules of the scenario, the Orks win as they got more DP off the board than were lost. 

Orks Win!

+++++++++++++++++++++++++++++++++++++++++++++++++++++++++++++++++

"Sir, the Ork Krooza is steaming away faster than we can pursue," the Augur operator reported. 

Captain Brahn nodded. He was standing over the shoulder of the Weapons Officer, and could clearly see that the Ork ship was escaping. He didn't let his frustration show to the other officers, but inside he was fuming. None of those blasted creatures should have escaped alive. 

"Good work everyone. Sound the All Clear. Some fine shooting today," Captain Brahn congratulated the Weapon's Officer. 

The Captain wondered how Vice-admiral Travers would react to the news?

Wednesday, March 22, 2017

Random: What's On The Table?

We have all faced it, the inevitable and unwinnable conflict.  It is a classic match-up like the immovable object vs. the unstoppable force, Space Marines vs. Space Orks, or Target vs. Wal-mart.  That is the inevitable conflict between Real Life and Hobby Life. 

I have run smack dab into this conflict recently.  Between my schedule, my families schedule, my opponent’s schedules etc. there has been very little time to game.  However, I wanted to give you all a sneak peek at some of the items that are still on the table!  These are games that are all set-up and ready to be played but I haven’t had the time to actually play with anyone yet!   

First up is this….


Another battle in the continuing Castles in the Sky Balkan Uprising Campaign

This time, the Balkan League is patrolling the Aegean for Turkish troop ships when the run afoul of an Ottoman League patrol.  This will feature the French Fleet assets supported by the Greek Armored Cruiser vs. an Austro-Hungarian squadron. 

You probably recognize my infamous paper templates and Aeronautica Imperialis bases. 

 Next up is this….

This is the first scenario in the Tomorrow’s War rulebook called Lost and Found.  You then see for yourself how accurate my review was.  Some people feel that this scenario is unbalanced.  We will have to see what happens.    

An Imperial Tie Striker was lost on routine air patrol on the forest planet of Tabletooine.  The Imperial pilot escaped and is evading rebel troopers in a nearby outbuilding.  Imperial Stormtroopers from a nearby garrison have been sent in to locate and rescue him and recover the Tie’s recorder device. 

The miniatures are old Star Wars Micro Machine toys that are probably 10mm scale or so?  The terrain is my trusty green mat, lichen, and electrician’s box that have served me well for so many games.    

Finally, I managed to get my Blood Bowl teams assembled (but not painted) and I taught my daughter how to play.  We might see a few of our game reports once I figure out how to write a good Blood Bowl battle report. 

I hope to have these battles done and updated soon.  In addition, I have mulling over some new purchases to review.  I am torn.  There are two genres three major genres that I have never really given much thought or effort to; Nappies, WWII, and Wild West.  However, lately I have been wanting to dabble my feet in them.  Maybe I will pick something up to review soon.  

or


These have both really been tempting me.  The Wild West will have to wait, but I think I have a copy of Legends of the Old West banging around here somewhere! 


Lastly, I have an upcoming review of Pulp Alley rules.  I have been reading through them and there are a lot of interesting ideas and concepts to comment on. 


Then, I also have some of the Frostgrave supplements to comment on. 


So I have a few reviews locked and loaded for the next few weeks.  I just hope stupid real life doesn’t ruin my plans! 

Final Thoughts
Like many of us, Real Life has been getting in the way of my important wargame projects.  However, I still have some projects to be posting soon.  In addition, I have archival content that I will use to bolster the slow times for me with things like, AeronauticaImperialis, The Games: Blood andSpectacles, and Da Deff Island Skirmish, and other things from my days of yore.    


Stay Tuned!