Monday, December 27, 2021

Random- The Close of Another Year


Here we are, the close of another year.  It is hard to believe.  If feels like the Pandemic started just a few months ago, yet here we are two years in.  2020 has slipped away, and now 2021 has also slipped away.  I am getting old!  The years are going by fast, but I am pretty sure I still have a few good years left in me.  

Like previous years, I made a few goals to try and accomplish this year and to keep me on the rails.  As usual, there is nothing binding about them.  They are more like suggested guiderails.  I think these goals successfully kept me from jumping from project to project.  

Like most years, I broke my goals down into a few categories: 

  • Purchases- Things I spend money on
  • Painting and Modeling- Things I paint and build
  • Playing Games- The games I play and report on
  • Rules Writing- New Projects and games I am working on
  • Miscellany- Other things related to Blood and Spectacles Publishing that do not fit into the other categories.  
  I think that covers it.  Let's get into what goals were and were not accomplished in 2021....


Purchases

Before I get too far, I need to say THANKS! Without your generous support I would not have been able to make the purchases I did this year.  As a Game Designer, my goal is not to make money.  If I wanted to make money, my time would be better spent doing something else.  Instead, my goal is to continue to self-fund Blood and Spectacles Publishing so I can continue to create new content for you.  Any purchase you make on the Wargame Vault, on the Osprey Site, or as a Patreon patron helps me continue to meet this goal.  Without you and your support, their would be no Blood and Spectacles Publishing!  

One of the most challenging parts of creating content for you is the post-production work.  This includes getting photos, painting models, artwork, editing, and other elements needed to create a fully-fleshed out product.  It takes both time and money.  I can not release new content without decent post-production content.  Your purchases make this possible!  

Thank you! 


This year, 90%  of my purchases were to support future potential releases for Blood and Spectacles Publishing.  Here is what I purchased.  

Purchased Models: 


I also purchased some rules to keep me up-to-date on what is going on in the Wargaming world: 

I have also been dabbling with RPG and RPG scenario design.  To hep out with this, I have purchased a few RPG books to help me understand what is out there.  These include the following: 
  • Paleomythic - Osprey
  • Dune: Adventures in the Imperium - Modiphius
  • Ruthless Blades, Righteous Blood- Osprey
  • Dungeons and Dragons 5E (PHB and DMG) - Wizards of the Coast
  • Those Dark Places - Osprey
  • Legend of the 5 Rings 3rd Edition - AEG
  • Monster of the Week - Evil Hat Productions


I did not get to purchase the following: 

  • Tumbling Dice Korean War aircraft for White Star/Red Star rules
  • Oathsworn Burrows and Badgers models
Sadly, since Burrows and Badgers is not Blood and Spectacles related, I think they are not going to make the cut for next year.  

Painting and Modelling

This has been my most productive year yet for painting!  I painted everything I had and reduced my pile of shame to 0!  I am surprised I am still alive!  I painted 319(!!!) miniatures, that is the most I have ever painted!  All of this painting was focused mostly on painting Victrix miniatures for Ancients.  

Irregular Infantry 

You can see on the Painting Log on the side of the blog about how productive I was as I went along: 

  • Roman 28mm Triarri - 20
  • Roman 28mm Principes/Regulars - 30
  • Roman 28mm Hastati/Militia - 50
  • Roman 28mm Skirmishers - 20
  • Flying Warships - 2
  • Roman 28mm Veteran Legion - 20
  • Roman 28mm Velites - 20
  • Viking 28mm Skirmishers - 10
  • Viking 28mm Warriors - 50
  • Space Mecha - 17
  • Ancient 28mm Slingers - 10
  • Etruscan 28mm Hoplites - 30
  • Etruscan 28mm Axemen - 10
  • Ancient 28mm Irregular Infantry - 20
  • Nativity 28mm - 10

Reaper Nativity

Gaming

This was another surprise success!  I was pretty conservative with my gaming goals.  However, there were some things I knew I would need to focus on.  This year, I mostly focused on my own game systems that needed to be tested or promoted.  My goal was one game a month, so 12 games.  However, I ended up playing 25!  That is two a month!  

Wars of the Republic - Greeks vs Romans

Here is what I got to play: 

      • Glittering Void - 2
      • Men of Bronze - 1
      • Classic Battletech - 2
      • Blucher - 2
      • Only the Strong Survive- 1
      • Blood Bowl- 2
      • Castles in the Sky - 4
      • White Star/Red Star - 1
      • Turf War - 1
      • Heirs of Empire - 1
      • Homer's Heroes - 1
      • Wars of the Republic - 6
      • In Strife and Conflict - 1

Heirs to Empire 

My RPG and Wargame group all got vaccines and boosters pretty early on and that helped us get more games in.  In addition to the wargames, I have been having a regular RPG session once a week as well.  There we have mostly focused on D&D 5e but have had the occasional One-Shot as well.  I even got to GM a one-shot of Those Dark Places.


 Rules Writing

I have been writing away, but much of my work is not ready for primetime OR supplements for existing games.  I have been slowed a bit by the Post-Production efforts related to some of my new games.  

1. Complete Castles in the Sky for Osprey- Complete

2. Update The Games: Blood and Spectacles - Started, but only about 50% complete

3. Try to get a new work published- Made a few pitches, but no new progress. 

4. Move a WIP Game to the Wargame Vault -   I have gotten three new items to the Vault.  Warships: Paper Ships, Steel Resolve, Combat! Starring Vic Morrow, and Revolt! A Wars of the Republic Supplement. 

5. Add a WIP game to the Blog- I actually have moved almost all WIP content to my Patreon, instead of using my blog.  That is a big change.

I still have a lot of rules in the hopper, but not across the finish line yet.  

Coming in June 2022

Miscellany

These are random gals related to "running the business" and other local efforts that may or may not be exciting to my dear readers.  However, they are still things I want to get done.  

1. I got a blog post up every week!  

2. I kept my painting and gaming tracker up-to-date all year! 

3. I tied the content of the online presence closer together.  The Website is still a bit behind though, that is harder to update than the others.  

4. I spent some time talking to other game designers via social media.  Not a huge success, but some progress. 

5. A new, better website was launched!    

A man and his chicken....

Final Thoughts

Overall, a very successful year!  Lot's of stuff painted, lot's of games played, and a decent amount of purchasing and rules writing.  If it wasn't a Blood and Spectacles game though, chances are it hit the back burner.    

Now, to make some goals for 2022! 


You can follow Blood and Spectacles Facebook page for more fun: https://m.facebook.com/pg/BloodandSpectacles/posts/?ref=bookmarks&mt_nav=0

Or our website:

Or our Messageboard:

Or our Wargames Vault Page:

Monday, December 20, 2021

Battle Report: Wars of the Republic- Anabasis of Antiochus the Great


Antiochus the Great took the throne of the Seleucid Empire in 223 BC.  By this time, the most distant eastern provinces had broken from the empire under their own Hellenistic rulers.  The rest of the empire was busy battling Ptolemaic Egypt and other foes to stop them.  However, once Antiochus the Great came to power he shifted his focus and travelled eastward to re-claim the lost provinces.  

The Anabasis of Antiochus would last 10 years and be largely successful.  He and his forces would battle the break-away provinces and bring them back into nominal obedience.  Antiochus even crossed into India on his journey similar to his ancestor Seleucus.  

This is a good time for wargamers since there is very little details remaining about Antiochus adventure, the armies involved, or even what the troops looked like.  Therefore, there is a lot of scope for playing out whole ancient campaigns in the East. 

You can pre-order the rules for Wars of the Republic from Osprey/Bloomsbury Publishing here.

Forces

This period is a fertile place for wargaming as it is ill documented. Very few sources remain and there is scope for a series of battles and even a campaign to take place in this region and time period.  Today's battle will represent one of the lost battles fought on this 10 year campaign to the east.  Our forces will be drawn from the Seleucid List and the Minor State/Lesser Satrapy list.      

We know little specifics about the Seleucid army that went East and even less about the Greco-Bactrian and other provinces armies that opposed them.  We can assume that they were based on a Hellenistic model as that was their heritage.  This gives us free reign to choose the units we want to use!   

Seleucids
1 Bronze Shields
1 Theurophoroi
2 Light Infantry
1 Heavy Cavalry- Commander

Greco-Bactrians
2 White Shields
1 Elephant - Commander
2 Skirmishers
1 Light Cavalry

The Greco-Bactrians have a 1 point advantage and a 1 unit advantage.  

Mission

We rolled up a mission from the main rulebook as normal.  We determined we would be playing a Control the Battlefield scenario during Bad Weather as a complication.  

In a Control the Battlefield game, both sides are trying to touch terrain to "control" it and score points.  The army controlling the most terrain at the end of the game wins!  This will force our units to split up in order to be holding the terrain.  The Greco-Bactrian advantage in units may play a big role.  

The complication of Bad Weather will slow us all down 1 MU and improve our armor against shooting attacks by 1.  It is raining pretty heavily as we move into the area. 

Set-up

We also randomly rolled up terrain per the rules.  The Seleucid side is 1-3 while the Greco-Roman side is on the opposite side and is 4-6.  We are playing on a 72MU x 48 MU board with 1 MU equal to 1 inch.  

  1. Spring- Difficult
  2. Swamp- Difficult
  3. No terrain
  4. Swamp- Difficult
  5. Grove of Trees- Difficult
  6. Walls- Obstacle
This will be a difficult board to get across thanks to all the difficult terrain.  The heavy rains must be making the area into a swampy mess!  

We follow the normal rules for deployment and take turns placing units with the Greco-Bactrians placing first.  Each unit can deploy up to 6 MU in from their deployment edge.

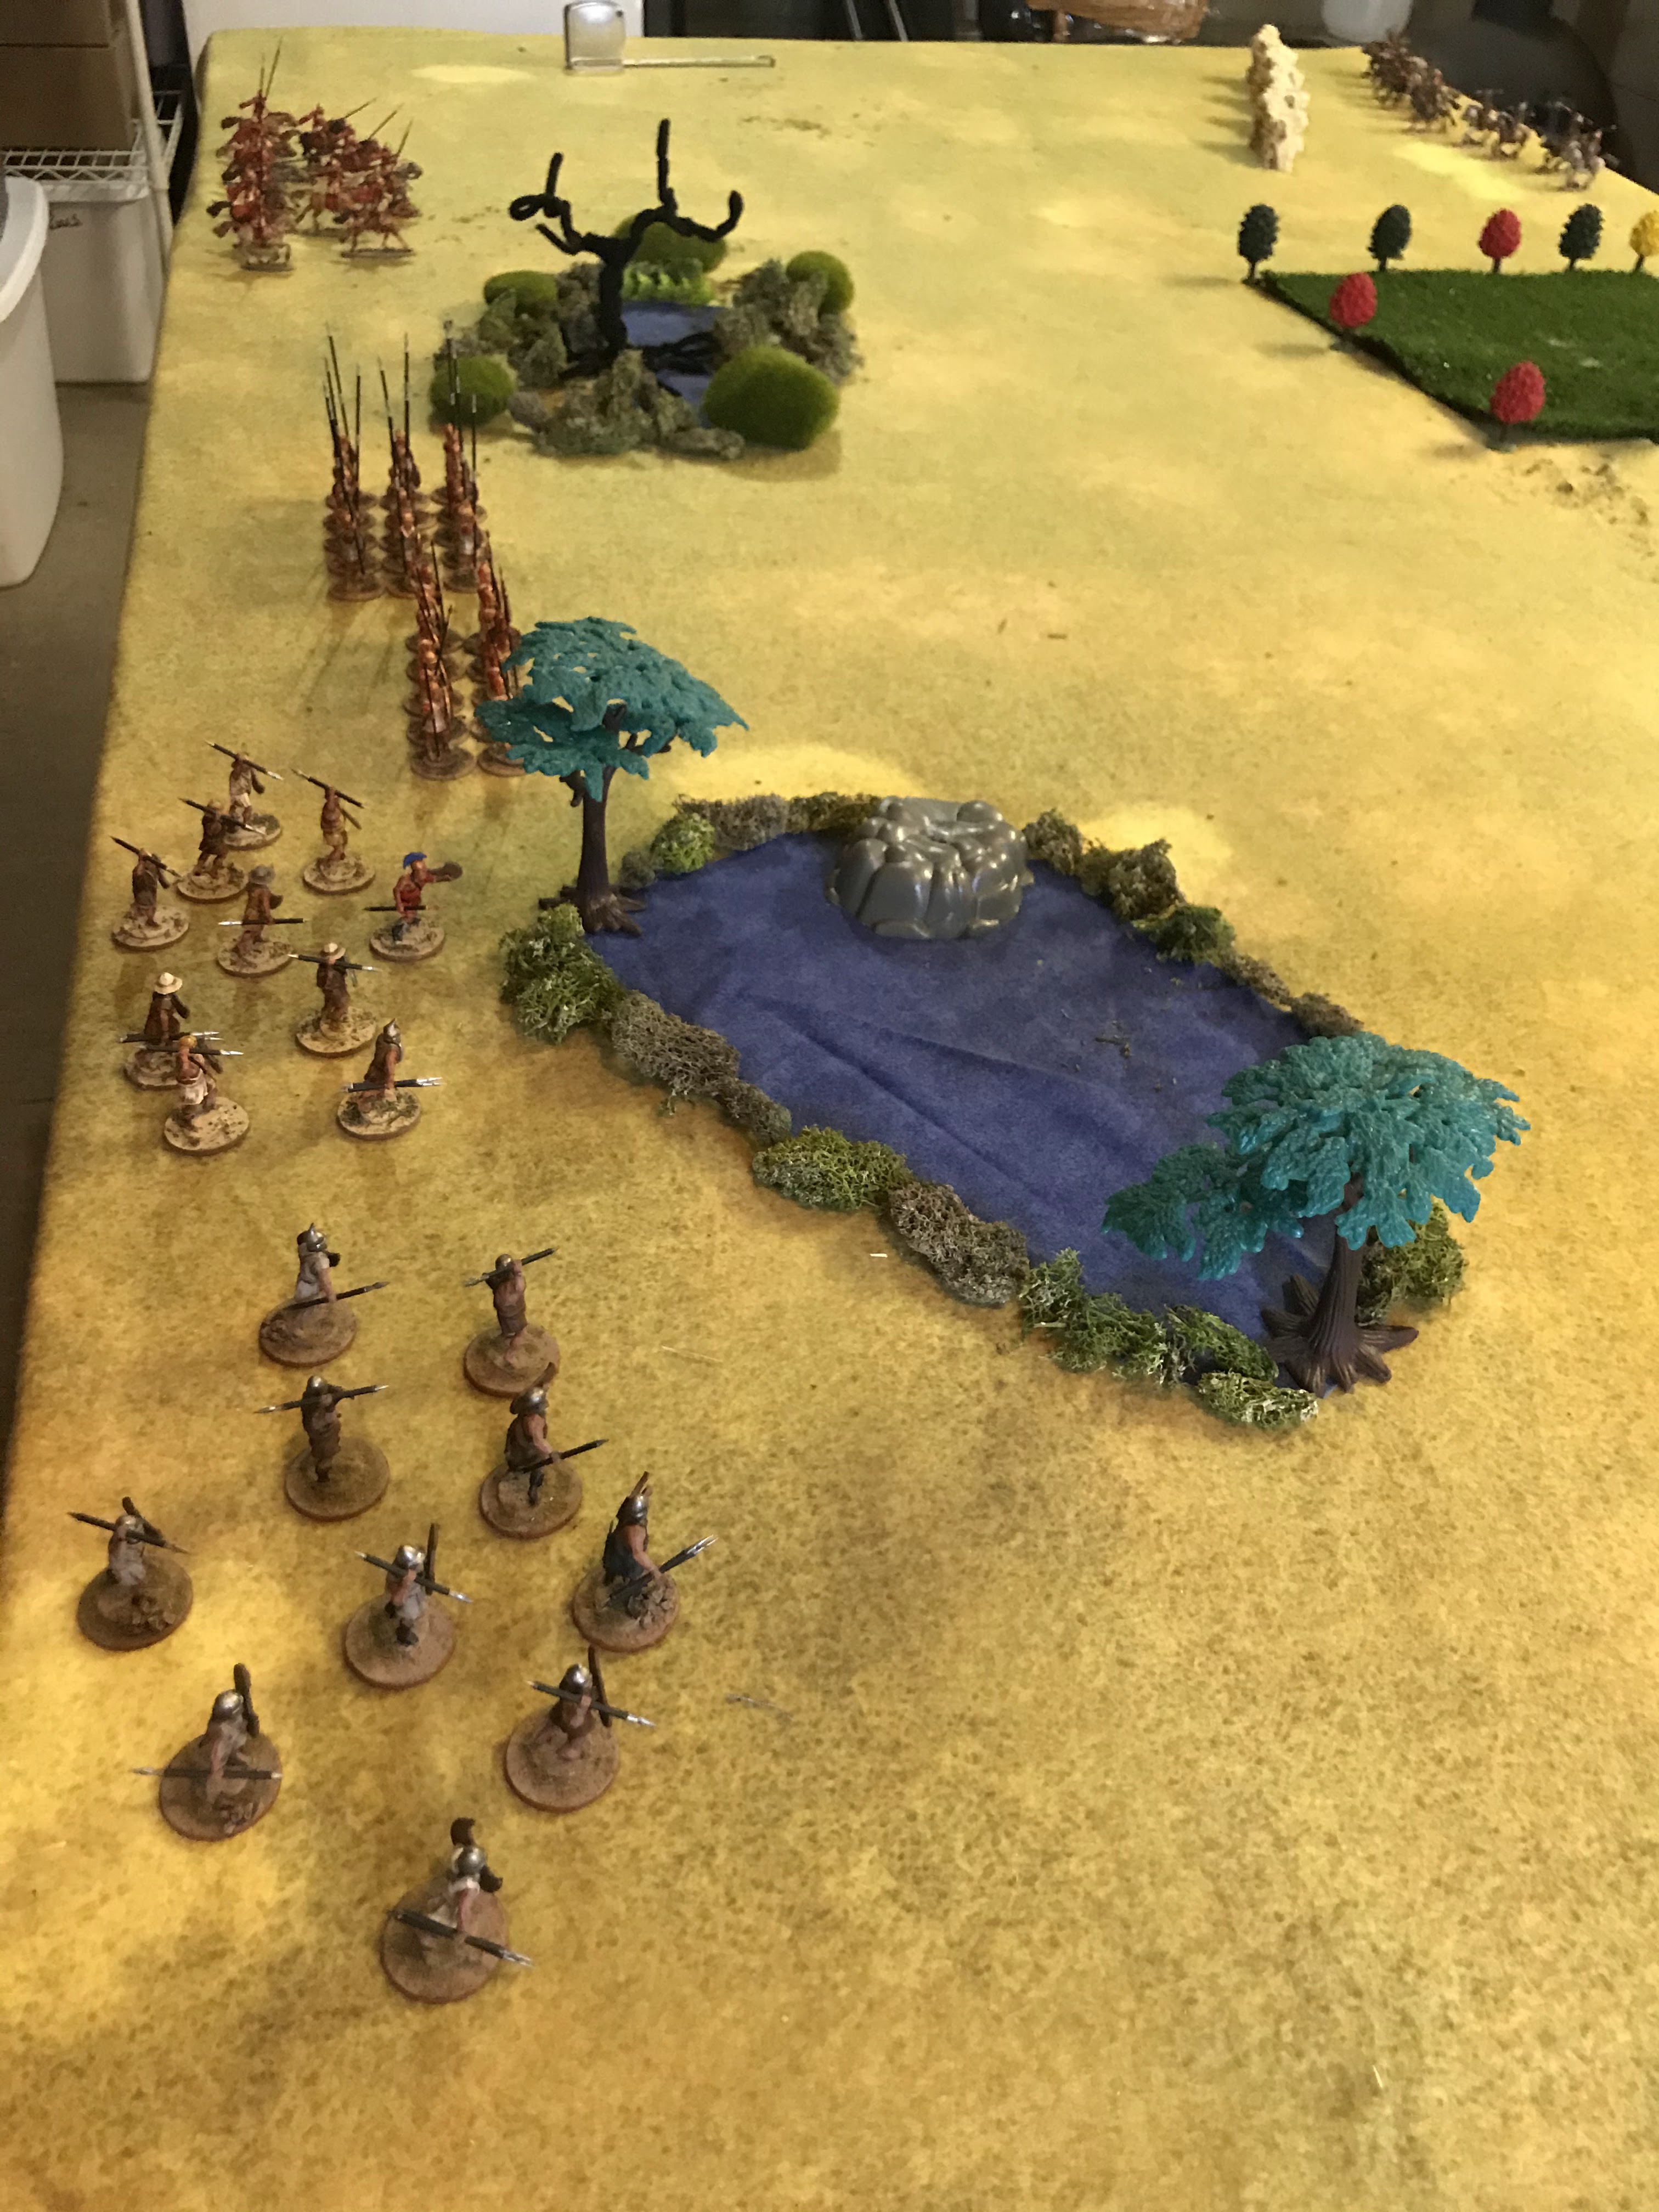
After set-up, we have the following units.  Seleucids have the Light Infantry in the right to head into the swamps and spring area.  The edge of the terrain has the Theurophoroi then the Bronze Shields and Heavy Cavalry anchor the left.  The Greco-Bactrians have the Skirmishers ready for the Swamps, the White shields bracketing the Elephant in the center, and then the light cavalry on the right as a screen.  


Seleucids deploy on the left of the board

Turn 1:

Both sides collect their Commander's Gaze tokens.  The Seleucids get 6 and the Greco-Bactrians get 7.   The Seleucids bid 2, and the Greco-bactrians bid 3.  Grecos will go first. 

We start with a unit of skirmishers paying their Gaze, and moving into the swamp.  The heavy rain slowed their progress, but they secured the terrain.... for now.  The second unit moves up between the board edge and the swamp.  On the opposite flank, the light cavalry ride up to the wall, but stay behind.  


At this point, the Seleucid commander interrupts and takes over successfully.  The Bronze Shields move forward, and then the Greco-bactrians try to take back over, but fail.  The Theurophoroi break into open order and move to secure the spring.  Meanwhile, the other light infantry supports their fellows flanking the spring by the board edge. Finally, the Heavy Cavalry moves forward. 


With all Seleucid units moved, the Greco-Bactrians take back over.  The elephant stays in line with the white shields as they trudge forward in the rain. The main infantry formations flanks seem secured by terrain.  

Melee:
None

End:
None

Turn 2: 

Both sides collect Commander's Gaze, and prepare to make their bids.  The Greco-Bactrians bid 2, to the Seleucid 1.   

Greco-bactrian skirmishers make themselves at home in the swamp using their skirmisher skill.  The second skirmisher unit moves up in the gap to support them.  The Seleucids successfully interrupt.

The Seleucid light infantry move up on the flank, with the spring secured by the Theurophoroi.  The Greco-bactrians try to interrupt to secure their flanks, but fail.  Meanwhile, the Heavy Cavalry moves to block the Greco-bactrian light cavalry from getting to their forces flanks. 

The Seleucids ceded movement back to the Greco-bactrians, electing NOT to move their core Theurophoroi or Phalanx unit. 

The core of the Greco-bactrian army moves forward, their flanks secured by a grove and swamp.  The light cavalry stay behind the wall. 


Melee:
None

End:
None

Turn 3:         

Both sides collect their Commander's Gaze.  The Seleucids bid 2, and the Greco-Bactrians bid 0.  The Seleucids go first. 

The Seleucid Light Infantry spreads out in front of the spring to defend it, and potentially threaten the swamp.  The Heavy Cavalry moves up and threatens to contest the grove of trees. They are daring the light cavalry to come out and attack them.  The rest of the Seleucids stay in position and cede movement over to the Greco-bactrians. 


The Greco-bactrian main battle line moves forward, taking an echelon formation to protect their flanks with terrain.  The furthest flank skirmishers move forward and try to throw their javelins at the enemy light infantry but fall short.  The Light Cavalry moves away from the Heavy cavalry, but is still touching their wall.    

Melee:
None

End:
None

Turn 4: 

This look like things might start getting real this turn.  Both commanders collect their Commander's Gaze tokens.  The Seleucids bid 3 to go first, while the Greco-bactrians bid 3 as well.  With the tie, the Seleucids opt to bid 1 more to win it.  

The Seleucid light infantry on the right flank charges into the Greco-bactrian skirmishers opposite them.  The Light Infantry get supported by their fellows, and the skirmishers are supported by the units in the swamp.  


The Heavy Cavalry moves to flush the enemy cavalry out and away from the terrain objective.  The Bronze shields feel their flank is secure by their cavalry and march forward towards the White shields across from them.  

In response, the Greco-bactrian White Shields by the swamp, break into open order and move towards the spiraling melee on their left.  The Elephant also moves forward to threaten the enemy. 


Melee: 
The Light Infantry of the Seleucids strike hard on the charge, and reduce the skirmishers to 1 courage, and they start to waver.  The Light Infantry also lose 2, and start to waver!  The skirmishers are pushed back 3 MU.  

End:

None

Turn 5:

The Greco-Bactrian White Shields need to get to the Skirmishers to help them out.  Both sides collect their Commander's Gaze and bid for initiative.  The Seleucids bid 4, the Greco-bactrians bid 3.  The Seleucids go first again. 

The Seleucid Heavy Cavalry declare a charge at the light Cavalry, but fail to get there due to the heavy rain!  They are Wavering!  The Greco-Bactrians try to interrupt.  This time, they win and get to go next! 

The Greco-Bactrian White Shields rush in to join the Combat against the Light Infantry, hoping to turn the tide!  It might be a mistake.  The War Elephant moves up to stop any support from the Theurophoroi.  The other White Shields also move up provocatively to threaten the Seleucid Bronze Shields. 

The Greco-Bactrian light cavalry throw their Javelins and cause 1 courage loss.  Then, the Heavy Cavalry fail to make a Discipline check thanks to Wavering, and lose another Courage, down to 2.  They then use their last Gommander's Gaze to ride away!  


Play turns over to the Seleucids.  The Bronze Shields charge into the White Shields, who can not counter-charge as they have no Commander's Gaze.  They use the last of the Seleucid Gaze to manage it.  

The Seleucid Theurophoroi throw their Javelins at the Elephant, but fall short. 

Melee:
The Greco-Bactrians are starting to doubt their flank charge into the Light Infantry.  They should have waited until the Skirmishers were routed first!  Oops.  


The melee turns into a swirling mess, and both sides quickly annihilate each other!  That cleared up the flank!  

The Bronze Shields use their momentum to push the White Shields back 3 MU and reduce their Courage 1.  The inexperienced troops begin to Waver. 


End:
The Theurophoroi sees the Light Infantry flee, and makes a Discipline test. They pass and avoid wavering.  

Both sides need to make collapse tests, as they lost 25% of the force by the swamps! In the ensuing Collapse tests, both the Seleucid Bronze Shields and the Greco-Bactrian White Shields call it a day and withdraw from the battle! 

Turn 6: 

Both sides only get 2 Commander's Gaze as most of their armies have withdrawn!  However, there is still more fighting left to do!  The Greco-Bactrians bid 1 to the Seleucid 0.  

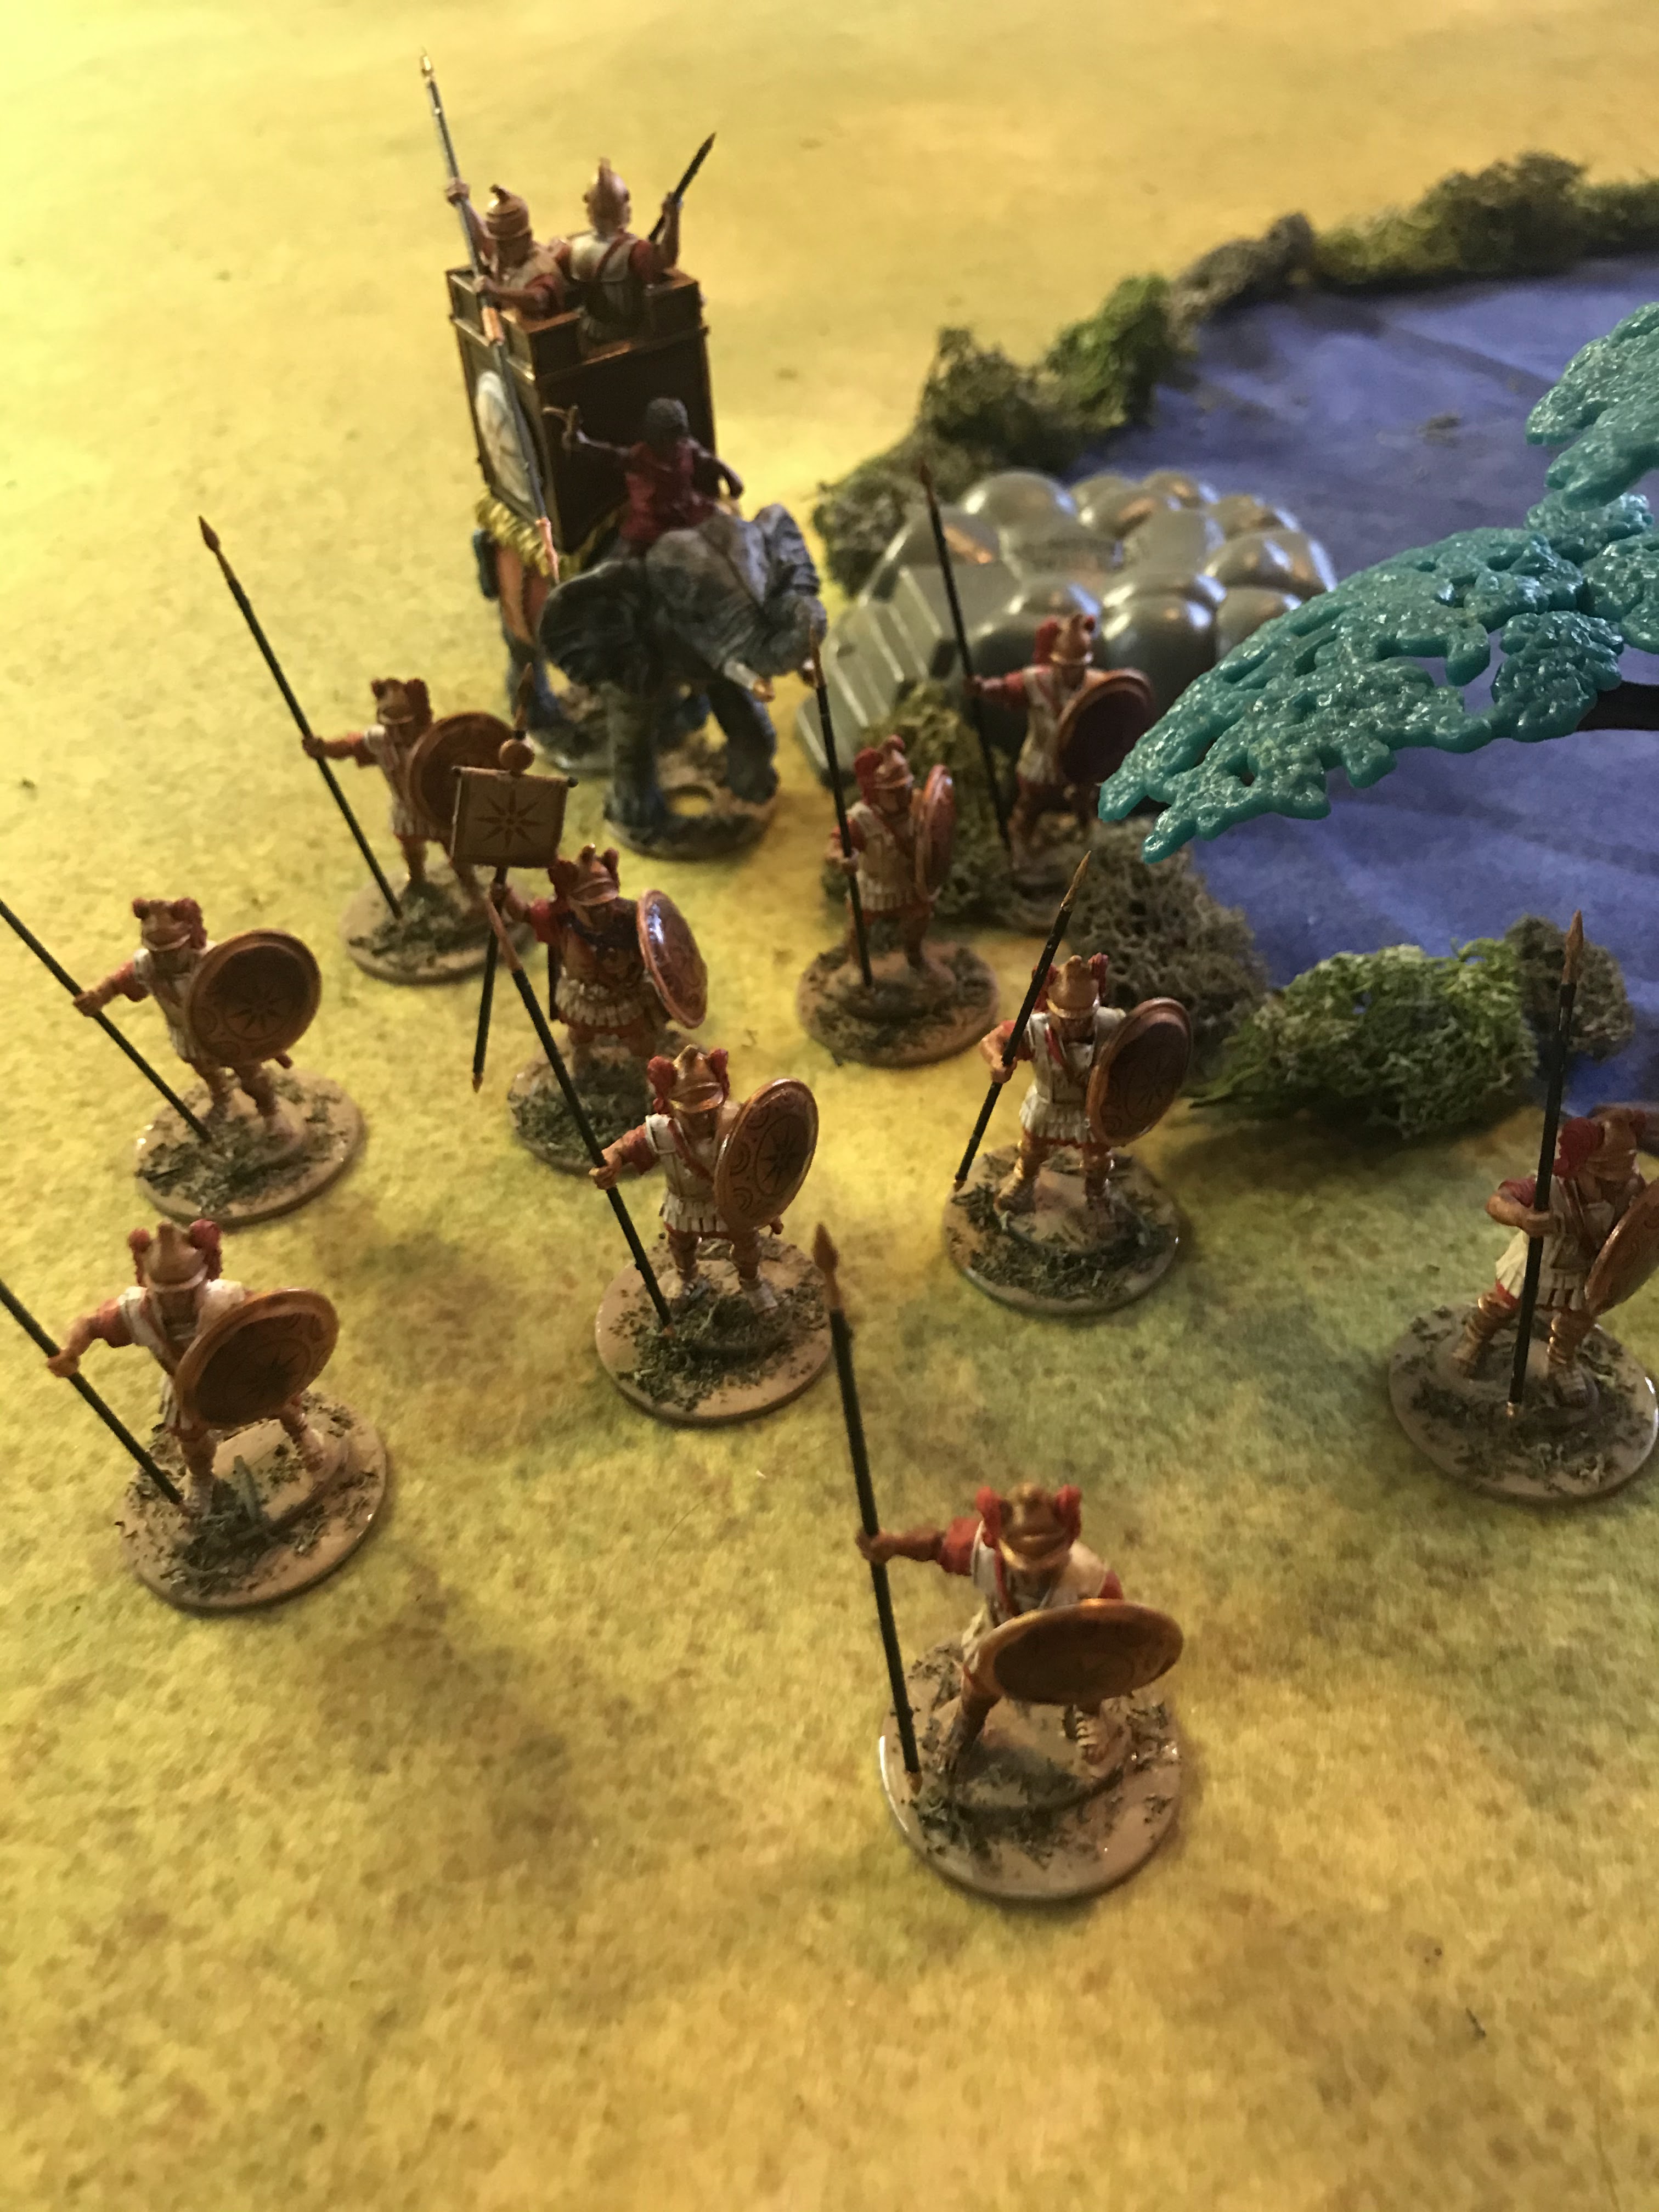
The Greco-Bactrians use their last Gaze to charge their War Elephant into the Theurophoroi, who are in cover by the spring.  The Light Cavalry then throw their Javelins, feeling safe behind the wall at the Heavy Cavalry but fail to cause any injury.  

The Seleucids use a Commander's Gaze to Rally their Heavy Cavalry.  After a quick look at the rules, the Heavy Cavalry leaps across the wall and charges to attack the Light Cavalry.  They have no Gaze to try and evade!  I guess they should have ran instead of thrown Javelins. 

Melee:          
The Greco-Bactrians decide to start with the War Elephant.  First, we make the Terror test for the Seleucids, who pass.  The War Elephant loses one courage in the fight, but despite the Theurophoroi being in cover, the Elephant stomps them pretty badly, reducing them to 1 courage and wavering.  The Elephant also pushes them back 3 MU.  

The Cavalry battle sees the Light Cavalry lose 1, and start to waver, but they also inflict 1 on the Heavy Cavalry. 

End:
None

Turn 7:
Both players collect their gaze, and bid none.  Everyone is in combat.  Seleucids win and get to go first. 

Melee: 
They choose to resolve the Cavalry battle first. This time, with some help from re-rolls, the Heavy cavalry drives off the Light Cavalry for good.  


The Elephant also drives off the Seleucid light troops it was fighting, giving it control of the spring.  The Heavy cavalry has the wall. 


End:
Both sides have to make collapse tests looking for 5+.  The Heavy cavalry succeed with 1 success.  The War Elephant has 0 successes, and retires from the battle!  

Conclusion: 
Another fight down to the wire based on collapse tests.  This time, the higher Discipline of the Heavy cavalry won out over that of the War Elephants.  Seleucids win in the East!   

I must say, that War Elephant made short work of the Theurophoroi!  Very impressive. I do not think they would fare so well against a tougher unit like a Phalanx or a Legion though.  Still, right tool for the job and all that.  

As the Greco-Bactrians I made a couple of tactical errors.  The first was having the White Shields on my left flank join the Skirmisher battle 1 round too early.  If they had waited until the Skirmishers had been routed, instead of joining the melee they would not have been scattered so easily.  The second was having my Light Cavalry throw Javelins instead of fleeing from the Heavy Cavalry and contesting a different piece of terrain rather than the wall.  This would have left them a threat in being to be dealt with.  I was tempted by the thought of a barrage of Javelins breaking the wavering Heavy Cavalry, which had a very low likelihood of happening.   I played the maneuver phase of the battle well enough, but fell apart once contact occurred. Oh well.  Next time. 

You can pre-order the rules for Wars of the Republic from Osprey/Bloomsbury Publishing here.


Become a Patron and get access to all the cool stuff, a peak behind the curtain of Blood and Spectacles, and early-access to playtest games!  


You can follow Blood and Spectacles Facebook page or Instagram for more fun! 

Check out the latest publications and contact me at our Blood and Spectacles website

Or purchase all out games at the Blood and Spectacles Publishing Wargames Vault Page!

Monday, December 13, 2021

Battle Report: Wars of the Republic- Romans vs Etruscans


I initially started working on Wars of the Republic as a more focused set of rules called Conquest: Rome in Italy.  As part of that rule set, I was focused on getting armies and forces for the early period of Roman history.  There is not a lot of data on these early foes, but one of my favorites was the Etruscans.    

The Etruscans was a loose group of city-states to the North of Roman territory.  They shared a unified culture and a religious League, called the Etruscan League.  Legend has it that 12 cities were part of this League.  Despite the existence of the League, Etruscan cities were fierce rivals and were not above feuding and fighting amongst themselves.  

The Etruscans themselves have very little written evidence that remains of their civilization.  Instead, we must rely largely on Roman accounts from a legendary age.  The other main source of information is archeology.  The Etruscans may have been colonists from Anatolia, but had a complex relationship with their mostly Greek neighbors and trading partners.  They entered and conquered much of the Northern Italy around 510 BCE.  

It has been theorized that much of the early culture of the Roman military came from the warrior culture of the Etruscans.  Some have theorized Rome herself was a colony or vassal of the Etruscans in its early history.   Roman myth itself talks about how the Romans overthrew the Etruscan kings and replaced them with the Republic.

Despite expelling the Etruscan kings, the two groups remained rivals for control of North Central Italy for generations.  This led to various battle, sieges, raids, and more.  There are several major battles that history records.  However, for every major battle recorded, there were several smaller skirmishes or lesser encounters that led up to the big clashes.  Today, we will be playing one of those lesser engagements.  

You can order your copy of the Wars of the Republic rules here

Forces: 

The Etruscan list will come straight out of the Wars of the Republic rulebook.  

Etruscans

1 Elite Phalanx- Pila - General 
2 Militia Hoplites
1 Drilled Infantry- Axemen
1 Skirmisher


They will face off against an Early Roman Triplex Acies.  It would also make sense to have them fight a Early Roman hoplite army, but I want to use these guys instead to highlight the difference between the two fighting styles. 

Roman Triplex Acies

1 Skirmisher
2 Hastati
1 Principes- General
1 Triarri


Set-up
This was completed using the rules laid out by the rules in the booklet.  The board is 72 x 48 MU with an MU being 1 inch.  The board was divided into 6 grid spaces and terrain rolled and placed using the chart.  The Players took turns rolling and placing terrain, with the player being able to place the terrain anywhere they wished in the grid square.

This system led to the following set-up.

Grid 1 is the Roman right, 2 Roman center, and 3 is Roman left.  Grid 4 is Etruscan left, 5 is Etruscan center, and 6 is Etruscan right.

Grid 1- Swamp
Grid 2- Stone Wall
Grid 3- 2 Level Hill
Grid 4- 1 Level Hill
Grid 5- Stone Wall
Grid 6- Grove of Trees

The Romans deployed with the Triarri on the right flank by the 2-level hill.  Then Hastati on the road, then Hastati in the open leading to the shrine, then Principes on the left, and the flank is anchored by skirmishers.  


The Etruscans deployed with the Elite Hoplite on the right, then a Militia Hoplite, with the second militia hoplites behind the other two.  The Axemen are on the road.  The left flank is Skirmishers in a ruined building.  The Etruscans seem as if they want to fight the entire battle to the right side of the shrine.  


Mission
We set-up our scenario using the method found right in the main rules.  This is going to be a set-piece battle, so no fancy scenarios for this one.  Etruscans are the attackers.   

However, this battle will have Hungry and Thirsty complication.  Disappointingly, no unit is suffering the effects of this complication as they all passed their Discipline checks.  

With that, we are ready to start fighting! 

Turn 1:
Both sides collect their Commander's Gaze.  The Romans have 6, and the Etruscan 6.  Nice and even.  The Romans bid 6, the Etruscan 4.  The Romans go first. 

Move: 
The Romans are all in Open Order.  The Hastati behind the shrine move up first, followed by the Principes on their flank, and the skirmishers.  The Etruscans try to interrupt, but fail.  The rest of the Roman force moves up unopposed. 

The Etruscans move forward.  The Elite Hoplites and the leading Militia Phalanx are all ready in phalanx.  The second militia follows them up in open order.  The Axemen move up the road.  The Skirmishers use the last Commander's Gaze to skirmish and take up fortified positions on the ruins.       

Melee:
None

Turn 2:
Both sides still have full units, so have 6 Commander's Gaze each.  The Romans bid 0, to the Etruscan 2.  Etruscans activate first.     

Move:
The Elite Hoplites move up, but keep their flank screened by the woods.  The Militia move up, slightly ahead.  Meanwhile, the second Militia unit moves to fill a growing gap between the Hoplites and the Axemen.  Then, the Romans try to interrupt, but fail.

The Etruscan Axemen, move up.  The Romans try to interrupt again, but fail again.  The Etruscan skirmishers hold position and cede initiative to the Romans.   

The Roman line pushes forward.  The Hastati behind the shrine begin to clamber up into the shrine for protection.  On the outside, the Principes see the Hastati taking position and form into Legion.  The skirmishers fan out and try to secure the Legions flank. 

Melee:
None
Turn 3: 
Both sides consider their next moves, and the Etruscans bid 2, to the Roman 3.  Romans go first.  

Move:
Roman Hastati plant their standard in the shrine.  It is safely in Roman hands.  The Hastati on the road form Legion and block the roadway.  The Etruscans consider trying to interrupt, but pass on the chance.  The rest of the Romans shuffle around, they seem content to let the Shrine be a lynchpin of their battle line.  


The Etruscans seem content with their match-ups, and move forward aggressively, with their Elite Phalanx leading the way.  Their Militia Phalanx moves up in support, and the second Militia fills the gap but stays in open order.  The Axemen and Skirmishers hold for now.  

Melee: 
None


Turn 4:
This turn we might see some action as the two sides get into charge range.  Both also have 6 Commander's Gaze.  The Etruscans bid 3 to the Roman also bid 3.  After a tense stand -off, the Etrsucans bid 1 more.  To win the initiative.  

Move: 
The Etruscan Militia Phalanx charges, and the Roman Principes Counter-charge.  They crash into each other half way between.  The second Militia unit also charges in to support their fellow farmers.  The Romans then try to Interrupt.  Which they do successfully. 

The Roman Skirmishers manage a Flank charge into the growing Melee between the Etruscan Militia and the Principes.  The Hastati in the shrine move to the edge of the shrine, while the ones on the road move up and threaten the Axemen.  The Triarri also move forward.

Losing the Initiative there put a wrinkle in the Etruscan plan.  The Elite Phalanx goes into Open Order and tries to get around the melee, as their target became engaged, and they do not wish to enter the Melee as support.  The Axemen and Skirmishers shift to the side to protect the shrine side flank of the Melee, while the Elites re-deploy.  

Melee: 
There is about to be a lot of dice thrown!  Principes get 4 base, +2 for charging, +2 for support, +2 for a support charge, and +2 for a flank attack for 12 dice, versus the Etruscans Militia Phalanx that has 3 dice base + 2 for charging, +2 for Phalanx, +2 for support, and +2 for support charge for 11 dice.  The Principes can take more hits before losing Courage though.  After rolling, the Roman Pila barrage pays off, and reduces them 2 to 1.  

The Romans push the Etruscans back 3 MU!  That is enough to push them back into the Elite Hoplites, who now join the battle as support.  The Etruscan plan just went pear-shaped!  

Neither side is forced to Waver.


Turn 5: 
Both sides have full Commnder's Gaze.  The Etruscans bid 0 to the Roman 2.  The Etruscans want their re-rolls to try and put the Principes away for good.  

Move: 
The Roman Hastati on the road charge the skirmishers in front of them.  They try to flee, but a dismal roll allows the skirmishers to get caught.  Ouch.  

The Romans Hastati in the shrine throw a hail of Pila and charge out, where they are met by Counter-charging drilled Infantry axemen.  

The Triarri move to the edge of the road looking for a place to assist. 

Melee: 
The Romans decide to start with the Hastati vs. the Skirmishers.  The Romans just steamroll them backwards 2 MU, and reduce them 2 Courage.  However, they are not wavering and are sticking.  This could bog down the Romans enough.  

Next, the Romans want to complete the Hastati/Axemen battle.  The Pila take their toll, but the Axemen hold their own.  Both sides lose 2 Courage with no pushback.  

The final Melee is the big brawl between the Principes and the Etruscan Left flank!  It is a fierce battle with the Romans rolling 8 dice vs. 9.  However, the Etruscan strategy to hold onto Gaze for Re-rolls pays off as the Principes and the Roman Skirmishers are routed!  However, the Militia Hoplites held on by the skin of their teeth!  


End:
The Hastati fighting the axemen see the Principes flee, but pass their Wavering check.  

The loss of the Principes also triggers collapse tests as that unit had the Roman general!  All the Roman units left passed their Collapse tests.  

Turn 6: 
The Romans have 3 Commander's Gaze to the Etruscan 6.  The Etruscans bid 1 to the Roman 0.  Etruscans go first! 

Move: 
The Elite Hoplites move to help the Skirmishers, knowing they will not get there in time.  One Militia Hoplite unit falls back to become a reserve, while the other breaks into open order and pivots into the flank of the Hastati/Axemen fight.  

The Roman Triarri forms Phalanx and charges into the flank of the same fight.  


Melee: 
The Etruscans want to resolve the Hastati/Axemen Fight.  The two sides obliterate each other in an orgy of bloodshed and fighting.  

The Hastati on the road kill off all the remaining Skirmishers and force them to flee. The Romans elect not to follow them up.  

End: 
The last two Etruscan units, a Militia Hoplites and the Elite Hoplites both pass their Collapse tests.  

The last Roman unit makes a Collapse test and fails.  They withdraw to fight another day! 

Conclusion: 
The Etruscans win their premiere battle report!  

This time, my concentration of troops on the Etrsucan right seemed to work!  I got a big assist by the Principes when they decided to counter-charge.  If they had stayed put, I think my charge would have fallen short!  That would have left me out of Phalanx and very vulnerable.  It was also serendipity that I drove off the Roman Commander.  I thought they were with the Triarri.  The Roman strategy was sound, but my abrupt shift and consolidation of my flanks gave me the staying power I needed to pull off the win!       

You can pre-order the rules for Wars of the Republic from Osprey/Bloomsbury Publishing here.


Become a Patron and get access to all the cool stuff, a peak behind the curtain of Blood and Spectacles, and early-access to playtest games!  


You can follow Blood and Spectacles Facebook page or Instagram for more fun! 

Check out the latest publications and contact me at our Blood and Spectacles website

Or purchase all out games at the Blood and Spectacles Publishing Wargames Vault Page!