Monday, July 27, 2020

Battle Report: Turf War- Get the Bagman


Donnie Ricketts was done taking orders from Bobbie Tarantine and the Double Deuces.  He had his own juice, he didn’t need old Bobbie taking his cut off the top.  Donnie had the muscle to take care of himself now, and he intended to show the old man how it was done in the Upper Eastside now.  Of course, the Double Deuces wouldn’t like being cut out of the action.  There would be some consequences. 

Bobbie Tarantine and his Double Deuces have gotten wind that Tony Maloney is bringing a bag of cash to Donnie.  This is their chance to send a message that Bobbie still has Donnie’s “best interests” at heart without causing too much of a mess.  After all, Tony is just some small timer shilling cheap hooch on the side.  Queennie, Push, and 2 Hearts head out to meet Tony on the road.  He was visiting his old flame out in the sticks before bringing his stash into Donnie.  Seemed like a good place to get the drop on him. 

However, the Double Deuces snitch didn’t know that Tony had some of his pals along with him.  Billie Bambino, “Big Knuckles” Smitty, and his squeeze Suzie Q were all out there with him.  The group of Upper Eastsiders were coming up the dirt road with the bag, when the Double Dueces jumped ‘em!

This will be a game of Turf War using some of my Copplestone Casting Gangster models.  I have had the models and gangs written up for a long time, but I have been slow to get in a game with them.  I figured no time like the present! 

The Score
The Score is the basic scenarios for a game of Turf War.  Before the score, each gang puts up a piece of their Turf.  Whoever wins the scenario will earn that turf from the opposing gang.  The gang that puts up the Turf of the highest value gets to choose the scenario. 

The Double Deuces wager a Gambling Den from Ricky Puzzino.  The Upper Eastsiders wager their Cheap Hooch from Tony Maloney.  The Gambling Den is worth far more so the Double Deuces reduce their risk or casualties and choose the Get The Bagman Score.

This one allows a handful of one gang to try and intercept a small number of the rival gang.  In this case, Tony is carrying the cash from his Turf.  The Double Deuces are trying to take him out before he can get across the board and deliver it. 

In this case, the Score is taking place during Darkest Night, but it is a clear night.  The gangsters are moving across a particularly dangerous stretch of the road.  In this case it is bramble patches and swamps that count as dangerous terrain. 

Forces

Double Deuces
Queenie- Femme Fatale- Tommy Gun
Rickie “Push” Puzzino- Shotgun- Gangster
Bobby “2 Hearts’ Henrizo- Dual Pistols

Upper Eastsiders
Big Knuckles Smitty- Revolver, Brass Knuckles- Gangster
Tony “Baloney” Maloney- Revolver, Knife- Hood
Tony “The Babe” Bambino- Bat, Snub Nose- Hood
Suzie “Q”- Pistol, First Aid Kit- Flapper

Set-up
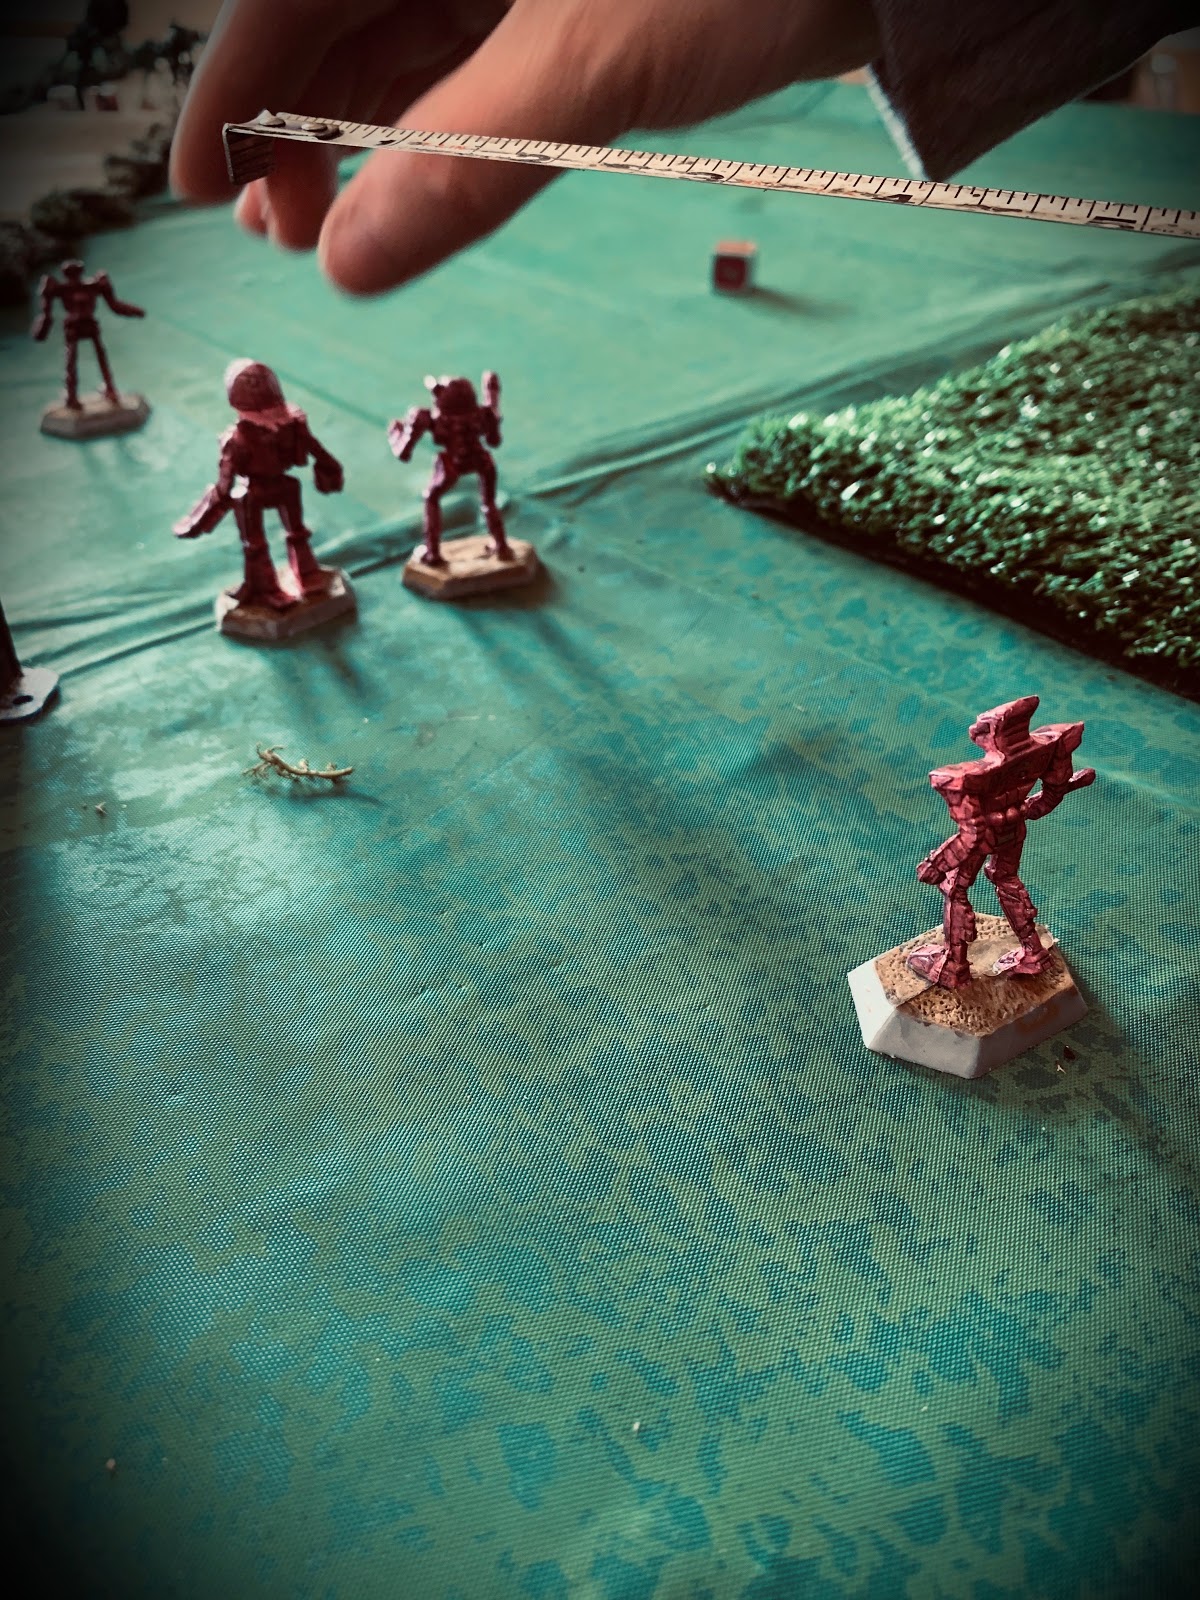
This will be on a 3x3 board with a dirt road curving around from one corner to the same corner on the opposite side.  The side of the road with no road is a light woods.  There are 3 swampy areas that the road is curving around.  These swamps are dangerous terrain. 

The Double Deuces start on the South side with Queenie and 2 Hearts near the road.  Push is moving near the edge of the woods. 

The Upper Eastsiders are coming in on the opposite side of the table.  Tony and Billy are walking on the road.  Meanwhile, Smitty and Suzi Q are off kanoodling in the field near the woods.
It is Darkest Night!


Turn 1:
The Double Deuces get to go first this turn as they are the attackers.  

Queenie and 2 Hearts move up along the roadway, one goes to each side.  Push uses an extra activation to move up further than the others in the fields near the swamps.  

Smitty cautions Suzie to get some cover, and proceeds into the darkness.  They both take cover near the swamps, before Smitty darts across the field to the edge of the woods.  

The two Tonys walk up the road.  Tony Baloney tries to get an extra activation, but fails.  This ends the turn. 


Turn 2: 
Queenie and 2 Hearts keep creeping towards the turn.  Queenie readies her Tommy, as she wants to slice the pie and get around the corner.  Push also gets around the swamp and moves to the corner, his shotgun held low at his hip.  


Smitty at the edge of the woods, and thinks he can draw a bead on Push in the darkness.  He carefully lines up his Revolver and fires.  His shot rings out in the darkness.  

This is the first combat so I am going to detail it out so you understand the mechanics.  Smitty has a Combat Pool of 3 dice, and Push also has a Combat Pool of 3.  Smitty uses 1 CP for the first shot, and Push uses 2.  They roll off, and Push avoids getting hit.  Smitty uses his extra activation to fire again and make sthe activation roll.  He again uses his 1 last Combat Pool, and Push uses his last CP to avoid.  This time Smitty fails to get any successes and flat out misses.  However, Push has no more CP left to use later in the turn during his own activation or if he gets shot at again!  

Suzie Q moved up to the edge of the swamp, but couldn't make out who Big Knuckles was shooting at.  Instead, she activated again and went into hiding with two successes on her Brains check.  Tony Baloney heard the shots and scrambled to the side of the road, he also successfully activated a second time and went into Hiding with a single success.  Finally, Tony "The Babe" hustled to the other side of the road and went into the underbrush.  

Push realized he was in a tough place, and moved towards the road, and ran into Tony "the Babe" in the darkness.  Out of Combat Pool, he decided to wait and hope to recharge it before it was too late.  


Queenie approached the corner, but the darkness limited her field of vision.  2 Hearts came around the corner and thought he saw someone in the bushes on the opposite side of the road.  He managed to activate again, and rushed into the "Da Babe" Bambino on the other side.  The two scuffled in the darkness.


"2 Hearts" Henrizino has a revolver and a knife.  Since he charged he gets +1 Combat Pool, and another +1 for the knife.  Da Babe has a baseball bat for +1, and is behind some brush for +1 to Tough or Cool tests.  2 Hearts tries to hit his target with 1 Cp from his pool, one from charging, and +1 from his knife.  He saves 2.  Da babe uses 2 to avoid getting hurt, and holds onto 1 to counter, and 1 from his bat.

Da Babe easily fends off the gangster and retaliates.  His retaliation is unsuccessful, and 2 Hearts gets a striking defense success.  He converts it into a Knockdown, but Da babe manages to keep his feet.

With that, we enter the Recovery Phase and the turn ends.

Turn 3: 
The Double Deuces maintain the initiative and go first.

Push runs in to help 2 Hearts handle Da Babe.  It is a big tussle now and Da Babe will have to be careful how he uses his Combat Pool so he doesn't use it all up.  Push attacks first using the butt of his shotgun as an improvised weapon.  He uses 1 CP and +1 for charging.  Da Babe uses 2 to defend.  Both get Striking Successes, and end up canceling each other out.

2 Hearts goes next, and uses 3 vs. Da Babe using 2 again.  His Combat Pool will be depleted.  Another draw of Striking Successes!  Da Babe is putting up a good fight! The Gangsters probably should have used some CP to parry, but they are nervous Big Knuckles might show up soon.

Queenie walked down the road looking for other gang members, but failed her opposed test.  Near the swamp, Suzie Q broke from cover and hoofed it across the clearing towards safety.  She double activated so moved a good pace.

Big Knuckles charged into the brawl between Da Babe and the two Deuces.  Big Knuckles connects with Push and reduces him 1 Tough, down to 1.  Henrizino takes a swing, but Big Knuckles blocks it. 

Tony Baloney darts away through towards the swamps at the bend in the road, and then hides in the shadows again. 

Turn 4: 
This time the Upper East Siders have initiative.

Tony Baloney makes a run for the safety again, but when he tries to activate again, he blows it.  Play swings over to the Double Deuces.

This time, 2 Hearts gets the drop on Da Babe and manages to slash him a good one.  He goes down to 1 Tough, but 2 Hearts also tries to knock him down, but fails.  Push also clubs him with his shotgun, but Da Babe takes the hit in stride with a Tough check.  Big Knuckles manages to crack push across the jaw and down him. 

Suzie Q keeps going for the board edge.  This makes the Deuces wonder if she is the Bagman.... er.... person.

Queenie gets a glimpse of Tony Baloney and chases him off the road.  She pulls her Tommy Gun to her hip and sprays the area with 4 Combat Pool.  Tony gets hit, but uses a Striking Success on Defense to cause Queenie to Jam.  He rolls his Tough test and is Okay.

2 Hearts uses his last activation and tries to knife Tony Da Babe, but fails to get past his defenses.


Turn 5: 
The Double Deuces have initiative.

Queenie clears the jam on her Tommy and opens fire at Tony again. He uses 3 to dodge.  Queenie lights him up with 1 success and 3 striking successes to 0.  Even with making his two Tough saves, he is reduced to 0 Tough.  She takes him Out-of-the Fight.

2 Hearts and Tony Da Babe keep scrapping, and Tony hits the Double Deuce gangster in the gut with the handle of his bat.  Big knuckles finishes him off with a powerful punch that sends 2 Hearts out of the fight.

Big Knuckles and Tony "Da Babe" fail to activate again.  Suzie Q runs off the board.


Turn 6: 
Upper East Siders have initiative.

Big Knuckles starts to go across the road to sneak up on Queenie, but he fails a second activation test to shoot.  She spins around, passes a activation test and lights him up with her Tommy Gun.  Scotty Big Knuckles goes down as his revolver clatters away.

Tony Da Babe draws his snubnose and fires quickly.  His aim is good enough and Queenie reels away and drops.  She is out of the fight.  With that, the Hood makes a break for it to tell Donnie Ricketts about what just went down!


Conclusion: 
The Double Deuces were knocked out, but not before they took out the Bagman.  Therefore, they won the Score. 

Well, Pitch Dark made that get up close and personal pretty fast.  2 Hearts and Push would have been better off shooting instead of tangling up close.  Oh well.  There was a moment where I thought maybe Suzie Q was the bagman, but she got so far away that there wasn't much I could do to stop her, so I went after who I could.

Shooting is so much more effective than Brawling.  At least in this game.  That Tommy Gun in Queenie's hands was deadly!  Ouch!

There was Turf War on the Table.  I have been saving real life Bucks to get some great terrain for some gangster action.  Hopefully, the next battle won't be in the forest, but the mean streets of Los Mundos!     

Tony burst through the door to the Gambling Den, making a ruckus.  The well-to-do patrons were less then impressed by this bedraggled street ruffian in their place.  Stitches quickly intercepted him, and he knew the wild look in his eyes.  Something had gone real bad.  He grabbed the wild-eyed hood by the elbow and rushed him into the back and out of view.   

"Whaddya see, Tony?"  Stitches voice was a truck in low gear.  

"It wasn't suppose to go down like that, it wasn't!"   His eyes darted around the room, not settling on anything more than a moment.  

Stitches smacked him across the jaw with an open palm, "Get it together."  Another low growl.  

Tony's hand touched the warm, red print on is cheek.  Then he shook his head fiercely, "It was the Double Deuces.  They jumped us on the way back from Tony's girl's place.  It was me, Scotty, Suzie, and Tony..... Tony Baloney."

"Where's Scotty?" Stitches had come up the ranks with Big Knuckles and knew he could get a straight answer out of him.  

"The Double Deuce %&*$#! shot him Stu.  She shot him!"  

Stu reeled back for a moment.  This were going to get real ugly, real fast between his boss and Tarantine.  They would need cash, guns, and muscle....

"Where's Baloney?  Where is the bag?"  

"I don't know, I don;t know.  i think he got shot too!  I don't know Stu!"

Stitches straightened up.  He had to think....

"What if they got him too?" Tony stammered

.... No, he didn't need to think.  Stitches knew he needed to tell the Boss.

"Come on, let's go talk to Donnie." 

Post-Game
The Double Deuces pick up a new bit of Turf but have no one to give it to, so it goes in their inventory for now.

Big Knuckles and Queenie got the most experience from the game, but not enough to pick-up anything new.

Push and Scotty Big Knuckles are just fine and recover from their injuries.  They can not collect from their Turf though.  Tony Baloney is hardened, has Deep wound (2 Scores), but is also picked up by the Cops and put in Jail.  Queenie is also picked up by the cops, while 2 Hearts is blinded in 1-eye.  Ouch!

The Double Deuces earn 20 Bucks after expenses, The Upper East Siders earn 18 bucks.  For the attack, the Double Deuces reputation goes up by 1 as well. Bobby Tarantine "Calls in a Favor" for 17 Bucks and gets Queenie sprung from the Big House, so the Double Deuces Net 3 Bucks this turn.

See you next time.   


You can follow Blood and Spectacles Facebook page for more fun: https://m.facebook.com/pg/BloodandSpectacles/posts/?ref=bookmarks&mt_nav=0

Or our website:

Or our Messageboard:

Or our Wargames Vault Page:


Monday, July 20, 2020

Review: Zona Alfa- Osprey Games


The latest in the Osprey Wargaming Series arrived at my door with a bunch of other wargames.  However, I had seen a lot of positive buzz about this game online so swooped in and snatched it up for the first review of the batch.  As a part of the Osprey Wargaming Series, or Blue Books; I think we are all familiar with the format and the 64 page limit.  That makes it a quick read.   

Zona Alfa is set to take place in a Eastern Bloc country where something really bad happened.  This really bad thing was corralled into an exclusion zone.  Your team is entering the zone to snatch goodies and anomalies and haul them out.  People often refer to this game as being themed around a series or set of genre books called STALKER, Roadside Picnic or Metro 2033.  I am not familiar with any of these sources, but the author calls them out.  I was thinking more along the lines of the Natalie Portman vehicle: Annihilation or the real life Chernobyl Incident.  The game is agnostic enough where you can tailor the setting to fit your own needs.

Now, with a rambling pre-amble out of the way, let's get into the game.


Things I Liked
First off, the opening couple of pages has a peak into the designers intent.  I am a BIG fan of designer notes.  I can then use these to determine if a game successfully met their goals.  Plus, as a designer myself if often helps me get a better feel or insight into the craft of designing.  These ones also give a bit of background on the genre and just generally set the tone of the book.  The author was looking to create a smaller scale gaming experience with a high "Cool Quotient" and a "bring what you want to the table" approach to gaming.  Gangs are typically between 3-10 models and the board is only 3x3 for 1-on-1 games.  However, there is a lot of opportunity for multiplayer games.   

I think one of the most interesting things about the rules is the way it uses Action Economy.  Each model has a level of combat experience.  The higher the combat experience the more actions it can take.  Each "action" is a singular action.  Therefore, a rookie can only move or shoot or spot, etc.  Meanwhile, a veteran soldier can move and shoot and spot in their activation.  This is a simple way to add differentiation between combat troopers.  Green soldiers are more likely to freeze or get caught in the open, while the veterans are less spooked and can do more.  To me, this is the biggest "innovation" in the game.  I put "innovation" in quotes because it is probably not unique to this game, but it is a key feature of it.  I love these Blue Books because I take something interesting away from each one I read.

There are also mechanics for doing things other than fighting via Complex tasks/Skill Checks that allow an RPG lite element to be used in the game.  I think that is a good thing.

Terrain provides benefits as cover, however it can work on three different levels.  The first is to make it harder for the shooter to hit, the second is by adding protection to the target's armor, and the third is to boost their morale to avoid getting pinned by the shots.  This is a great way to differentiate terrain and I think adds to the tactics of the game.  The downside is it is more to remember in game, but the differences make sense to me.  Related, being in cover makes it easier to rally from being Pinned. 

One of the key elements of the rules is that the Zone itself is hostile to you.  You come across hot spots that when investigated resolve into encounters and potential rewards.  You trigger them by getting within a certain distance.  These could be wandering monsters, environmental effects, and other interest items.  These areas also serve as Objectives so there is a reason to engage with them.  They are a mix between "hotspots" that generate hostiles in Force-on-Force and treasure tokens in Frostgrave.  This elements lead me to believe this game could also be played solo very easily, in fact I am pretty sure the author has solo-play rules up online.


Things I Do Not Like
Most mechanics resolution is a roll of a d10.  However, in this game you are trying to roll low.  That is not intuitive to me, so that will take a bit of getting used to.  I prefer games where you roll over a stat rather than under, but mechanically it makes no real difference.  Just a personal preference. 

Critical success and critical failures also exist int he game.  However, when rolling multiple dice for some actions, it can get a bit confusing.  A Critical success allows you to take another action, so Veterans can get up to 4 with a critical!  Meanwhile, a critical failure gives you a pin counter.  Personally, I am not a fan of Crits in a game like this.  It is intended to add a cinematic feel to the game, but I do not think the game needs them at all and is just something else to remember.

Melee is simultaneous, so an attacker and defender could kill each other off.  Both sides roll for and compare who has more.  Attackers must use an action while defenders do not.  After the success are calculated, the attacker can choose to convert hits into parries to reduce hits on them.  This process seems like it strongly favors an attacker in melee, which is probably intended.  I will need to try it out to verify if this is the case.

Shots that do not hit can cause pinning.  That is good!  However, each deflected hit does not modify the Pin test, it is the number of rounds that a model that has been shot at that causes the modifier.  This seems like a difficult thing to assess, and number of deflect shots seems more intuitive and easier to recall.

There is a small three-mission campaign in the book, but no other scenarios.  Despite the Zone constantly creating new environments I think a handful of team vs. team scenarios would have been helpful for replayability.  Like many skirmish games, I fear without scenarios the game will get stale quickly, even with the environment constantly changing.  It should be no problem porting scenarios from other games into this one.


Meh and Other Uncertainties  
Most of the mechanics are pretty straight forward for a skirmish game. Skill rolls are rolling a d10, apply modifiers to the roll, and compare it to an opponent's stat as a Target Number.  The number of dice you roll depends on the firepower of your weapon or other similar variables.  They are sensible, but a QRS will help you get through it all. Targets also get armor rolls, which is nice as no one wants to just stand there while your guys die. 

 Zona Alfa does use WYSIWYG as well for the models.  This can easily be ignored if a player wishes, especially as models progress.  I find once they have a bit of an identity in the group, you need WYSIWYG a lot less.  Instead of Model A has an AK-47 you get to, Iron Ivan is over there with his surprisingly accurate AK-47.

The games uses a combination of model stat lines, Weapon stat lines, and a some keywords for skills and the like.  I think it would be pretty helpful to have a roster or each model on index cards while you play.  That is not bad advise for most skirmish games. 

The game allows pre-measuring.  I have no qualms with this in a modern setting where range finders and similar details are very common.  I think it is a strange artifact of modern game design that pre-measuring or not pre-measuring is a huge deals for some players.  To me, it is not a huge factor either way.  It is more of a Yes/No question in my mind.     

The game has a lot of types of guns, gear, and skills.  There is a lot of ink spilled on the campaign element, which is fine.  It tends to follow the Necromunda/Gorkamorka/Mordheim model that is a very popular template.  The injury table is not extensive and the inclusion of Med-kits means it is unlikely your best characters/boss will go Out of Action for good, however things could get ugly for your rookies.

A note on Factions, there are some factions that are aligned and will not fight each other.  This is good if you can have multi-player games, but not so good in one-on-one fights.  Instead of fighting they are playing against the zone, but that makes for a boring campaign.  Choose your starting factions carefully and in consultation with your opponent.


Final Thoughts
This game brings two big elements to the table.  The first is the action economy and the second is the Zone mechanics.  Both of these features help differentiate Zona Alfa from its peers to provide a unique experience.  I like that the setting and gear are agnostic enough that you could place this in any setting you really wish, but the Eastern Europe/former Soviet Bloc vibe is also a unique aspect.

The designer wanted a "Bring what you want" and high "Cool Quotient" in his game.  The Action Economy allows a more cinematic feel as Heroes can be bigger than those around them.  They can do more and survive longer.  There are even mechanics for them to save the day with complex tasks/skill checks.  Overall, I think he accomplished what he set out to do.  I have some minor quibbles with the rules and potential replayability, but overall you get what it says on the tin with this game.

This is not a hardcore competitive set of rules.  Campaign games frequently have some combination of equipment, stats, and skills that will put someone or something over the top.  However, it is not intended to be such a game.  You and your buddies are suppose to just get together and explore the Zone together.  There are some situations where combat against other players isn't even a thing!  If you approach the game with this "explore the Zone together" mindset, you can have fun.  This would be great as a multi-player club event, a convention game, or a short group campaign with RPG-lite elements thrown in. 

Overall, I am glad I picked this book up and look forward to giving it a go.         


You can follow Blood and Spectacles Facebook page for more fun: https://m.facebook.com/pg/BloodandSpectacles/posts/?ref=bookmarks&mt_nav=0

Or our website:

Or our Messageboard:

Or our Wargames Vault Page:

Monday, July 13, 2020

Battle Report: Wars of the Republic- Battle of Scarpheia


Shortly after the Fourth Macedonian War, the Greek Acheaen League rose up against Rome.  This war was one of defiance after Rome's high-handed treatment of the League during the 3rd adn 4th Macedonina War.

The Roman's took hundred of hostages from the League and refused to return them or even entreat the ambassadors sent to secure their release.  In addition, populist generals were elected to the Achaean League leadership on a platform of reforms and taxation that would be counter to Roman interests.  Finally, Rome's efforts to reduce the size of the League by severing several cities and limiting the size of the League.  These three issues were politically unbearable to the Acheaen League and war was decided upon.  

It is unlikely that the Greeks had any hope of beating the Romans.  After all, the Romans had just defeated the much larger Macedonians and the Seleucid Empire.  However, it was a war of defiance.  It is best known for two key battles, the Battle of Scarpheia and the Battle of Corinth.  There may have also been several smaller skirmishes that were unrecorded.

The outcome was the total defeat of the Acheaen League.  As punishment, Rome complete destroyed Corinth, killed all the men, and sold the women and children into slavery.  All of the cities wealth was looted and sent back to Rome.  The Greeks were no longer a force in the Eastern Mediterranean after this cataclysmic defeat. 

We know nothing about the Battle of Scarpheia except that it happened in 146 BCE between the Romans and the League.  Rome won the battle and it is beleived the Greeks took heavy losses, but there are very few sources on this particular battle.  That is what makes it so interesting to us as wargamers!  It gives us free reign to play as we wish!

Forces

Roman Triplex Acies- Praetor Matellus
1 Skirmisher
1 Triarri
1 Principes- Praetor
2 Hastati

Rival City-States- Critolaus of Megalopolis
2 Drilled Hoplites- 1 with General
1 Militia Hoplites
1 Light Infantry- Peltasts
1 Archers
1 Skirmisher- Psiloi

The Acheaen League will be represented by my Men of Bronze Corinthian army.  Sadly, for this playtest, the Romans will be my famous Paper Templates.


Set-up
This was completed using the rules laid out by the rules in the booklet.  The board is 72 x 48 MU with an MU being 1 inch.  The board was divided into 6 grid spaces and terrain rolled and placed using the chart.  The Players took turns rolling and placing terrain, with the player being able to place the terrain anywhere they wished in the grid square.

This system led to the following set-up.

Grid 1 is the Roman right, 2 Roman center, and 3 is Roman left.  Grid 4 is Greek left, 5 is Greek center, and 6 is Greek right.

Grid 1- No terrain
Grid 2- 2-level hill
Grid 3- Grove of trees
Grid 4- Stone walls
Grid 5- Stone walls
Grid 6- Swamp or spring

The Greeks place the supplies 12 inches in from their board edge and across the frontage of the army.  1 by the swamp, two in the open field, 1 inside the stone walls, and 1 in the ruins.

The Romans deploy from left to right as Principes, Hastati, the skirmishers on the hill, Triarri on the opposite side of the hill, and then the Hastati again.  The Greeks facing them from right to left are, Drilled Hoplites, Drilled Hoplites, Militia Hoplites, Archers, Light infantry (Peltasts), and Skirmishers (Psiloi)


Mission
We again followed the rules found in the Wars of the Republic rules and determined the mission and complication.  We got the following:

Rome as the Attackers
Raze and Loot scenario
Complication is Bad Water

Turn 1:
Both sides are distributed their Commander's Gaze tokens for the turn.  The Romans have 6 and the Greeks have 7 tokens.  The Greeks bid 4 Commander's Gaze, while the Romans bid 3.

Greeks move out first.  The Archers clamor up and over the stone walls into the abandoned corral.  Militia Hoplites in Phalanx march forward towards their objectives.  The Romans try to interrupt, which is successful.


The Romans pay a Gaze token and the Skirmishers rush to the edge of the hill at full speed.  The Hastati on the Roman right are in open order and move in front of the Triarri.  The Roman forces on the left move up freely and in their Legion formation.  The Romans are content and turn control back to the Greeks.

The League continues their early deployment.  The Peltasts use a point to Skirmish and move into the ruins with the supplies.  The Drilled Militia on the Greek right moves up on Phalanx, while the second one breaks into open order and also moves up.  Finally, the Psiloi on the left use the last Greek Commander's Gaze to skirmish into the ruins as well.


Melee:
None

Turn 2: 
This time the Greeks bid 5, to the Roman 3 again.  Greeks win again.

The Greek right phalanx marches up and secures the supplies.  The Romans try to interrupt, but fail this time.  The Greek Peltasts use Commander's Gaze to skirmish and go to the edge of the ruins to defend the supplies there.

This time, the Romans successfully interrupt.  The Roman Hastati on the right form up in Legion and march towards the ruins.  The Skirmishers also pay a Gaze and move down the mountain and into the field, threatening the Militia Hoplites and Archers.

The Greeks interrupt successfully.  The Greek Archers struggle over the wall of the corral and secure the supplies inside.  The Psiloi in the ruins take up positions to support the Peltasts.


The Romans interrupt again and take over.  The Triarri march up behind their Hastati screen.  On the Roman left the Hastati pause as the Principes move ahead of them along the line.  The Romans are satisfied and let the Greeks take back over ot finish their activations.

The Militia move up and secure their supplies, staying in Phalanx and facing the Roman skirmishers.  The Drilled Militia in Open Order move up and stay in Open Order.

Melee:
None

Turn 3: 
Everyone still has their full Commander's gaze as no one has lost a unit.  The Greeks bid 0, and the Romans bid 2.  Romans get to go first.

The Right Hastati move up towards the ruins.  They are followed by the Triarri.  The Hastati on the Roman left then use the Legions maneuverability to shuffle across and behind the advancing Principes.


The Greeks use a Gaze and successfully interrupt the Romans.  the Greek archers open fire on the Roman skirmishers but fall just short of the target.  The Light Infantry in the ruins have the same issue as their Javelins fall far short of the Roman advance.  The Drilled Greek Hoplites in Open Order charge out towards the Roman Skirmishers, but fall short and start to Waver!


After this string of failuers, the Romans try to interrupt, but fail themselves.  The other Greek Drilled Hoplites use Drilled to slide to their right to try and cover both supply caches.  The Militia Hoplites stay right where they are. Play turns back to the Romans.


The Principes keep moving forward with the Hastati behind them.  The Skirmishers throw their javelins at the oncoming Drilled Phalanx who failed their charge.  Even with two re-rolls they fail to injure the wavering unit.

Melee:
None

Turn 4: 
Greeks bid 4 and Romans bid 4.  It goes to the roll off!  The Greeks win and their general breathes a sigh of relief.  He uses a Gaze to Rally the Drilled Hoplites, forms them into Phalanx, and then charges them into the skirmishers.  They are so close, the Skirmishers do not even bother to try and Evade.

The Romans then interupt.  The Principes declare a charge and surge forward using the last of the Commander's Gaze.  The Drilled Phalanxx has not Commander's Gaze left, so do not counter-charge.  However, the Principes JUST fall short and fall into open order and start to waver!  Concerned the Hastati move up to follow.

On the Roman right, the Hastati move up towards the ruins, but do not charge yet.  They do not want the slippery Peltasts to evade them.  The Triarri break into open order and begin to swing off to move towards the archers in the corral.


The Greeks take over.  The Greek Drilled Hoplites can not charge, so just move into contact with the Principes.  The Peltasts toss Javelins at the Hastati closing in on the Ruins but do nothing but anger the Romans.  The Militia Hoplites break into open order and dash to support their comrades fighting with the Principes, leaving their supplies exposed to the Roman Triarri.


Melee:
The Drilled Hoplites simply explode the Roman Skirmishers, who quickly re-think their life choices and turn to flee.

On the flank, the other Drilled Hoplites and the Principes get in a vicious fight.  The unorganized and reeling Romans fight hard, but unsuccessfully.  The Drilled Hoplites reduce them 2 Courage for no loss and push them back just shy of the Hastati marching up from behind.  That mis-timed charge was costly for the Romans!

End:
The Roman Skirmishers are routed, but this is witnessed by the Triarri.  They easily pass a Courage test. 
   
Turn 5: 
The Romans have lost a unit so are down to 5 Commander's Gaze to the Greeks 7.  The Greeks bid 3 to go first, eager for their victorious Drilled Hoplites to get the drop on the Roman Triarri.  The Romans bid 0 and hold onto them for charges and combat re-rolls.  The Greeks get to go first. 

They start with their victorious Drilled Hoplites breaking into Open Order, lining up on the Roman Triarri, and then reforming into Phalanx again.  Surprisingly, they opted not to charge as they did not judge the distance correct.  The Militia Hoplites move in on the Principe/Hoplite battle but also decide not to charge judging the distance to be insufficient. 

The Greek Light Infantry and Archers fire on the Hastati but fail to do anything to them.  The Greeks are content and let the Romans take over having spent 5 Commanders Gaze so far.  The Hastati outside the ruins spend Commander's Gaze and charge into the Greek Light Infantry.  Immediately, the Greek Skirmishers decide to support their fellow Greeks. 


The Hastati on the other side have a tough decision.  Should they support the badly injured Principe and risk being swept away if they lose?  However, without their help the Principes will be destroyed for no gain.  Plus, they need to strike before the Militia Hoplites get there.  Ultimately, they decide to charge in a desperate gamble. 

Finally, the Triarri square up on the Drilled Hoplites and charge them.  The Drilled Hoplites decide to counter-charge the Triarri.  The two groups clash with a huge clang of metal on metal. 


Melee:
The Greeks decide to start with the Triarri battle.  Neither side opts to use re-rolls and the pushing and shoving causes both sides to lose 1 Courage.  The Greeks have to use a re-roll to avoid Wavering!   

Next, the Greeks go to resolve the battle at the ruins.  The Hastati charge which allows them to use their Pila.  However, the difficult terrain forces them out of Legion, just as the Greeks hoped.  Both sides are reduced 1 Courage, with no re-rolls being used.  However, the Greek troops begin to Waver against the fierce assault, even after using a re-roll!  That leaves them with 0 Commander's Gaze. 

The final Melee has the Principes with Hastati support suffering a Courage loss, but forcing the Greeks to lose two and pushing them back.   

Turn 6: 
With almost all forces engaged, no one bids for Initiative.  The Romans win the roll-off.  They have no moves as everyone is in a Melee, so play goes to the Greeks.

The Greek Archers clamber over the walls and charge into the side of the Roman Triarri for a Flank charge!  The Militia Hoplites also charge into the Principe Melee on the Flank.  Things look bad for the Romans there. 

Melee:
Both sides have equal Commander's Gaze for Re-rolls.  The Romans decide to finish the Principe battle first.  With a desperate push the Principes fight on, but ultimately their Courage breaks and they are routed after reducing the Drilled Hoplites to 2 Courage left. 


Next, the Romans wish to fight in the Ruins with the Hastati.  The Greeks use three re-rolls and reduce the Romans 2 Courage, even against the Wavering Greeks!  The Romans would not have benefited from additional re-rolls.  However, the Greeks lose 1 Courage in the Melee.  The Hastati are pushed back from the walls of the Ruins. 


Against the Triarri, the Drilled Hoplites and Archers fight valiantly.  The Romans begin to waver after both sides suffer 2 Courage loss.  Copious amounts of re-rolls were used by both sides.   

Things look bad for the Romans! 

End:
With the Principes and Hastati routing, on the Roman left it triggers collapse tests.  The Triarri decide to call it a day and break off.  Seeing this the commander of the Hastati on the right decides it is better to retire and live to fight another day!

Conclusion:
We had an "ahistorical" outcome this time as the Romans are sent packing by the Greek forces! 

The deciding factor Melee of the battle was the failed charge and the inability of the Drilled Hoplites on the Greek right to counter-charge due to lack of Commander's Gaze.  This short charge caused the entire flank to get crumbled on the Roman side as they lost the protection of Legion! Even support from their Hastati back-up was too little and too late. 

However, I think this game was actually lost in deployment.  The large two-tier hill in the middle forced the Romans to split their forces.  Plus, the Objectives were evenly spaced where the Greeks could easily get them and hold them.  Once the Skirmishers in the center were routed, the Hoplites had exposed Roman flanks to exploit!  Secondly, I had the a great defensive position to fight from on the Greek left.  Legion is a strong formation for Hastati BUT it is better at "sticking" than it is at driving home an assault.  Once they had to break formation the Hastati did not have the hitting power to drive out the Peltast and Psiloi on their own.  The Principes or Triarri were needed on that flank to clear out the ruins.

The Bad Water complication played no roll.  The Raze and Loot scenario was critical to the Greek success.  The Romans essentially were forced to come to the Greeks, negating some of the Romans defensive abilities. 

Overall, a fun game.  Twice the Romans have tasted defeat.  Once against Gauls and the second time against Greeks! As an opponent, I think I have the measure of the Romans as an army.  Break them out of Legion with terrain and force them to attack and they have a tough time overcoming their foes.  If you have to go to Romans, they are very tough nut to crack and will whittle you away to nothing.         


You can follow Blood and Spectacles Facebook page for more fun: https://m.facebook.com/pg/BloodandSpectacles/posts/?ref=bookmarks&mt_nav=0

Or our website:

Or our Messageboard:

Or our Wargames Vault Page:


Monday, July 6, 2020

Random: 2020 Half-Way Goal Update!


So far 2020 has not been like anything that I expected it to be.  I expected a vast nuclear wasteland, or to be living in a giant dystopian city, I thought we would be on Tokyo-3 by now!  That is what my childhood had prepared me for?  It did not prepare me for the dystopia that we actually have!  Pandemics, riots, political chaos..... I guess it is a good thing I have wargaming to keep me going! 

Last year, I tried a different approach and focused on goals by Period.  I decided not to be doing that this year.  I placed my goals into a series of categories instead of by genre or period.  Those categories are:

·         Purchase- This is goals that require me to spend my hard earned bread, cash, grip, money, coin, etc. 
·         Painting and Modelling- Here is the section of stuff I will want to paint up or build up
·         Playing- This section will be for what I intend to put on the table for 2020
·         Rules Writing- Here are my goals for writing and creating games
·         Miscellany- This is for stuff that falls into the realm of Blood and Spectacles but doesn’t neatly fit into a category

I laid most of my goals out in a different thread, so there is no need to rehash that post!  If you want you can go back and read it for yourself.

So, let's find out what we have accomplished so far.....

Purchases
This year, I expected to buy a lot of stuff.  Thanks to your support via the Wargame Vault, I have been able to make progress on this front.  Not as much as I had hoped.... but progress.  Thanks for the assist on this one guys!  I have been able to get the following from my list:

1. Clash of Spears
2. Zona Alfa
3. Gangster Terrain (3 Shotgun houses and 2 store fronts) 
4. Blood Bowl Lizard Men
5. Last Days: Seasons
6. Realty's Edge


There are still a lot of ancients left to buy.  However, I think I cleared some space in the painting Queue for them so I can probably start buying some Romans.  

That leaves to buy:

  • Victrix Elephant
  • Victrix Greek Cavalry
  • Victrix Republican Romans
  • Victrix Samnites/Carthaginians/Italians
  • Gangs of Rome
  • Mortal Gods
  • Oathsworn Burrows and Badgers bundles A and B
  • Any new Osprey Blue Books
That still looks like a long ways to go on the buying front.  I have a feeling some will slide into next year!


Painting and Modelling
Last year, I painted over 150+ models.  That is probably a record for me, and I doubt I will be getting anywhere near that this year.  However, a man can dream can’t he? So far I have painted up 75 minis or bases.  Not bad.  

I finished my two Greek Men of Bronze armies- Corinthians and Spartans


Spartan Army

Corinthian Army

Paint my 6mm Baccus Successor Armies- I have enough for two armies of Heirs to Empire!


Finish up my loose Gangster Models from Copplestone casting- I only have 5 left


Complete a set of Scorpion Drones for All Quiet on the Martian Front- Not Started

Paint my Purchases for Use- Painted up my Lizzies!


Playing
This year, in half a year I have managed to play as many games as I did all of last year!  Plus, i have the beginning of a variety of games.  I just need to finish them off on the table.

  1. Broken Legions- Played
  2. Wars of the Republic!- Played a couple of times
  3. Men of Bronze- Played it! 
  4. Operation: Hemlock- Got those in too!
  5. Play a New Game- Watch this space for the battle report! 
Broken Legions

Wars of the Republic

Men of Bronze

Aeronautica Imperialis

Wars of the Republic


Wars of the Republic

Rampant Stars

Turf War


Aquanuatica Imperialis

Rules Writing
Typically, this is one of my more productive goals for the year.  Last year was a pretty good year for me on this front, and I hope to keep expanding on my successes.  I always have various projects on the go, and this year I have a few deadlines to hit!

1.       Complete writing Wars of the Republic for Osprey Games- Sent to the Publisher!

2.       Update the photos and artwork in Turf War for Wargame Vault- I have the models and terrain now.  Just need to take the photos and make the updates! 

3.       Get 1 game from the WIP section to the Wargame Vault- I finished the rules for Glittering Void, but I really need some better pictures before that is ready for prime time. 

4.       Get 1 new game into the WIP section of the blog- I actually have 4 games I have been working on: Under the Martian Yoke, White Star/Red Star, Homer's Heroes, and Aquanautica Imperialis: Force of Arms.  Two are up in the WIP Games section for you to review. 

White Star/Red Star Playtest

Miscellany
This is stuff I want to do for the Blood and Spectacles publishing, but don’t really fall into other categories. 

1.       Get 1 new blog post a week- So far I am on track! 

2.       Take more photos for Social Media Marketing- Check my Instagram! 

3.       Add a games Played/Models Painted Tracker to the Blog- In web version, look at the bottom right hand side, below the WIP games!
4.       Do preliminary work for organizing a local Convention for 2021- Covid absolutely killed this one!  No  progress. 


Conclusion
There is an update.  Like usual, it has been a productive year writing games but it has also been unusually productive with gaming and painting too.  I have a strong start to 2020, but I expect the Apocalypse to arrive and ruin the second half from a wargaming perspective.  I mean, it is an election year!  I hope my progress so far is enough to carry me through the end of the year.

Good luck to all of you out there! 


You can follow Blood and Spectacles Facebook page for more fun: https://m.facebook.com/pg/BloodandSpectacles/posts/?ref=bookmarks&mt_nav=0

Or our website:

Or our Messageboard:

Or our Wargames Vault Page: