Monday, January 25, 2021

Men of Bronze- The Etruscans


Most of the time, we associate the Etruscans with the rise of Rome.  This is true, but the Etruscans were not just rivals of Rome, they were also early rivals of Carthage and the Greek settlers into the western parts of the Mediterranean.  There was a period known as the Etruscan Expansion that brought Greeks and Etruscans into conflict.  Most of the documented battles were at sea, but where there is conflict at Sea, there is also conflict on land.  Since we have no remaining written Etruscan sources, such details have likely been lost to history.  

Who Were the Etruscans? 

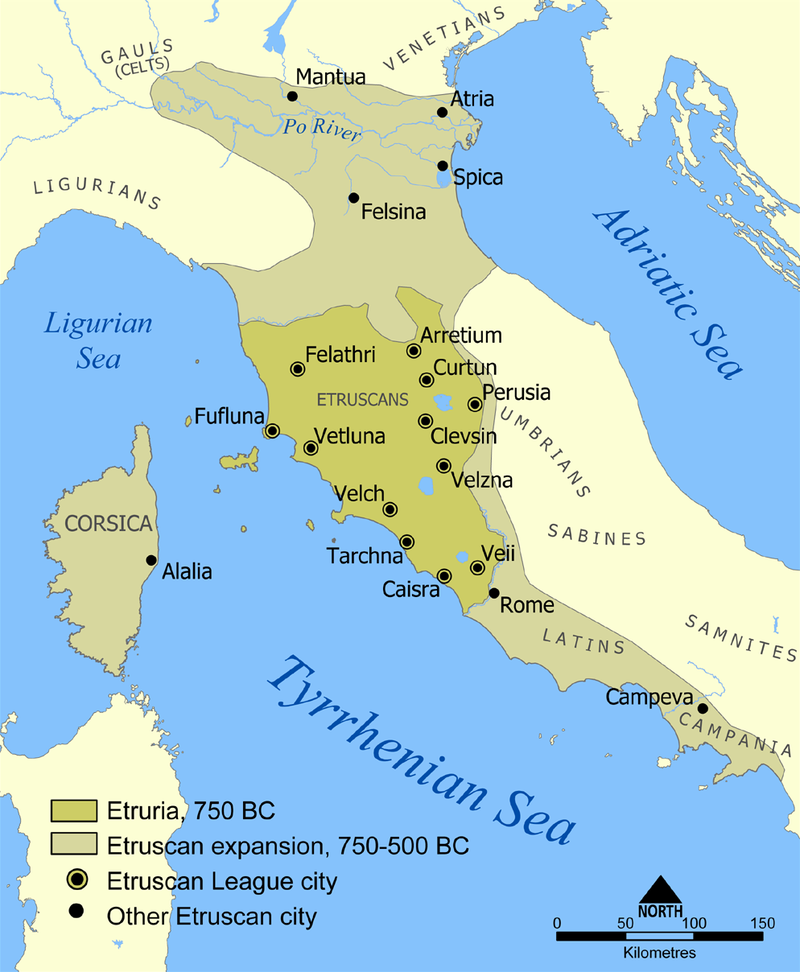
The Etruscans were a loose confederation of powerful city-states of the North and Central Italian peninsula.    They were a regional power from 600 BCE to about the 4th Century, when they were caught between the rising power of Rome, and the expansionist nature of the Celts.  

Legend has it that 12 cities were part of this League.  Despite the existence of the League, Etruscan cities were fierce rivals and were not above feuding and fighting amongst themselves. 

The Etruscans themselves have very little written evidence that remains of their civilization.  Instead, we must rely largely on Greek and Roman accounts from a legendary age.  The other main source of information is archeology.  The Etruscans may have been colonists from Anatolia, but had a complex relationship with their mostly Greek neighbors and trading partners.  They entered and conquered much of the Northern Italy around 510 BCE. 

It has been theorized that much of the early culture of the Roman military came from the warrior culture of the Etruscans.  Some have theorized that Rome herself was a colony or vassal of the Etruscans in its early history.   Like the Greek city-states, the Etruscan model had social classes that made up the composition of the army.  The defining characteristic was the ability to purchase bronze arms and armor. 

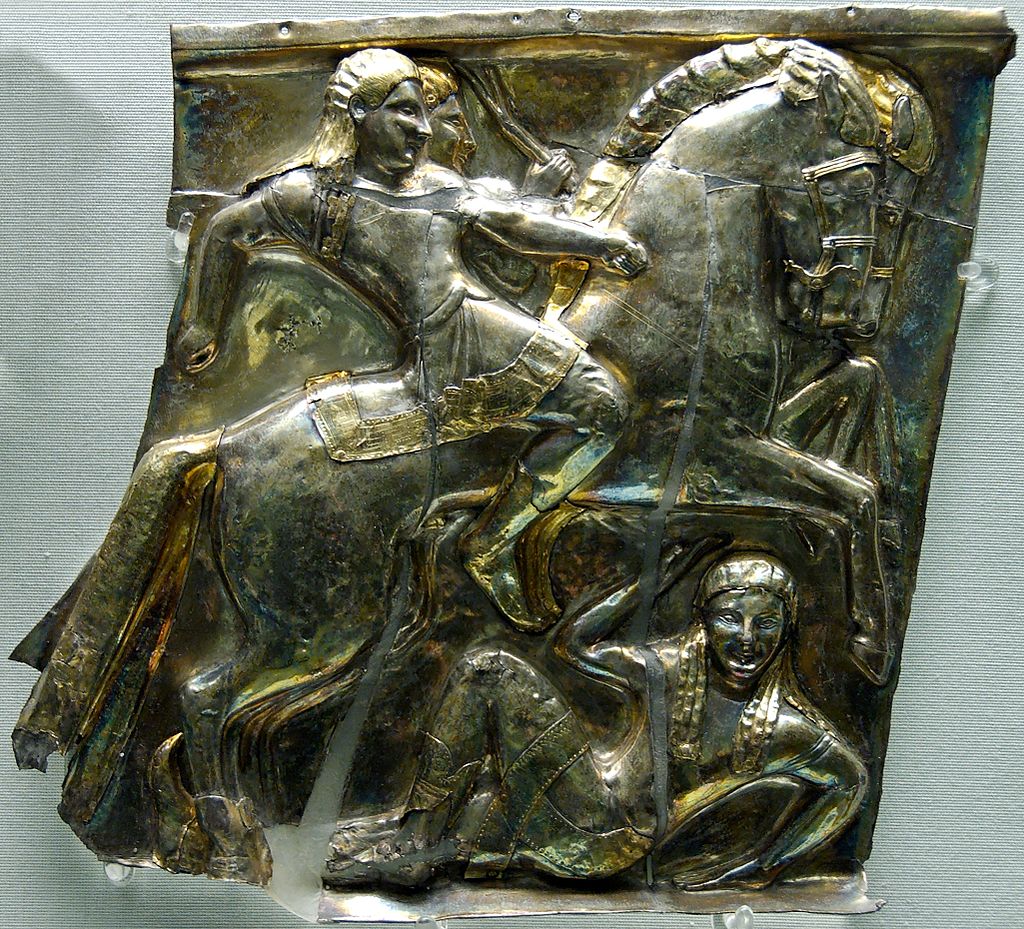
The Etruscan elites made extensive use of sea borne trade.  They had extensive contacts with the Greek colonists of Magna Graecia and also the Greeks found in Sicily.  Greek pottery was a favored trade item.  Many of the existing examples of Greek pottery were found in Etruscan tombs.  Despite having many cultural similarities with the Greek City-State system, the Etruscans were a less egalitarian and more aristocratic society.  The tombs located with Greek pottery were family tombs of the Etruscan elite, an not for individual burials.     

How Did They Fight?

The main fighting force of the Etruscans used the Hoplite Phalanx method of combat.  The richest could buy the bronze shield, cuirass, and helmet needed.  These men represented the warrior elite.  From this class, the Etruscans formed a phalanx, cavalry, and even some specialized engineering units.  They acted as a “standing army”

The next levels were levied in wartime.  They were also equipped as Hoplites, but with less expensive equipment such as a wooden shield, or smaller breastplate.  The final two levels were slingers, skirmishers, and archers.  The poorest members of the society would not be used in combat operations at all.

It is believed that the Etruscan army was exclusionary in nature.  The main fighting force was probably drawn from those who were descended from the Anatolian settlers and acted as the aristocracy.  The native Italians formed the lower ranks of the military.       

Such a societal and military model meant many people were excluded from military service due to class and ethnicity.  Therefore, the Etruscan forces were not able to draw on the same manpower pools as their neighboring rivals such as the Gauls and Romans.  To supplement this, the Etruscans had to make use of vassals, allies, and mercenaries.

The Etruscans frequently used cavalry, however they preferred to dismount and fight on foot.  The horse  and chariot was a tool used for mobility and not fighting.  This meant they had heavier equipment, and would only stay mounted when fighting other cavalry units. 

The Etruscans had a warrior culture, and also had warrior brotherhoods.  They were skilled warriors and took devotional oaths to never retreat in battle.  This frequently formed a commanders “bodyguard” unit and could have been Hoplites, Axemen, or horsemen. 

Unlike other contemporary cultures, such as the Romans or Greeks; the Etruscans seemed to make use of the Axe.  It is unclear if they were mostly ceremonial or a weapon of warfare.  One theory has the armored axemen being used to cut enemy spear points off and pull down the shields of a Phalanx with heavy blows against the shield’s face.  This would allow a gap in the shield wall that fellow soldiers would then exploit.  However, this practice seems to have been abandoned during the 4th century. 

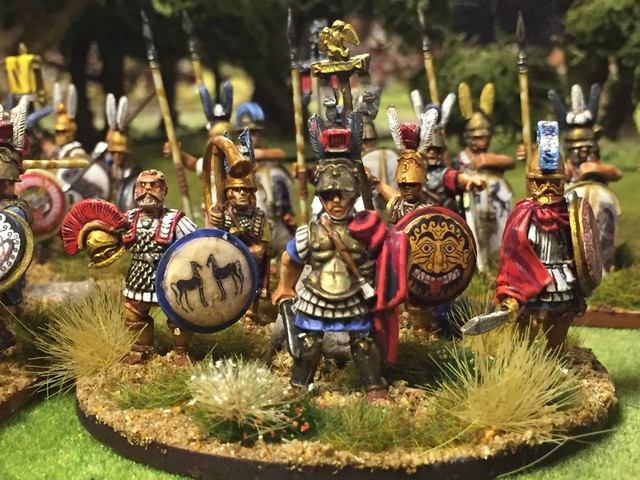
Illustration of Etruscan Warriors from Warry's: Warfare in the Classical World 

Building the Etruscan Line-of-Battle

The nature of Etruscan warfare allows us to make use of them using many of the Units found in the main Men of Bronze rules.  

When you look at the Etruscan military structures, there are two big questions to address.  The first is the extensive use of the Javelin as a prelude to Phalanx combat.  The main battle line seems to have exchanged Javelin fire prior to closing in an attempt to disrupt the enemy formation.  These pre-clash Javelin barrages seem to be a unique feature of warfare on the Italian Peninsula as opposed to battles in Greece and Persia.  There, Javelin men and light troops had a more distinct role separate from the Hoplite battle line. 

The second element to discuss is the role of Axemen within the Etruscan Hoplite formation.  Again, this is a unique element designed to disrupt the opponent's shield wall.  Javelins were to disrupt before and just prior to contact, while the Axemen were to disrupt during contact.  The tactic also seems to have fallen out of favor, so one must question its effectiveness on the battlefield.   

The easiest answer, is to not incorporate these elements into any special rules.  Instead, you could just keep them as separate units.  Javelin men could be Peltast and Psiloi as the units in Men of Bronze.  Axemen could simply by a form of Drilled or Elite Infantry.  In this scenario they are individual units in the Hoplite battle line instead of incorporating them into the battle line with special rules.  

The other alternative is to create an alternative "Special Rule" that is triggered by the use of an Arete point.  This special rule could either increase their attack value, or decrease the enemies Armor value to resist damage.  Upon review of how these Javelin and Axe tactics were designed to work, it seems as if reducing an opponent's armor rating aligns better with the tactics intent.  It was supposed to disrupt the enemy shield wall. 

Kit Bashed Etruscans with Axemen and Javelin Men from various Victrix LTD Kits


DisruptionTherefore, let's introduce the following Special Rule for Etruscans: 

Units with this Special Rule have the following rules applied to them:

       Units that charge automatically use this ability if they paid the Arete Point token to charge.

       The unit that is being charged has their Armor rating reduced by 1 to a minimum of 1.

       If a unit is charged by the enemy, they can spend 1 Arete Point to use this ability.  The attacker has their Armor rating reduced by 1 to a minimum of 1.

       This reduction only lasts for the turn that the charge occurs.    

Ultimately, I will try to incorporate both solutions into the rules for the Etruscans in Men of Bronze.  I will make some tweaks to their actual forces available to them, and also apply a new Special Rule unique to this army.  In addition, the Disruption Special Rule will allow you to put a few Axemen into your units as opposed to only have a sperate unit of them!

Etruscan Line-of-Battle

Use the following lists to build your historical forces for Etruria. The Lines of Battle help to choose the appropriate units for your historical forces. These are sample lists and there to provide a flavor of potential forces. Players can always modify these lists as they see fit

Each Line of Battle will have an entry with a number. The number indicates the limit of that Unit you can take in the army. If an entry says 1+ your army must have at least one of these units in it. If it is 0+ any number of that unit may be taken. If a Unit is not on the list, it can not be chosen.

Etruscans

0-1 Elite Hoplites*

0+ Drilled Hoplites*

1+ Militia Hoplites*

0-1 Psiloi/Slingers/Archers

0-2 Drilled Infantry*

0-1 Light Cavalry

*- Unit can be given the Disruption Special Rule for +1 point    

In the army list above, you can see that the Disruption rule is being used to replace an individual unit of Peltasts and leaving only a single psiloi at the expense of archers/slingers.  It helps make the list unique from other Greek lists.  In addition, the adding of Drilled Infantry for additional Axemen does the same.  This makes the army relatively "aristocratic" and "Elite" in nature. 

Finally, the Disruption Special Rules gives us the final ingredient to help us capture the nature of Etruscan fighting compared to their Greek rivals in Magna Graecia and abroad.  

Sample Army List

Below you can see a Sample Army built from the Line of Battle provided.  It is intended to give you an idea of what an Etruscan Force could look like on the battlefield.  It is built to 38 points, and has X Units.  

1 Drilled Hoplite 

    - Disruption

1 Drilled Infantry

    - Disruption

2 Militia Hoplite

1 Psiloi

Late Etruscans from Aventine Miniatures:
https://aventineminiatures.co.uk/img_5812/

Battle for Corsica

Most of the recorded fighting between Greeks and Etruscans took place at sea.  This included the Battle of Alalia and the Battle of Cumae.  The Etrsucans were allied with the Carthaginians, who wanted to shut the expansionists Greeks out of the Western Mediterranean.  On the line were valuable trading points in Corsica and Spain. 

The Phocacaeans were settlers from Greek Asia Minor.  They were spreading westward, and had founded a colony on Massalia.  The Carthaginians had tried and failed to thwart these Greek efforts.  The Greeks also founded a city on Corsica called Alalia.  After the Ionian Greek coast fell to Persia, many of the Ionian Greeks fled to Alalia.  From here, the Greeks began to cause problems with the Punic and Etruscan trade routes in the area.   

The Carthaginians and Etruscans decided to put this menace down.  This time, the Greeks faced off against a combined fleet of Etruscans and Carthaginians in 540 BCE.  The Greeks won the battle.  However, they were forced to fall back to Rhegium.  Despite winning the battle, the Greeks had to flee and eventually gave up in Corsica. The Greeks founded Elea in Magna Graecia instead. 

This allowed Etruscan forces to establish themselves on Corsica, and to secure it.  Again, since the Etruscans records do not survive, and the Greek records are also scarce, much of this time period in the Western Mediterranean is poorly documented.  This gives us as Wargamers some space to operate and create "What If" or speculative scenarios for our games to operate.  

In this case, we will assume that the remaining Greek colonists in and around Alalia have joined forces to defend themselves from the Etruscan advance into the region.  To aid them, they have allied or hired groups of Corsi (and other local tribes) to fight as light infantry forces.  In the meantime, the Etruscans have moved to solidify their hold on the island and re-exert their influence.  The Etruscan army is made up of adventurers, brotherhoods, and nobles from the newly formed Etruscan League eager to expand their power.  

Forces: 

Etruscan League

1 Drilled Hoplite- Disruption

1 Drilled Infantry Axemen- Disruption

2 Militia Hoplites

1 Psiloi

Ionian Greeks and Allies

1 Drilled Hoplite

2 Militia Hoplites

2 Peltasts - Corsi and Others

1 Archer - Corsi and Others

There are no actual records of such a conflict, and indeed the people of Alalia may have actually just let Etruscan administrators enter the city and take over.  Who knows?  However, as wargamers it is more fun to create a conflict even if there are no documents to support any of it.  We just know the Etruscans and Carthaginians fought the Greeks in a few Naval battles around the Itallic, Sicillian, and Corsican coasts for control of the trade routes.         

Set-up:

This battle, could be a coupe of scenarios from the Men of Bronze book.  Indeed, it could be fun to create a series of linked battles into a small mini-campaign.  However, for this battle we will make it a stand-up fight between the two groups just after the Etruscans have made landfall in their Pentekonters (pre-Trireme even!) ships.  Prior to the battle, I imagine the Etruscans would make their claims to Corsica as Spear-won land, while the Greeks would assert their independence.  They would then agree to engage in a ritualized combat to decide the matter, with the winner raising a trophy and claiming Alalia without further bloodshed.  Battle in this period between city-states was ritualized, but Etruscans tended to fight for spoils and slaves; so perhaps battles between cultures would be less formalized?  We really do not know.  

This game should take place on a 72 Base width by 48 base width board.  Deploy terrain and roll for complications as normal.  Deployment in such a ritualized battle would also follow that found in the main rules.  Use the Set-Piece Battle scenario as a guide. 

 Special Rules:

This scenario is designed to allow players to feel how Etruscan armies play versus a traditional Greek army.  Therefore, no special rules are needed. 

Victory: 

Victory conditions should be the same as for a Set-Piece Battle scenario in the main Men of Bronze rule book.  


Final Thoughts

The battles between Etruscan and Greek colonists of Magna Graecia took place long ago and are poorly documented.  However, the Greeks were an expansionistic culture, and the Etruscans were an established trading empire and military force on land and sea.  It is inevitable that these two cultures would clash!  These clashes took place before Salamis and before Himera even.  They were long standing grudges.  Despite our knowledge mostly involving Naval battles the endemic raiding and warfare of the period does not preclude land conflicts as well.   

The Etruscans in addition to fighting Greeks from the Men of Bronze rules could also encounter the Carthaginians and Barbarian Tribes from the main rules.  These conflicts would eventually be put to an end by the rise of a third power house in the region; Rome.  

You can get all of the updated materials including a FAQ, Campaign rules, and Lines-of-Battle in the Men of Bronze Supplement: Hercules Abroad.


You can follow Blood and Spectacles Facebook page for more fun: https://m.facebook.com/pg/BloodandSpectacles/posts/?ref=bookmarks&mt_nav=0

Or our website:

Or our Messageboard:

Or our Wargames Vault Page:


Monday, January 18, 2021

Wargame Design: High Noon- Cowboys vs. Aliens


I came across some plastic toys from the old Star Patrol line of plastic army men.  There were various manufacturers and from various countries of origin for this line.  The most common and well-known maker was probably Tim Mee Toys. 

They were popular in the late seventies and early 80's as they had a Star Wars "rip-off" vibe to the models.  There was a low rent Buck Rogers/Luke Skywalker model, a knock-off Darth Vader, wanna-be Wookie, a female "Princess" or crewmember at a control panel, and a squared off droid looking suspiciously like a low-rent R2-D2.  Plus, there was F-16/X-wing lovechild.  To top off the line, there were also a couple of random, normal looking astronaut figures.  I am sure many of you had these as a kid or have at least seen them someplace.  


Of course, I naturally wanted to turn them into a Dexterity Game, but ultimately there were not enough "useful" models in the range for me to really make a good, stand-alone Dexterity Game like Total CARnage, Green Army Men, or High NoonThe models in the packaging just did not lend themselves to this idea.  Plus, I only had one package to work with, and did not really want to order more as the trash to useful ratio was pretty low.  

Over Thanksgiving I shared this problem with my younger relatives.  They had spent a lot of time playing High Noon over the Holiday.  They had plenty of ideas on how to add these Space Patrol figures into a Cowboys vs. Aliens scenario for High Noon.   I have to hand it to the kids, they had ingenious ideas!  


For those of you that have High Noon all ready, I guess you could call this a "supplement" to the game!  If you don't have the rules, you should head over to my Wargame Vault page to get them, and then add these new add-ons for your own Cowboys vs. Aliens battles.  

Our first model is the Buck Rogers/Flash Gordon/Luke Skywalker wanna-be.  I guess he is supposed to look like a 1950's ray gun wielding space cadet.  That ill-fitting helmet makes him look SO heroic! We decided that he would have the following weapons: 

  • Ray Pistol - Direct, Hand-to-Hand, Rapid Fire                Coin: 2 Nickels

He couldn't shoot as fast as a Cowboy fanning his revolver, BUT he had bigger coins when he did shoot so it would be easier to hit his target!  

If you so desired, you could also choose to give them the "shield/armor" trait to represent a Force Field or power of mystical, cosmic energy, or just advanced armor compared to Cowboy weapons too. 


Next up is our Female Controller and Robots.  I guess this could be a crew member type figure or something similar.  However, it is clear that she is using a computer to do "something" and here is where the kids got pretty creative.  They gave her two different potential ways to use her "computer"

Option #1

  • Orbital Strike- Indirect, Blast                                        Coin: 1 Quarter

In this option, she is calling down fire from an off-board resource like a space ship or flying drone.  This would give her the ability to use "indirect" fire.  The only way to stop the rain of destruction was to take her out!  

Option #2

  • Bomb-Bots- Blast                                                        Coin: Robot Model

In this scenario, the Female Officer was using her console to move about and detonate the square little Bomb-Bots.  They could move like ordinary figure in their turn.  However, in the Female Officer's turn, should could use her action to "detonate" them as a normal Blast weapon.  If she was taken out-of-action, the Robots would also become inactive.  

We also discussed various ways to use the Robots on their own, without the Female Controller.  After all, R2-D2 and Battle-Droids do not need a controller!  Here are some options to make them fun! 

Square Bots Option #1

  • Square Bot- Hand-to-Hand                                        Coin: None

In this case, they are considered to have small shockers/tazers like R2 uses in Return of the Jedi.  They can use these like a Knife or hand-to-Hand weapon in normal High Noon.   

Square Bots Option #2

  • Square-Bot- Protective, Blast OR Area                    Coin: None 

In this Option, the robots are not offensive, but Defensive.  They can choose to project a force field to act as the shield/armor as either a Blast radius around themselves OR as a Shotgun spread in front of themselves.  This gives any model under the effect the "Shield/Armor" keyword for the rest of the turn.                                      

Our next figure is the dreaded Space Knight who totally isn't a Darth Vadar wanna be!  Honest!  This guy could either be a "Big Bad" individual, or a bunch of faceless thugs to an evil warlord!  Depends on how many you have!  Either way, here is what we came up with for these guys: 

Evil Space Knight #1

  • Evil Space Knight: Hand-to-hand                                            Coin: None

Like the Space Cadet, you could also give him the "Shield/armor" ability to represent his magic, space powers, better armor, or just carrying around a force shield.  

You could also say that his "Beat Saber" could send out an electrical pulse similar to many video games.  This would give him the following profile:  

Evil Space Knight #2

  • Evil Space Knight: Hand-to-hand, Area                                      Coin: None
Now that makes them a bit tougher and scarier.  As the Big Bad, you could also give them multiple "hit" that they could get up from where ever they ended up.  Therefore, he might have 5 hits before being taken out!  So, a penny hits him and he flies back two inches.  In his turn, he gets up where he fell and has 4 hits left!  Scary for those Cowboys to face off against him then! 


Our next set of models is the Nottawookie Alien with Rifle.  These guys seem pretty straight forward to us.  They are dudes with rifles!  Not much else to say, and if you have multiples would probably make up the bulk of your "alien" force.  Here was some quick thoughts on them! 

Nottawookie #1

  • Nottawookie: Direct, Rapid Fire                            Coin: 3 Quarters

With Rapid-Fire, if they move they can fire 1 Quarter.  However, if they stay still they can fire three Quarters!  That is some big firepower compared to Nickel and Penny throwing Cowboys! 

To make them extra tough, you could add Hand-to-hand, Shield/Armor, and replace Rapid Fire with Area to make their guns more like Shotguns.  To make them extra tough you could also give them more than 1 Hit too.  You can flavor them to taste depending on the difficulty of the scenario or how many Cowboys and Indians you bring to the table.    


The next batch of models from the Star Patrol set is a weird looking clawed alien with an inverted shell.  I have no idea what to make of these guys.  They are some odd looking creatures, and I am unsure if they are suppose to be sentient aliens, or more like alien animals.  Either way, here is a shot at how to play them.

Clawed Alien #1

  • Clawed Alien: Hand-to-hand, Shield/Armor                        Coin: None

In this scenario, they are more like simple shock troopers that run towards the enemy and attack them up close.  Not much of a threat on their own, but they could be used to mask more dangerous enemies or charge an objective.  

Alternatively, look at those crazy alien eyes!  Clearly, they can shoot death rays!  

Clawed Alien #2

  • Clawed Alien: hand-to-Hand, Shield/Armor, Direct            Coin: Penny

Again, if you want them to seem extra tough against Cowboy weapons, you could give them 1-3 hits for that alien durability.  They will seem almost immune to primitive Indian/Cowboy weapons then!    

Finally, we have the astronauts from an Apollo mission.  I honestly have no idea what to do with these guys.  They look very unthreatening.  Perhaps their suits give them protection and strength?  At a stretch the guy with the portable oxygen tank could be wielding some sort of Area weapon?  Maybe..... The other guy just looks like he should be planting a US Flag into the moon.  We didn't have much for these guys.  We thought maybe they could be objectives for the aliens to try to capture while the Cowboys/Indians tried to protect them.   

So, here is some half-hearted attempts to do something with them.

Astronaut #1    

  • Astronaut: hand-to-Hand, Shield/Armor                                Coin: None

Astronaut #2

  • Astronaut with Tube: Hand-to-hand, Shield/Armor, Area        Coin: None

If you have something better for these guys, feel free to post it below in comments or on the Messageboards.

Final Thoughts

I didn't think these Star Patrol models would be enough for a new Dexterity game, but it sure could be fun to add them to a game of High Noon in some Cowboys vs. Aliens type scenarios.  Give these rules a go and let me know what worked for you! 


You can follow Blood and Spectacles Facebook page for more fun: https://m.facebook.com/pg/BloodandSpectacles/posts/?ref=bookmarks&mt_nav=0

Or our website:

Or our Messageboard:

Or our Wargames Vault Page:

https://www.wargamevault.com/browse.php?keywords=blood+and+spectacles&x=0&y=0&author=&artist=&pfrom=&pto=   

Monday, January 11, 2021

Battle Report- Castles in the Sky- Tropic Thunder


Commodore Leftbridge could not believe what his spotters were calling in.  He had to see it for himself.  When he raised his own binoculars to his eyes, he could not deny it.  Seeing was believing.  

Commodore Leftbridge's small command had been cruising the Caribbean on routine patrol.  The usual stuff of rescuing would-be sailors, customs enforcement, and showing the flag with the local British citizens.  The close proximity to French colonies in the region had never really been much of an issue.   They kept to their sky ways, and the British tended to keep to theirs.  

Now however, the Frenchies looked like they were feeling a bit feisty.  The Foreign Office had cabled Leftbridge in Bermuda and let him know a new French officer was en route to station at Martinique.  The cable claimed he was hot-blooded and eager to prove himself.  They didn't say he was a looking for trouble.  

A French cruiser was now flying provocatively close to the Commodore Leftbridge's flotilla.  The question was, what to do about it.

Today's battle report is V4 Castles in the Sky play test.  I am intentionally using asymmetrical forces to see how they stack up against each other.  

Forces

Royal Navy

Arethusa Class Light Cruiser- Command 2  

Bull Finch Destroyer- Command 4

Shah Class Frigate- Command 4


L'Aire National

Gloire Class Armored Cruiser- Command 1


Mission

This is a Raiders mission with the French as the Attacker.  They are attempting to disable or destroy the Arethusa Light Cruiser.  The British are attempting to drive the French attacker away.  This game will last 6 turns.  

Set-up

We rolled for complications and terrain as normal.  Since this is in the Caribbean, it will mostly take place over ocean.  It is a 48MU x 48MU board.  1 MU = 1 inch.  We rolled up no complications.  

For terrain we rolled up an Alt 3 Mountain, two island (land based terrain with no impact), and a cloud bank at Alt 2.  We followed the terrain placement rules to place the terrain with the mountain and one island on the British side of the board, and an island and the cloud bank on the French side.


The British were in a group to the West with the Shah lagging slightly behind moving up the middle of the board at mid-altitude and speed. The French started on the Northeast side of the board, steaming towards the British at full speed and mid-altitude.  


Turn 1: 

 The French win initiative with 1 success, to the British 0.  The French also have 1 Command.  They decide to go first.  

Move: 

The French Captain issues an Full Ahead when the British force is sighted, but the Boiler is not prepared and the ship fails to respond due to a failed Command Check.  

The British Flotilla Commander also sees the French heavy Cruiser and immediately realizes she is out-gunned and out-armored.  The small ships begin to scatter, with the Bullfinch and Shah going up 2 altitude bands to try to get above the fray.  Meanwhile, the Arethusa turns away.  

Battle:

None.  No one has the range. 

Turn 2: 

The French fail to get any Commands this turn, and the British score two successes.  They opt to move first.  

Move:        

The Arethusa drops altitude to gain speed as she speeds up.  The Gloire turns to keep her to the front.  Meanwhile, the Destroyer and Frigate are moving to try and get behind the French Cruiser.  

Battle:

The distances are still too far.  


Turn 3: 

The French win Initiative with 1 success.  They let the British go first this time. 

Move: 

The Arethusa dives towards the clouds for cover.  The Gloire keeps closing the range.  Meanwhile, the Shah goes to Altitude 6 while the Bullfinch keeps cruising at 7 altitude.  They also are closing the distance for a Torpedo attack.  

Battle: 

The British Bullfinch fires a Torpedo Salvo at the French Cruiser.  The Torpedoes race to their target.  Two streak by harmlessly.  One is destroyed by point defense guns, while the last one strikes home.  It manages to detonate on a lightly armored part of the Cruiser and cause a Hit!    

The Gunnery Officer let's the Gloire's captain know that the British ship is in long range.  However, the Captain opts to hold fire until they can get closer.  He wants the first salvo to be devastating.  

The Shah also fires a pair of torpedoes.  1 misses, while the other crashes into the armored belt of the French Cruiser, causing only friction.  


End: 

The Gloire loses 1 point of armor, but a Fire also begins where the torpedo struck!  

The French also had 3 Friction markers, but a good Command roll allows them to shrug off the Friction this turn.  

Turn 4: 

The French score 1 success, to the British 2.  This time, the British make the French go first!

Move: 

The Gloire drops altitude as she tries to bleed some speed off.

The Arethusa makes for the cloud bank, but does not make it in time.  The Bull Finch gets Commanded to Re-load and does so successfully.  She moves towards the French ship.  The Shah also gets to Re-load.  She also tries to keep the French ship in her sights.  


Battle: 

The Gloire's Captain tries to give a Fire for Effect command, but interference on the Telecomm scrambles the order.  Her bow batteries still fire on the smaller, lighter Arethusa, but miss the mark.  

The Shah and Bull Finch fire another air torpedo salvo, but vigilant Point Defense gunners on the Gloire destroy them before they can hit home.  This leaves the French cruiser with 3 Friction tokens.  

End: 

The Gloire fails to put out her fire, and loses another armor point.  She also only manages to remove 1 of the 3 Friction markers.  

Turn 5: 

Both sides score 1 success.  However since the British have far more Command dice they can choose who has initiative.  They choose to move first this time.  

Move:

The Arethusa slows down as she races into the cloud bank and into cover. 

The Gloire is slowed by the Friction, but manages to climb one altitude.  Not as high as the approaching British escorts.  

The Bull Finch Re-Loads successfully and presses her attack.  She is confident she has the height to advantage.  Meanwhile, the Shah gains more speed and breaks off away from the French Cruiser.  

Battle: 

The French desperately try to get targets, but the altitude/size difference is too great and no shots are available.  They are sitting ducks.  

The Bull Finch fires another Torpedo salvo at close range.  The Gloire's Point Defense destroy 1, and 1 misses.  Two more strike the Cruiser, but fail to cause damage to the weakened armor.  


End:

The Gloire's crew manage to get the fire extinguished below decks!  In addition, they quickly batten down and manage to clear the Friction markers on the ship! 

Turn 6: Final Turn

The British score 1 success to the French 0.  They choose to go first this time.  

Move: 

The Arethusa speeds up and dodges away and out of the clouds and away from the French cruiser.  The Gloire continues to slowly rise up, but it can not out maneuver the smaller British Escorts who easily out climb her and stay away from her guns.  


Battle: 

No one has the right altitude or angle to successfully fire on an enemy vessel.  

End:

None

Conclusion: 

The British win by successfully avoiding the French cruiser's guns, while managing to reduce her 2 Armor points!  Jolly good show! 

As the French commander, I was hampered by my very low starting Command rating!  I could not get any of my Commands off, and I failed to put out a Fire in a timely way.  It also hampered my ability to clear Friction.  Meanwhile, the British Destroyer and Frigate commanders were command 4 and were easily able to get their Re-Load Commands for their Torpedo Tubes.  This left me at a huge disadvantage in this battle!  In addition, I simply could not get the right height, speed, or range to deal with any of these smaller ships decisively as the French captain.  

Therefore, the results of the battle were as I intended.  The Escorts could out-maneuver the big ships and still cause enough damage to win.  Therefore, the weaker Escorts still have an important role to play even in a big ship duel!  Plus, big ships alone can not counter Destroyer, Frigates, Patrol Boats, etc.  That means, for a Commander to be successful in negating these threats, you need Escorts of your own.  Taking the biggest and baddest ship is not always the best decision, instead you need a mixed fleet to be successful.  Perfect! 

Overall, I was very frustrated to play as the French Cruiser, but the rules worked as intended.  That makes this a win for the system in general! 


You can follow Blood and Spectacles Facebook page for more fun: https://m.facebook.com/pg/BloodandSpectacles/posts/?ref=bookmarks&mt_nav=0

Or our website:

Or our Messageboard:

Or our Wargames Vault Page:


Monday, January 4, 2021

Random- 2020 is Dead, Long Live 2021!


2020 is dead.  Long live 2021!  

Last year was a year, and this year will be another year.  Time keeps slipping into the future.  I have yet to find someone where it goes backwards or even stagnates for.  Time waits for no man.  Insert your other cliche's into the mix here as needed to get the point across.  

Like previous years I plan to create a few goals for the year.  These are not binding, but it keeps me from going off the rails and spending like crazy on the new shiny.  It also keeps me from jumping from project to project without finishing stuff first.  Like I say, to be a Game Designer, you need to have games for people to play! 

Like most years, I am breaking this down into the following categories:  

  • Purchases- Things I spend my money on
  • Painting and Modeling- Things I paint and build to play games with
  • Playing Games- The name says it all.  The games I will play and report on
  • Rules Writing- New projects and games I am working on
  • Miscellany- Other things related to Blood and Spectacles but not the other 4 categories. 
So, with no further ado, let's dive into what 2021 will hopefully bring......

Purchases

My goal is always to have a self-sufficient Hobby experience.  As I have said many times, you can make more money recycling cans than being a game designer, so I am not looking to make a living.  I have a corporate job for that!  However, with your help I CAN expand with projects that motivate you and inspire you in my own gaming systems!  

Creating games requires more than just writing rules.  You need to playtest games, market games, and put pretty pictures into your publications.  These purchases help with that process!  When you make a purchase from Blood and Spectacles, you are helping to support this work.  For that, I thank you! Thank you!  I will keep trying to produce good products for you to have fun with and play!  

So, here is what I would like to Purchase this year.....

  1. Victrix Vikings for my Fury of the Northman Project
  2. DreamPod 9 With the Lightning Mechs for Glittering Void
  3. Tumbling Dice Korean War Aircraft for White Star/Red Star
  4. Oathsworn Starter Bundles A and B for Burrows and Badgers
  5. Stay caught up with the Osprey Wargaming Series
  6. Pick-up Stargrave when it comes out
That's about it for the purchases in 2021.  4 to support projects I am working on, and 2 keep me up to date with trends in the wargaming industry.  

White Star/Red Star using my (in)famous paper templates

Painting and Modeling

One of the reasons my Purchase list is limited, is because I know I can only paint about 100-150 models in a year.  No need to buy more than I can paint!  Plus, going into this year, I have a full size Republican Roman army to paint, so there goes most of my painting time this year!                    

  1. Victrix Republican Roman army for Wars of the Republic
  2. Paint the new miniatures I purchase
That's it!  I will be painting about 60 to 100 Romans so there goes most of my bandwidth for the year!  Therefore, my goals in this area are very limited.  You will be able to keep track of the miniatures I paint in 2021 with my painting tracker on the right hand side of the blog.   


Gaming
The last two years I have been able to get between 12-18 games in a year.  Therefore, I need to keep that in perspective for this year.  I am not going to be setting the world on fire with the number of games I get to play.  However, that doesn't mean I won't get a bit creative! 

  1. Play 4-6 games of Ancients of any system- Heirs of Empire, Men of Bronze, The Games: Blood and Spectacles, or Wars of the Republic will all be acceptable! 
  2. Play 1-2 games for Operation: Hemlock 
  3. Play 2-4 games of my WIP games- This includes Castles in the Sky for Osprey
  4. Get 1 new Non-Blood and Spectacles game on the table
That is only 8-13 games for all of next year.  So, about 1 a month!  Again I am being conservative with my gaming.  You will be able to keep track of the games I play in 2021 with my game tracker on the  right hand side of the blog. 


Rules Writing
I may not be the best or most popular game designer in the world, but I am a very productive one!  I pretty consistently am moving new content to you, the gamer!  I endeavor to continue this trend! 

  1. Complete Castles in the Sky for Osprey
  2. Update The Games: Blood and Spectacles with new photos, art, and resources
  3. Try to get a new work published in a Magazine, Osprey, or through another channel
  4. Move a WIP game to the Wargame Vault
  5. Add a new game to the WIP section
I have several games in various states of WIP from Modern Naval, to Dexterity Games, to Historical, to Gunpowder Fantasy, Modern Horror, and beyond.  The hard part is prioritizing and completing works in a timely manner.  There are so many concepts, it can be hard to get all the concepts into reality!  


Miscellany
These are random elements that apply to running Blood and Spectacles Publishing that I want to continue to accomplish.  Sometimes they are administrative, marketing, or other details that I do not want to lose site of.  
  1. Get a new Blog post up every two weeks, if not every week
  2. Update the Painting and Gaming tracker for 2021
  3. Tie my Social Media, Website, Blog, and Messageboard together for a more unified marketing message
  4. Try to increase my network with other Game Designers
  5. Update my Products on my Website
Basically, keep working on finding ways to improve my "Side Hustle".  


Final Thoughts
In some ways, my goals are less ambitious than last year.  However, in other ways they are more ambitious.  There is much more focus and rigor around completing projects that tie into the growth and development of Blood and Spectacles Publishing as opposed to just MY hobby side of things.  The Purchases are to align around ongoing projects, the painting to support releases, the gaming to market and play-test products, and the Rules Writing to continue to expand my stable of games for you the player.  

2020 was a good year for Blood and Spectacles Publishing!  Here is to 2021 and growing and expanding even further!