Monday, November 27, 2023

Castles in the Sky: The Indo-China Campaign - The Final Battle


Welcome to the final battle of the Indo-China campaign between the British and the French.  The French finally took the lead in the campaign at 7 to 5 points and have triggered the "Final Battle".  One thing about the "Final Battle" scenario in the rules is that it encourages the players to determine what that scenario is going to be!  

In an unfortunate stroke of bad luck, the British ambassador to Siam passed away.  This left the Foreign Office in a bit of a dilemma.  The deceased ambassador had a well-established and long running relationship with the King of Siam.  This untimely opening had to be filled, before the French could exploit the opening and insert themselves into a position of power in Siam.  Therefore, the Foreign Office dispatched a new Ambassador immediately via airship.  

Commodore Duckworth received the news and immediately deployed with what was left of the Royal Navy of Siam to rendezvous with the British airship.  However, Commodore Aubre also received word of the arriving diplomat from his own Foreign Service contacts.  He also left with his own fleet to intercept and stop the new British Ambassador from arriving on-station.  

Forces: 

L'Aire National

Camot- Commodore Aubre- Command 4
Charles Martel Class Heavy Cruiser (Battleship)   

Cuchinchina - Captain Gourdon- Command 2
Gloire Armored Cruiser

Tourane- Captain de Genouilily- Command 2
Descartes Class Cruiser

Tonkin- Captain de Vence- Command 2
D'Iberville Class Cruiser

Fantassin- Captain Valjean  - Command 4
Chasseur Class Destroyer- Torpedo  

Royal Navy of Siam

HMS Malaya- Commodore Duckworth- Command 2
Queen Elizabeth Class Battleship

HMS Medusa- Captain Butler- Command 2
Active Class Light Cruiser

HMS Corsair- Commander Montgomery- Command 4
Bull Finch Class Destroyer- Torpedo

The British will also have to protect the ambassador's airship:

HMS Wesley Anne - Command 2
Troop Transport Ship

Mission: 
This is the Final Battle, so there is no scenario from "the book".  Instead, we are going to use elements of other scenarios to make this custom scenario.  

The British ambassador in the HMS Wesley Anne is placed within 18 MU from the short table edge at any speed and altitude 24 MU in from the British edge.  In addition, a landing point is placed on the opposite short table edge 12 MU in, and 24 MU in from the British edge.  The landing zone is a box 6 MU x 6 MU and the center is represented by a terrain piece.  The British are attempting to land the Ambassador within the landing zone before the game ends.    

Then, both the British and the French can place up to 15 AV of picket ships on opposite sides of the board on the long table edges, but no closer than 12 MU from any short edge.  Non-Picket ships go into reserves.  All ships can be placed at any speed and altitude.  Reserves enter the board in the normal deployment zones and follows the normal rules for reserves.  

In addition, if the British Ambassador's ship is stricken with a Fire! from critical damage, it will also trigger a special rules that the Ambassador was killed in the attack and ensuing fire.  Any successful boarding actions on the Ambassador's ship can "take the Ambassador" prisoner instead of the normal effect.  

The game will last 8 turns. 

The outcome of the campaign is thus: 
1. The Ambassador lands successfully in the landing zone - British Major win and Siam becomes part of the Empire as a client state

2. The Ambassador's ship survives the battle and is not crippled or sunk and still on the board - British Minor win and Siam stays in the British Orbit

3. The Ambassador's ship is crippled or left the board - Draw, but Siam becomes independent

4. The Ambassador's ship is sunk/explodes or the Ambassador is killed - French Major win and Siam is out of British orbit

5. The Ambassador is captured - The French have broken Siam from British control and swung them to French orbit         

There are three cloud banks on the board at randomly assigned heights as terrain and complications.  They are at 3, 4, and 2 and their height is a die next to them.  


Set-up:  
The Final Battle will take place on a 72 MU by 48 MU board.  1 MU is equal to 1 inch.  

The British Picket ships are the HMS Corsair and the HMS Medusa.  The Medusa is set-up to try and catch up with and escort the Wesley Anne, while the Corsair will try to lead them towards the landing zone.  
The HMS Wesley Anne has the flag 

The French picket ships are the Fantassin and Tonkin.  They are coming across at an angle towards the HMS Wesley Anne, eager to sink some torpedoes into her.  


For this battle, we are using a standing white board to track the key details of the battle like ship speed, altitude, Command, damage, and special effects.     

In addition, I am not going to be detailing every move and shot like previous game reports. Instead, I am going to give some high level details.  The battle will be broken down by stage.  These will be the Maneuver Phase, Battle Phase, and the End Phase.   

Maneuver Phase:
The French get a good jump and aggressively move in on the Ambassador's ship.  The Fantassin hits her with a spread of torps at long-range, but thankfully the look-outs saw them coming in time to Brace and avoid any damage.  That was a wake-up call to the British to start maneuvering and get the lead-out! 


The Wesley Anne gets under the Medusa's protection as she desperately blows smoke and tries to dive out of the line of fire.  However, the French keep barreling in heedless of the Corsair bearing down on them.  The Medusa's Point Defense guns swat two torpedoes from the Tonkin out of the air, but three others slam into the transport ship.  The Corsair tries to drive off the French Destroyer with a burst of Torps, but fails to strike home.  


The Wesley Anne desperately makes for the Cloud Banks, while the HMS Medusa stays as her escort.  The HMS Malayan and Commodore Aubre and the rest of the French fleet also arrive on scene.  The HMS Medusa escort pays off as she swats incoming Air Torpedoes from the Fantassin out of the sky. 
 

Battle Phase: 
The Wesley Anne escapes into the cloud bank, with the Medusa staying just above it.  The Tonkin moves to get the angle for when the transport comes out, but is greeted by the Corsair unloading on her from the Stern and the HMS Malayan from the port bow with her heavy guns.  The Tonkin is rocked by Friction and a heavy shells penetrates her armor.  


The Tonkin found itself caught up in the middle of the British fleet.  Meanwhile, the HMS Corsair was in front of the French.  They were both going to take a pounding.  The Tonkin's Captain let rip on the Wesley Anne and Corsair from both sides, passing the Command check.  Despite the Medusa's best efforts a torpedo managed to strike the transport and detonate.  


The Corsair managed to sink a torp into the Tourane, but in return was shelled by the guns of the Camot at close range.  She came away worse off with two hits.  The Malayan and Medusa pounded on the Tonkin, who failed to Brace.  

The Corsair lost armor, but the Tonkin's bridge was smashed by the enemy shelling knocking the Captain out of the fight.  The Tourane also had her screw fouled.  However, things went really pear shaped for the Brits as the Wesley Anne exploded in mid-air!  

The end of British control of Siam
End Game: 
With the British Ambassador's ship blown up in a catastrophic explosion, we decided to play one last turn as the fleets tried to disengage or get revenge.  

I finally obliged the British player and took my inferior French Battleship broadside to broadside against the British Dreadnought.  I even brought my Gloire Heavy Cruiser to support and he brought a Light Cruiser.  The engagement proved the wisdom of avoiding such and encounter all campaign.  The British fired for effect, while I braced.  Once the smoke cleared, the French Battleship lost 4 armor, a fouled screw, and took 13 friction.  The British Dreadnought took 7 Friction but no damage.  Ouch!  


With that, we called it a campaign! 

Conclusion: 
Well, the British lost the campaign when the Ambassador's ship blew up!  He's super dead now.  However, the British also ended the campaign on a high note as they finally got to use the full power of their battleship and reduced the Camot to half armor in one volley.  That was pretty satisfying for them.  

Commodore Duckworth tried to fill the gap for the lost ambassador with the King of Siam.  His diplomatic skills were worse than his command skills.  The Foreign Office in London was unable to recruit a new ambassador after the fate of the last one.  

It was not long before the French had easily out-maneuvered Commodore Duckworth at court.  The King of Siam was also unimpressed by the British being unable to help quell rebels in the Kraa isthmus, and the high upkeeping cost of their Navy.  He expelled the British, and turned to the French in Indo-china for aid.  The French were quickly able to quell the rebellion, since they had been secretly funding it. 

It was not long before Siam and France signed a mutual aid pact.  This effectively brought Siam into the French orbit.  With French ships patrolling the region, the trade lines to and from Indo-china were secured.  A great diplomatic and strategic victory for the French. 

Now, to talk a bit about the battle and the campaign.  The British underestimated the range of the French torpedoes, and in the first turn failed to take evasive actions to avoid coming under fire.  This was a big problem as the little transport got pasted before reinforcements could show up.  However, the British had a tough climb in this scenario because their fleet had been decimated in the previous Fleet Battle, and they really didn't have enough ships to challenge the French.  The HMS Malayan was powerful, but not maneuverable or fast enough to get there in time.  The French discarded their usual Fabian tactics and just came pouring on with a single-minded determination to sink the Transport.  

This was the 7th or 8th  battle in the campaign.  The pool of ships and the post-battle repair sequences were fun and interesting.  Damaging or losing ships in battle turned out to be a big deal.  However, the experience side was not as useful.  We kept forgetting to use the experience benefits in the heat of the battles.  Plus, it was a bit of tracking during the battle for the gains.           

Overall, a good time with the scenario and the campaign in general.  


Become a Patron and get access to all the cool stuff, a peak behind the curtain of Blood and Spectacles, and early-access to playtest games!  


You can follow Blood and Spectacles Facebook page or Instagram for more fun! 

Check out the latest publications and contact me at our Blood and Spectacles website

Or purchase all out games at the Blood and Spectacles Publishing Wargames Vault Page!    


Monday, November 20, 2023

Battle Report: White Star/Red Star - Bandits Inbound! November 21, 1950


Dateline: November 21th, 1950
Location: MIG Alley

By August of 1950, UN forces had taken Pyongyang and the North Korean air force had been silenced.  However, the war continued as UN forces closed in on the Yalu river border with China.  B-29 bombers were hitting targets across North Korea.  However, the entire war changed when Chinese forces attacked the UN in October throwing back the Eight Army  However, the 1st Marine Division engaged near the Chosin Reservoir and reached the Yalu on Nov. 21st.  

Far East Air Force (FEAF) aircraft supported these counter-attacks and defensive actions.  B-29s and assorted fighter-bombers continued to attack targets of strategic and tactical value.  It was in November that a flight of F-51 Mustangs first encountered the Mig-15 by the Yalu River.  However, soon the Communists were contesting air superiority across the North with this new threat. 

With that said, we will be playing an engagement between Mig-15s and USAF aircraft.  We rolled up a Sortie and got a Bomber Interception mission.  The Mig-15s main role was to stop the bombers from getting through! 

Forces

USAF

3 B-29 Super Fortress
- Experienced Pilots

2 F-80 Shooting Stars
- Experienced Pilots


Soviets

3 Mig-15s
- Experienced Pilots


Mission:
Today's Sortie is a Bomber Intercept mission.  Each Bomber that escapes off the table counts as a Kill for the Attacker.  

Set-up:
1 MU will equal 1 inch and the board will be 48 by 48MU.  

There is no difficult terrain on the board and the weather is clear.   

In this case, the USAF is the Attacker.  The Russians are the defenders. 

Weather, sortie type, and Attacker were all determined using the methods found in the main White Star/Red Star rulebook.  

If an aircraft is off the base, it is at Low altitude, on the base is combat altitude, and on a dice is High altitude. I won't be following the details on a turn by turn basis.  Instead, I will break it down into three broad phrases; Maneuver Phase, Battle Phase, and Endgame and try to cover the battle in broad strokes rather than turn-by-turn, aircraft by aircraft detail. 

Maneuver Phase:
No planes are deployed until they are detected.  However, they are all detected all at once.  The 4th turn the USAF and the Russians are detected.  The B-29s are set-up across the board at maximum forward movement at high altitude.  The Shooting Stars are at High and Combat between B-29 1 and 2.  The Mig-15s stack up coming in on B-29 2 in the center, at all three altitudes.  


In the initial pass, the Mig manages to down the 2nd B-29!  The Shooting Stars close in and engage, but the Migs dodge away from the incoming fire.  Everyone still has ammo. After the Experienced and Ace phases, the Migs seem out of position, but have 1 kill. 


Battle Phase: 
The Migs try to turn back onto the attack, but a Shooting Star lines up and fires a deflection shot at long range, but runs out of ammo.  The shots fail to strike home!  This causes him to break away and head for home at high altitude. 


Due to poor flying, a Mig breaks off his attack and heads for home.  That leaves his wing leader, and a squadron mate.  The B-29s are almost to their target areas.  


Disengagement Phase: 
The USAF makes a mistake and moves the disengaging F-80 first.  This gives a Mig time to swoop in on a B-29 and blast it apart.  However, the last B-29 and Shooting Star disengage off the board.  This is soon followed by the last remaining aircraft disengaging by the end of the turn.  


Conclusion: 
A very narrow Soviet victory.  The USAF got 1 Kill for a B-29 escaping, while the Soviets downed 2 bombers for 2 Kills.  

The introduction of the Mig-15 changed the complexion of the war.  The USAF had air superiority over the majority of Korea, but the Mig-15 kept the areas close to the Chinese border as contested air space.  Eventually, the USAF suspended day time attacks with B-29s, and switched them over to night time bombing.  

Good, quick fun.  The key to this game is deployment after detection and activation order.  We saw that today.  We have now played through two major engagement types for the early part of the war.  It is now time to move onto 1951, where much of the early air battles involved attacking and defending ground attacks from fighter-bombers.  

Until next time! 


Become a Patron and get access to all the cool stuff, a peak behind the curtain of Blood and Spectacles, and early-access to playtest games!  


You can follow Blood and Spectacles Facebook page or Instagram for more fun! 

Check out the latest publications and contact me at our Blood and Spectacles Website

Or purchase all out games at the Blood and Spectacles Publishing Wargames Vault Page! 


Monday, November 13, 2023

Wargame Design: We Don't Need Another Warhammer


Those of you who have been reading my blog, interact with me online, or heard some of my interviews know one of my key maxims as a Wargame Designer.  Innovation is Over-rated.  Therefore, you maybe a bit surprised to see an entry with this title.  

I often think of my own development as a wargame designer as Path A.  I started with Dungeons and Dragons in the mid-80's.  Saw and advert for Warhammer 40K: Rogue Trader and got into that.  Played that for a long time.  Did time playing the Specialist Games. Then, eventually moved over to historical and other games at some point.  I have heard this exact same story from so many gamers and wargame designers.  Hence, why I call it Path A as it is so common.

Due to this Path A, there is a common Indie Wargamer joke that we all started out trying to build a better Warhammer.  The first "published" rules I ever had were for a variant set of rules called "Jungle Fight" that was published in Firebase #7 a fanzine I found on the Old Warseer forum.  I am pretty sure you can still track them down.  Indeed, much of my early work was "Modding" Specialist Games to fit my campaigns and wants.      


I have sad news for everyone though.  No one actually wants a new Warhammer, well; at least not from you.     

The Balancing Act 

As a Game Designer there is a delicate balancing act that you need to walk between two points, and the wire you are on is very narrow.  You see, players have certain expectations about what a genre or a game is going to deliver when they open it.  If you stray too far from these expectations the likelihood of rejection is higher, but if you stay too close to what they all ready have then the likelihood of rejection is also higher.  You are trying to navigate between these two points. If you go too far one way or the other, your game design falls.   


 Point A: What Players are Comfortable With

-------- to ---------- 

Point B: What Your Game Does


Wikimedia Commons, Kevint3141
https://creativecommons.org/licenses/by/2.0

Point A- What Players are Comfortable With
As a designer, we almost always start at Point A: What Players are Comfortable With.  This is where looking at an existing and established game can be very helpful.  By looking at what people are all ready playing and comfortable with, you get a feel for what they are comfortable with. 

Here is a quick and dirty look at some popular rulesets: 

Warhammer
- Hit, Wound, Save
- True Line of Sight

DBA
- Momentum PIPs
- Battle Line formation/deployments

X-wing
- Movement Reveals
- Special Rules Cards

Bolt Action
- Dice Pull Initiative
- Pin Markers

Infinity
- Action/Reaction
- Unique Model Rules

Battletech
- Heat
- Armor bubbles

Of course, these are broad generalizations and each rule system does much more than what I listed.

However, each of these is what is "expected" from the game and the players are comfortable with these mechanics and ideas.  Looking and knowing what players all ready have access too and use helps set the guidelines for what Players are willing to do within the scope of a game.  It is these guidelines that create the expectations of what is possible for a game. 

For example, if you bring a big, stompy robot game to the table and it does not have some sort of Heat or similar friction mechanic people look at it sideways.  To them, Heat management is considered an expectation of big, stompy robot games.  If you come to an Ancient battle and do not bring a focus on battle lines, players wonder what the designer was doing because Battle Lines are now considered core to Ancient games.  If you do not meet these expectations players are more likely to reject what your game IS trying to do.   

However, no one really needs or wants duplicates of these existing games.  If you completely re-skinned a game like Warhammer 40K and released it, there would be a small audience.  Look at Void as a great example.  It was Warhammer 40K rules with minor cosmetic or mechanic tweaks.  After playing Void, players ultimately wondered why should they switch over from Warhammer 40K to Void?  You can see the same thing with countless Historical, SCi-Fi, and Fantasy games out there.  I am sure you can all think of a few knock-offs right now.  Heck, I may have even written a few of them!  

Building a Better 40K?  No. 


Point B - What YOUR Game Does
One point you will notice about the games I used as an example earlier is that they all had something distinct to bring to the table.  Warhammer doesn't use Heat like BattletechX-wing doesn't use Pin Markers like Bolt ActionDBA does not use  Action/Reaction mechanics like Infinity.  Each of those games is bringing a new spin or unique set of tools to the table. 

Every game needs that "secret sauce" that makes it stand-out in the marketplace of games.  A simple re-skin of an existing game is not sufficient.  Why not just buy the original game?  As the designer, you have to have a compelling answer to that question in your design.  No one wants another Warhammer Ancient Battles, another DBA, another War Machine because those games all ready exist.  

There are a couple ways to go about creating something unique for your game.  You can create a really cool Hook  or you need some interesting Chrome.  These are what YOUR game does different from the others.  

Cavalry kind of sucks in Men of Bronze!  Is that Point A or Point B?  

The Right Mix?
Of course, here is the hard part.  There is no guaranteed formula for the right mix.  Every player and game group is different.  I would offer this completely arbitrary and unmeasurable rule of thumb.  

- 80% Point A/ 20% Point B

Of course, you can lean into more Point A or more Point B but the more you do the greater the risk of player rejection.  Of course, there is no absolute right answer, this is just an estimate. 

Final Thoughts 
I know many of us miniature wargame designers often start by wanting to build a better Warhammer.  STOP!  No one wants that, and you don't either.  The market all ready has Warhammer.  

That said, it is a balancing act to get the right mix of NEW and IMPROVED versus Tried and True.  Too much one way or the other can impact the likelihood of folks playing your game.  There is no scientific answer on the ratio as Game Design is also an art.  However, an 80/20 mix of expected vs. new is probably a good mix.  

Easier said than done.

Bonus Content:
The most common game I have played this year is Games Workshop's Kill Team.  This has been very useful at our local club in attracting eyeballs and new players.  Considering the "club" started last the summer of 2022 we have seen pretty good growth in our rural area.  

I managed to get in a three-way game between my Eldar Corsairs, Legionary Chaos Marines, and some Ultramarine Primaris types.  We played the standard 3-player mission found in one of the rulebooks.  The scenario tries its best, but the person in the center has a disadvantage.  


 As usual, my Shuriken Catapults with aim did a great job eliminating enemy troopers.  I hung back a bit at first, and the Chaos Marines were able to get an early lead going into the third turning point.  However, I had kept my troops well hidden and in cover until I was ready for the decisive push.  

The Primaris Player and the Chaos player duked it out and wore each other down.  Their factions natural hatred of the other playing into my filthy, xenos hands.  We surged out from our locations behind some grimdark shipping crates and managed to knock the Chaos Marines off the center objective and flip it for the last two turning points.  The Corsairs sneaky Tac-ops helped out with this alot.  However, the Chaos Marines were full of special rules and nasty tricks of their own.  


At the end of the battle, the Corsairs tied the Chaos force 2 VP to 2VP.  I was a touch too slow to get to my special objective, but it was not from a lack of effort.  However, I took a morale victory because the Primaris and Chaos forces had been incapacitated to the last man.  Meanwhile, I had only lost 4 Corsairs.  Normally, when I win I only have 0-2 guys left standing so this was a big improvement.  

A good game overall.  We had a couple of new players and a handful of veterans at the club day.  I am very happy how the club is growing.  So far we mostly play Kill Team, but we have also played Castles in the Sky and Wars of the Republic.  We are also working on a Force-on-Force game in a Cold War Gone Hot setting.  

The club has managed to grow in a low population, rural area for a few reasons:
 
1. We have a set, bi-monthly place, date, and time to play 
2. We have a monthly painting clinic
3. We advertise online and physically
4. We poach folks from local board games, CCG, and RPGers
5. We have a good communication network via Social Media and other methods
6. We are a welcoming, friendly, laughing, and smiling group 

Anyway, I think I might put some thought together on the long, hard work of community building in the future.  

Happy gaming. 


Become a Patron and get access to all the cool stuff, a peak behind the curtain of Blood and Spectacles, and early-access to playtest games!  


You can follow Blood and Spectacles Facebook page or Instagram for more fun! 

Check out the latest publications and contact me at our Blood and Spectacles website

Or purchase all out games at the Blood and Spectacles Publishing Wargames Vault Page!       


Monday, November 6, 2023

Battle Report: Restless Stars- Operation: Hemlock


Restless Stars is my unit-vs-unit generic sci-fi skirmish game.  Today, my Skumgrod and I are using it to fight a battle in our ongoing and open ended Operation: Hemlock campaign.  This campaign takes place on a homebrew campaign setting in the Warhammer 40K universe circa 5th edition of so.  Despite it taking place in the Warhammer 40K universe, we are using all sorts of games to play-out the campaign.  

Big Boss Nobsplitta peaked out the window of the Mek Shed he was holed up in.  Explosions rocked the area, and the sound of jet engines filled the sky.  Smoke filled the air and made seeing difficult, but he knew the Oomies were coming.  He licked his lips in anticipation of the fight. 

The boyz had landed on this pile of rock and dirt a while ago.  At first, it had been all fun and laughs as they zoomed around on their buggies and Truks just krumpin' all the Oomies they could lay their hands on.  They got all the way to the gates of a big Oomie camp full of slaves for the takin'.  Then, the serious fightin' got started.  Since then, the Oomiez had been the ones having all the laughs.  

Now, he and his fellow Nobz and boyz had been pushed all the way back to the edge of the Big Bloo.  The tin kanz they used to get across from Skarbashz island were no where to be seen.  The only way back there was to swim, and Nobsplitta and his boyz never bothered to learn how.  They had intended to make take over this pile and lord of the Oomie slavez.  It had been a good plan, but Skarbash had failed to deliver on his end of the deal.  Never trust a Morker.  

The Oomiez had hit them with tanks, artillery, bombs, and whatever else they could find.  Most of the ladz had managed to survive holed up in their bunkerz and hutz.  Well, enough had anyway.  The Oomiez had rolled up in their trakz, and now they had to go the rest of the way sloggin'.  This was going to be Nobsplittaz chance to get in some good laughs now.  He and his boyz were still plannin' on rulin' this place, but it might take a bit longer and some 'arder fightin' than he first thought. 

However, there was no place left to fall back to.  It was now or never to show dem Oomiez who was boss of these shakz, and why not now?  

Across the gloom, movement caught his eye.  He squinted and leaned into the peakhole.  Yup, movement across the rubble all right.  Oomiez.  Time for some fun.  He smiled to himself for the carnage ahead. 

Forces: 

For this battle, we changed it up a bit and decided to go more infantry heavy! 

Taskforce: Sword

PDF Command Squad
- Regular Infantry
- Squad Support Weapons     
- Small Size
- Leader

PDF Infantry Squads
- Regular Infantry

Militia Refugees
- Irregular Infantry

Panther's Claws Space Marines
- Elite Infantry
- Armored
- Rapid Fire

Scout Cars x 3
- Regular Mounted
- Squad Support Weapons
- Fast

Ork Defenders

Ork Nobz Squad
- Regular Infantry
- Armored
- Leader
- Combat Weapons

Big Bangerz Mob
- Irregular Infantry
- Armor Piercing
- Rapid Fire

Stomperz X 2
- Irregular Infantry

Basherz x 2
- Irregular Infantry
- Fierce
- Combat Weapons

Killa Kanz x2
- Irregular Infantry
- Armored
- Squad Support Weapons

Dakka Dakka 
- Irregular Infantry
- Rapid Fire

Mission
In the center of the board is a Adaconite spire.  The continued war effort of the Orks on Baron's Rest depends on maintaining access to the Adaconite here.  It is just the tip of the proverbial iceberg, with the Adaconite leading deep beneath the ground.  With this resource, the Orks can continue to build weapons of war and keep their tenacious hold on Baron's Rest.  The force that is touching the Adaconite at the end of the game wins.

In addition, the battlefield is covered in the dense smoke and fog of battle.  LOS is restricted per the rules for this complication. 

Set-up
The terrain is set-up with a scattering of scrap, walls, and buildings.  Both sides set-up 6 inches in from their edge.  

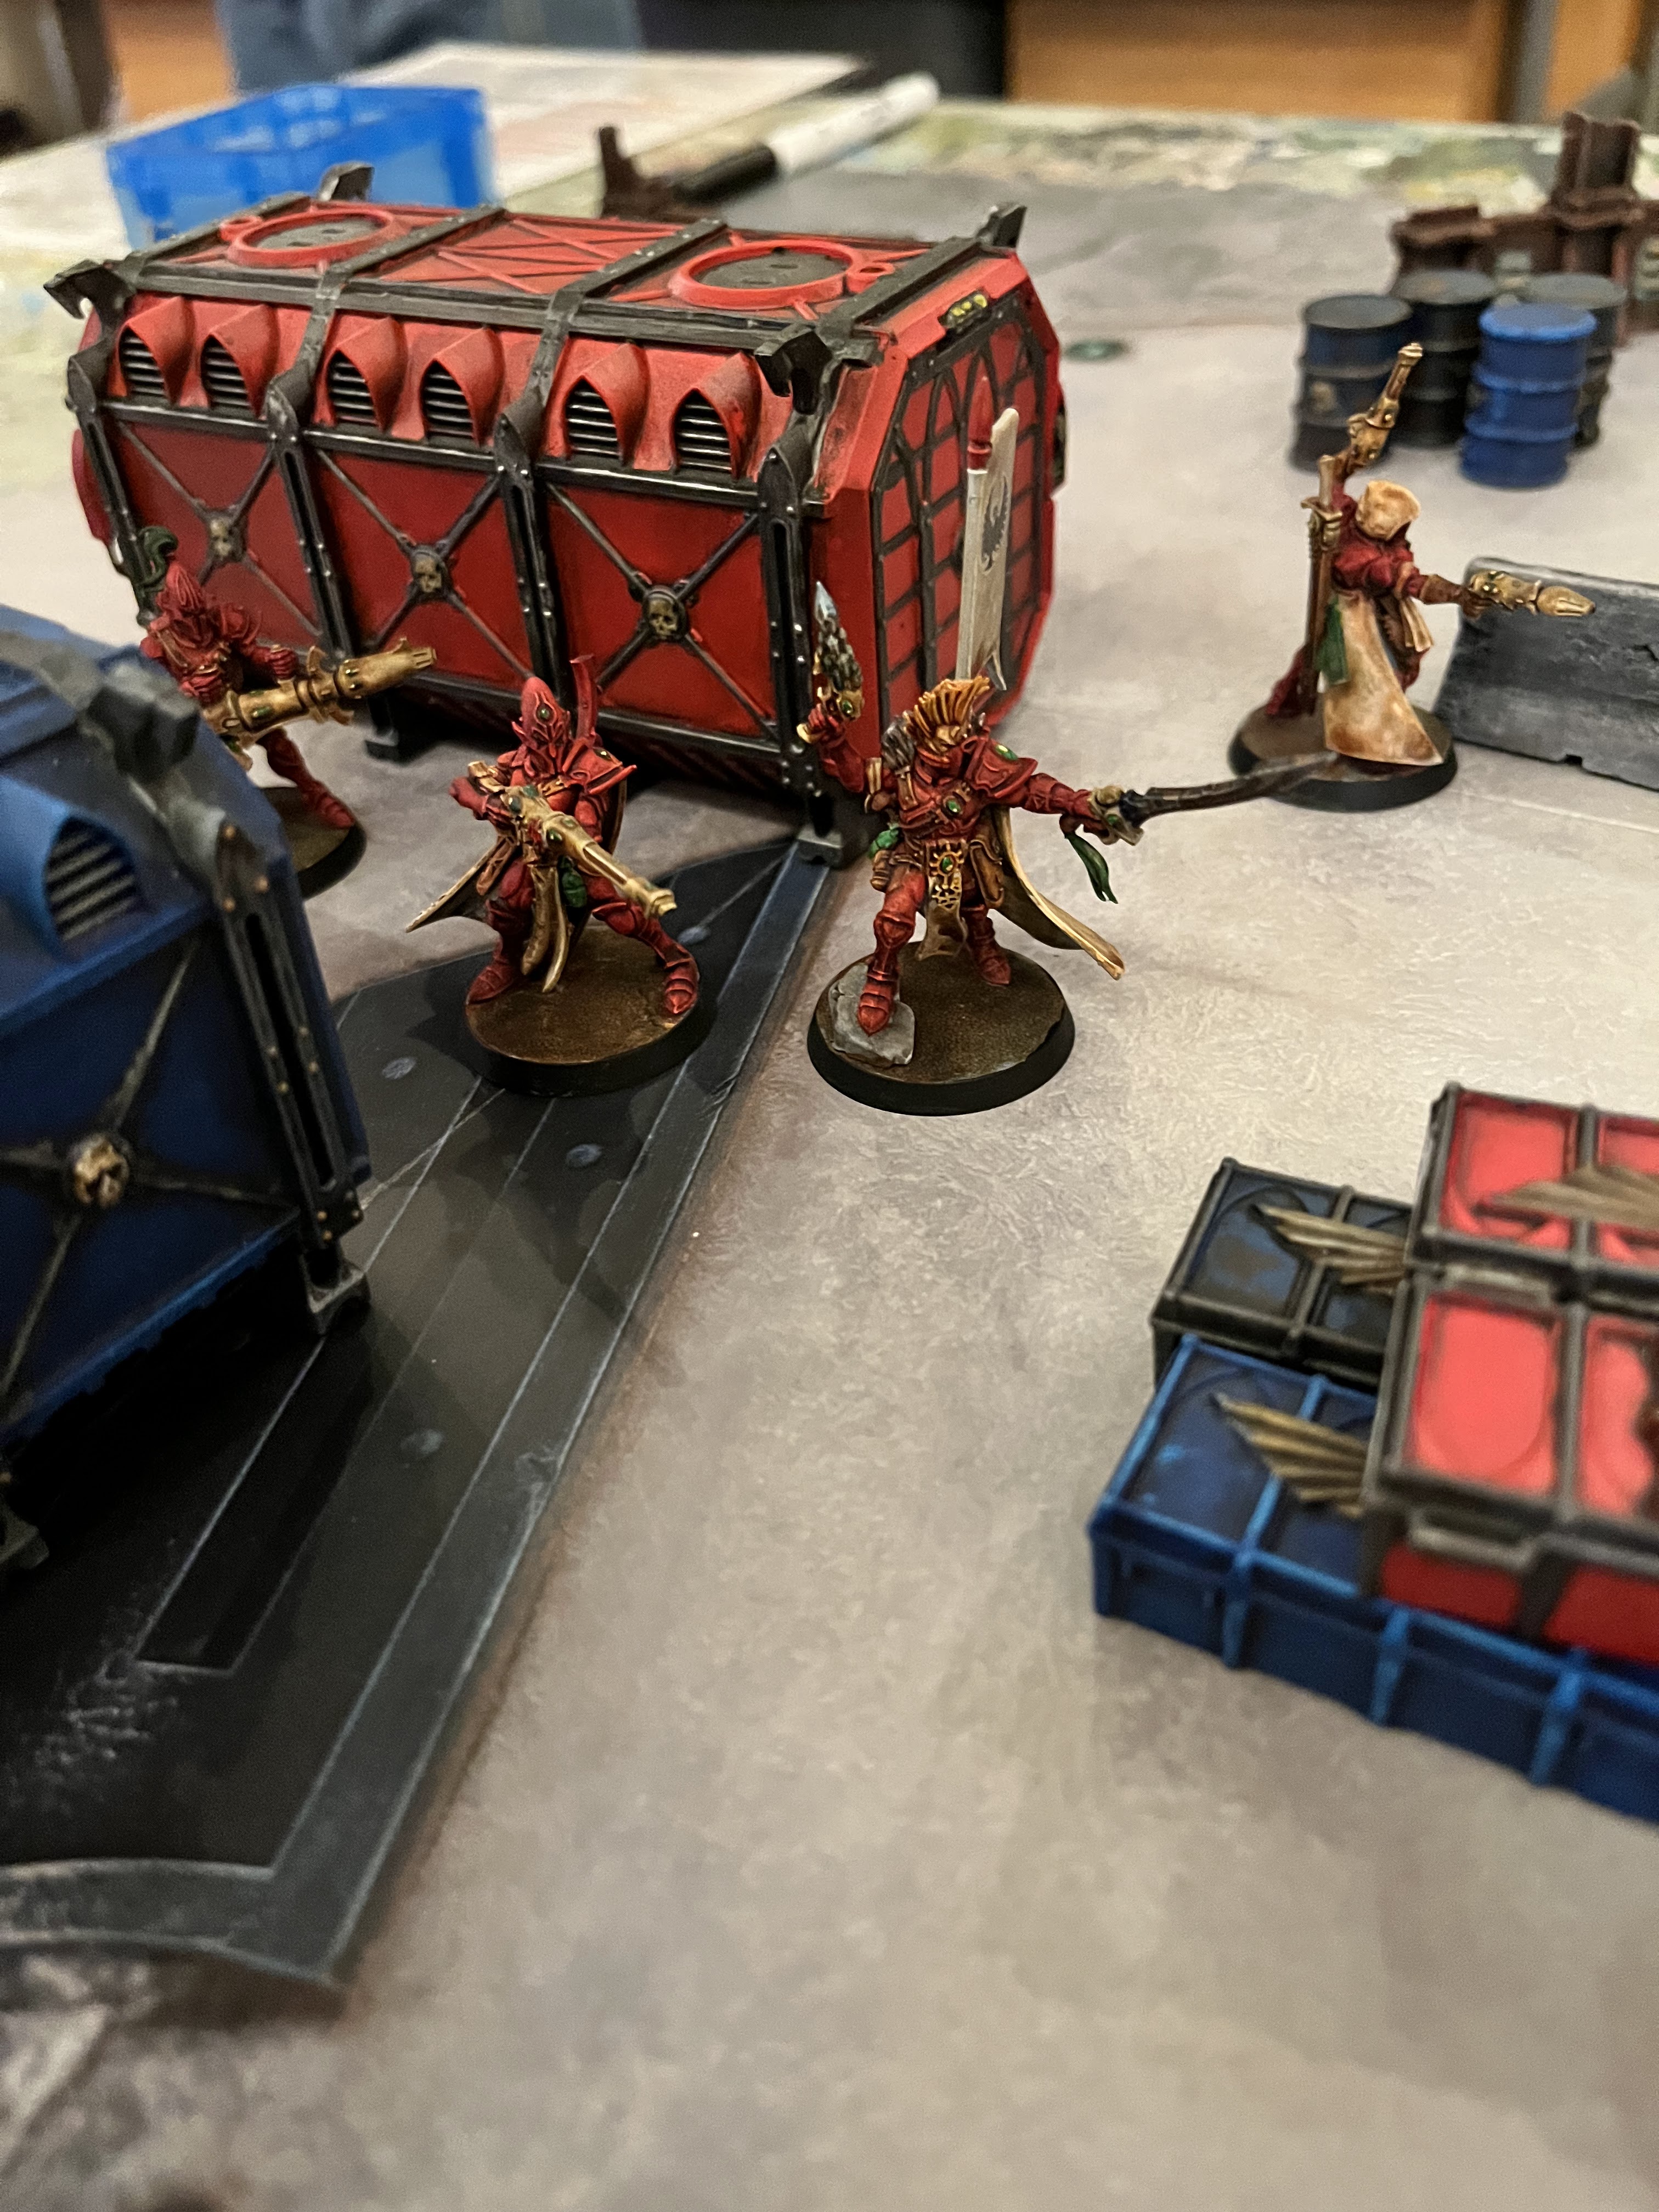
The Imperial forces from their left to right are 1 Scout car, PDF Troops, Command Squad, Militia, PDF Troops, Panther's Claws, 2 Scout Cars.


The Orks on the other side from their own left to right are, Dakka Dakka boyz, Stomperz. Killa Kan, Basherz,  Big Bangerz, Nobz Mob, Stomperz, Killa Kan, and Basherz.  


You can see the Adaconite spire in the center of the board. 

Maneuver Phase: 
Both sides tentatively move up in the smoke, dust, and fog that hangs thickly across the Mek Shedz.  Both sides are hampered by command and control issues.  The Imperial Refugee Militia refuses to move during the opening of the battle.  As the Killer Kanz seem to have trouble on the Ork side. 


The Imperial right flank has some success as the Space Marines and Scout Car manage to eliminate a bold, forward operating mob of Orks with shootas, sending their last scrambling back to safety.  However, the Big Boss starts making his way to the objective under the cover of the Big Bangerz guns.


The Scout car on the Imperial left scoots forward aggressively, but can not see the Killer Kan he his heading straight towards due to the fog.  In addition, the Ork boyz with shootaz on the Ork right have a good firing position on the objective.  


The Imperial Command Squad boldly leads the way and gets to the Adaconite spire first, bravely urging his troops forward.  The Killa Kan on the Ork left sees one of the Scout cars and opens fire, cauing 3 hits.  The Ork Big Boss also manages to get to the Adaconite Spire, but on the opposite side as the Imperial officers.  The Big Boss is followed by a horde of Basher boyz.  

The Ork right flank is hampered by command issues and the fog, failing to do much against the Imperial troops moving in. 

Battle Phase: 
The Panther's Claws open fire on the Ork Big Boss on the Objective and whiddle his forces down.  The Scout Car on the Imperial left manages to see and hit the Killa Kan for serious damage.  In return, the Ork Boss comes around the objective and lights up the scout car for some damage.  The Killa Kan also charges it, but in a fierce close range firefight, the Killa Kan is destroyed when the commander of the Scout Car manages to hit it with a Krak grenade up close.  


On the Ork left, the remaining Killa Kan manages to destroy another Scout Car with accurate fire from it's weaponry.


The remnants of an Ork Basher squad breaks from the objective and attacks an Imperial PDF infantry unit.  The fighting is close and upfront, with 3 Orks taking out 5 PDF troopers.  Firing from the last Killa Kan on the Ork left fails to damage the last Scout Car, while the last Basherz unit surges forward. 


End Phase:
The Last Scout Car devastates the Ork assault on the Imperial right, sending the few Basher survivors fleeing.  The Panther's Claws break cover and try to make for the objective, but they are under the (unreliable) guns of the Big Bangerz.  The Imperial Command Squad at the Objective is reinforced as the Militia finally move up and take positions to defend the Adaconite spire.


The Killa Kan forces the Scout Car on the Ork left to withdraw after damaging it.  On the other side, the Stomperz open fire on the other scout car, but barely scratch it.  The Big Bangerz start chittering excitedly about the enemy Space Marines in front of them and in the open, but fail to fire!  

The Panther's Claws get into position at the base of the Adaconite Spire, but they are exposed.  They trust in their armor.  Imperial PDF troopers on the left fire on the Ork Stomperz, and kill a couple.  


The Ork Killa Kan comes around the corner, and fires into the Space Marines with its big gun and tears the squad up.  In addition, fire from the Ork Dakka Dakka boys put paid to the Space Marines and render them combat non-effective.  The Ork Stomperz also return fire on the PDF troopers and take out a few.  

Finally, the Ork Boss turns the corner and attacks the Imperial Militia up close and personal.  He loses his Painboy, but in exchange he kills three Oomiez and sends them running for safety.  That leaves him and the Imperial Commander holding the Adaconite spire. 


Conclusion: 
The battle for the Adaconite Spire is a draw! 

The squeal of jet engines roars over the battlefield, and both sides have to hastily jump for cover.  Cluster munitions rain down on the field of battle, but when the smoke clears the Adaconite is still standing in No Man's Land between the battling forces.  Neither side was able to successfully take control of the vital resource.   

With heavy fighting in the ruins of the Ork Settlement, Commander Brusilov orders the troopers of Taskforce: Sword back.  He orders the PDF to fall back and encircle the shanty town.  He then calls forward his artillery to begin bombarding the city, and to flatten it.  PDF Heavy Bombers from North Ammoriss proper also join the bombardment, as do local strike fighters.  

The last bastion of the Ork on Baron's Rest was slowly being pounded into a crater. 

Well, the second time I have had a big Restless Stars battle that ended up inconclusive.  Next time, I think we will give Xenos Rampant a go.  Perhaps we can get a more decisive result with those.  I also  printed up a 6mm Imperial force for a big climactic battle, BUT I have been having some issues with the Ork side.  Therefore, the big field battle has been delayed.  I will keep you posted on how that progresses. 


Until next time! 


Become a Patron and get access to all the cool stuff, a peak behind the curtain of Blood and Spectacles, and early-access to playtest games!  


You can follow Blood and Spectacles Facebook page or Instagram for more fun! 

Check out the latest publications and contact me at our Blood and Spectacles website

Or purchase all out games at the Blood and Spectacles Publishing Wargames Vault Page!