Showing posts with label Kill Team. Show all posts

Monday, February 24, 2025

On The Painting Desk: Anglo-Saxon Shieldwall for Fury of the Northman


The first big painting project of 2025.  I am working on an Anglo-Saxon army for Fury of the Northman.  I picked up the miniatures for it in 2024 but did not get the time to work on it back then.  However, it is winter time and there is no better time to paint a big project than now.  I am using a combination of Victrix kits, the Late Anglo-Saxons, the Early Anglo-Saxons, and the Dark Age Archers kit for this army.  The army will look like this: 

  • 1 Unit of Shieldwall Nobles as Thegns from the Late Anglo-Saxon kits
  • 3 Units of Shieldwall Militia as Fyrd from the Early Anglo-Saxon kits
  • 2 Units of skirmishers/irregulars from a mix of Early and Late Anglo-Saxon kits
  • 3 Units of Archers from the Dark Age Archer kits
That is enough for an army plus some swappable extras to play against my Dark Age Irish and my Viking force.  That will allow a pretty decent campaign mix.  Still thinking about a Muslim army for this period too. 


I decided to get started on the Shieldwall infantry first.  That is the heart of most armies in the Viking Age isn't it?  Well...... no..... but it is for this one!  I have been spoiled by all those Heroquest models because I forgot what a pain it is to actually assemble your models!  That really slowed me down.  However, I soon had the 40 shieldwall models all assembled and put on washers.  Then, before painting I of course gave them an undercoat of Grey Seer.  

Before I got started, I decided I was NOT going to be using Speedpaints on these guys.  All of my other Historical models I use the base coat and a wash method.  So these fit in, I decided I wanted to do the same with this army.  Therefore, after spray undercoating it was time to start batch painting.  

Here is a quick look at my batch painting technique.  I have obviously batch painted a few armies in my time, so I think I have a decent technique down for it.  First thing I do, is paint all of their flesh and all of their shoes/boots.  I typically use three different colors for their footwear.  


From there, I start painting from the lowest layer up.  Typically, that is the pants!  I decide on the various colors of pants I want, then I start to break them up into smaller groups, so that each unit will only have one or two guys with the same color pants.  


I then, do the same thing with the next layer.  In this case, it was going to be the leggings.  I typically use the same colors I just make sure a guy with that color pants doesn't get the same color leggings.  I then make one last mix up for their tunics.  I tend to do the same thing but with fewer colors and larger batches for all the colors as I move up the model, so belts, hafts, armor/helms, etc.  You may have also noticed that I keep all the shields off, I paint those on the sprue separately and add them just before basing.  

Of course, I got a bit impatient and spent some time away from the Fyrd, and focused on the Thegns and got them done the fastest of all the Shieldwall infantry..... woops......
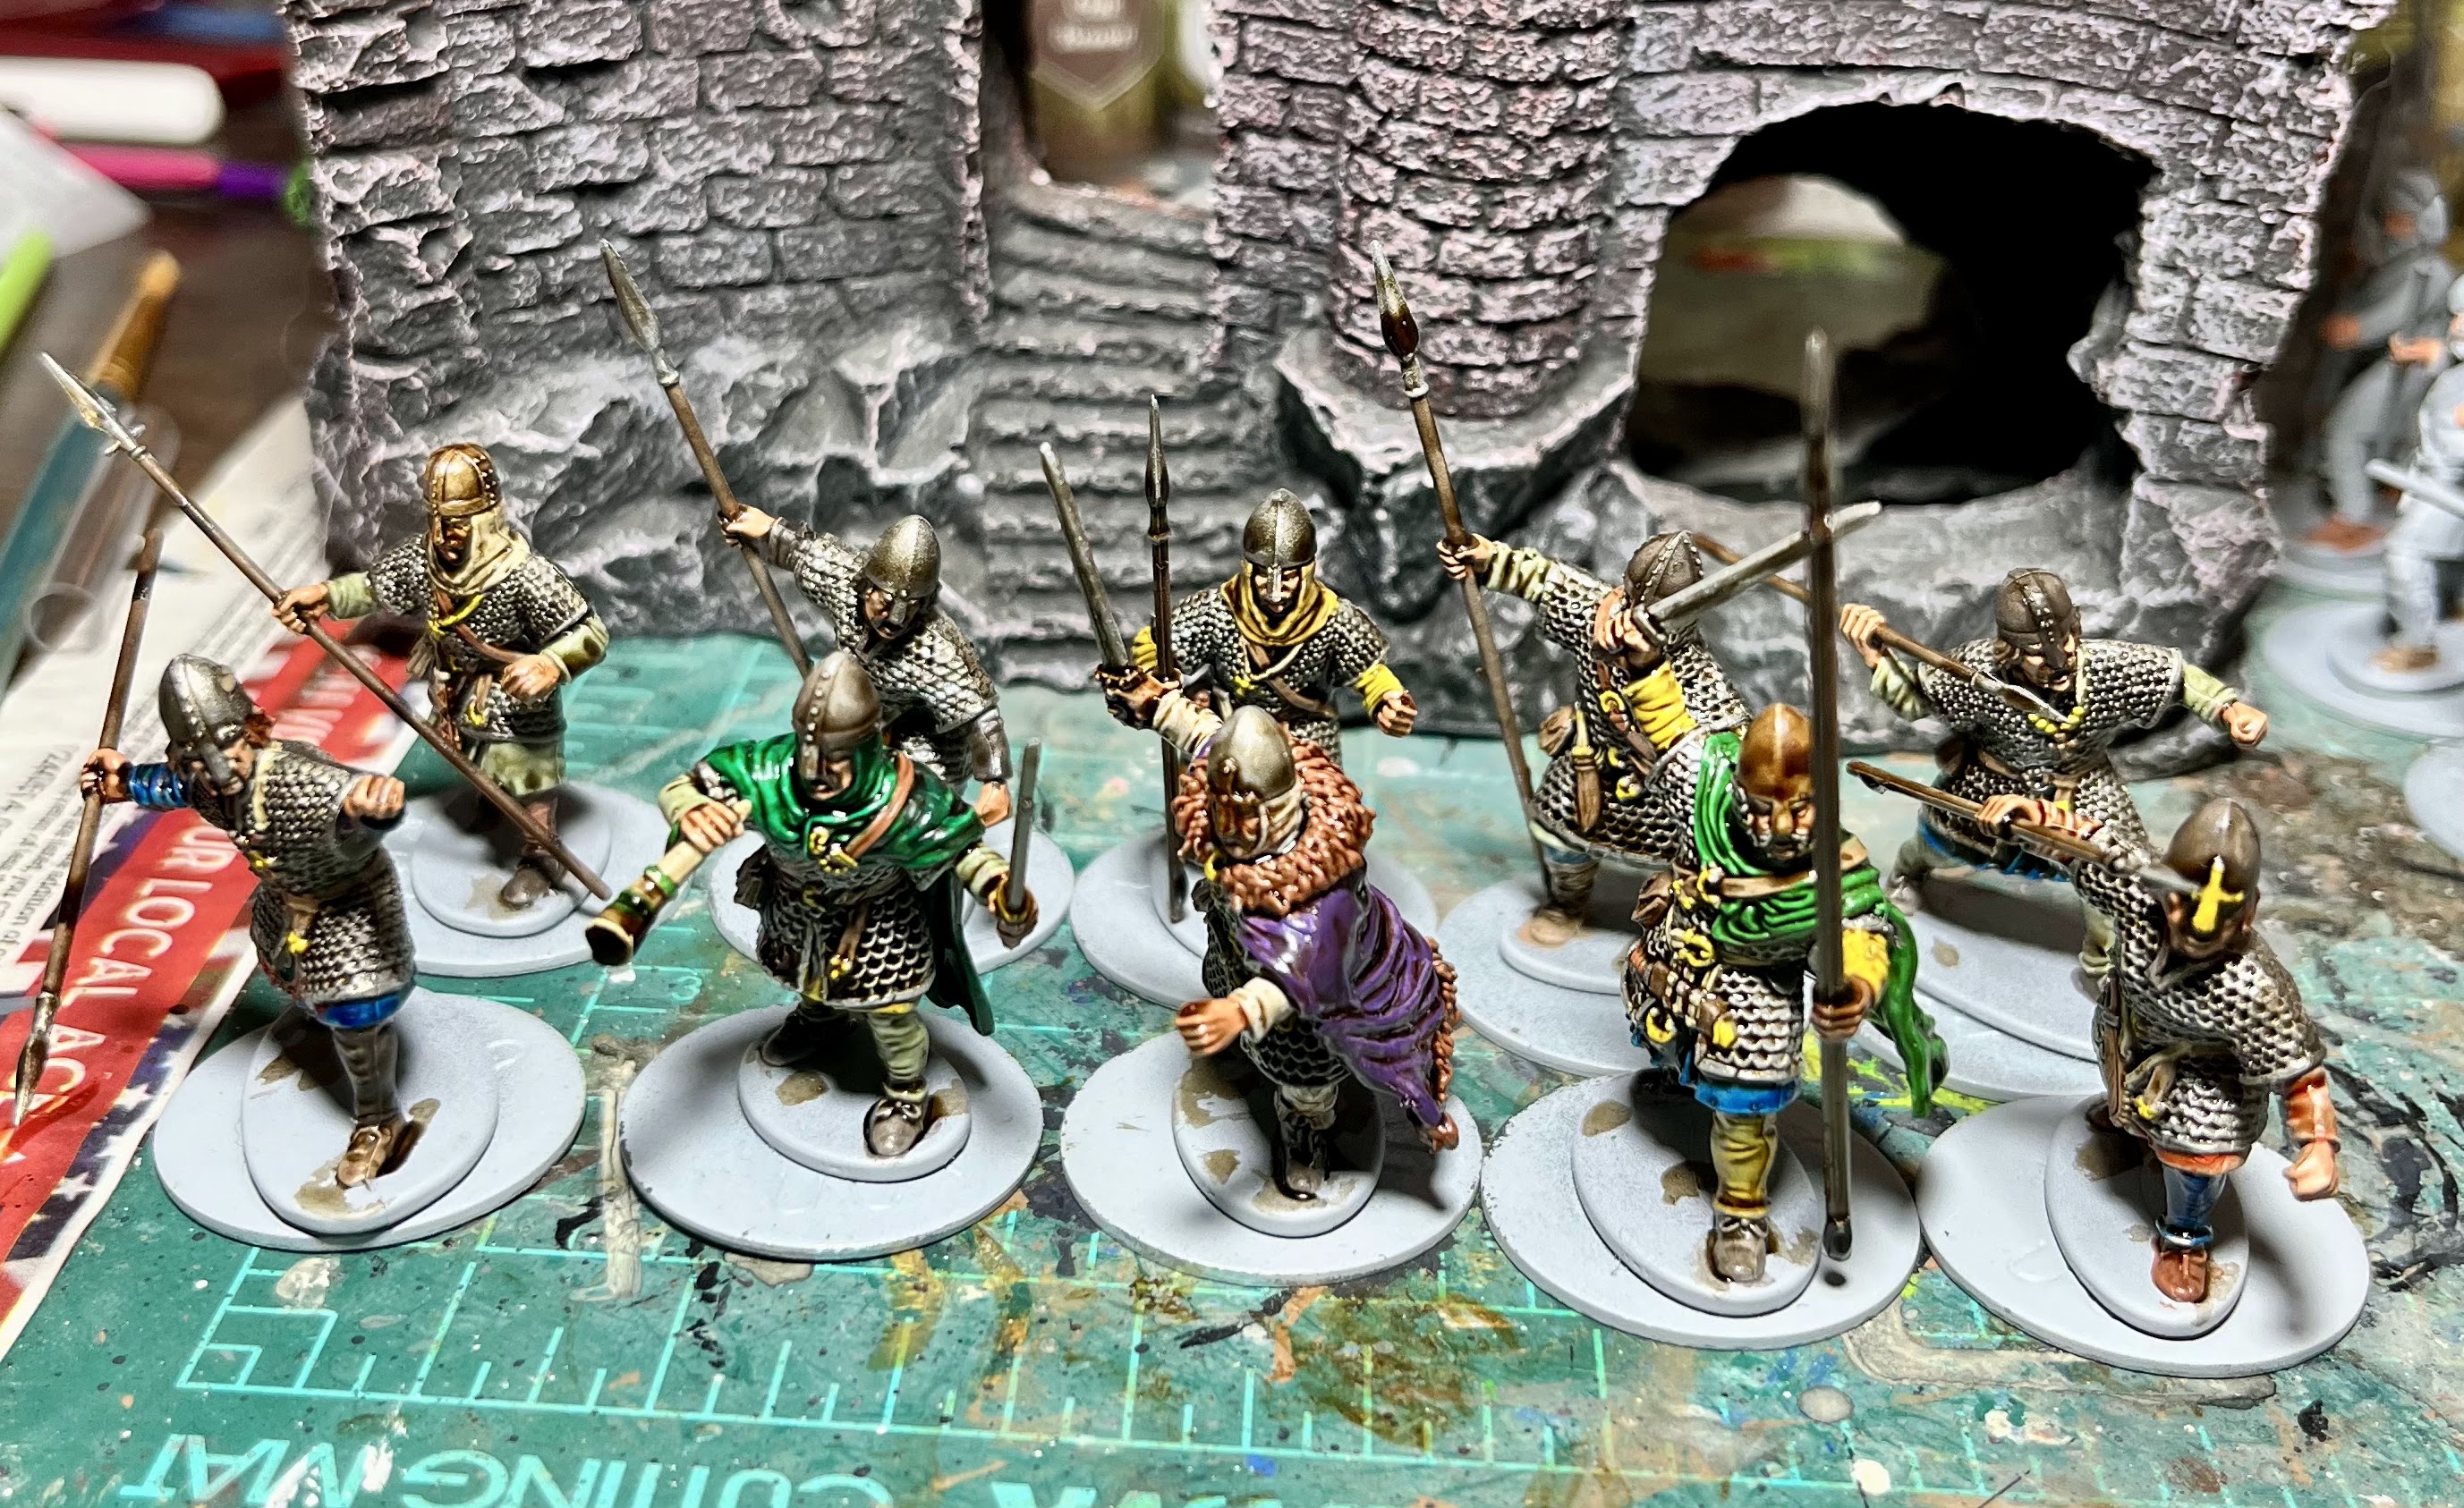

All that chainmail was just begging for me to finish it off.  Afterall, they look so... unfinished... in all that gun metal and polished silver.  I couldn't let that stand!  I finished the base colors with a nice coat of Strong Tone wash. The guy in the purple cloak is supposed to be my Earl.  I like to give my officers purple..... it is a hang-over from my ancients painting.  Any excuse to use purple am I right!  Like the Fyrd, I will be painting the shields and adding them last.  

With a small hit of Dopamine to help me get to the end, I went back to working on batch painting the Fyrd with my tried and true method.  I mean, it is only 30 of them right!  The biggest "batch" to batch painting with these guys will be their tunics.  I mean, these look super comfy and I am hoping one day they come back in style!  It is basically a really long and flowing shirt belted around the hips?  I would wear that.  


Look, it's the Power Rangers: Dark Ages!  Go, go Power Rangers!  Here the Fyrd are about half finished.  From here, it is about painting up the belts, pouches and gear that they are all wearing.  This is mostly Skeleton Bone, Dessert Yellow, Leather Brown, and Fur Brown.  Again, each model typically uses two different gear colors to mix it up.  Since I use those colors on their tunics (or are they tabards?) you have to make sure you don't make the belt and gear the same color as the clothing.  Easy to do when batch painting.  

It is always amazing to me how "finished" a model becomes when you paint their weapons.  I could have a full unit painted, but not their weapons and it would look like I still had a ton left to do!  Since they are spears, I mixed it up with different colors on the hafts using the same colors as their belts.  Then, I painted up all the metal, including helmets, buckles, spear points with a variety of Plate Mail, Gun Metal, Bronze, and a few Metallic Speedpaints for variety.  Once again, hair color was one of my favorite parts using a some yellow, and orange, but mostly ash grey, dark stone, fur brown, and monster brown.  The base colors were all in place! 


The last step to finishing the basics on these guys was a nice Strong Tone wash using my Armypainter washes.  The Strong Tone is black based and it works well with Chain Mail and armored minis.  These guys are not wearing chain, but I used it on the Nobles.  I felt like if I switched to a Light or Soft Tone they would not blend in as well.  Those tones are sepia based.  So, with some trepidation I hit them with the Strong Tone......


Oh yeah, that darkened them up.  However the blend in pretty good with the leader squad.  The only left to do is to base them and get their shields painted.  Man, I hate painting shields, but especially Dark Age shields.  You can see how it went last time with my Vikings, but you will have to see how these turn out.  

Painting these 40 guys to this level took me about 4 days of work, spread over a couple weeks of time, a few colors here and there.  I rarely get to just sit down and paint for 3 days straight!  Most of my painting projects I pack up in between sessions, but these guys just sat on the desk and waited pateintly.  I do not think I would enjoy just sitting down and painting all day!  I tend to do a color or two, get up, do something else for a bit, and then come back to it.  

Next up, I will go over the shields and start in on the Skirmishers and Archers.  Probably another batch of 30-50 guys.  Until next time! 

Bonus Content! 

I managed to go down and play some of the new edition of Kill Team with the True Crit Gaming Guild.  I took the Hand of the Archon out to play since it had an actual Kill Team box and I hoped the rules were still current.  No idea still, but my opponent was nice enough to let me use what I had.  


I honestly only picked up on a few differences compared to the last edition.  Of course, the missions changed, some of the keyword rules changes a bit, assets changed, and the way Conceal/Engage worked changed a bit.  They also ditched the stupid shapes instead of numbers thing.  However, it seemed to play pretty much the same after that.  However, it is also possible that I never knew the old rules well enough to notice the differences!  


This was a classic battle of dwarves vs. elves, as my friend took the new League of Votann Scavengers for their list.  I couldn't tell you too much about them, except they seemed to be a close ranged team.  They had shotguns and a lot of pistols and CC dudes.  I had them pretty well shot up, and managed to out flank them.  We scored points by being in the enemy control zones and deployment zones.  They had some resourceful tricks, but ultimately the Dark Eldar were nastier this time.  


I saw the Hivestorm box at the store, but ultimately I doubt I will pick it up unless I come into some sort of windfall.  I really do not need two new Kill Teams when I all ready have more than I will probably use!  Plus, I am not sure the rules changes are enough where I feel like I need the update to the newest edition in order to keep engaging with it on a casual level.  

Until next time!  


Become a Patron and get access to all the cool stuff, a peak behind the curtain of Blood and Spectacles, and early-access to playtest games!  


You can follow Blood and Spectacles Facebook page or Instagram for more fun! 

Check out the latest publications and contact me at our Blood and Spectacles website

Or purchase all out games at the Blood and Spectacles Publishing Wargames Vault Page!        


Monday, December 16, 2024

Wargaming on a Budget: Making Walls for the Gameboard

Welcome back to Wargaming on a Budget.  Many years ago, I barely held onto the hobby of wargaming, because I was getting priced out of it.  All my money was going to being a young parent and homeowner.  No time or money for wargaming.  Plus, when I started wargaming Do-IT-Yourself was a huge part of the hobby.  There was not much pre-made terrain or supplies for wargaming, and instead you had to get creative, loot like crazy, and use your imagination!  In honor to this bygone era of wargaming, I like to show off some of the tips and tricks of yesteryear to help make wargaming an affordable hobby.  Plus, there is a certain pride one can take in terrain they built up themselves.  

Last, time you may recall that I built a Kill Team sized game board.  However, it is not enough to simply have a game board, you need to create fire lanes, corners to cover, and other nooks and crannies to make your games much more tactically challenging and fulfilling.  Today, I am going to show you an easy way to "fill-in" the board for compelling games.  

Before you begin, you will want a metal edged ruler, a razor cutter, pencil/pen, PVA or similar glue, masking tape, cereal card/card stock, sprue bits, and then the paints you will use.  Spray paint works great for this project. 


The first thing I decided to do was use some of my left-over cardboard and cut it into 6 inch tall and 8 inch long rectangular sections.  It is best to have a metal edged ruler, so that when you cut with your box cutter/razor blade you can use the metal edge as a guide.  In addition, you will want to run your razor blade over the cut a few times to get through the various layers of a corrugated box.  Cut on something you don't mind slicing up like another layer of boxes or a cutting mat.  Your blade WILL go through and cut whatever is underneath so do not cut on your kitchen table, counter top, or carpeted floor.  You will regret it.  

I cut-out 10 pieces, and you can make them various lengths and heights, but I made them all the same.  I made my walls 6 inches tall, but honestly 4 often does the job and makes it easier to get in and out of the board.     

Once you have the wall sections cut you will want to add a few doorways as openings in your long wall sections.  These make great little chokepoints and short cuts to move around the board.  Each wall section should have 0-2 or these.  For most 28mm miniatures, these doorways will be about 1-1/4 inch wide and about 1-3/4 inches tall.  It might make sense to put a model where you want the door to make sure the dimensions are big enough.  Then, you use the same method as cutting the card to cut-out the door way.  Once you cut out one, the scrap can be used as a guide for the rest.      


Next step is to use your masking tape to seal all the edges and corners of the cardboard.  This strengthens the cardboard, but also seals off any bad cuts and the unsightly corrugated edge.  When you paint the cardboard, it will help it look finished.  You do not have to be too precise in this step, just make sure all gaps are covered.  


Next, take two or three sections of walls, and simply paste them together using PVA glue at 90 degree angles.  I like to make T and H shaped sections, but U and L shapes also work well.  You will need to put the glue along the edge of the wall, and then simply hold them together for a few minutes while they dry.  Not much different than assembling models.  I hade two H shapes, and 2 L shapes when I was done gluing all 10 pieces together. 

A Reaper Cloud Giant and Axolotl mage for scale 

Congrats, you are now ready to do the time consuming part.  The first thing you do is take bits of cereal packet and cut three pieces for each side of the doorway.  You glue these on to create a door frame around each archway.  So you put one strip across the top, and one on each side of the door.  Then you do it again on the opposite side of the wall piece.  This helps the openings look like actual doorways. 

From there, you grab your bitz box, cut-up sprues, cereal packet, and assorted found items and go to town gluing them all over the surface of the wall sections with your PVA.  Some good bits are squares of cereal packet, cut up straws, bits of screen, and corner sprue pieces, string hanging out from under a bit of card, or long sections of sprue.  More angular shapes work better than organic shapes.  These additions will create the illusion of texture on the walls once they are painted.  This is the longest step of the process.  

Once you have suitably covered the wall sections with scrap, you will be ready to paint.  I recommend three layers.  The initial layer should be the lightest and a full covering.  This will be the base color.  Then, I recommend a darker color than the base coat, and I would use a distance spray as you do not want this coat to over-power your initial coat.  I also spend a bit of time using the darker color on the edges of the wall and any large blocked up shapes on the wall.  The final spray is another distance spray of black to add some texture, and maybe around any doorways to darken them up.  When this stage is done, the walls will look something like the below.....


Now comes the final step.  Go online and print up some posters and graffiti online.  Carefully cut these out and glue them around on your walls.  You can also use stencils and the like in order to paint numbers and letters on the wall to add that "pop" of detail.  It is also a good time to take some acrylic paints like bronze, brass, copper, black and oranges and drybrush along the edges of some of the edges.  You can also paint a few squares here and there.  All these details make your walls look "lived in" and more like a location worth fighting over instead of a blank space  


Once you have all of your sections done, you can easily set them out on your game board in different combinations to make narrow corridors, open bays, and wide edges.  You can use your L, T, U and H shaped wall sections to make a variety of interesting shapes and tactical situations.  For added fun, you can even put them on your board at an angle instead of flush or straight with the edges.  Also be sure to add the scatter terrain for the final look! 


Well, you can see the same basic shapes in the game board and the walls in order to make compelling and inexpensive game boards.  The same spray cans can be used for each stage, and the materials are all found materials, and simple household items.  This board cost less than a single blister of miniatures.    


Until next time! 


Become a Patron and get access to all the cool stuff, a peak behind the curtain of Blood and Spectacles, and early-access to playtest games!  


You can follow Blood and Spectacles Facebook page or Instagram for more fun! 

Check out the latest publications and contact me at our Blood and Spectacles website

Or purchase all out games at the Blood and Spectacles Publishing Wargames Vault Page!    

Monday, October 14, 2024

Wargaming on a Budget- Making a Game Board


 Welcome back all. 

Many of you know that I had a long period of my life where wargaming was barely part of it.  I was locked out by cost!  This period led me to lean into something I call DIY (Do-It-Yourself) wargaming, or wargaming on a budget.  It is still a part of the hobby that I hold onto closely in my heart.  

A while ago, I had a short post about how to Wargame on a Budget to make a board look good.  I want to go back and revisit that idea.  Lately, I have been playing games of Games Workshop's Kill Team game with the True Crit Gaming Guild.  Thankfully, one of our members managed to get in good with the local GW Rep and get us some good resources to start, but we soon outgrew the couple of boards we got from them.  Therefore, we needed some more 30 x 22 inch boards for our Kill Team group!  

I decided to step in to create some terrain for myself, that I could share with the group on game day.  I actually started this process by using a 6x4 city terrain mat from Cigar Box Battles.  It looked great, but was much bigger than what we needed for a game of Kill Team.  I also used one of the group Project Social days to make a reasonable set of DIY "futuristic city terrain" out of found materials and printed accessories.  

Amazing what some cheap big box acrylic paint, styrofoam, printed images, and a good mat can do!

However, I wanted to try and build a quick and easy board for Kill Team that was modular and called back to the Gallowdark/Space Hulk boards.  However, I wanted to do it all with found materials only.  Today, we will take a look at the first major step in that project, we are going to make the 30 x 22 inch game board.  

The first challenge was that Kill Team used a 30 x 22 inch game board, when a standard sheet of Foam Board or similar display boards were 28 x 22.  I am not a conspiracy theorist, but I am almost 100% sure the size difference was not an accident.  Therefore, I had to hunt for an alternative base.  I managed to find it with a big box of corrugated cardboard. 

I traced out the size I wanted, and cut two pieces of 30x22.  Why two pieces and not just 1?  Well, corrugated cardboard will warp.  Therefore, to prevent warping, I cut out two pieces and glued them together with simple adhesive.  This was to just give the board some additional strength.   


Those of you old grognards out there will probably recall an old article G-Dub did called Cardboard City.  This was around the time of the first Cityfight Codex.  Well, that article had a great tip for using cardboard.  

To cover the unsightly edges, you needed to cover them with masking tape!  Brilliant.  That is the next step of our board! 


Once that is done, now comes the fun part!  Time to detail!  Go out and find a whole bunch of boxes from cereal, oatmeal, and various other products that use that thin cardboard.  You know the stuff!  


Cut this out into a variety of small squares and shapes you like.  Take regular adhesive and glue these all over the top of your board.  In addition, find any other fun little items that strike your fancy such as straws, tongue depressors, sand, sprue bits, bits of screen, whatever!  Go crazy!  Use these to detail the board by gluing them to the playing side of it.   You want to make it look like more than just a flat piece of cardboard.  However, you want to put enough on, but not too much.  You don't want it to get in the way of putting your terrain on top, just enough to give your piece of board some texture and favor when you paint it.  


Once all of that is done, you are ready to paint.  First step is to give it a simple undercoat of grey primer.  This can be any old primer since you are not trying to make a detailed piece.  No need to use the expensive stuff you use on miniatures here!  Give it enough coats so the colors from any original packing material does not show through the primer.  


Once it is primed, you can go about giving it some rough coverage.  The easiest way is to either use spray paint or some cheap big-box acrylics.  It works best if you use a color that is a bit darker than the original primer.  Then just slop it on messily and let it dry for a few hours or overnight.  Then, go back and highlight the texture pieces with a lighter color than you used as the primer, again just using cheap, large brushes and big-box retailer acrylics.  

Now that those two steps are done, you are ready to move onto some detail work.  Again, no need to do anything fancy here.  Just use cheap big-box brushes and acrylics to paint out some details to make the base board POP!  Some red here, some green there, a splash of metallic colors on some sprues, etc.  Enough to give your board some character, but not overshadow the terrain or the models you are going to put on top of it.  

Congratulations, you now have a 30x20 play board for your games.  It is just big enough where you can easily carry it around and store, with just enough detail to make it look good.  If all goes according to plan, this probably took a weekend or two.  Plus no one else has a game board like yours! 

Next time on Wargaming on a Budget, we will start to build some simple walls to put on the board for quick and effective terrain!  Keep the materials you used for this project, as you will be using them again for the next phase!         

Until then! 


Become a Patron and get access to all the cool stuff, a peak behind the curtain of Blood and Spectacles, and early-access to playtest games!  


You can follow Blood and Spectacles Facebook page or Instagram for more fun! 

Check out the latest publications and contact me at our Blood and Spectacles website

Or purchase all out games at the Blood and Spectacles Publishing Wargames Vault Page!       

Monday, May 20, 2024

On The Painting Desk: The Levellers- Chaos Guard for Kill Team


Going into the Siege Perilous with the True Crit Gaming Guild I wanted a chaos force.  Ever since the very old Eye of Terror campaign I have wanted a Traitor Guard for the tabletop.  The Vraksian Militia from Forgeworld was eye-opening and super-exciting when that came out.  Despite my desire, I never fully got to a place where I could create the army I had wanted.  Therefore, when the Blooded came out for Kill Team I was excited.  

However, I decided not to go with the standard Games Workshop version.  I had been eyeing up the Only-Games website to pick up some Wargames Atlantic digital figures.  I was interested in checking out their printed Gladiators and a few other odds and ends.  I had never really gotten 3D printed models from a supplier.  I had only printed my own. 

While on the website, I was drawn to a creator called Station Forge who made a wide variety of grimdark models.  One of their sets was called Corrupted Guard, and they were set-up in order to make a Blooded Kill Team.  I went ahead and ordered them and the Gladiators.  The time of shipping did take a bit, but I did not really realize they were coming from the EU when I first ordered them.  They had to come across the pond!     

They came all wrapped up nicely in some bubble wrap in relatively small boxes.  When I unwrapped them, I only had one chainsword that was broken.  However, there was still flash/supports that I had to remove from the printing process.  Perhaps a touch worse than the amount of Flash you have to remove from metal models.  


I took a look at the rules for the Kill Team and started to separate my minis into what was going with what, and what I was going to bring to the party.  For the most part, the set I ordered had everything I needed.  I would have preferred 3 more small bases though so I could have swapped in more Traitors to replace the Orgryn/Enforcers.  I had plenty of parts and bodies to do it, but 4 bases shy.  

The minis glued together fine with Gorilla Glue.  I then got to work priming them.  In retrospect, I should have washed them first just to be sure I got any resin materials off, but the Grey Seer Prime seemed to work just fine.  I then did my standard approach of washing them in a dark grey, and then drybrushed them white. When I was done, they were ready to be speedpainted.

Primed! 

These guys speedpainted relatively fast.  My biggest issue was that I had not planned out their paint scheme before I started so there was a lot of looking at the model, looking at the paint, and then trying to determine what parts were going to be painted.  For the most part, the detail was pretty good, with the Ogryn having the shallowest detail in some areas.  However, it didn't really hinder me on the model.  I used a couple of left-over Vet Guard parts such as the Medical bag for my Chaos Medic, a Vox for my Comms man, and a flamer Tank to make my Brimstone Grenadier look a bit more explosive.  The other downside was that the only support weapons were Plasma Guns, I would have loved a couple of other options, even as a separate purchasable option.  I like Melta-guns in Kill Team to erase annoying Space Marines.  The Trench Cleaner is armed with a shotgun, but the kit only had las-guns but the shield tells you who the guys is.  I also love the shield, so used the second one on the Chaos Thug model who looks much tougher than the stat-line probably warrants with that huge hammer!    

I decided that the primary color of my Levellers was going to be Crusader Skin for the coats.  This gave them a somewhat drab overall look.  I then accented it with Slaughter Red, Palid Bone, and Malignant Green.  Since I used skin tones for the coat, I simple gave their primed faces a skin tone wash which made them look very unhealthy!  This gave them a suitably Chaotic look.  I toyed around with giving them the same colors as my Vet Guard like they had fallen from the same unit, but ultimately decided to make them distinct.  Afterall, the Levellers were most likely former PDF troopers and not Imperial Guard!    

For finishing touches I washed them all with a light tone brown based wash to gribble them up a bit and fill in any gaps.  I painted their bases Hardened Leather and trimmed the bases Citadel Chaos Black.  As usual nothing fancy on the bases.  Finally, I waited until a nice day and gave them a Matte Spray as a final touch.  

So from left to right we have the Brimstone Grenadier, the Flenser, the Butcher, the Trench Sweeper, the Medic, a Specialist with Plasma, another Plasma specialist, the Thug, the Ogryn, the Comms guy, the sniper, the Champion, a traitor, and finally the Enforcer. 

The Levellers are members of the Cult of the Emperor's Hand that have had their simple faith corrupted.  They are mostly farm hands, indentured servants, workers, and traitor PDF troopers from the outskirts of Absaroka.  They are dedicated to tearing down the Imperial society and "levelling" it so that all are equal in the eyes of the Emperor.  They have a special hatred for the Great Houses and their lap-dogs and are eager to swarm into Warzone Epsilon, Delta, and Sigma of Powellington.  Of course, their zeal, violence, and bloodlust against their former rulers has allowed the Levellers to easily be unwittingly turned to the services of the Chaos Gods.    

Final Thoughts

Overall, I am very pleased with how these guys turned out.  I think the "Flesh Coats" makes them look very Chaos-y.  I especially enjoy the Sniper, Flenser, Butcher, and the Brimstone Grenadier.  I was happy with the price and final result, even if it took a bit to get them and finish cleaning them up.  I would consider getting more pre-printed 3D models in the future as they painted up just as easily as Wizkids plastics and better than some formulations of Reaper Bones. 

Never fear, I still have a 8 Gladiators to paint up, a couple Reaper minis for Of Gods and Mortals, and a whole Heroquest box to paint.  I am not close to being dead yet.  However, it did make me consider finishing off my Chaos Kill Team with a box of Chaos Legionaries and/or some Beastmen?     

Until next time! 


Become a Patron and get access to all the cool stuff, a peak behind the curtain of Blood and Spectacles, and early-access to playtest games!  


You can follow Blood and Spectacles Facebook page or Instagram for more fun! 

Check out the latest publications and contact me at our Blood and Spectacles website

Or purchase all out games at the Blood and Spectacles Publishing Wargames Vault Page!       


Monday, May 6, 2024

On The Painting Desk: Kill Team - Octarius Boxed Set


I have been playing a lot of Kill Team with my local Gaming Guild this year and last year.  I had primarily just been using old Warhammer miniatures, but also picked up and painted a few Kill Teams in the last few years as palette cleansers.  I painted up the Corsairs, Hand of the Archon, and some Sisters of Battle.  Through all of these games, I had been bumming tokens and other brick-a-brack for the game from others.  I didn't expect the popularity of Kill Team to go away, so I decided to bite the bullet and get the Octarius boxed set.  It was pretty cheap.  However, from that boxed set there was a decent amount of "stuff" to paint up.  This ranged from barricades, widgets, terrain and two new Kill Teams!

I got to work on it pretty fast so I could clear the work out of my queue.  This had not really been on my Goals and Objectives for 2024.  I wanted to keep it freed up for a larger project later in the year.  What exactly was still a bit unclear.  

The first thing I painted up was the 6 barricades.  Nothing special, just some quick primer and some Speedpaints to get them done and ready.  I needed them pretty quick for some games!  I also primed the Widgets via brush, but didn't bother painting them beyond that.  The Prime would help me know which widgets were mine! 

You can see a barricade in action in this game!

From there, I assembled the Kill Teams.  I had to make some decisions early on, and here are some of the key ones.  For the Vet Guardsmen, I decided not to use all the fancy guys I could.  I went with a Vet Sarge, two vet guardsmen, a Medic, a Spotter, a Hardened Veteran, a Melta, a Plasma, a Sniper, and a Zealot.  I skipped out on a few of the special dudes.  Controversially, I had to do some conversion work as some of the gunners re-used parts from others, so it was tough to get the load-out I wanted.   

For the Orks, I also made some controversial choices like skipping the Power Klaw on the Nob, ditching the Comms boy, and skipping the Burna.  Instead, I used like 4 standard Kommando Boyz.  Orks have gotten a LOT bigger than when I started with them in 1st edition- RT days! 


Then, I managed to get a sunny, warm-enough day and got them all primed with Grey Seer from a spray can.  This was the Orks, Vets, and the Octarius scrap terrain.  From there, I followed my usual approach of Dark Grey wash and then dry-brushed with white.  This was to prepare them for a good Speed painting! 


I decided to start with the Vet Guardsman.  After all, the Siege Perilous campaign I was part of was Imperial vs. Chaos.  Sure, my Orks were Blood Axe mercenaries and have been since 'Ere We Go days, but I figured the Imperials might get used first.  Plus, they were much more uniform in color and would be easier to batch paint.  

I actually started painting their boots, and just kind of worked my way up the models as I went.  A slightly different approach to how I usually paint.  I typically start at the lowest level, i.e. exposed skin;  and then work up from there.  Since they don't really have any exposed skin I figured this approach was as good as any.  I pretty much made up the color scheme as I went, using the Armypainter Speed Paint colors I had.  These guys took me about 10 hours to completely paint, wash, paint the base, and seal.  The bases came-out way too dark though, but I am not going back to fix them.  These guys are perfectly usable in games now.  


Next, I turned my attention to the Blood Axe boyz.  I figured I would tinker with the Ork terrain as I went along too.  Again, I didn't really start off with a color scheme in mind.  One of the fun "ideas" about Blood Axe boyz from first Edition was that they tended to wear camo colors, but combinations that weren't very effective!  I liked that idea, but was not sure I could pull it off.  Plus, my older Ork boyz were a combination of Bright Blue and Light Grey.  I figured I might want these new ladz to blend in with that force a bit.   


These guys were a bit of a bear to paint.  They are much bigger than the Vets, and they have a lot of stuff going on with them.  A simple speed paint ended up painting the boyz themselves, and then their packs.  It was like painting two different models there was so much going on with their packs!  These guys will fit in just fine with the rest of my Ork Boyz.  

The only parts left to do were the terrain bits.  Honestly, an air brush would have made short work of these, but I don't have one.  Therefore, I decide to brush the majority of it with Speedpaint using Fiery Orange and Grim Black for the bulk of it.  I could have really gone into detail, as these scrap piles had a ton of it.  Ultimately, I decided that I didn't need terrain to overshadow my minis, so I skipped most of the finish work. There is too much detail and I question if "scrap piles" was the best choice for a starter box.  Something that you could paint easier might be a better choice in the future.  Something like crates and barrels, craters, or rock spires maybe?  These were a bit of a chore and slowed down my ability to just play some games.     


There you go.  All the terrain done and ready to game with! 


Final Thoughts

Well, there you go!  That wrapped up my Octarius Boxed Set.  I think the whole thing took me about two months from purchase to finishing the painting on it.  Of course, I am an experienced painter who has spent a lot of time learning how to paint quickly, and who has most of the proper tools.  

As a place for a beginner to start on Kill Team who hasn't played miniature wargames before?  I am not sure this is a great place to get started.  The minis are awesome, but not that easy to paint or assemble.  The terrain is mostly big pieces, but not easy to paint.  The play mat will tear in a matter of days playing and would be better served with a folding, thicker board.  You know, like a Blood Bowl board.  The basic rules are solid and not too complex, and the way they introduce the rules via scenarios is good.  However, each Kill Team has a lot of special rules with individual models often having something unique about them.  

Is this a good place to start wargaming?  Without a mentor or local gaming group?  Probably not.  If you do have a local store, group, or a fellow experienced gamer though it is a pretty good value.  

Could I make a better starter box to attract existing gamers and be good for complete newbies?  Nope.   

Until next time.         


Become a Patron and get access to all the cool stuff, a peak behind the curtain of Blood and Spectacles, and early-access to playtest games!  


You can follow Blood and Spectacles Facebook page or Instagram for more fun! 

Check out the latest publications and contact me at our Blood and Spectacles Website

Or purchase all out games at the Blood and Spectacles Publishing Wargames Vault Page!