

Last year, I picked up an Anglo-saxon army from Victrix using a combination of Late Anglo-saxon, Early Anglo-saxon, and Dark Age Archers ranges. I started by painting up the Anglo-saxon shield wall infantry. I left off the process here:

I still had to do the finishing touches on these troops. They needed a good basing and their shields done up. One thing about shields, is it is almost like painting up another miniature! So much of the attention will be taken up by the shields!
Therefore, I decided to start off phase II by doing the bases! This is a simple coat of Territorial Beige of cheap big, box acrylics. Then, when the paint is still wet, I sprinkle in some lichen for some ground cover. Nothing fancy and all easily sourced at your local Big Box retailer. With bases these little plastic dudes look like this.

That led me to the shields. The bloody shields. I paint all my shields on the sprue to start with. I find them much easier to manipulate this way. I undercoated them with a cheap acrylic white. Then, I start by batch painting them with some sort of wooden color like Fur Brown, Bestial Brown, Oaken wood, Desert Yellow, and Skeleton Bone. This gives them their wooden base and frames. From there, I give them an initial coat of white, green, blue or red. This often takes two coats for good coverage. Then, I paint their metal boss a metallic color.

Now comes the hard part. Vikings shields, and Anglo-Saxon shields, tend to have quartered or other similar designs. Those are not easy to free hand, but I am going to give it a shot. I have done it before, and I will do it again. Here is a quick tutorial on how to do basic Dark Age shield designs.
First, you paint 4 to 8 lines on the face of the shield in the alternate color. It reminds me of slicing a pie or pizza. Yum. Shields from the period tended to be whole colors, halved, quartered, and in eighths.
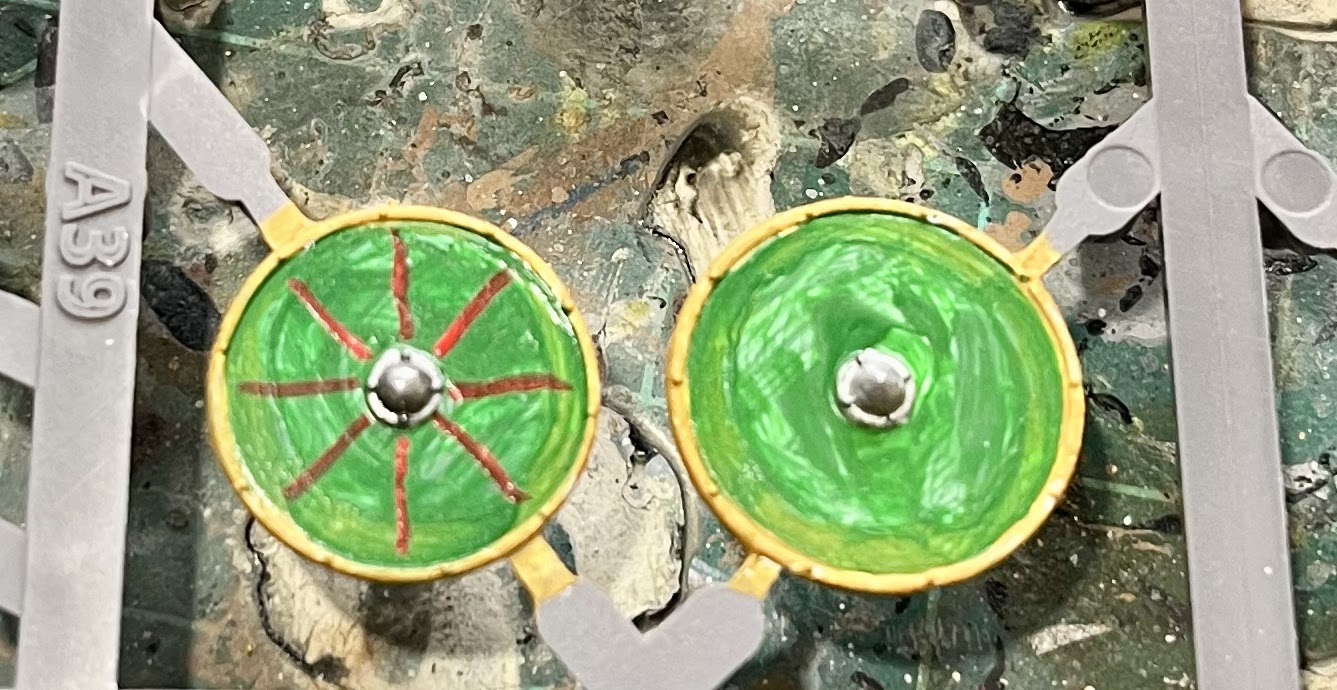
Second, you fill in the tops and bottoms of the wedges in alternating pieces of the pie. This informs which wedges you are going to fill in.

Lastly, you just put paint in the wedge where it belongs. Ta-da! Now it is time to go eat some pie! Only 39 more to go!

Once you have painted all the designs, the bosses are done, and the frames are all blocked you take the final and most important step. You slather in a Strong Tone wash to help cover up all your sins and lack of coverage!
Finally, you remove them from the sprue and attach them to the models. Fun fact about Viking and round shields from this period is that they were carried in one-hand and had no supporting straps. That means they were not worn on the forearm like the Kite shield. They were held out in front in a single fist along the center axis of the shield. They were also rather light weight and mostly protection against missile weapons unless they were overlapped for extra strength. This allowed for a variety of tactics for individual shield usage but also shields overlapped with others reinforced and strengthen each shield for a shield wall, while keep each individual shield light and easy to carry. They were also often slung on the back when two hands needed to be free.
 |
| The Fyrd all ready to fight! |
 |
| The Earl Eirkir and his noble Thegns |
That finishes up the shield wall infantry for my Anglo-saxon force. 40 guys batch painted. The shields are almost like painting another half dude! The Fyrd were all from Victrix's Early Saxon box, while the Thegns were from the late Anglo-Saxon kit. I figured the bosses would have the best, most modern gear while the Fyrd maybe not so much.
This army still needs 20 skirmishers and 30 archers before I call it done. This will give me more than enough units to mix and match a bit to take on Erik Greybeard and his Viking raiders or King Errc and his Dark Age Irish using Fury of the Northman.
Here is the infantry out on the table, formed up for battle.

Until next time!

Every time I paint shields I realise why some people use transfers... (Leaving them on the sprue seems like a good idea, I'll try that next time.)
ReplyDelete