Showing posts with label Conquest! Rome in Italy. Show all posts

Monday, November 25, 2019

Battle Report: Wars of the Republic- Romans vs. Gauls


As I mentioned in my blog last week, Osprey has asked me to do some work on a new Wargaming Series book based on the wars of the Roman Republic.  This project actually started by working on two separate projects for myself.  One project was centered on the Roman conquest of Italy and the other was focused on the revolt of Spartacus.  A third project about the wars of the Diadochi also ended up tied into this book as well, since the Romans and the later Successor kingdoms tended to clash as well.    


Much of the rules use the Men of Bronze engine as a base.  However, I have taken a great deal of feedback and incorporated it into the rules.  Therefore, they are their own unique beast.  However, I do maintain the basic concepts such as generic troop types, model and base agnostic, and mass battles at more manageable sizes. 

This is just an initial play-test that led to some interesting learnings going forward.  I hope you enjoy it as I work diligently on streamlining the rules. 

Celtic and tribes of Gaul were a constant problem for the Romans and the more settled people of the Italian peninsula.  Roving warbands, tribes, and clans would often swoop into the area for plunder and also ended up displacing the local populations. .  This challenge was one shared by the Romans, Latin League, Etruscans, and many more.  During the early days of the Republic, the threat of barbarian invasion was real, and it is said the Rome itself was sacked by the warlord Brennus in 387 BCE. 

Roman Consuls frequently had to take the legions out to defend the borders of Roman territory from the barbarians moving in.  Some of these missions were successful, but some were not.  However, the battle between Romans and Gauls was a perennial feature of the Roman campaigning season.      

Today’s battle will represent an Early Republic “Polybian Legion” or Triplex Acies formation facing off against a migrating tribe from Gaul somewhere to the north of Rome. 

Forces

Gauls

1 Elite Infantry
1 Drilled Infantry
2 Light Infantry
1 Warband Infantry
1 Lancer Cavalry
1 Skirmisher
1 Slinger*

Points= 42

*- Due to a faulty memory on my part, I set-up the game with the slingers and did not realize the points mismatch until it was too late.

Romans

1 Triarri- Drilled Hoplites
1 Principes
2 Hastati
2 Velites

Points= 38 Points

Mission
This will be a standard set-piece battle.  I opted not to use some of the more exotic scenarios and avoided complications this time around.  I am revamping the scenario and campaign system completely, but those will not play a part in today’s battle.  This is more of a straight up test of battle.  

Set-up
The Romans rolled up a field, and put it in the corner of their deployment zone.  The Gauls also got field and put it in the middle of the board to try and force the Romans out of formation.  The Romans put a hill in their deployment zone to avoid breaking up their forces.  The Gauls got a small wood and again put it in the middle of the field for cover and to break up the Roman Legion formations. 

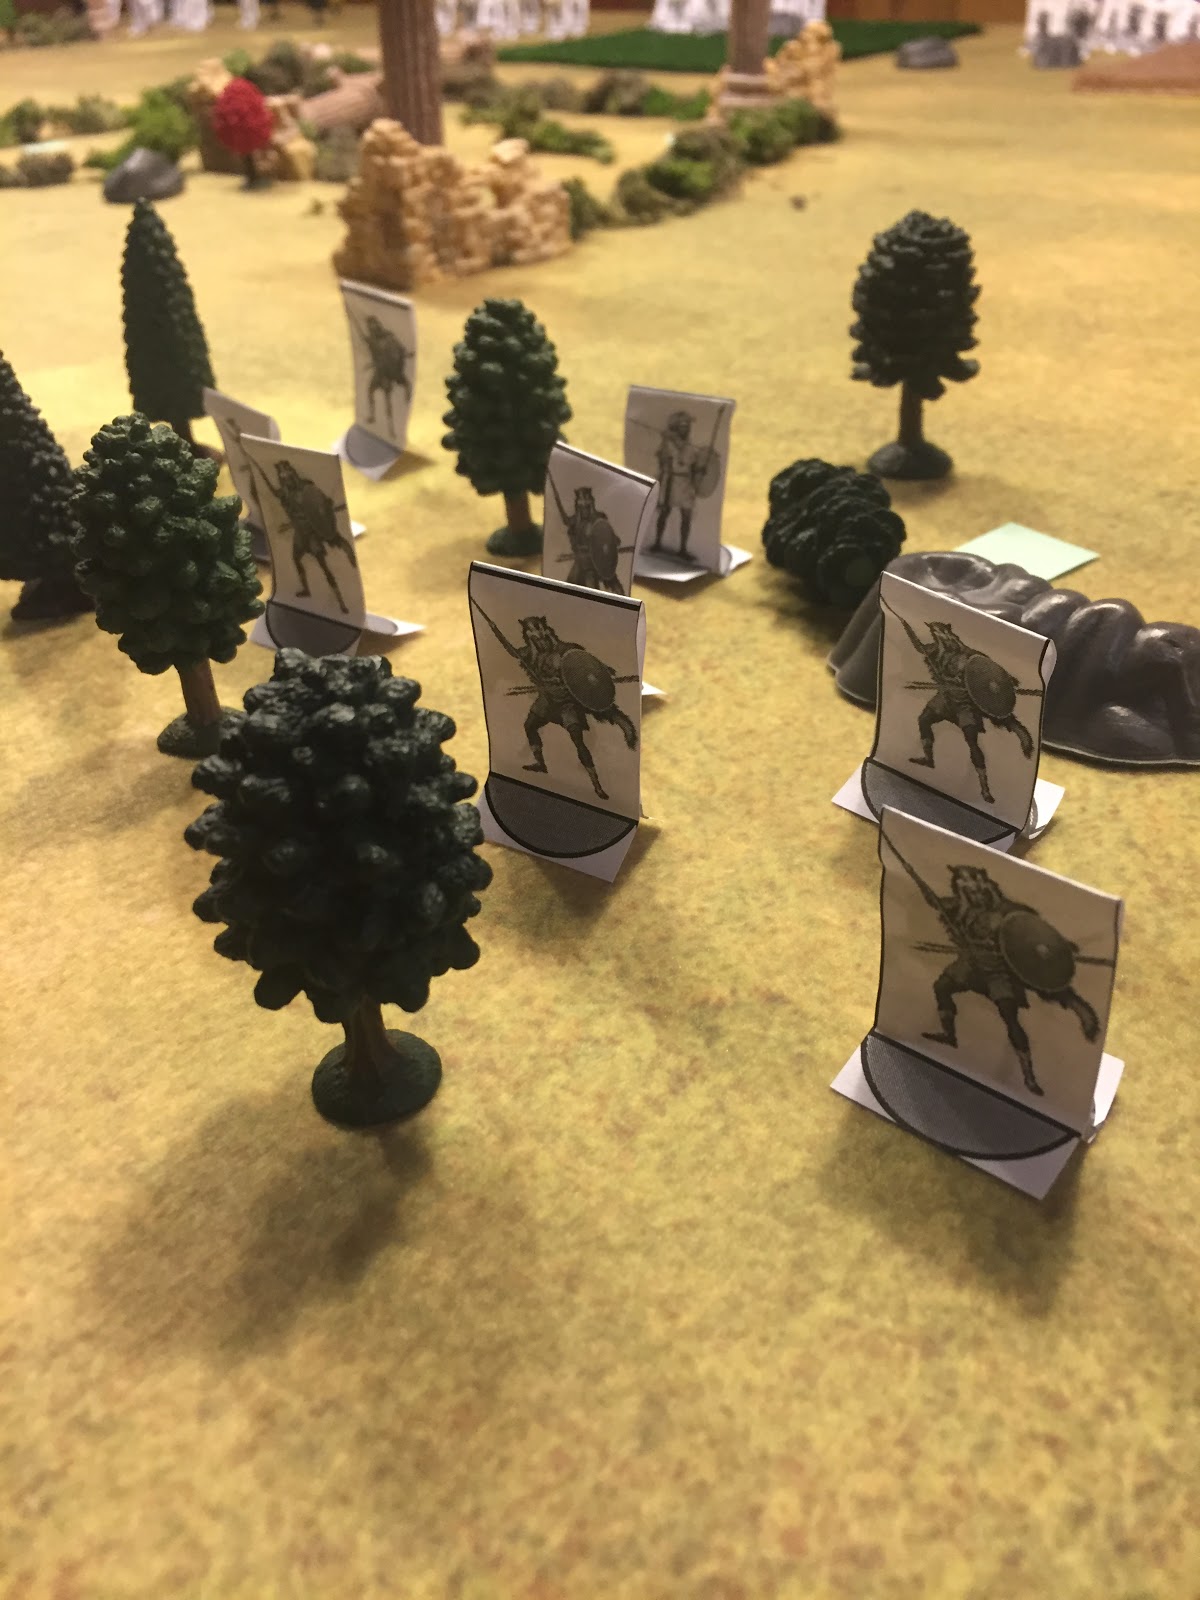
Paper templates will take the field again as I test out the rules.  These are mostly using 28mm models in units of 10.  They work great with Victrix models.  I will be testing out multi-based models a bit later. 

The Romans on their side deployed with the Velites on both flanks, one in the field and the other on the hill respectively.  The Triarri were in the center back, with the Principes in front of them.  The Principes were flnaked by the Hastati.  All were deploed in open order. 

The Gauls forces barely fit on their edge of the 4x4 table.  The cavalry had to deploy in reserve as they did not have room to deploy.  On the left were the slingers, then the warband, followed by the light infantry.  The center was the Drilled Infantry and the Elite infantry.  The right was the light infantry and skirmishers. 

Turn 1 
The Gauls spend all of their Commander's Gaze to go first.  The Romans only spent two. 

The Drilled and Light infantry on the Celtic left move forward to secure the grove.  However, the Romans then steal the initiative and move up.  The Principes and right flank Hastati form Legion.  The other Hastati is in a field and can not form up.  The Roman army advances forward. 

The Gauls follow suit with their forces also moving up.  The cavalry moves onto the edge of the board. 

Turn 2:
The Gauls go first again, and the Romans do not interrupt.  The Celts win the bid 2 to 0.

The slingers try to move and shoot the Velites but fail.  The Light infantry takes the grove, while the Elite and Light infantry on the opposite flank move into the field with some skirmishers supporting them.  The Celtic cavalry hovers around in reserve ready to support. 


The Romans move forward.  Their light infantry also moves up and throw their Javelins.  The Slingers are too far away still.  However, the Skirmishers at the bottom of the hill and they take some Courage loss from the barrage, and start to Waver!

Turn 3
The Gauls bid 2 to Romes 0. 

Gallic slingers pelt the Roman Velites on the flank, and reduce them to 2 Courage and wavering.  The Romans try to interrupt and fail. 

Gallic skirmishers fire on the Velites in front of them, but fail to damage as they are wavering.  This time, a Roman interrupt succeeds.  The Velites charge down into the barbarian skirmishers, who do not try to evade. 


On the other flank, the Roman Hastati clear the field and form Legion.  This time, the Gauls use Commander's Gaze and successfully interrupt.  Gallic light infantry moves to charge the remnants of the Velite and Skirmisher battle, but they do not choose to support the Skirmishers.  Meanwhile, the Warband infantry moves up to support the slingers from the Velites.  The Gallic Light Infantry moves out of the woods and screens the Drilled Infantry moving into position.  The legion will have a tough time cracking those woods.


The Romans move up, with the Triarri staying in open order to act as a reserve.  The Velites ont eh right flank are rallied and are no longer Wavering.  The Hastati supporting their flank form legion.

The Melee between the skirmishers and the velites on the Roman left is resolved.  Both sides fight valiantly.  The skirmishers reduce the Velites 1 Courage.  The Skirmishers also lose 1 Courage, but fail their discipline check.  Since they were all ready wavering, they lose their last courage and flee. 

Turn 4
Gauls bid 2 and the Romans bid 4!  Romans go first. 

The Velites on the Roman right fall back from the slingers.  The Gauls then interrupt and steal the initiative.  Gallic light infantry on the Roman left storm out of the field and hit the Velites in the Flank.  The Velites try to evade, but fail to go far enough.  They are trapped in melee. 

The Romans try to interrupt, but fail.  The Gauls maneuver around with the Warband infantry moving in front of the Slingers to shield them.  The Gauls are inviting the Romans to attack them in the difficult terrain, and the Romans need to decide how to respond to the challenge. 

The Hastati on the Roman left break formation and try to charge into the Light infantry skirmish as a flank attack.  However, their momentum is broken up by the edge of the field and they fail to make the distance and are wavering!  The Triarri move to support them, but do not have enough Commander's Gaze to form up. 


The Hastati on the Right shuffle over to protect the Velites and square off against the Gallic warband. 

The Light Infantry Melee is resolved and the Celts steam roll the Velites into a rout.  However, the Gauls also lose 2 Courage and are Wavering. 

Turn 5
Romans bid 3 while the Celts bid 4. 

The Romans gulp, realizing that the Hastati are in a tight place.  The Gallic Elite Infantry containing the Celtic chieftain charges the flank of the hastati and is supported by the Gallic light infantry.  Meanwhile, the Celtic Light infnatry runs screaming from the center of the battle and throws their javelins at the triarri, but they are batted away by the veteran's shields. 

On the Right, the Celts fall back from the Hastati and Velites there while the Drilled infantry holds the woods. 

The Triarri form up and charge into the Celtic light infantry with abandon.  The Principes also go into open order and charge the light infantry flank. 


Melees need to be resolved, and the Celts decide to resolve the Light Infantry vs. the triarri and Principes first.  The Celtic Light infantry is swept from the board and the Triarri only take 1 Courage loss. 

The Celtic attack slams into the Hastati flank and they are reduced to 1 Courage and are wavering!  They are pushed back 2 Measurement units. 

Turn 6
Gauls bid 4 and Romans bid 0. 

Ferocious Drilled Infantry of the Gauls storms from the woods and attacks the Principes in the rear!  Meanwhile, barbarian cavalry comes thundering down between the woods and fields and also attacks the Roman Principes.  The triarri jump in to support their comrades. 

The Gallic Warband moves to block the Romans on the right from supporting their friends in the center.  The slingers also move up to threaten a barrage.  However, the Hastati break formation and charge headlong into the Celtic troops with the light infantry in support.  Things are about to get messy!

The Gallic chieftain and his entourage drive-off the Roman Hastati in a rout. 


The fighting in the center is bloody an intense.  The Romans use their Pila special ability and the two sides destroy each other in an orgy of blood and combat. 

On the Roman right, the Hastati break through and destroy the barbarian warband infantry.  However, the Hastati lose 1 Courage and begin to Waver. 

In the End phase, the Roman Hastati and Velite flee the board, as do the Gallic slingers.  However, the Celtic Elite infantry, along with their Light Infantry stay.  They have won the spoils of War this day!  

Conclusion
The Gauls manage to defeat the Romans when the Roman army collapsed at the loss of its Consul and main fighting units.  What did we learn from this test? 

The Roman Legion formation allows for powerful armor bonus, but it can be beaten by careful planning and maneuver.  For example, difficult terrain breaks up formations.  In addition, the Legion formation is more mobile than a Phalanx, but is limited in the diagonal approaches and can be out-maneuvered there.  Any overwhelming attack can cause them to fail a Discipline test and break formation.  If you keep them out of formation units with lower attack and armor ratings can beat the Romans.

Command and Control was vital in this game.  A lack of command resources hampered the Romans ability to respond effectively in the key Turn 5.  They could not use their Pila special rule and could not provide a key support charge.  In addition, a mis-timed charge in Turn 3 by Hastati left them vulnerable to counter-attack, and the Gauls had the Command points to make sure they could capitalize on the error. 

Proper supporting also was a big component of the game.  Without support units, the Elite Infantry would have tar-pitted in the Hastati.  In addition, the Triarri/Principes vs. Drilled Infantry/Cavalry fight would have not been as decisive.  Units going one-on-one would be a grind, but with support a Melee can end quickly. 

The new wavering and Discipline check rules make wavering a more common occurrence.  It is harder to recover from a devastating attack that rolled a lot of attack dice.  This means you may want to let a damaged unit get destroyed instead of helping it with more support units.  You have to decide.  For example, in this battle the Light Infantry decided NOT to support their Skirmishers allies since they were all ready in desperate shape.  Joining and supporting them would have led to the loss of the Gallic Light Infantry and Skirmishers in one melee.  I am not sure how I feel about this yet, but it is a decision point for the commander.

The terrain placement rules played a big part in this battle.  The Romans tried to keep terrain out of their way so their formations could stay together.  However, the Gauls used it to their advantage and allowed them to control the center of the battlefield.  In retrospect, the Romans should have placed out of their deployment zone and forced the difficult terrain away from the center of the board. 

Overall, a lot was learned as I start to test out the rules and lists I have written so far.  I learned a lot.  I tinkered with the turn sequence, supporting, terrain placement, and C&C.  This let me try it out on the field of battle.  More to come as I keep tinkering with the rules prior to publication.

Monday, December 17, 2018

Conquest! Rome in Italy: Battle Report- Forced Recon in Samnium

The Roman forces faced a humiliating defeat at the Caudine Forks in 316 BC.  Despite this defeat, the Samnites were the ones to be unsettled.  The Romans were incensed to fight on to regain their honor.  However, the prospect of continuing the war took time and the “Caudine Pax” took hold.  Despite an official peace, the war still boiled around the edges. 

 In 315 BC the war started in earnest again.  He war raged on until 304 BCE.  During this time, the Roman army evolved from the Phalanx formation into the Manipular Army of the Triplex Acies.  There were any number of battles and skirmishes between the two sides and their allies.  Besides local Italian tribes and city-states, the Etruscans also became embroiled in the war between 312-308 BCE.  It was a Pan-Italian conflict.  The winner would be poised to control northern and central Italy.

Conquest! Rome in Italy is a derivative of the Men of Bronze engine with special rules and units to help match the flavor of combat in ancient Italy. These rules cover a long period of time fromt eh founding of Rome until the Pyrrhic Wars. The rules are still a Work-in-Progress, but those familiar with Men of Bronze will have a general idea of the rules being used here. Since I ma int eh testing phase, behold my amazing paper template armies in action!

You can read all about a previous battle of the Great Samnite War here.

Rome had a three part strategy to contain the threat of the threat of the Samnites.

  1. Isolate them them from their potential allies
  2. Colonize deep into their territory
  3. Beat them on the battlefield

As part of this strategy, the Romans had to establish and build colonies deep in Samnite territory. Naturally, the Samnites did not appreciate this move to enter their territory. When possible, they would raid and attack these settlements. Roman troops would try to drive them away and secure the settlements. Many such battles will be lost to history as they were not recorded, but if Rome's settlements were destroyed, her three part strategy to defeat the Samnites would be for nothing.

Today's battle will be a Roman column coming to defend a settlement but the Samnite have all ready ransacked it and are waiting for them.

Forces:

Romans
2 Hastati
1 Principe
1 Drilled Hoplite
1 Skirmisher

38-Points

Samnites
2 Drilled Infantry- Pila
2 Warband Infantry
2 Velites

38-Points

Scenario:
This is a Recon-In-Force scenario. The Romans are the Attackers and trying to find survivors from the Samnite raid in the ruins of the settlement. There are six counters on the board, some are even and some are odd. The Romans are trying to touch and reveal 2 even number tokens of the 6. The Samnites are going to try to stop them. They have 8 turns.

The Set-up:
The Romans are lined up with the skirmishers on their right in a grove of trees. Then the Principes, Triarri, and the Hastati on the Roman Left. The Samnites are lined up with velites on their left across from the Roman Skirmishers. Then both units of drilled infantry, then the warband infantry, followed by the rest of the Velites.


The ruins are difficult terrain, and the fields are not.

The board has several ruins and 6 counters scattered near the middle. These counters are the objectives. The Romans want to hold two even ones by the end of the 8th turn.


Turn 1:
The Samnites generate 6 Honor points to the Roman 5. Neither side bids to go first. The Romans win the roll off.

The Roman skirmishers use an Honor Point to move through the difficult terrain of the grove as skirmishers. There is a general advance across the Roman battle line, but none of the units form Legion.


On the Samnite side, the same general advance occurs.


Turn 2:
This time, the Romans bid 1 to go first. They are unopposed by the Samnites.

Immediately, the Roman skirmishers rush forward and reveal an objective. It is a five, they find nothing of value in the ruins. The Hastati see the Velites on their side of the battle line lurking near an objective by the groves, and they form a Legion unit and advance. The second Hastati stays in open order as they approach the ruins in the center of the board. The Principes also form legion and advance seeing the Samnite horde across from them. The Triarri move to back them.

The Samnites do not attempt to interrupt. Samnite Velites use an Honor Point to skirmish up into the ruins to deny it to the Roman skirmishers. Meanwhile, the Drilled and Warband infantry continue their advance, they are not going to let the Romans claim any more easy objectives. The last Velites stay camped near the final Objective and wait for the Roman Hastati to come for it.


Turn 3:
Again, neither side bids to go first, and the Romans win the roll-off.

The Romans press forward, led by their legion of Principes. The triarri move behind them and form up at a slight angle, moving to secure the large ruins the Samnite Velites are in. The Skirmishers just consolidate around their objective, not wishing to engage the enemy forces yet. The Hastati also advance, with the loose formation lagging behind the formation in Legion.


The Samnites have their Velites secure their position in the Large ruins and the grove on their right, safely defending Objectives with their missile fire. Meanwhile, the Warband infantry press into the center ruins to deny easy objectives and possible secure flank positions. Finally, one of the Drilled Infantry units steps forward to challenge the Principes.


Turn 4:
The Romans are running out of time. They will need to move quicker to secure some Objectives. Again, neither sides bids to go first, but the Samnites win the foll-off. They are in no rush to move into Roman charge range. The Samnites make some slight adjustments to their lines, as time is on their side. They are content to let the Romans come to them!


The Romans grimace and move forward, they know time is against them and they are moving into the Samnites attack range. The real battle is about to start.

Turn 5:
The Samnites bid 2 to the Roman 0. They will be going first.

They start by declaring a charge with their Drilled Infantry who are also using a Pila attack on the Principe. The Principes decide to counter-charge and Pila attack as well. The Romans lose one Courage, but completely route the Drilled Infantry in the process. The Romans then try to steal the Initiative, but fail. However, a flank charge in support by the Samnite Warband also hits the Principes and reduces them another Courage and forces them to be disordered. However, they will also be routed with the Drilled Infantry.


The Velites on the right fall back into the woods, while the Velites on the right charge into the Roman Skirmishers. The Skirmishers try to evade, but it is not far enough. The fighting pushes the skirmishers back and causes the Romans to fall into disorder. However, both sides took casualties.

The Roman Hastati charge the warband infantry in the center ruins. However, the terrain forces them out of Legion formation. The Samnite warriors manage to push back the young Romans and cause 1 Courage loss.

The Roman Triarri keep marching to their objective, as do the Hastati on the Roman left. The Samnite Velites melt before their approach.

The remaining Samnite Drilled infantry passes their morale check after seeing their comrade defeated by the Roman Principes.

Turn 6:
With their loses, the Samnites only generate 4 Honor Points to the Roman 5. The Romans need to recover their Principes before they get charged and bids 3 Honor points. The Samnites also bid 3. The Samnites win the roll-off.

The Samnite Drilled Infantry immediately declare a charge which will use their Pila. The Romans are disordered and can not spend Honor Points to Counter-Charge or use their own Pila this time. It is a bloody fight in the center. The Principes are pushed back and the Triarri behind them get caught up in the melee as well.

The Samnite Velites and the Roman skirmisher continue to battle to a stalemate in the edge of the ruins.

The Hastati in the center ruins and the Samnite Warband are at a standstill with neither side gaining the advantage.

Finally, the Hastati on the Roman left manage to charge into the Velites in the woods and push them back. The Velites took two Courage loss and the Romans none. However, the Romans are no longe rin Legion due to the terrain.


Turn 7:
With everyone in melee, both sides hold on to their Honor Points for re-rolls and the like. Samnites win the roll-off.

The battle turns for the Samnites as the Drilled Infantry in the Center manages to put the main Roman force to rout! The Principes and Triarri decide to run for it in the confusion of the battle. The Samnite Velites also manage to rout the Roman Skirmishers.


Meanwhile, the battle in the center ruins and continues to be a stalemate. However, on the Roman left, the Hastati are whittling away the Samnite Velites to secure the objective. Next turn they should have it.

The Hastati units pass their Collapse test.


Turn 8- Final Turn:
The Samnites have 4 Honor Points and the Romans 2. The Samnites bid 1 to go first and win the initiative.

The Drilled Infantry and Velites on the Samnite left try to swing around to support their colleagues. However, they will not get their in time to make a difference.

On the Roman Left, the Hastati route the Velites!. They mange to find some Roman colonists hiding in the woods. That is one even objective!


In the center, it is a stalemate again. The Roman Hastati have been denied their objective there. That's the game. The Samnites have won the battle, but at a terrible cost.

Conclusion:
The Samnites won. However, I am still unsure if the Roman Legion rules are overpowered or not. When the Principes routed the Samnite Drilled Infantry in one round by dealing 5 Courage loss to 1 Courage lost in return, I was a bit nervous. However, the additional flank charge and managing to disorder them to lose the legion rules really mattered. To break a unit in Legion, the Pila rule is a must.

I also learned that the Samnites must make use of terrain in a defensive manner to boost their own Armor ratings and to deny the Romans their Legion rules. They also have to make use of the flanking and support attacks. If they do that, they can beat the Romans as they greatly improve their own sticking power.

In this scenario, time was not on the Roman's side. The Samnites had the luxury of delay and stalling, while the Romans did not. They had to move aggressively, and that allowed the Samnites to set the terms of the battle. Overall, a good time.

Perhaps next time I play Conquest! Rome in Italy I will try out some of the other army lists such as Etruscans vs Romans? The Etruscans did get involved in the Great Samnite War as allies of the Samnites. We will have to wait and see what happens.

Monday, May 7, 2018

Battle Report: Conquest! Rome in Italy- The Great Samnite War 326-304 BCE


The Roman forces faced a humiliating defeat at the Caudine Forks in 316 BC.  Despite this defeat, the Samnites were the ones to be unsettled.  The Romans were incensed to fight on to regain their honor.  However, the prospect of continuing the war took time and the “Caudine Pax” took hold.  Despite an official peace, the war still boiled around the edges. 

 In 315 BC the war started in earnest again.  He war raged on until 304 BCE.  During this time, the Roman army evolved from the Phalanx formation into the Manipular Army of the Triplex Acies.  There were any number of battles and skirmishes between the two sides and their allies.  Besides local Italian tribes and city-states, the Etruscans also became embroiled in the war between 312-308 BCE.  It was a Pan-Italian conflict.  The winner would be poised to control northern and central Italy.

The battle here is to represent one of the many forgotten or ill-documented battles between the Samnites and Romans during this timeframe.      

The Forces
I will be using some standard armies from the Triplex Acies and Samnite lists.  These exact lists are found in the Sample Armies section of the book.  This was a small scale action and we will be playing on the edges of Samnium.  The two armies met as the Romans were maneuvering to besiege a Samnite city, and the Samnites have gotten the drop on them.    

Romans
2 Hastati
1 Principe
1 Drilled Hoplite
1 Skirmisher

Samnites
2 Drilled Infantry- PIla
2 Warband Infantry
2 Velites

Both sides have 38 points. 

Deployment
This battle will be on a 6x4 board with each corner having the difficult terrain famous in Samnium.  It will be using the Attack at Dawn complication.  The set-up will be a Surprise Assault mission with the Samnites acting as the attackers.   

The Romans deployed in the center in marching column.  The vanguard were the skirmishers followed by the Hastati, then the Principes, and the Triarri in the rearguard.  They were all in loose formation for the march.  Suddenly, warning cries went up from the lead officers.  The Samnites had been sighted the dim, early morning light. 


The way had been blocked by experienced Samnite drilled infantry, supported by Velites in the difficult terrain.  On the right flank appeared the Samnite warband, Drilled, and the second Samnite warband.  On the opposite flank a unit of Samnite Velites appeared to threaten any stragglers.

The Samnites want to keep the Romans penned in, while the Romans wish to punch through and off the board.  Let’s see what happens.      


Turn 1:
Both sides are distributed their Honor Points.  The Romans have 5 to the Samnite 6.  The Samnites bid 1 for Initiative and the Romans 0.

A unit of Samnite Velites use an Honor Point to Skirmish and rush through the woods to try to flank the head of the Roman column.  The rest of the Samnite force closes in on the Romans, who seem content to let the Samnite forces go about their business without trying to interrupt.  The last Samnite velites rush forward eager to do a move and shoot, but they are out of range. 

With that, the Romans are free to activate and not have to worry about Samnites responses.  The skirmishers move forward cautiously and fan out into a skirmish screen to slow any quick Samnite attacks to the fore.  The Hastati peel off and move away from the main Samnite attack, while the Principes turn to face the Velites and form Legion.  The Triarri swing in behind the Roman forces and form into their Phalanx wall to hold off the approaching Samnite warriors while the rest move to escape. 


Turn 2:
Both sides pick-up their new Honor Points, and think about their plans.  The Samnites bid 2, while the Romans bid 3 for Initiative.  The Romans only have 2 left, and the Samnites 4. 

The Romans begin by throwing in an Honor Point to charge with the Principes into the Velites.  The Velites could Evade for an Honor Point, but the Samnites decide they are too close and that it would not help their situation.  Since the Principes are in Legion, the Velites only real hope it to not die instantly!  The hope pans out as they hold, but are wavering with 1 Courage point left. 

The Samnites decide to spend an Honor Point to try to interrupt the Romans.  However, the Romans win the roll off and continue activating.  The Hastati continue their flight from the board, while the Skirmish screen gives them cover.  The Triarri kneel down and plant their shields in the ground, daring the Samnites to come for them. 

The Samnite Velite futily try to fight the Principes, but it is pointless.  The main Samnite battle line closes in on the Triarri cautiously so they can laubch the charge instead of receive it.  The Samnite warriors at the head of the column close in, but can not keep up.  Finally, the last velite use an Honor Point to Skirmish to leave the woods, and then move and shoot to eliminate the Roman Skirmishers.  Instead, they are reduced 2 Courage and are wavering.


Turn 3:
Both sides get their Honor Points, 5 Roman and 6 Samnite.  The Samnites bid 4 to the Romans who bid 3.  The Samnites must speed bump the fleeing Roman troops so their heavier elements can catch up. 

They start by having their lead Samnite Warriors declare a charge into the wavering Skirmishers.  The Roman skirmishers are quickly routed and turned about. 

The Romans spend an Honor Point and try to interrupt.  The Romans win the roll-off and take control of the Initiative.   They use their last point to form Legion on one of the Hastati units.  Both units push towards the board edge and safety.  Next turn they will escape unless something happens. 

The Principes finish routing the Samnite Velites.  The way will be clear for them to escape.  Meanwhile the Triarri continue to hold the center. 

The Samnites are now back in control of the turn as all the Roman units have been activated.  Their flanking Velites will not longer have a soft Hastati target to speed bump as they managed to form Legion.  They can only slow them with melee.  The Samnites use their last Honor Point to charge the Hastati in the Flank.  They have 7 attack dice, and need 4 to cause a Courage loss.  If the dice are lucky they can do it.  However, the dice are not lucky.  However, they do tie them up in combat and will keep them on the board.  

In the End of the turn, the Roman Skirmishers and a unit of Samnite Velites are removed as routed.  Only the Samnites could see their Velites rout, but all units in LOS passed their Discipline Check.  


Turn 4:
This time the Romans get 4 Honor and the Samnites 5.  Both armies lost a unit.  The Samnites MUST catch the Romans!  The Romans bid all 4 Honor Points to escape, while the Samnites do not bid any since they need Honor Points to launch charges.

Romans activate first.  The Principes march to the board edge in their Legion formation.  The second Hastati unit makes it off the board edge.  The Samnites do not interrupt.  The Hasati engaged witht eh Velites attack them.  The Velites are reduced to 2 Courage and are waivering.  One more turn and they will be routed.  The Triarri stand firm. 

The Samnites declare charges across the board.  However, two of the units fail to connect and end up wavering.  However, Samnites warriors swarm the Triarri in the center.  However, some bad Samnite attack rolls leave them only reduced 1 Courage! 

The Samnite Velite fail to scratch the Hastati, and they are pushed back the maximum amount!  The Hastati and Velite combat is at the very board edge. 


Turn 5:
If the Principes or Hastati escape the board this turn, the game is over!  The Romans collect 3 Honor Points and the Samnites 5.  The Samnites bid 4 to make sure they get to control the initiative.  The Romans are wise to this plan, and choose to bid none in case they need the re-rolls or interrupts.

A Samnite Warband manages to catch up to the Principes in the rear.  However, because they were wavering they could not use the last Samnite Honor Point to charge.  They simply moved to contact and tied the Romans up. 

On the other side, if the Samnite warriors move in they will be supporting the all ready weakened Velites and risk routing with them.  However, without their help the Hastati will easily rout the Velites and escape.  They also move into contact and support the Velites with a rear attack, so +4 dice!  However, no Charge bonuses since they could not use the Honor Point as they too were wavering. 

The Velites attack the Hastati with the Samnite Drilled infantry in support!   They use the last Samnite Honor Point to re-roll an Attack dice.  They only score 3 hits, not enough to cause a Courage loss to a unit in Legion!  Man, the Pila rules or a charge would have been helpful there, but the Wavering made it a moot point!

In the Center, the Samnites battle with the Triarri.  There the Samnites reduce them another  Courage down to 3, but they pass a Discipline check.  The Romans take back over and start with a Triarri counter-attack!  The Romans have a bad roll, and contemplate using Honor Points as re-rolls, but decide to hold onto them until the important fights! 

The Hastati manage to break the Velites and cause them and their supporting Samnite Drilled Infantry to Rout!  That was the danger of having the Velites be supported by the Samnites! 

Finally, the Principes fight with the Samnite wraband that moved to attack them in the rear!  Here the Romans use 2 Honor Points to re-roll misses.  The Samnites lose 2 and are wavering. 

In the End phase, the Samnite Units that were routing were removed.  In addition, the Triarri are pushed back as are the Samnite Warband. 


Turn 6:
The Romans get 3 Honor Points, to the Samnite 3.  There is nothing the Samnites can do to stop the Romans from winning the battle.  Therefore, the Samnites bid 0, and the Romans bid 1. 

The Roman Hastati unit moves off the board!  That means 16 points have succeed in leaving the board and the Romans have won!  However, we decide to play out the last two battles for fun.

The Roman Principes dismantle the Samnite Warband they are fighting and cause them to rout! 

The Triarri counter-attack the Samnites and reduce the Drilled infantry 2 Courage, but lose another Courage point themselves.  They are again pushed back but stay in the fight. 


Conclusion:
The Roman forces were able to skillfully withdraw from the Samnites trap.  They were able to maneuver deeper into Samnium, and the Samnites withdrew before them.  This gave the Romans the space they needed to construct a fortified camp in which to harass the Samnites in their own territory.  The strategy to slowly encircle and cut-off the Samnites from potential allies was working. 

I expected the Romans to turn and come at my lines.  I did not expect them to flee the opposite table edge!  My initial Samnite deployment was heavy on one flank, and the lone Velites on the opposite side were to take opportunistic rear/flank charges.  The Romans turning towards them and charging them instead my main force did not cross my mind.  I was really lucky to catch up and make a game of it at all! 

One of the key things I wanted to determine was if the Legion rules were too strong.  After this game, I am not sure.  Velites were unable to even scratch the Romans in Legion, and I am not sure this is bad.  My Legion busting rules like “Pila” never came into play due to lack of Honor Points, Wavering, or the wrong units being able to engage.  I was not able to “crack” a Principe or Hastati Legion, but I also wasn’t using the right tools for the job once it became a matter of catching up with them first. 

The Romans only “lost” their Skirmishers and took damage to a unit that uses Phalanx instead of the Legion rules.  The Samnites lost 2 Velites, 1 Drilled Infantry , and 1 Warband Unit.  On paper, it looks like a pretty lopsided Roman victory with the Legion rules being overpowered.  However, the reality is my opponent just out played me.  I was constantly on the horns of a dilemma with the Samnites while the Roman path was clear and straight forward.  So, in the final analysis I was outplayed in this scenario and it does not necessarily mean I need to re-work the Legion rules.   I will need to playtest further to know for sure. 

I tweaked a couple of Stat line here and there to fit the timeframe a bit better.  Those should be in the new Conquest! Rome in Italy rules now.  I am unsure how long they will be up on the blog, so it you are interested you might want to grab them now.  

If you have tried the rules and know more about this topic than me, I would love to hear your thoughts on the Messageboard Here.      

Monday, February 19, 2018

Wargame Design: New Wargames W.I.P. for 2018

One of my goals for 2018 was to create two new WIP games for the blog.  I also shared some of the ideas that I have been mining and working on for 2018.  One of the games I talked about was Conquest! Rome in Italy.  I am pleased to announce that a Work-in-Progress version is now available on the blog.  It will be available for a short period of time, and I am eager to get feedback on how it currently works.

This game was a challenge to build.  There were two main reasons for the challenge. 

1.       The game covers the Roman conquest of Italy from Rome’s founding to the end of the Pyrrhic Wars.  That is a range from something like 753 B.C.E. to 275 B.C.E.  We are talking 500 or so years!  During that time, the Roman military went through (at least) 3 major structural changes and all of them need to be represented in the rules even though they work very differently. 

2.       The next issue was that early Roman military history is a bit sparse for the Roman military itself, but especially for her opponents.  Much of the “history” at this time was almost mythical, especially when dealing with the Kingdom of Rome prior to becoming a Republic.  This is due to the sacking of Rome by the Gauls in 390 B.C.E. that destroyed many of the Roman records. 

In addition, ancient authors did not spend too much time discussing formations, tactics, etc.  Instead they were focused more on telling a narrative at a higher level and assumed their readers knew what they were talking about.  Since many Romans had military experience, such discussions were not relevant.  For modern readers and scholars, the lack of this detail is problematic.  We don’t know what they are talking about!

As a designer, I had to decide how to deal with this ambiguity.  Thankfully, I had the bare bones to work off of from my two related works Men of Bronze and Heirs toEmpire to help guide my efforts.  Ancient warfare has a similar vibe to it.  It is about the push of shield on shield, spear vs. sword, etc.  Morale and holding together is the key factor in success and failure.  The critical decision is how to abstract a units’ ability and the mechanics of resolution to get a somewhat historical result.

The game was intended to meet the following criteria:
1.       Focus on quick, simple game play with easy rules for combat
2.       Use resource management to represent C-and-C
3.       Streamlined unit types
4.       Close enough “historical” outcomes

For Conquest: Rome in Italy I am still unsure how to organize armies together.  In this draft, I am using units of ten bases with a leader.  The situation of being in or out of formation is critical for combat bonus and ability to absorb damage differently.  It is still focused on a closer battlefield level.  This works well for the early periods of Roman history such as the Kingdom period, Etruscan battles, and battles with local city-states.  However, once we get to the Republic and the Triplex Aceis this scale seems too small.  That means looking at unit interactions and abstracting some of the factors makes sense.  Therefore, I have not fully decided on the “scope” of the game when it comes to Unit interactions.  Hopefully, you guys can look at these rules and help me decide. 

Feel free to discuss the rules on the Messageboard here.        


The next game is an interesting set of rules for me.  Unlike most of my rules, these came to me in a dream!  Yes, I dreamed these rules and then went and wrote them down.  Why would I dream about rules?  Clearly I have problems!

Fog of War is not as polished as many of my games are.  It is functional, but was not built in PowerPoint from the ground up like most of my games.  This one was pounded out in a Word document in the heat of the moment after awaking.  In addition, it departs from my normal rules in another key way.  This game was built and designed for groups to play as opposed to 1-on-1 games.  It was designed for two teams of 3+ people per side to play and uses an Umpire.    

I have been banging my head on Horse-and-Musket style games for a long time.  I do not normally play them and have little experience with them.  However, I have been thinking about how I integrate a Muskets and Magic style game.  Therefore Horse-and-Musket have been circling in my psyche for several years.   In addition, I have been thinking about novel ways to foster team building and working together at my corporate job.  That is the elements at work in my psyche to generate Fog of War.

The game was intended to do the following:
1.       Creating a Fog of War between players on the same team
2.       Restricted communications to force clarity
3.       Simplified mechanics and resolutions for newbie players
4.       Focus on working together as a team to meet objectives
5.       Lots of friction!
6.       No specialized stuff to play- Minis not required

I expect the players of this game (My direct reports) will have no exposure to wargames; hence the need for an Umpire.  Their experience with wargames also made me want to avoid using special gear beyond dice.  Therefore all measurements are with playing cards, wounds are tracked via candy, and combat resolution is via dice.

Friction and Fog of War is integral to this game.  The entire idea is to force the team to work together on team goals with limited communication, time limits, interpretation of orders, and independent decision making where mistakes will be made.  The idea with this game is for it to be clunky and awkward as a commander to follow orders, but easy to resolve actions once committed. 

I plan on using this game with about 10 people in the dry run plus an Umpire.  If you get a chance to try it out feel free to post about it on the Messageboard.


You can find both of these games on the right hand side of the blog under the Work-in-Progress section of the blog.  I can now cross one resolution off my 2018 Goals list.