

I initially started working on Wars of the Republic as a more focused set of rules called Conquest: Rome in Italy. As part of that rule set, I was focused on getting armies and forces for the early period of Roman history. There is not a lot of data on these early foes, but one of my favorites was the Etruscans.
The Etruscans was a loose group of city-states to the North of Roman territory. They shared a unified culture and a religious League, called the Etruscan League. Legend has it that 12 cities were part of this League. Despite the existence of the League, Etruscan cities were fierce rivals and were not above feuding and fighting amongst themselves.
The Etruscans themselves have very little written evidence that remains of their civilization. Instead, we must rely largely on Roman accounts from a legendary age. The other main source of information is archeology. The Etruscans may have been colonists from Anatolia, but had a complex relationship with their mostly Greek neighbors and trading partners. They entered and conquered much of the Northern Italy around 510 BCE.
It has been theorized that much of the early culture of the Roman military came from the warrior culture of the Etruscans. Some have theorized Rome herself was a colony or vassal of the Etruscans in its early history. Roman myth itself talks about how the Romans overthrew the Etruscan kings and replaced them with the Republic.
Despite expelling the Etruscan kings, the two groups remained rivals for control of North Central Italy for generations. This led to various battle, sieges, raids, and more. There are several major battles that history records. However, for every major battle recorded, there were several smaller skirmishes or lesser encounters that led up to the big clashes. Today, we will be playing one of those lesser engagements.
You can order your copy of the Wars of the Republic rules here.
Forces:
The Etruscan list will come straight out of the Wars of the Republic rulebook.
Etruscans
1 Elite Phalanx- Pila - General
2 Militia Hoplites
1 Drilled Infantry- Axemen
1 Skirmisher

They will face off against an Early Roman Triplex Acies. It would also make sense to have them fight a Early Roman hoplite army, but I want to use these guys instead to highlight the difference between the two fighting styles.
1 Skirmisher
2 Hastati
1 Principes- General
1 Triarri

This was completed using the rules laid out by the rules in the booklet. The board is 72 x 48 MU with an MU being 1 inch. The board was divided into 6 grid spaces and terrain rolled and placed using the chart. The Players took turns rolling and placing terrain, with the player being able to place the terrain anywhere they wished in the grid square.
This system led to the following set-up.
Grid 1 is the Roman right, 2 Roman center, and 3 is Roman left. Grid 4 is Etruscan left, 5 is Etruscan center, and 6 is Etruscan right.
Grid 1- Swamp
Grid 2- Stone Wall
Grid 3- 2 Level Hill
Grid 4- 1 Level Hill
Grid 5- Stone Wall
Grid 6- Grove of Trees
The Romans deployed with the Triarri on the right flank by the 2-level hill. Then Hastati on the road, then Hastati in the open leading to the shrine, then Principes on the left, and the flank is anchored by skirmishers. 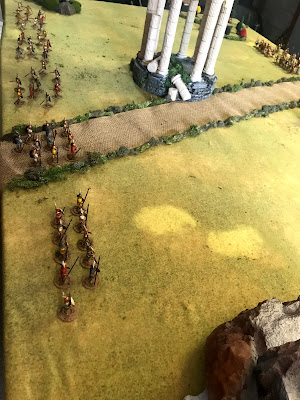

The Etruscans deployed with the Elite Hoplite on the right, then a Militia Hoplite, with the second militia hoplites behind the other two. The Axemen are on the road. The left flank is Skirmishers in a ruined building. The Etruscans seem as if they want to fight the entire battle to the right side of the shrine. 

Mission
We set-up our scenario using the method found right in the main rules. This is going to be a set-piece battle, so no fancy scenarios for this one. Etruscans are the attackers.
However, this battle will have Hungry and Thirsty complication. Disappointingly, no unit is suffering the effects of this complication as they all passed their Discipline checks.
With that, we are ready to start fighting!
Turn 1:
Both sides collect their Commander's Gaze. The Romans have 6, and the Etruscan 6. Nice and even. The Romans bid 6, the Etruscan 4. The Romans go first.
Move:
The Romans are all in Open Order. The Hastati behind the shrine move up first, followed by the Principes on their flank, and the skirmishers. The Etruscans try to interrupt, but fail. The rest of the Roman force moves up unopposed.
The Etruscans move forward. The Elite Hoplites and the leading Militia Phalanx are all ready in phalanx. The second militia follows them up in open order. The Axemen move up the road. The Skirmishers use the last Commander's Gaze to skirmish and take up fortified positions on the ruins.
Melee:
None

Turn 2:
Both sides still have full units, so have 6 Commander's Gaze each. The Romans bid 0, to the Etruscan 2. Etruscans activate first.
Move:
The Elite Hoplites move up, but keep their flank screened by the woods. The Militia move up, slightly ahead. Meanwhile, the second Militia unit moves to fill a growing gap between the Hoplites and the Axemen. Then, the Romans try to interrupt, but fail.
The Etruscan Axemen, move up. The Romans try to interrupt again, but fail again. The Etruscan skirmishers hold position and cede initiative to the Romans.
The Roman line pushes forward. The Hastati behind the shrine begin to clamber up into the shrine for protection. On the outside, the Principes see the Hastati taking position and form into Legion. The skirmishers fan out and try to secure the Legions flank.
Melee:
None

Both sides consider their next moves, and the Etruscans bid 2, to the Roman 3. Romans go first.
Move:
Roman Hastati plant their standard in the shrine. It is safely in Roman hands. The Hastati on the road form Legion and block the roadway. The Etruscans consider trying to interrupt, but pass on the chance. The rest of the Romans shuffle around, they seem content to let the Shrine be a lynchpin of their battle line. 

The Etruscans seem content with their match-ups, and move forward aggressively, with their Elite Phalanx leading the way. Their Militia Phalanx moves up in support, and the second Militia fills the gap but stays in open order. The Axemen and Skirmishers hold for now.
Melee:
None

Turn 4:
This turn we might see some action as the two sides get into charge range. Both also have 6 Commander's Gaze. The Etruscans bid 3 to the Roman also bid 3. After a tense stand -off, the Etrsucans bid 1 more. To win the initiative.
Move:
The Etruscan Militia Phalanx charges, and the Roman Principes Counter-charge. They crash into each other half way between. The second Militia unit also charges in to support their fellow farmers. The Romans then try to Interrupt. Which they do successfully.
The Roman Skirmishers manage a Flank charge into the growing Melee between the Etruscan Militia and the Principes. The Hastati in the shrine move to the edge of the shrine, while the ones on the road move up and threaten the Axemen. The Triarri also move forward.
Losing the Initiative there put a wrinkle in the Etruscan plan. The Elite Phalanx goes into Open Order and tries to get around the melee, as their target became engaged, and they do not wish to enter the Melee as support. The Axemen and Skirmishers shift to the side to protect the shrine side flank of the Melee, while the Elites re-deploy.
Melee:
There is about to be a lot of dice thrown! Principes get 4 base, +2 for charging, +2 for support, +2 for a support charge, and +2 for a flank attack for 12 dice, versus the Etruscans Militia Phalanx that has 3 dice base + 2 for charging, +2 for Phalanx, +2 for support, and +2 for support charge for 11 dice. The Principes can take more hits before losing Courage though. After rolling, the Roman Pila barrage pays off, and reduces them 2 to 1.
The Romans push the Etruscans back 3 MU! That is enough to push them back into the Elite Hoplites, who now join the battle as support. The Etruscan plan just went pear-shaped!
Neither side is forced to Waver.

Turn 5:
Both sides have full Commnder's Gaze. The Etruscans bid 0 to the Roman 2. The Etruscans want their re-rolls to try and put the Principes away for good.
Move:
The Roman Hastati on the road charge the skirmishers in front of them. They try to flee, but a dismal roll allows the skirmishers to get caught. Ouch.
The Romans Hastati in the shrine throw a hail of Pila and charge out, where they are met by Counter-charging drilled Infantry axemen.
The Triarri move to the edge of the road looking for a place to assist.
Melee:
The Romans decide to start with the Hastati vs. the Skirmishers. The Romans just steamroll them backwards 2 MU, and reduce them 2 Courage. However, they are not wavering and are sticking. This could bog down the Romans enough.
Next, the Romans want to complete the Hastati/Axemen battle. The Pila take their toll, but the Axemen hold their own. Both sides lose 2 Courage with no pushback.
The final Melee is the big brawl between the Principes and the Etruscan Left flank! It is a fierce battle with the Romans rolling 8 dice vs. 9. However, the Etruscan strategy to hold onto Gaze for Re-rolls pays off as the Principes and the Roman Skirmishers are routed! However, the Militia Hoplites held on by the skin of their teeth!

End:
The Hastati fighting the axemen see the Principes flee, but pass their Wavering check.
The loss of the Principes also triggers collapse tests as that unit had the Roman general! All the Roman units left passed their Collapse tests.
Turn 6:
The Romans have 3 Commander's Gaze to the Etruscan 6. The Etruscans bid 1 to the Roman 0. Etruscans go first!
Move:
The Elite Hoplites move to help the Skirmishers, knowing they will not get there in time. One Militia Hoplite unit falls back to become a reserve, while the other breaks into open order and pivots into the flank of the Hastati/Axemen fight.
The Roman Triarri forms Phalanx and charges into the flank of the same fight.

The Etruscans want to resolve the Hastati/Axemen Fight. The two sides obliterate each other in an orgy of bloodshed and fighting.
The Hastati on the road kill off all the remaining Skirmishers and force them to flee. The Romans elect not to follow them up.

The last two Etruscan units, a Militia Hoplites and the Elite Hoplites both pass their Collapse tests.
The last Roman unit makes a Collapse test and fails. They withdraw to fight another day!
Conclusion:
The Etruscans win their premiere battle report!
This time, my concentration of troops on the Etrsucan right seemed to work! I got a big assist by the Principes when they decided to counter-charge. If they had stayed put, I think my charge would have fallen short! That would have left me out of Phalanx and very vulnerable. It was also serendipity that I drove off the Roman Commander. I thought they were with the Triarri. The Roman strategy was sound, but my abrupt shift and consolidation of my flanks gave me the staying power I needed to pull off the win!
You can pre-order the rules for Wars of the Republic from Osprey/Bloomsbury Publishing here.

Become a Patron and get access to all the cool stuff, a peak behind the curtain of Blood and Spectacles, and early-access to playtest games!
You can follow Blood and Spectacles Facebook page or Instagram for more fun!
Check out the latest publications and contact me at our Blood and Spectacles website
Or purchase all out games at the Blood and Spectacles Publishing Wargames Vault Page!
Interesting but... whre is the triple acie of the Romans?
ReplyDeleteThey usually deployed in three avies with hastati in the first rank, Principes in the second and triarii in the third, so to exchange ranks as the battle goes on.. (not to speak abouh velites who skirmished in front of the Hastati...) No way to reproduct this manouvre with this rules because no unit can move through another unit... Am I wrong?
Oh yeah, you can easily do the Triplex Acies in the rules. However, you actually have to deploy and maneuver correctly to do it. It is not as simple as a special rule on the unit called "Triplex Acies".
ReplyDeleteThe game has Velites, Hastati, Principes, and Triarri. It also has all the rules you need via supporting, pushback, deployment, etc. to easily pull off a Triplex Acies formation.
In fact, during the Demo battle at the Book Launch, newbie Wargamers managed to pull it off and defeat the Greeks, However the players knew next to nothing about wargaming or Roman military tactics prior. It was intuitive to them. You can also see the tactic being employed in other battle reports, some times more successfully than others.
Now, in THIS battle the Romans opted for a different approach that hinged on holding the center terrain piece but they could have easily attempted a Triplex Acies if they wanted to as well. They just chose not to.
It is interesting to note, that the much vaunted Triplex Acies is still a matter of mystery. We have a description of what it is, and what it does; but no one is really sure how it actually worked in practice. In its simplest form, it is basically three battle lines as opposed to 1. In its most complex form, it involved rotation Hastati troops with Principe troops during the battle. Therefore, implementing a Triplex Acies in a game requires the designer to make a decision about how the formation actually worked, and that starts with deciding how the designer interprets the nature of ancient battles in the first place. I could really go on and on, but I will stop for now. If you want to discuss the topic further, we can carry on here, on the message board, social media, or you can contact me via the website too! Discussing the nature of Ancient battles is super interesting, but possibly beyond the scope of this reply. :)