Showing posts with label reaper. Show all posts

Monday, December 15, 2025

On The Painting Desk: The End of the Year Sprint


The end of the year is upon us!  Soon, the year that was once considered mythical; 2025 will be over.  Since mid-year I have not done a ton of painting but I do have some projects I want to get wrapped up by the end of 2025 to clear space going into 2026.  This post basically covers painting that I would have done from the end of October until today.  

Most of what I have left is Heroquest stuff.  I have picked up all the expansions that were available except Perilous Dark and the Rogue Heir.  I can't find the Rogue Heir anywhere at a reasonable price, and I was not impressed with Perilous Dark enough for one dragon (although a very cool dragon) miniature.  There is rumor that the Wizards of Morcar will also be out soon.  Therefore, I am focusing on catching up all my Elves, polishing off my last Heroes, lot's of Henchmen, and furniture for Spirit Queen's Torment, Rise of the Dread Moon, Jungles of Delthrak, Prophecy of Telor, and The Frozen Horror.  When I put it like that..... that is a lot of miniatures!  

Progress

I was slow to get started, but in late October I went to one of the True Grit Gaming Guilds painting sessions.  That got me started on the final sprint.  There I undercoated all the elf models I had from the Mage in the Mirror and Rise of the Dread Moon boxes.  I also got the Bard and Knight heroes undercoated and ready to paint.  In addition, I got Elf Felsh on all the fleshy-bitz on the Elves.  

I think the big story was that I finally broke the seal on my painting and finished everyone's favorite hero, the orc bard.  


As usual, I am using a mix of Armypainter and Armypainter Speedpaints.   The undercoat was a Grey Seer spray, followed by a cheap acrylic Pavement Grey wash, then drybrushed with cheap acrylic white.  The finish was a basic satin protective seal.  Base is Runic Grey with a straight black base rim. Nothing fancy.    

That broke the seal from the summer and now it was officially the end-of-the-year painting season again!  Next up, I wanted to complete the Knight.  Typically, for my hero miniatures, I like to paint them individually.  Monsters, Henchmen, and Furniture I tend to batch paint.  

November Painting

Starting the month I knew I wanted to finish off my HeroQuest heroes.  I would have every currently non-Kickstarter, available hero except for the Rogue Heir.  I have no intention of paying the ridiculous prices for that.  Secondly, the Wizards of Morcar are not out yet either which has a female Wizard sculpt that I am looking forward to.

First up was the Knight from Rise of the Dread Moon.  I was looking forward to painting this one up as I wanted to use him with my new adventuring team, Hope Reborn.  However, I did not get him purchased and painted up in time.  However, now he is ready in case one of the current Heroes falls.  


Not much special to say about this good sir.  I used Armypainter speedpaints and my usual methods.  One trick is that I used Runic Grey for the scale/chain armor instead of a metallic speedpaint.  I have found that this and Graveyard Grey can give good non-metallic metal looks.  The High Lord Blue cloak also really stands-out on this model in person.  

That led me onto my Halfling Warlock.  This character has an alternate "Demonic Form" that is an alternate Gargoyle sculpt.  The Halfling is one of the rare Heroes that has a default ranged attack with her wand.  Like the Orc Bard and Druid, she feels like more of a support character to me.  It was also interesting that they decided to make Halflings cannon in Heroquest!  I kind of see her as a elf Noble child that decided to take a shortcut to power...... 


In retrospect, I should have painted the "Warlock Hand" to match the Demon Form, but..... I did not paint them at the same time.  I had intended to paint the Demon Form that purple color, but when I sat down to paint it Swamp Thing came out instead.  Not 100% sure how that happened!  Then I was too lazy to go back and re-paint the Warlock hand.  Done is done.....

Next up was the female Barbarian alternate sculpt.  This one comes equipped with a shield on the miniature.  Not 100% sure how I feel about that.  However, that did not stop me from diving in and getting her painted.  This sculpt painted up really nicely though.  I particularly like the "ringlets" on the front of her armor.  

Of course, she had to be a blonde.  I am pretty sure that is the female barbarian archetype at this point?  Of note, the Speedpaints only have "Crusader Skin" as flesh tones.  I actually never use it for flesh, and just use it as an alternate color for cloth and leather type materials.  For flesh tones, I have standard ArmyPainter paints that I use.  I normally use Barbarian Flesh, Elf Flesh, and Tanned Flesh.  I also have a flesh wash from them, but I rarely use it.  You will never guess which one I used for the Flesh Tone on this little lady.  

From there, I went to do my pair of Dwarf Explorers from Jungles Of Delthrak.  I am way behind on reviews, because I think the last one I wrote was for Spirit Queen's Torment.  Obviously, I have these heroes so I have a few other supplements.  I got to get writing some reviews!  Things to look forward to in 2026 I guess! 

So, the Dwarf models I make an exception on the skin tones.  For these guys I use the Sand Golem color from the Speedpaints set.  I also use this same color for Ogre skin tones.  I like the look of it I guess.  These folks are dungeon delvers and ranger-types so I tried to keep their color scheme on the natural side.  I really struggled with what colors to use that would not make them too dark looking.  I finally settled on Malignant Green, which is the same color I use for Goblin skin.  


The most interesting thing about these guys is their backpacks.  They have a lot of detail and painting the backpack is like painting another dwarf model.  I had flashbacks to painting that Ork Kommando Kill Team!  Another trick, is I like to use the color Pallid Bone for a variety of uses including a dirty white or leathery strap look.  I find it is a very versatile color.  I also use it for Elf metals, as it makes them look distinctive from everyone else. 

I also rarely use Grim Black as a color.  Instead, I typically use Graveyard Grey if I want dark hair.  However, on these Dwarfs (Dwarves?) I gave it a go.  I think it is darker than I normally want it to be, but done is done.  No going back!  

That led to my last pair of Heroes, the Berserker.  These guys also had a rough and ready barbarian look to them.  They would fit in nicely with the Barbarians.  Those axes were comically huge too!  


So, I intended to paint the Female Berserker with the same Runic Grey armor as the Male one but.... things happened.  I accidentally used Dark Wood instead!  Oops.  It still looks like a heavy leather jerkin, but not what I had intended at all.  You can see Pallid Bone on the straps on the Male Berserkers legs, the difference between Graveyard Grey (Male) and Runic Grey (Female) as a metal, and that I used a metallic speedpaint of Golden Armor on the boss of each shield on their backs.  These two were relatively straight forward to paint.  

That left all my Heroquest Heroes done and ready to game with!  Here they are all together, plus a couple of statues from the Rise of the Dread Moon.  


With these done, it was time to turn to my next painting challenge to finish before the end of the year.  This one was going to be a bit different from the other things I painted this year.  However, it was not going to be the first time I have tackled this kit...... The Reaper Nativity Scene!  In the past, I painted them as gifts for my in-laws, my own parents, and for my wife.  This time, I am painting one up for my Skumgrod and their place as a gift.  Let's see how I can make this one unique!

December Painting

This month, I was focused on completing that Nativity scene!  This one had some nasty mold lines on the bases.  They took clippers and files to sort out.  Yuck!  This is an old mold, but sadly not the first time I have run across this issue on this kit.  

Once these were cleared, I undercoated them in my usual method.  What, you don't know what that is?  I base coated them with Grey Seer primer, washed them with watered down cheap acrylic dark grey paint, and then dry-brushed white with cheap acrylics again.  They were now ready for painting.  


I always start this project by painting the Manger and the Star.  I did a bit of research and went out of my comfort zone on this one. I actually started with a pink base coat on the star. I even mixed some paints in order to get the right color shifts.  I used my Armypainter regular paints for this one, no Speedpaints on the star.  I also tried to do some OSL, which is not something I have done on this in the past.  I am happy with how it turned out and am glad I stretched myself. 


From there, it was time to move onto the figures.  I typically do the animals next, so sheep and donkey.  I was mostly using the Speed Paints on this one.  Runic Grey donkey with some white highlights.  Holy white on the sheep with Grim Black.  I then dry brushed some white on the wool and away we go.  

That led to Joseph, Mary, and the Shephard boy.  I did not do too much special on these guys as I mostly stuck with my Speedpaints for the first coats.  I made a strange choice to give the kid a Fiery Orange over robe.  Not sure exactly what I was thinking on that one.  From there, I decided to reverse what I usually do with Mary.  I gave her a Blue cloak instead of white and made her dress white.  The Blue is Highland Blue, and I wish I would have used Magic Blue.  Magic Blue is a bit lighter.  Finally, Joseph is a weird cat in that he is a central part of the Nativity but no one really wants him to stand-out.  Therefore, I used mostly natural colors on him so he can be present but not draw attention to himself.  

That left my Nativity looking like this, and I had 1 weekend to finish it off....


From there, I moved onto the baby Jesus himself.  I did the usual Hardened Leather crib, with Zealot Yellow straw.  The big question with Baby Jesus is how you want to paint his blanket?  In the past I have tried to make it stand out with Prismatic Bolt or match Mary's dress with blue.  That was to align them and make it look like Mary had used her own dress to swaddle him.  This year, I went simple, I made his blanket Holy White.  Simple, yet elegant. 

That left me the three Kings or Wisemen, depending on who you want to believe.  It is interesting to me that some versions of the Nativity in the Bible mention these guys, others the shepherds, and others the Manger.  The stories we are presented do not line up that well, but modern Christians have made a sort of amalgam of all the stories into the traditional Nativity scene.  It is amazing what we think about the Nativity scene, and how much actually does not line up with what we are told in the Gospels.  Anyway, just some random thoughts as I paint.  I am by no means a Theologian, so what do I know? 

Anyway, the three Wise Men are the most difficult to paint of the scene.  I have seen some versions where the painter just leaves them out in order to focus on Joseph, Mary, the Manger, Christ, and the animals.  This makes a nice, compact set-piece.  However, I am not going to do that.  They are the most difficult to paint, but also my favorite models from the set!  I decided to make each one predominantly a primary color of Red, Blue, or Green this time around.  In the past I have made them mostly purple, or painted them in Christmas colors.  This is yet a different take on these dudes for me.  


For the Green one I went with Malignant Green for his robes, Orc Skin for his cloak, and Camo Cloak for his head wrap.  I made some details in Zealot Yellow and Absolution Green.  The Blue guy used Magic Blue, Highland Blue, and Storm Cloud Blue with some Zealot Yellow and Plasmatic Bolt details.  Finally, on the Red one, I actually used Fiery Orange (?) and Zealot Yellow on the inner robes and then Blood Red and Slaughter Red on the upper layers.  I used Zealot Yellow on a few details as well.  They all got Gravestone Grey beards though.  

After that was done, I washed all the figures with Light Tone wash.  I then waited for it to dry, went back and highlighted the colors back up where it was needed with Armypainter Paints.  Then, I gave them a protective coating to call it a day!  In the end, they turned out like this.....


Conclusion
Wow, what a sprint to the close of the year.  I feel like it went down to the wire this year.  

However, I did not clear my backlog out completely.  I still have Heroquest modesl from several expansions to paint.  That includes all my antagonist and mercenary elves, some furniture and more.  I have plenty to keep me busy into next year on the painting front.  When I am done, I will probably have enough Heroquest models to make a mass battle game!           
            
Until next time.  The End of 2025 is upon us!  Seasons Greetings to you all! 


Become a Patron and get access to all the cool stuff, a peak behind the curtain of Blood and Spectacles, and early-access to playtest games!  


You can follow Blood and Spectacles Facebook page or Instagram for more fun! 

Check out the latest publications and contact me at our Blood and Spectacles website

Or purchase all out games at the Blood and Spectacles Publishing Wargames Vault Page!       


Sunday, December 22, 2024

On the Painting Desk: Something a Bit Different


Welcome back all for your weekly dose of .... whatever it is we do here.  This week I am painting something a bit different.  We all know that Reaper has a wide, wide variety of miniatures in their catalogue.  I went wide and deep into the catalogue and picked up the Reaper Nativity scene.  I have actually painted this set two times previously, so this is my third go at it.  My previous two were gifts for my parents and in-laws, I figured it was time to paint one for my own household.  It is the right time of year afterall, and this will probably be the last things I paint for the year.  

The first effort


The second effort

These previous efforts were all painted with my standard base and wash approach using Armypainter paints.  This time, I plan on using a combination of traditional methods and Speedpaints.  I am interested to see how this turns out compared to my more traditional approach.  Therefore, the first step was to go ahead and undercoat it using my standard methods, Grey Seer base coat, dark grey wash, and white drybrushing.  After this, I was ready to get started.  


Oh yeah, I also painted some Giant rats real quick for various Fantasy games as a palette cleanser and warm-up.  Very simple and quick painting with a simple coat of Speedpaints.  Nothing much to say about these little guys.      


With these Nativity scenes, I do not tend to paint them in a single batch.  I tend to paint a couple of the miniatures at a time, work on them to a certain point, and then switch over.  So, I got started on the flesh colors to start with, and the Manger.  I really wanted to make the star on the Nativity scene really pop on this one.  Here is where I ended up after my first quick sit down and painting session. 


For the star, I painted the base with Zealot Yellow Speedpaints.  Then, I used my basic Armypainter paints to add a highlight of Daemonic Yellow, and then painting it up another layer with plain white.  The white really helps make it pop! The rest is simple Hardend Leather, Tunic Grey on the nails, and Zealot Yellow for straw.  

The skin tones were Crusader Flesh for the shepherd boy, Jesus, Joseph and Mary, Sand Golem for two wise men, and Dark Oak for the last wise man.  Now, it was time to dig into the models only a couple at a time.   


 Some progress as I have painted up Baby Jesus, the sheep, and the donkey.  Jesus was Crusader Flesh, Plasmatic Bolt for the blanket, Hardened Leather for the crib (same as the Manger), and Zealot Yellow for the straw.  Zealot Yellow will also be the primary basing color for all the models, to look like they are standing in straw.  The Sheep was Grim Black and Holy White Speedpaints, with a drybrush of Matte White Armypainter.  The Donkey is some Alchemy purple in the nostrils and ears, some Holy white on the nose, Grim Black mane, hooves, and tail, and Runic Grey skin.  Starting to come together!     

So, onto Mary and Joseph.  Typically, I paint Mary in blue because many times that is how I have seen the Virgin Mary depicted in artwork.  However, this time I was thinking about the idea that blue is not a common color in the Ancient world. For example, the works of Homer never really mention blue, and there is some linguistic works that indicate that blue is the last color to get a developed word in many languages.  I also decided that I want to highlight Christmas colors in my Nativity scene and Blue is not one of them.  That limits my palette somewhat to more Green, Red, and White with some accent colors/natural colors to go with it.  

Mary is relatively easy to paint.  The hardest part is the locks of hair around her face in her hood.  I used Grim Black for her and Joseph's hair. I traditionally give Joseph some grey or white in the beard, but wanted a younger looking Joseph for this go around. Mary's dress is Orc Skin while her belt and cloak is Holy White with a drybrush of standard Armypainter Pure White.  

Joseph was a bit more challenging.  My Speedpaint's have a more limited palette of natural colors than my traditional set of paints.  You can see in my other works, that Joseph is mostly natural tones.  Here I went with the Camo Cloak tunic, Hardened Leather Belt, and Dark Wood cloak.  The head covering is Holy White and the stick is Sand Golem.  The base is Zealot Yellow for straw, like all of the bases.  

That left the three Wisemen or Kings left to paint.  Honestly, these guys are the most challenging of the Nativity to paint.  I wanted Purple to symbolize their higher status, but also to keep with the Christmas color palette.  


Look at that, all the miniatures are base coated.  The three wise men I decided to give their base clothing in purple.  That was the color of wealth and power in ancient days.  From there, I wanted to use red, green, and white as the main alternate colors in order to fit the Christmas theme.  I have always enjoyed painting the Three Wisemen.  The Speedpaint colors were slaughter red, orc skin, holy white, and regular white from the regular range as well.  Any jewelry I did with Zealot Yellow, which was also the base.  The hard parts are done, now I want to do some washes, some highlights, and then seal them up.  

Here is the final product after washes and highlighting back up......


That wraps up my painting for the year.  I think next year, I will have to paint one more Nativity scene for my Scumgrod.  However, that is a project for next year!  Next week I will do my end of year wrap-up, and I wonder how many miniatures I got painted for the year?  It feels like alot! 


Until next time! 


Become a Patron and get access to all the cool stuff, a peak behind the curtain of Blood and Spectacles, and early-access to playtest games!  


You can follow Blood and Spectacles Facebook page or Instagram for more fun! 

Check out the latest publications and contact me at our Blood and Spectacles website

Or purchase all out games at the Blood and Spectacles Publishing Wargames Vault Page!              


Monday, November 21, 2022

On The Painting Desk- Ferals for Under the Martian Yoke


I have been working on various projects to help support the releases of my own games on the Wargame Vault.  Today, I am focusing on creating adversaries for my game Under the Martian Yoke.  It is a survival horror game set after the Martian Invasion of the Orson Wells' broadcast.  The game is designed to be a solo/co-op/versus experience as the survivor's of the Martian attack struggle to escape Martian territory and to freedom.  


The game has a number of adversaries that survivor's may encounter.  The biggest and most dangerous are the Martian Tripods of various types.  Thankfully, I have a variety of Tripod models from the now defunct All Quiet on the Martian Front.  However, there are a variety of other tripod models available on the market as well.  

In addition to the the Martian Tripods, there are smaller foes as well.  That includes various drones, animated human corpses, modified animals, and even wild, feral dogs to face off against.  I have a few drones from Alien Dungeon and plenty of Irish Wolfhounds thanks to my Dark Age Irish army from Wargames Atlantic.   

Last time, you may recall that I was working on building up my adversaries, and created various cadaver troops to oppose the human survivors.  These foes are re-animated human corpses operating on Martian technology.  These undead troopers roam the Martian control zones to track down and kill lone or small groups of humans.  Worse, they can flush out humans for the Martians to capture for their own nefarious purposes later.  

In addition to reanimated humans, the Martians also reanimated various animals using their advanced, Martian technology.  It is unclear if the Martians actually know the difference between humans and animals, and if they even care.  These re-animated animals are known as Ferals.  They will viscously attack any humans they come across! 

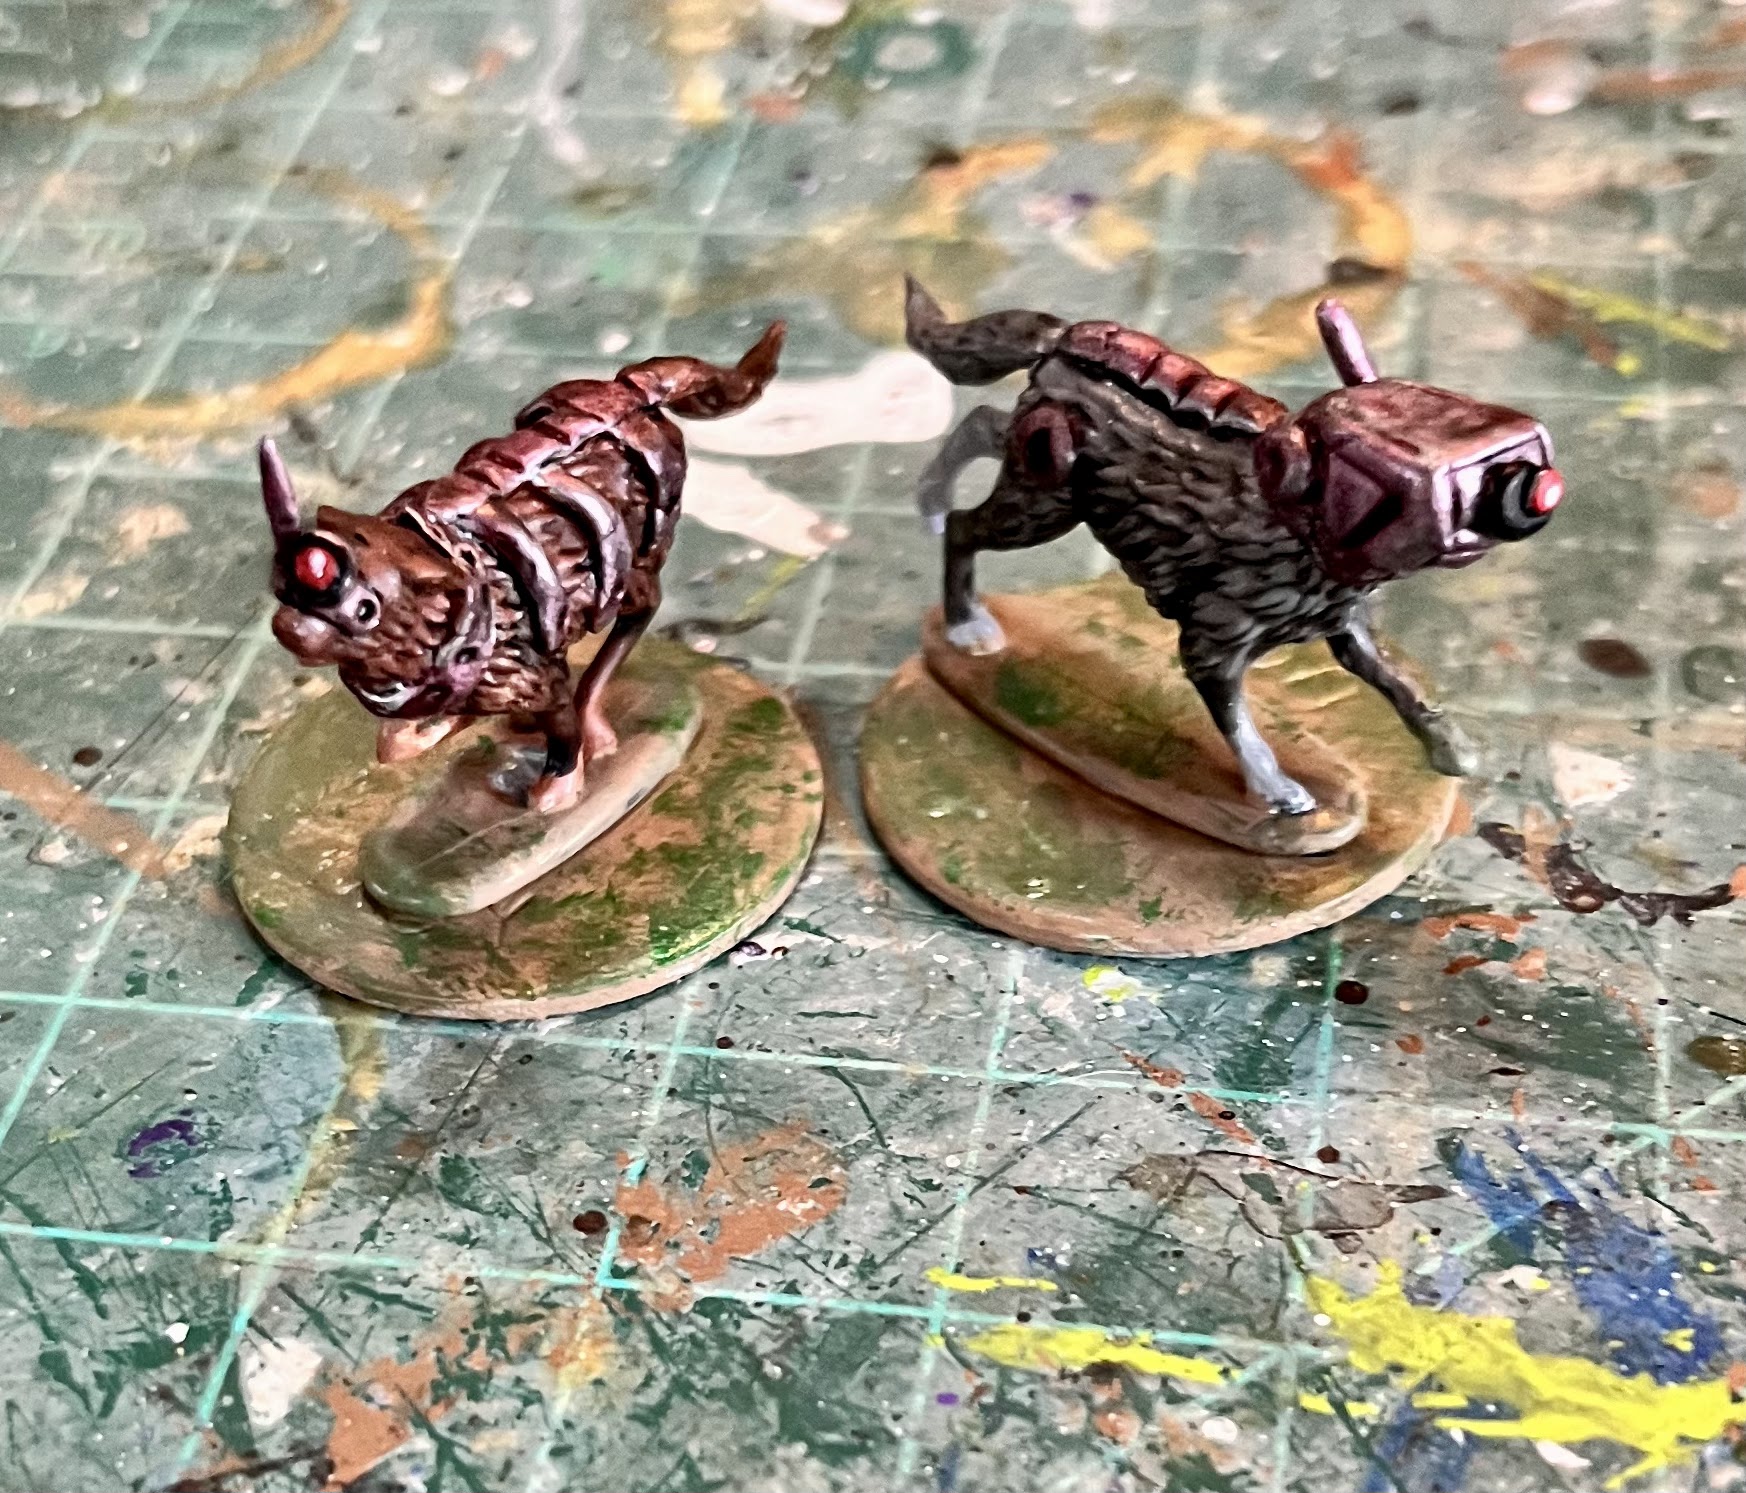
You may recall that I made two Ferals out of Irish Wolfhounds from the Wargames Atlantic Dark Age Irish kit.  Plus, I also use these as wild dogs.  With some green stuff, and paint they ended up looking like this....


 My initial plan to expand my Feral collection was to get a box of plastic barnyard animals and convert them in a similar manner.  However, a fellow hobbyist was taken by the idea of barnyard astro-zombies and decided to design some for 3D printing!  You can find them on CookAndrewB's Thingiverse page here.  There is a ton of cool stuff, so check it out.  

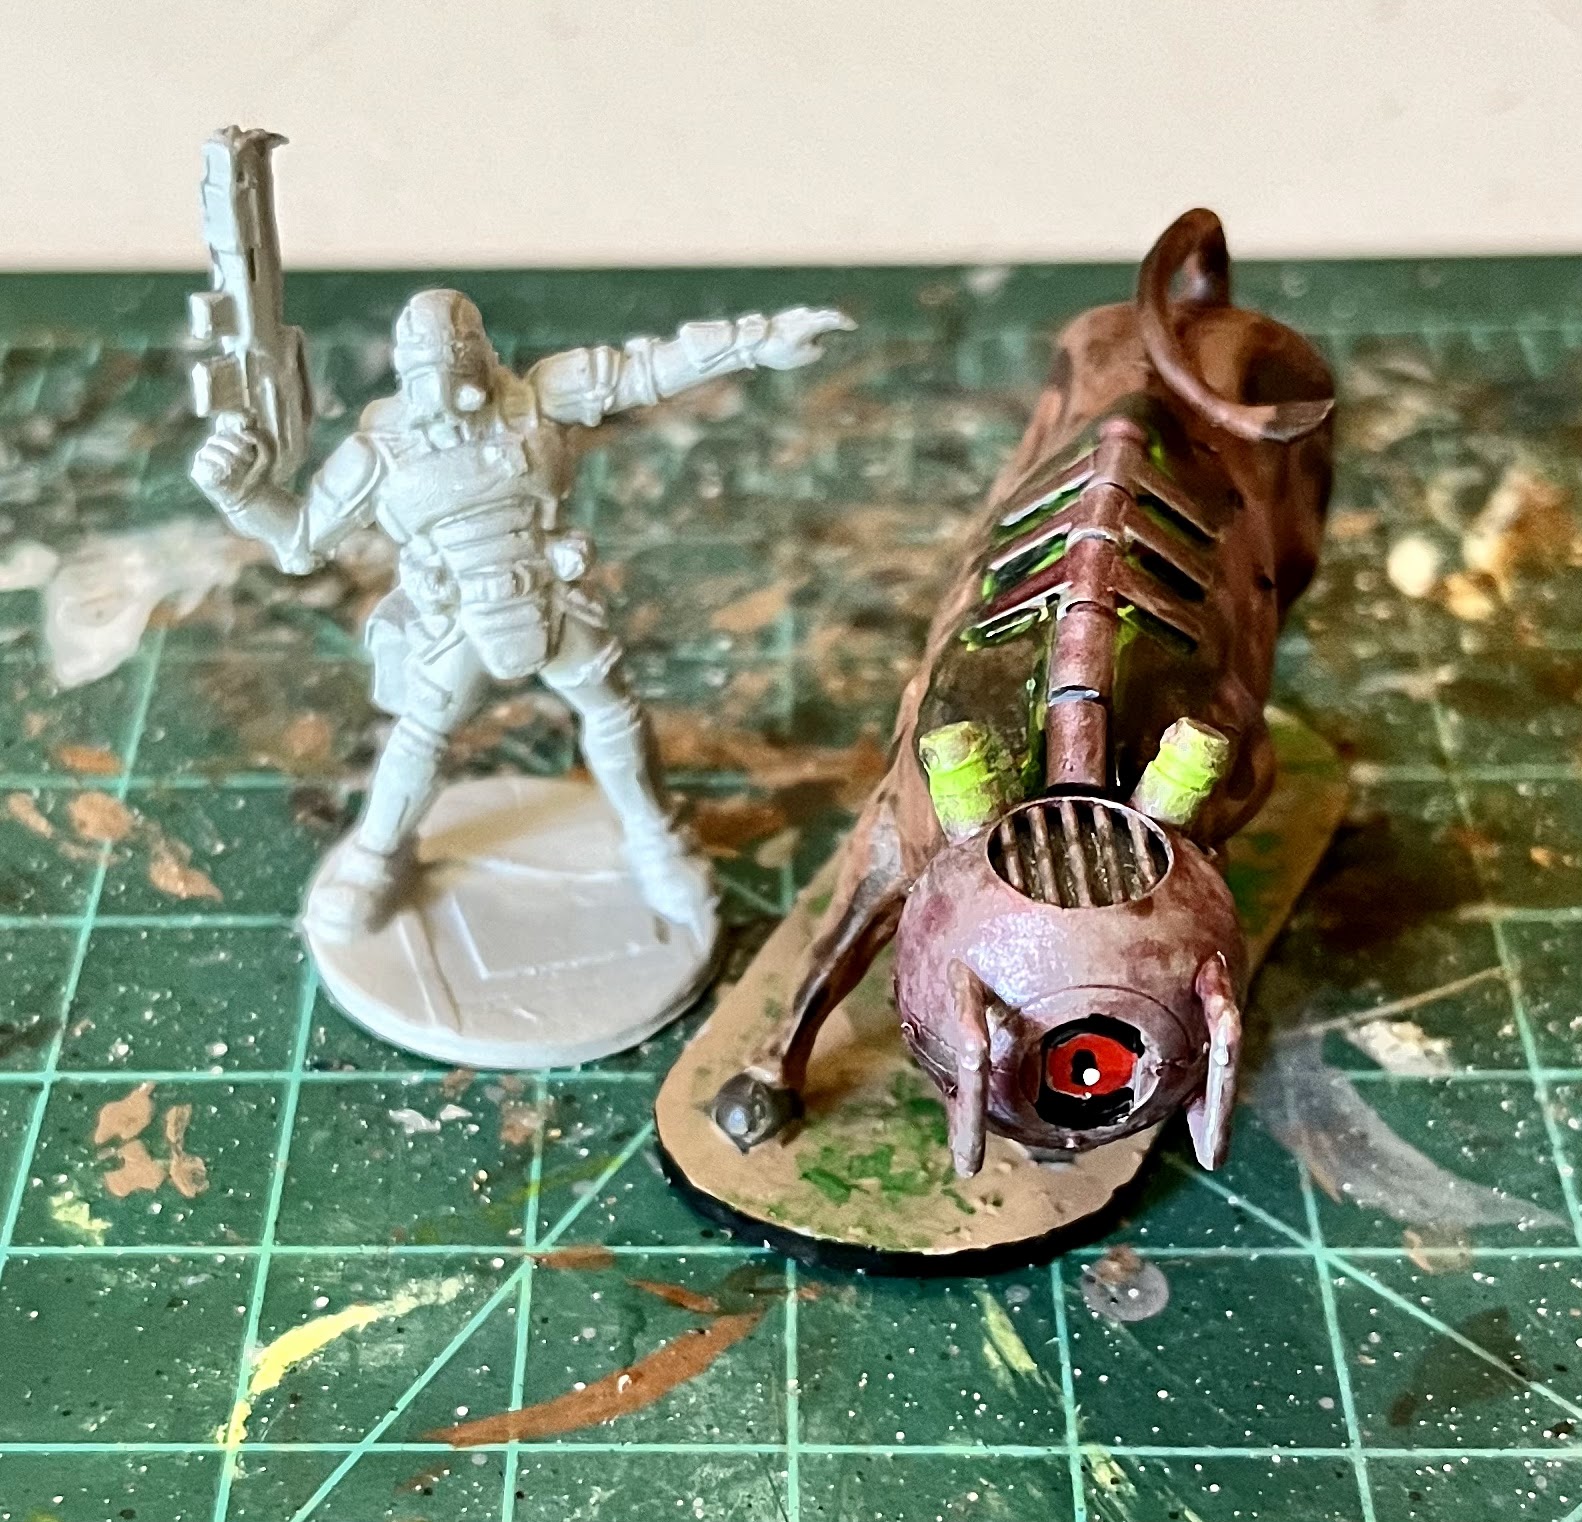
A Feral bull that was 3D printed

So armed, and after a bit of trial and error, I was able to print 1 Cow, 2 Goats, and 4 chickens.  Suffice to say, I am not very good at 3D printing yet so this project was a huge learning curve for me.  However, at the end of it, I feel like I have a good idea of printing projects going forward.  I look forward to continuing to press my boundaries here.  

From there, I set about painting up the Ferals.  This time, I was able to base coat them with grey seer primer.  Then, I painted them various shades of brown.  The metal was plate mail silver with a red ink wash.  Then, the traditional Martian eye of red, white, and black.  Then, I gave it all a nice light tone wash to finish it up.  Here is what they ended up looking like.  


The bases I just painted brown with a few dabs of green here and there.  Nothing fancy.  Then, a black ring to help set them off. 

I took a lot fewer pictures of the Goats and Chickens, but here is an action shot of the "Barnyard of Martian Terrors"!  With these new additions, my Cadaver troops, the Drones, and the Alien Dungeon Tripods I have enough foes to keep going with some great games and a plethora of opponents.   


You can find the rules for Under the Martian Yoke on the Blood and Spectacles Wargame Vault page.  

Finally, I also spent some time painting up a team of "Knights" to help me keep play testing Darkest Knights.  These are all Reaper Bones (White) models that I then painted with various Armypainter paints.  Two are from the Savage Worlds lines, and two are from the Chronopia line, I think.   

A friend of mine, The Painted Dwarf; showed me that GW's grey seer primer does a great job prepping Reaper Bones White models.  I had trouble getting good undercoats on them in the past, but the GW primer did the trick. This made them MUCH easier to paint. 


 I also got a bunch of portals and enemies from the Hellboy board game to use as Shadowpoints and potential enemies.  I still need to get those painted up, but I think you can expect to see some more playtesting on that system soon too.  

Onward! 


Become a Patron and get access to all the cool stuff, a peak behind the curtain of Blood and Spectacles, and early-access to playtest games!  


You can follow Blood and Spectacles Facebook page or Instagram for more fun! 

Check out the latest publications and contact me at our Blood and Spectacles website

Or purchase all out games at the Blood and Spectacles Publishing Wargames Vault Page!       


Monday, August 30, 2021

Wargame Design: Creating Character in Wargames


In addition to wargaming, I also play Role-Playing Games (RPGs) and board games.  One of the most interesting aspects of RPGs is how individual characters can interact with the game world to achieve their objectives.  This at a high-level is not much different from war games, and in fact RPGs are a "modern" off shoot of wargaming.  The roots of RPG is in wargaming. 

Of course, in an RPG two mechanically identical characters can end up being completely different characters.  This differentiation is done via the "role" part of Role-Playing Games.  There are a variety of tricks and characterizations decent role-players can bring to a character to make each one feel incredibly different.  However, most RPGs also use mechanics to help shape different roles or archetypes that players can fulfill, such as the bard, barbarian, thief, and wizard archetypes.  

In wargaming, there is very limited "Role-Playing" elements.  However, as designers, you still want to capture the idea that individual models or units are "unique".  Typically, gamers do not want to play a number of faceless, joyless, boring, goons all the time.  No instead they want to play the 14th Uhlans, the Iron Brigade, Astro-dog, the Joy Hill Gang, etc.  Thankfully, as designers there are a few ways to add this level of "character" to your games.  

Here are a few things you need to consider when adding in "character" elements to a wargame:

  1. Genre
  2. Scope
  3. Focus

Genre

Some style of games demand more character elements than others.  In certain historical time periods, such as Horse and Musket; the nature or personality of commanders often comes into play mechanically.  I feel this mainly derives from how so many books focusing on the period are using the "Great Man of History" lens to tell the story (which is a side tangent).  Therefore, a dithering commander may slow a pursuit, or a dashing one may allow more aggressive movement.  Typically, it is the character of the commanding officer that matters most to gameplay.  These character traits are often built into the Command and Control mechanics.  You tend to see this less in Ancients, Medieval, and Modern games for a variety of reasons. Certain genres have certain tropes that players like to have followed, and as a designer it never hurts to embrace some of the tropes.  They are tropes for a reason. 

Scope

The Scope of the game is a bigger impact.  A smaller, model vs model skirmish can put a lot more emphasis on individuals and how they are different than others around them.  The two main methods to do this are Stat line changes that lend themselves to various ways to play, or special rules.  There are whole games that only use named characters such as Arena Rex, Bot Wars, Mercs, and others.  Personally, I am not a fan as I prefer to make my own characters thanks.  

As the scope increases, these individual emphasis turns into unit vs unit features.  For example, a Scot's Greys Heavy cavalry unit may fight differently than a Old Guard Cuirassier unit.  However, this is typically done via the same method as stat line adjustments or special rules.  However, the "character" is not the individual soldiers but the doctrine and reputation of the unit itself.  Unit vs unit games it would make no sense to make individual model differentiation. 

Focus

The last element to consider is the Focus of your game.  What is your game trying to accomplish and highlight?  Your Design Goals will be the key component to review and think about when determining this level of the game.  Some games will have a higher level of "RPG" type character interaction built into the mechanics to achieve their Design Goals.  Any game that includes an "Action" outside of shooting/fighting allows for more character to be used by the player to resolve a situation.  For example, instead of shooting the player may opt to "talk it out", hide from danger, set a trap, etc.  

Not all games need this level of detail depending on what the game wants to focus on.  For example, the infamous Battle of North Africa board game dealt exclusively with logistics, and included the evaporation rate of fuel in different types of containers.  The focus has little to do with units or models and instead is focusing on Logistics.  In this situation, character does not matter as the Focus is not right.  

Another example is an Age of Sail game.  You could add Character two ways.  The ship itself could have defined characteristics unique to each named ship AND you could have named captains with unique traits as captain.  In this example, the focus is right for Character in a wargame. 


How to Create "Character" in a Wargame

Now that we have talked about when it is appropriate to have "Characters" in your wargame, let's talk about how you can go about adding them.  First, let's define what I mean by "character".  In this case, a character is a model/unit who's role or abilities are influenced by a defining characteristic.  

For example, if the soldier is supposed to be "bookish and shy" how does this defining characteristic impact the battlefield?  How do you translate the defining characteristic into abilities or role?  

I have identified a few methods to add "character" to wargames:

  1. Stats
  2. Special Rules/Chrome 
  3. Special Access
  4. RPG Lite
  5. Campaigns
Stats

As the name implies, the model or units stats are some how impacted by the defining characteristic of a unit.  For example, the Iron Brigade was a highly motivated unit with a strong battlefield record.  Therefore, on the table top the unit may have improved Morale or Leadership stats to reflect their heightened reputation.  

Special Rules/Chrome

In this case, the Character's defining characteristic is represented by a special rule that other model's do not have access too.  For example, in old Necromunda the leader of a gang could rally nearby units to  re-roll pin tests.  

Special Access

In this case, choosing the unit allows access to different units or structures in your force construction or mission objectives.  Essentially, the character allows you to have special access to something that is normally not allowed or available in the rules. 

RPG Lite

The rules allow access to various actions or activities beyond shooting/fighting.  This allows a player to show a models character on the field by doing something other that just shooting and fighting.  Perhaps talk to a foe, read a book to gain access to knowledge, create something, etc.  For example, in Frostgrave a Wizard can cast a spell instead of shooting/fighting. 

Campaigns  

By playing a linked series of games, a model/unit can gain "character" by gaining buffs/de-buffs via action or results of action.  This makes the units have an individual character based on their history with the game/player.  For example, a Survivor in Last Days can earn a skill that improves their ability to perform a certain action, or take an injury that makes them less likely to perform actions.  They have earned a defining characteristic via game play. 


Conclusion

Role-Playing games allow a lot of scope and depth for character as they are the main focus of those types of games.  They often have various mechanical hooks to differentiate between archetypes, but two models with the exact same stats can play totally differently based on the 'Role" aspect of Role-Playing games.  RPGs are an off-shoot of wargames therefore wargames also have a capacity for players to build characters into their games too. However, they will function and integrate into the game differently than in an RPG based game. 

There are some types and styles of games where the integration of "character" is better suited.  At the minimum all wargames can add a story telling component to them, with little of no impact on game play.  However, some genres, scope and focus are better suited for adding "characters" whose abilities and role are influenced by a defining character trait.  A wargame does not need "characters" to be a good wargame.  

Like all game design, characters are a tool that can be used to help build out and meet the design goals of the designer.  It is up to the designer to choose the best tools for the job, and Characters are just another tool.  Use them wisely! 


You can follow Blood and Spectacles Facebook page for more fun: https://m.facebook.com/pg/BloodandSpectacles/posts/?ref=bookmarks&mt_nav=0

Or our website:

Or our Messageboard:

Or our Wargames Vault Page: