Metallus was in good spirits. He left the villa, crossed the marketplace and ventured to investigate the small arena his troupe had been booked to perform at. It was a mix of stone and wood, and relatively new construction. The facilities seemed adequate, and he looked forward to the Games. They were to celebrate the incorporation of North Africa into Roman rule. Games were going to be held across the city on the same day.
Metallus’ spirits were high. He met with the Editor to begin to draft the program for the day’s events, and suddenly Metallus’ mood dropped. By Jupiter, what was Quintillius doing here? His spirits dropped lower when he realized that his opponents for the day would be House Quintillius yet again. He thought he had left them in Leptis Minor! However, the need for Gladiators was so great, that Ludus from across North Africa were being drawn in. Why did it have to be Quintillius again?
With his spirits dampered he returned to the Villa and worked his Gladiators hard until the day of the big event. This time, he wanted the laurels of victory.
Welcome back to another exciting spectacle of Gladiators using The Games: Blood and Spectacle rules. We will be using the standard rules for determining Events and Gladiator usage. I look forward to seeing what the day has in store for our champions of the Arena!
Historical Re-enactment
We rolled up our first event and got a 6. Spectacle! Maybe I got those chariots painted up just in time! We rolled again and got…. 6! That means a Historical Re-enactment. Oh no, those use 1d6+2 Gladiators per side and go until everyone is OOA. This could be a blood bath to start The Games! I hope the crowd isn’t blood-thirsty. We roll and get the Mood of the Crowd is Normal and the Weather is normal. That could have been real ugly!
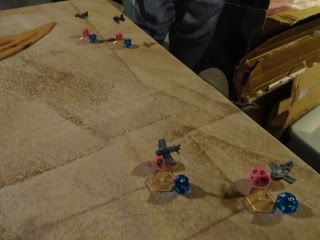
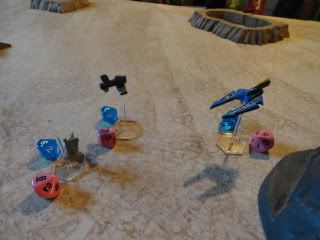
This battle is intended to fancifully represent the troops of the Numidian king Massinissa fighting with the Romans at Zama. This is to represent he battle by placing a light gladiator on the wings, 2 mediums inside, and a single Heavy in the center. This represents the battle lines and deployment at Zama. House Quintillius is the Romans.
House of Leptis Minor:
Alexander the Eldar
Regulus the Dimachaerus
Minoris the Murmillo
Ordinarri the Secutor
Plano the Retarius
House Quintillius
Priapus- Barbarian Retarius
Lucius- Provacteur
Juggartha- Murmillo
Haram the Barber- Arbelas
Arminius- Velite
This will leave both Houses very low on available models! Plus, there is a big risk for a lot of dead Gladiators at the end of this Event!
Turn 2
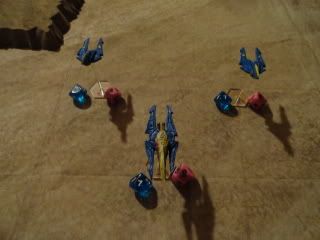
As the opening moves unfold and the Gladiators approach. Just like Zama, the fight starts with a missile barrage as Plano and Alexander throw at the Men of Quitillius. I thought it was the Romans who closed with a Pillum barrage? Alexander heaves his spear and manages to injure the approaching Haram the Barber, reducing him to Pain 1.
Turn 4
Minoris charges Haram the Barber, but fails to cause any injuries. Juggartha charges using Berzerk Charge. His ferocious attack draws blood on Minoris! Ordinarri counter-charges Juggartha. He parries away the Nubian’s crazed swings and manages to draw Juggartha’s blood!
From the edge off the battle, Priapus throws his net and manages to entangle Minoris!

Turn 5
Lucius charges into Alexander, but the wily old gladiator pushes him back with an unexpected chest bump across his shield followed by a dagger to the forearm!
Regulus charges Priapus and knocks him down and reduces him to 0 Pain. Ouch!

Plano rushes Haram to relieve the pressure on Minoris. His trident swing goes wide, but he manages to get his arm guard up in time to counter-Haram’s Arbela that pings loudly off Plano’s shoulder guard.
Juggartha and Haram team-up on the entangled Minoris, who gamely tried to fight them off. Minoris is reduced to Pain 0. The crowd is roaring in approval as they begin to sense blood! Ordinarri presses his attacks the distracted Juggartha and injures the fearsome Gladiator yet again! Juggartha is at Pain 0!
Minoris rips the net off of him and tosses it aside. Priapus gets up.

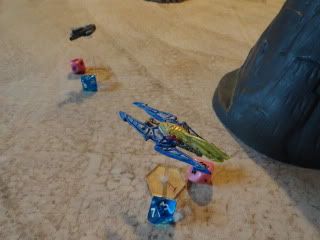
The pennies represent scattered weapons such as spears, tridents, and nets.
Turn 6
Juggartha manages to nimbly spring away from Minoris and Ordinarri! In return, Lucius turns and charges into the side of the Secutor. However, the Gladiator from Leptis Minor meets him and manages to use his flashing sword work to injure Lucius and reduce him to Pain 0!
Alexander the ledar swats away a Javelin from Arminius, then calmly lasso’s and entangles Priapus!
Haram fights off Plano, and attacks Minoris, who bashes him away with his shield and reduces him to Pain 0!
Ordinarri turns and clashes with Lucius, who takes a shot to his armored breastplate. Minoris lands a punishing blow on Haram, and the man is wounded and knocked down. The crowd roars in approval!
Entangled, Priapus tries feebly strike at Regulus, but misses. He leaves himself open and the medium Gladiator slashes and wounds him. However, he can not follow-up and seal the deal.

In the Recovery Phase, haram and Priapus both raise the two-fingers of the Missio. The crowd approves of their performance, and they are spared! Things look bad for Quintillius’ men!
Turn 7
Eager after defeating Priapus, Regulus charges the bleeding Juggartha. The Murmillo proves why he is so feared as he easily swats away the Medium gladiator with his shield and downs him into the sands of the Arena. Juggartha ruthlessly turns and puts Regulus Out-of-the-Fight, caught in the moment, the crowd bays for blood as Regulus is dispatched! Ouch!
Alexander is appalled at the death of his fellow Gladiator, and lassos Juggartha easily.
Lucius and Ordinarri clash, but a timely parry keeps Ordinarri away from getting hit.
Minoris charges the heavily bleeding Juggartha and smashes him to the ground with a flurry of attacks. He is out-of-the-fight. Plano follows up and forces a Mercy check on the popular Murmillo. Juggartha passes and is allowed to live for another Games.
Turn 8
Lucius knows his time is limited and that he must finish Ordinarri. He attacks with everything he has, but the Secutor manages to use his Gladius and shield to parry the assault.
As expected, Minoris plows into Lucius and takes him down with a series of powerful blows. The Provacateur raises his two fingers in the Missio. However, the crowd is disappointed in the “Romans” being defeated and Lucius is executed in the arena by Minoris.
Turn 9
Plano charges Arminius, but the Velite pushes the Retarius back and draw blood with his dagger. He falls back and tosses a Javelin that misses the mark.
Minoris has the range and angle and charges the last “roman”. He manages to knock off two Pain, but Arminius’ helmet absorbed two ringing hits.
Turn 10
Arminius scrambles away from the Murmillo, and turns and charges Alexander. The clashes reduces the Greek to a single point of Pain. The Greek counters, but again comes away worse from the Velites flashing dagger.
Plano charges in, and this time takes the Velite Out-of-the Fight. The crowd cheers the bravado of the last of Quintilluis’ gladiators acting boldly, and they chant for his survival.

Conclusion
The re-enactment of the Battle of Zama is over. This time, the Romans lost! The men of Leptis Minoris are hailed the victors for the event!
Overall, this was a good look at how Combat Pool was a previous commodity. I was careful in how I spread and used it. I also tried hard to get higher type gladiators against lesser ones. Regulus a Medium against Priapus a Light, Minoris a heavy against Haram a medium, etc. My approach seemed to work for this one, but the cost was high on both sides!
For Quintillius’s picked men Juggartha survived his injuries from being taken Out-of-the-Fight, but acquired a limp, reducing his Move by 1. Arminius was not so lucky, and later died of his wounds. Lucius the Provacateur was killed in the arena. That means two Gladiators were lost to Quintillius.
The men of Leptis Minoris also lost a Gladiator. Regulus was killed in the arena by Juggartha! The Ludus of Leptis Minoris was down a couple of Gladiators previous to coming to Sabartha. Now, they were in rough shape.
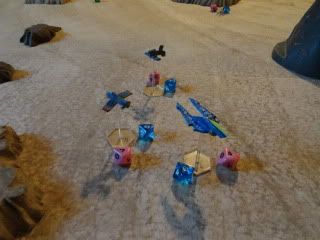
Event 2- Beast Fight
To continue the theme of the Battle of Zama, the Editor brought in a small elephant for a Beast Hunt! Lupin Lupinius gave his trademark wolf howl as he entered the arena. On the other side, the plumed helmet of Longinus gleamed in the sunlight. The crowd roared in anticipation and began to chant the two gladiator’s names.
The weather and crowd mood did not change. Normal.
Turn 1
The beast started wandering closer to Longinus’ side of the arena. Right away the Hoplomacchus was able to charge at it and bring it into combat. However, the elephant swung its head and its tusks banged off of Longinus armor. However, he wasn;t so successful the next time, and the tusks reduced him to Pain 0! Lupin ran to try to cross the arena
Turn 2
The elephant moved away from the Hoplomacchus at a trot. He threw his spear at it and hit it once, for 1 Pain removed. Longinus drew his Gladius. Lupin also hit it with a Javelin.
Turn 3
The beast continued to move away from the Gladiators. Longinus jogged after it, while Lupin paralleled it. However, he was caught behind a column.
Turn 4
The elephant moved around the edge off the arena, but this time Longinus was able to charge it again. He managed to cut the beast deeply with his Gladius and it bellowed in Pain. Lupins final Javelin clattered off the wall of the arena as he missed the beast.

Turn 5
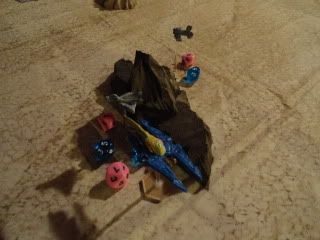
The badly injured beast stumbled away and egan bellowing at the Gladiators through its trunk. Lupin drew his dagger, but the trumpet like blasts from the elephant’s trunk caused him to freeze in fear. Unphased, Longinus rushed the beast again! He leapt into the air and delivered a killing blow straight through the hard skull of the creature, killing it dead!
Conclusion
Victory for Quintillius’ men! Victory for Longinus. It was a rocky start for the Hopplomachus, but he managed. It was a bit odd seeing a Heavy compete against a Light, but both Ludus’ ranks were thinned after the Historical Re-enactment.
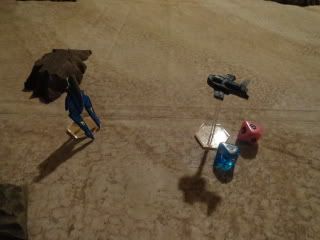
Event 3- Single Combat
The final event of the day was to be a Gladiator duel between single combatants. From House Quintllius was Marcomanni. The huge barbarian hefted his axe and entered the ring. On the opposite side was the Nubian Samnite Mediocrates.
The crowd was eager to see some skill at arms. The re-enactment and beast fight had sated their thirst for bloodshed. Now, they were eager to see some skill with weapons.
Turn 1
The two Gladiators ran forward eager to do battle.
Turn 2
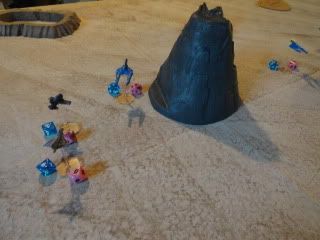
Marcomanni turned and moved behind a column, while Mediocrates slowed to a walk up the center.
Turn 3
Marcomanni came around the column, and Mediocrates turned to face him. The samnite was not in charge range, so he readied himself.
Turn 4
The Samnite moved backwards, to tempt the Barbarian forward. The Barbarian knew he couldn’t reach him so instead moved along the outside of the columns.
Turn 5
Mediocrates moved behind a column, where the axe-wielding Marcomanni could not get the charge on him.
Turn 6
The crowd was getting restless as the two Gladiators jockeyed for positioning. This time, the barbarian managed to get the drop on the Samnite! A deft blow from the haft of the Barbarians Ace reduced his Mediocrates Pain to 1.
He turned to face his foe. His counter-attack failed to hit, but he deflected a sneaky blow with his manica.

Turn 7
Now they were locked in and all eyes were on the two Gladiators. Mediocrates moved first by pulling his shield in tight and jabbing outward. The barbarian spun away and landed a swat across the back of the Samnite’s helmet, but he shook it off.
When Marcomanni countered, he managed to reduce the Samnite’s Pain by 1 more with a hook shot that went up under his shield.

Turn 8
Mediocrates attacks are again easily blocked. Marcomanni’s counters are not, and the Samnite is dazed. However, he manages to keep the other Gladiator from tripping him up.
Turn 9
Marcomanni follows-up his successes and pushes in for the kill. He continues to smack the poor Samnite in the grill of his helmet and dazes him further. His ears are ringing. However, he shakes away the dizziness and tries to counter.
He sees his chance and ferociously attacks back. Marcomanni manages to twist enough for his shoulder guard to take the hit. However, Mediocrates follows up with a quick upward jerk of his sword that catches the haft Marcomanni’s axe. The weapon spins through the air and lands in the sands behind him.
The crowd gets to its feet and applauds approvingly.
Turn 10
Mediocrates presses his success, but the Barbarian manages to avoid the jabbing blade. Dispensing with the loss of his axe, Marcomanni grabs the helmet of his opponent and smashes it into his own helmet in a vicious head-butt! The Samnite stumbles around on his feet, but is still standing.
Turn 11
Marcomanni is beginning to feel fatigued. He tries to disengage, but fails. The Samnite has kept him locked in close. He tries to grapple with the Nubian, but he knocks the barbarian’s hands away with his shield.
Mediocrates hits him with his sword, but he takes it on the Manica. While distracted, the Nubian pushes with his shield and knocks the big barbarian over.
He fails to get up.
Turn 12
Mediocrates pounces on the knocked downed Gladiator. However, Marcomanni manages to get his foot up and toss the Nubian into the dirt, downing him. Marcomanni crawls over and recovers his axe, but failed to get up.
Mediocrates decides to Burn a Combat Pool dice and return to Pain 1. However, he fails to get up.
Turn 13
Mediocrates is feeling Fatigue! He has 2 CP. However, he stumbles to his feet first, and jabs at the Gladiator on the ground. Marcomanni rolls away to avoid the attacks then stumbles to feet.
Turn 14
Marcomanni is feeling fatigued and is down to 2 CP. Mediocrates clumsily swings at the Barbarian. However, it is enough and he reduces him to 0 Pain. Marcomanni swings back, but he stops the axe with his shield.
Turn 15
Marcomanni can barely lift his axe anymore. He is so fatigued he is down to 1CP. Mediocrates presses the attack again, forcing the Barbarian to use his 1 CP to defend. Neither can land a telling blow.
Turn 16
The two swat pointlessly at each other.
Turn 17
Mediocrates also feels fatigue, and is down to 1 CP. In one last act of strength, he manages to bash away Marcomanni’s guard and strike him. He is wounds to 0CP and is considered Out of the Fight.
The crowd cheers the two warriors valiant battle! The crowd grants mercy to Marcomanni.

Conclusion
The House of Leptis Minoisr is declared the winners! Marcomanni is hardened by the battle and no longer feels the effects of Fear!
The people of Sabartha cheer the remaining Gladiators of both Ludus as they come back to the Arena for a final salute and parade. The Edutor of the games presents Metallus the Laurels of Victory on a well fought day of Events.
Post-Game
The men of Leptis Minoris entered this Games as underdogs. They were to earn an additional +3 experience per Gladiator. Every Gladiator from both Ludus took part in this Games.
Injuries and Deaths have been covered previously.
Experience
Juggartha gained Dodge
Mediocrates gained Trip
Minoris gained +1 I
Alexander got +1 CP
Lupin earned Jump Up
New Gladiators
Quintillius hired a new Deserter Sagittarius
Metallus hired a new Provacatur
Neither side lost or gained any reputation.
House Quintillius Troupe rating dropped from 806 to 741
House of Leptis Minor Troupe Rating went from 623 to 720
That evened the odds a bit!
You can check out the rules yourself Here:
http://www.wargamevault.com/product/210557/The-Games-Blood-and-Spectacles?src=newest_since