Sunday, August 12, 2018

Heirs to Empire: First War of the Diadoch- Eumenes vs. Craterus


Craterus vs. Eumenes of Cardia
Here is another Heirs to Empire battle report featuring the armies of Eumenes of Cardia vs. his rival Successor’s in Anatolia.  These battles took place early in the Diadochi wars between Alexander’s successors, and helped shape the political map of the wars to come.  As such, the armies were probably similar to those that Alexander himself used in his great campaigns. 

After Neoptolemus’ defeat by Eumenes, he fled and joined up with Craterus.  Craterus was crossing the Dardennelles from Greece to pressure Eumenes and force the Pro-Perdiccan loyalists out of Turkey.  Meanwhile, Perdiccas himself was assembling and leading an army to face off against Ptolemy in Egypt after Ptolemy stole the body of Alexander. 

Most of what remained of Neoptolemus’army from his Satrapy in Armenia was easily absorbed into Eumenes’ army to absorb losses.  However, Craterus’ force had much greater numbers than Eumenes could muster.  In addition, the core Phalanx was made up of reliable Macedonians from Europe. 

The two forces faced off.  The details of the battle have been lost to ages.  We only know the outcome.  In a daring attack, the outnumbered Eumenes managed to smash the larger army of Craterus.  Craterus himself was killed in the battle.  Neoptolemus was also killed in a duel between himself and Eumenes.  It is said that Eumenes and his cavalry unit squared off against Neoptolemus’ cavalry on purpose to face the treacherous enemy general personally. 

The Forces:
The forces are pulled from the sample armies in the rules.  They are both 54 points.

Craterus’ Army
Center
2 Bronze Shields- 1 Led by Craterus
2 Irregular Peltasts
1 Thureophoroi

Right Wing
Asphract Cavalry- Neoptolemus
Asphract Cavalry (Javelin)

Left Wing
Archers- General
Skirmishers
Skirmishers

Eumenes of Cardia
Center
Silver Shields- General
Bronze Shields
2 Thureophoroi

Right Wing
Epilektoi Cavalry

Left Wing
Companion Cavalry- Eumenes

During this battle, it is probable that the Silver Shields were probably deployed with Perdiccas for the Egyptian campaign, and not with Eumenes of Cardia.  However, for simplicity and uniformity of the campaign I am going to keep them with Eumenes. 

In addition, it is likely that Thureophoroi were not a distinct and established part of the army.  Such troops played a role of that of the Hypaspists in Alexander’s army.  Since the main difference between these troop types is the Hoplon versus an oval shield they are interchangeable this early in the Diadochi period.   

Mission:
It is unclear how this battle actually took place.  Some scholars believe it must have occurred during a river crossing or similar situation for the victory to have occurred as described in the sources.  It is unclear as the sources that remain spend little time on the actual battle, only the aftermath.  To that end, we rolled a random scenario and came up with Raze and Loot. 

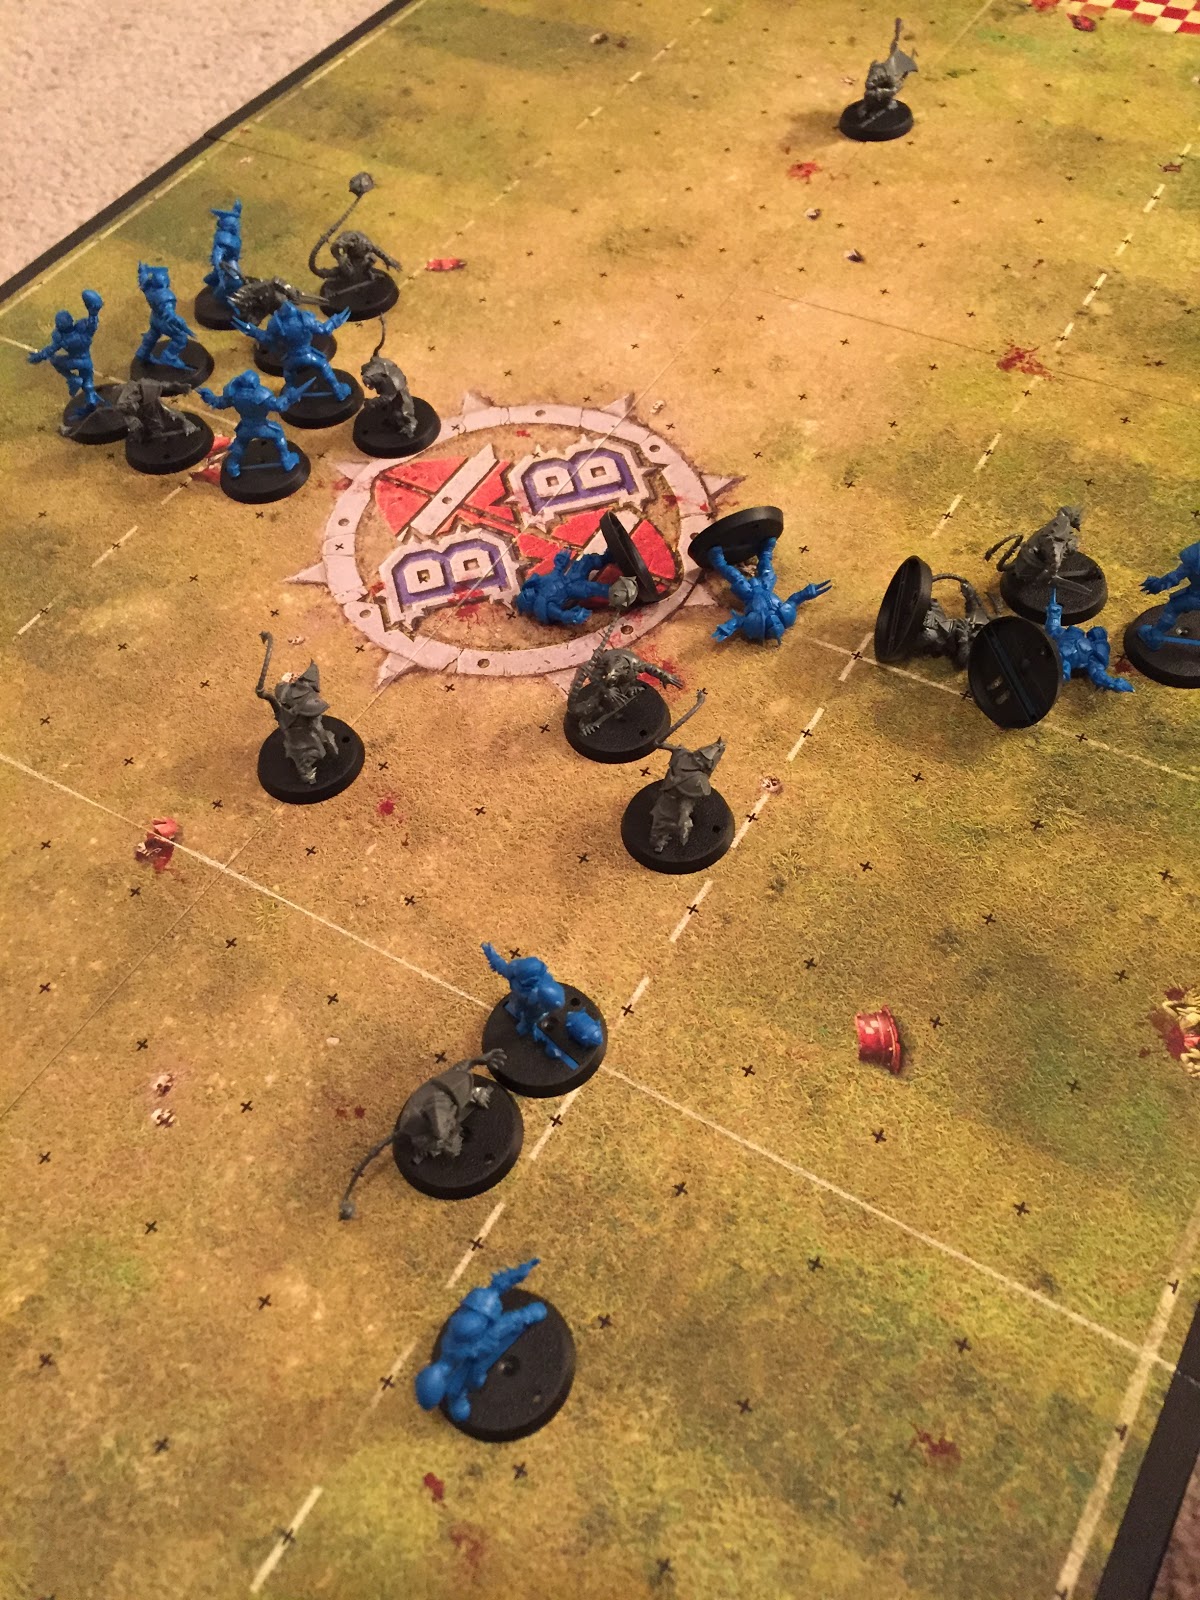
In this scenario there are 5 markers placed on the board to represent valuable items such as wells, supplies, sacred sites, etc.  The Defender tries to protect them while the attacker tries to destroy them by attacking them in melee.  Craterus was determined to be the defender. 

Set-up:
To match the situation, we changed he deployment a bit.  We made sure that Craterus and his army was by the river, to help match the potential historical match-up.  Also, this scenario allows Craterus to deploy a bit seperated based on the location of the objective counters.  This also probably helps match the situation Eumenes and Craterus faced. 

The objectives were watering holes spread across the desert, and the river crossing Craterus and his army used.  Eumenes’s deployment was pretty standard.  He was on the right flank with his Companions.   The center was his phalanx flanked by Thureophoroi on each side.  The Epilektoi were on the left.  Nothing fancy and fairly compact and in a straight line. 

The Left wing (of Archers and Skirmishers) deployed forward to protect the watering hole, but also potentially harass the main advance of Eumenes army.  The Center was deployed just past the river ford in an arrowhead formation.  The right flank was the Asphract cavalry units and they deployed out near another watering hole. 


Turn 1:
Both sides determined their Commander’s Gaze.  7 for Eumenes and 7 for Craterus.  Craterus bids 5 while Eumenes bids 0.  Craterus goes first. 

His Left Wing and Right wing stays put, while the center moves up to join them and try to form some sort of battle line.  The center jostles around abit to try and let the Peltasts move slightly ahead of the phalanx units.  Eumenes does not try to interrupt at all. 

Eumenes’ has his Epilektoi pivot and race towards the farthest objective over the ridge line.  He also turns his Companion cavalry and rides closer to his center.  Meanwhile, the center forces move towards the center objective.  The Bronze Shields are lined up to run over it. 

Turn 2:
Both sides determine their Commander’s Gaze for their wings.  Eumenes has 7 and Craterus has 9, he has the advantage in Commander’s Gaze.  Craterus bids 3, while Eumenes bids 1. 

Craterus’ forces move forward and form a battleline with their left wing.  Neoptolemus uses his Javelin Asphracts to ride forward and throw their Javelins at the Epilektoi, but they are just out of range!  The other Asphracts follow suit.  Eumenes does not interrupt.

Eumenes forces respond by moving forward steadily and confidently.  His Companion Cavalry moves up to be next to his main battleline.  The Epilektoi ride up the ridgeline towards their objective.  Will the Asphracts pursue them? 

Turn 3:
Craterus has 7 Commander’s Gaze across his front, compared to Eumenes’ 7.  Eumenes bids 1 and Craterus bids 0. 

Eumenes’ Epilektoi continue to move down the ridge towards the watering hole.  Craterus does not interrupt.  Then, the Companion Cavalry go into open order and head towards Neoptolemus.  No enemy interruption.  Finally, the center moves up.  The Bronze Shields secure the objective while the rest of the army moves to support. 

Craterus waits patiently to respond, allowing his opponent into his kill zone.  The Left wing starts the fighting.  The Archers open fire on the Thureophoroi.  In addition, the skirmishers move up and move and shoot.  One is out of range.  However, the Thureophori are reduced two armor. 

From Crateru’s center the Thureophoroi move up and hurl their javelin’s as well. Eumenes’ Thureophoroi are reduced to two Courage and start to waver.  One of Craterus’ Irregular Peltast units move up and reign Javelins on Eumenes’ Bronze Shields. To soften them up.  A Commander’s Gaze re-roll forces them to lose one courage.  This is followed up by a charge from Craterus’ Bronze Shields, with the second unit supporting the attack.  Eumenes troops counter-charge with a Commander’s Gaze.  This reduces Eumenes’ Bronze Shields to wavering.  However, with the counter-charge the Craterus’ troops are reduced 1 Courage. 

Turn 4:
Craterus earns 9 Commadner’s gaze, while Eumenes has 6.  Craterus then bids 5 Gaze compared to Eumenes 2. 

Archers hit Eumenes’ Thureophoroi for another Courage loss.  Eumenes’ center general tries to interrupt with his last Commander’s Gaze, but he fails.  This is followed up by a charge from Craterus’ Thureophoroi into Eumenes troops. It is enough to break them.  Meanwhile, The Skirmishers move up.  Craterus’ Irregular Peltasts charge into the main center melee.  ON the other side. The irregular Peltast move up and shoot Eumenes other Thureophoroi for 2 courage loss. 

The javelin Asphracts move up and attack the Open Order Companion Cavalry, but fails to cause any courage loss.  Eumenes manages to interrupt then.  He charges into the horseman using a last Commander’s Gaze.  The weaker Asphracts are easily shattered! 

Eumenes Thureophoroi charge the Irregular Peltasts.  No one has any Commander’s Gaze left to try and evade or pursue.  They just start fighting.  The damage is pretty catasprophic as both side fight ferociously!  Both are now wavering! 

Meanwhile, the Epilektoi storm a well.  They change to open order and start heading over the ridge towards the next marker.  Eumenes’ troops just need to hang on long enough for them to get to it.  However, in the center Craterus and his Bronze Shields manage to smash through Eumenes’ Bronze Shields and force them to rout. 

At the end, Eumenes’ army takes a Collapse check after losing two major units.  However, they all pass.  In addition, Neoptolemus’ and his Asphracts take are disordered after seeing their friends get smashed by the Companions.        

Turn 6:
Thinks look bad for Eumenes and his army.  Eumenes earns 8 Commander’s Gaze, while Craterus has only 6.  Eumenes bids 4.  Craterus bids 5 in an effort to win his first turn. 

Craterus uses the first turn to dangerously charges his injured Bronze Shields into the Silver Shields supported by his other Phalanx and Peltasts.  They hit hard, but ineffectively only reducing them 1 Courage.  The return push by the Silver Shields is enough to rout the rest of Craterus’ main infantry force!  Meanwhile, the Irregular Peltasts rout Eumenes’ last Thureophoroi unit.    

The Companion Cavalry with Eumenes charges headlong into Neoptolemus and his Asphract unit.  It is completely obliterated, leaving the way clear for the final well.  Meanwhile, the Epilektoi climb over the ridge. 

Seeing Craterus’ unit collapse, one of the Skirmisher units breaks up and runs for it as well. 

Turn 7:
Craterus has 5 Commander’s Gaze and Eumenes gets 8.  Eumenes bids 5 and Craterus bids 0. 

The Epilektoi and Companions meet on the third watering hole.  With that, Craterus army sees that all is lost and falls back. 

Conclusion:
Things looked bad for Eumenes there, but he managed to pull it out in the end.  Again, the Companion Cavalry and Silver Shields lived up to their reputation.  In hindsight, Craterus gambled big by charging with his injured Bronze shields, but his dice failed him in the critical charge and only caused 1 Courage loss.  He should have held back and used his uninjured units as a second wave.  Ultimately, it might not have mattered as Eumenes’ superior cavalry allowed him to win the day.

Ultimately, another historical outcome.  Both Neoptolemus and  Craterus’ units were overwhelmed.  We do not know how Craterus died, but in the main infantry push seems appropriate to me.  We do know that Eumenes killed Neoptolmus in a duel after crushing his cavalry unit with his own, which is what happened here too!  In addition, Craterus had Eumenes outnumbered just like in the Historical battle. 

Overall, a fun scenario and a fun little battle.             

Monday, August 6, 2018

Blood Bowl: Match Report- Humans vs. Skaven- Exhibition Play


I all ready had a Chaos, Khemri, and Skaven Blood Bowl team when the new version came out. I had never had the templates of a pitch of my own though. Therefore, I got the new boxset, and was a bit disgruntled to see that the new minis were a bit bigger. I was unsure if I wanted to get new teams to match up.

Then, a new FLGS opened in my town and they had good prices on the new Blood Bowl boxed teams and I soon found myself with new Dwarfs, Skaven, and Chaos. Ostensibly, my wife encouraged my to buy them as she wanted a few teams to play with me and my daughter. How could I refuse?

The Dwarf teams and the Skaven teams went together great and pretty much needed little or no glue. The Chaos team.... not so much. The poses were great and dynamic, but putting them together was a chore. However, now that they are all assembled, they are ready for the pitch. Maybe I can even convince myself or my wife to paint them one day..... maybe.....

At least I was able to convince her to play. I took the Skaven per the rules in the box for the Skavenblight Scramblers and she took the human Nottingham Nobles. This should be a good match-up.

* * * * * *


Lord Summervale: Thanks for watching Cabalvision IV and their ongoing coverage of Blood Bowl post- NAF and the outgrowth of smaller leagues.  

Mad Johan: We know it is only the pre-season but there is still plenty of mayhem to dish out! It may not count on the record books, but you can still see a a skaven get punched in the face. That is worth the price of admission right there!

Lord Summervale: Indeed Johan. Today is another exhibition match featuring the Nottingham Nobles and their team captain Rick Priestly in the lovely Citadel arena. Their opponent was a new Skaven team calling themselves the Cheese-Ballerz, led by their captain King Chedda'.

Mad Johan: The Deep North League- Southern Regional Conference has two Skaven teams this season. Favre' Da Cheese Monger leads a high powered offense with three gutter-runners on Da' Rat Packers. However, these ratmen seem to have a more traditional offense with two Storm Vermin blockers and two Gutter Runners. These Cheese-Ballerz will pack a bit more punch, but it might hurt their scoring ability.

Lord Summervale: Well, the Nobles haven't exactly been scoring power houses in their last two exhibition matches. After the coin flip, King Chedda' has won the toss and elected to kick-off to the Nobles. The Nobles set-up with Priestley ready to receive. A missed block up front by Adrian Wood let the Cheese-Ballerz front line stream through towards the Noble's thrower.

Mad Johan: They are coming through like a rat.... urr.... ummm.... chasing after.... oh nevermind.....


Lord Summervale: Priestly manages to dump it off to Gav Thorpe who is rushing around the edge of the Skaven line. However, the Skaven see it coming and chop him down at mid-field. He coughs up the ball, and it is scooped up by the Feta Fiend, a line rat who makes a break for the end zone.

Mad Johan: Down field his fellow clan rats seem to have Priestly covered, and on the ground.


Lord Summervale: Holy cats! Somehow Priestly broke loose and managed to knock the ball free from the Feta Fiend! That just saved a score! That was enough and the Nobles have somehow recovered it!

Priestley manages to dump it to Gav Thorpe again, and this time, he is being escorted by Jervis Johnson and Paul Sawyer to the end zone. The Cheese-Ballerz fail to respond, stunned by the sudden turn of events.

Mad Johan: Looks like Priestly and Thorpe are going to try to be star players this season!


Lord Summervale: That puts the Nobles up by 1 late in the half. They set-up for a deep defense against the speedy Cheese-Ballerz. Both of their Gutter Runners are out on the field for the kick-off; Horrible Havarti and Rotten Rochefort.

Mad Johan: Boom! There is the kick!


Lord Summervale: King Chedda' collects the ball while his line rats push the line back. Horrible Havarti goes deep, and the Nobles move to intercept him. Meanwhile, Rotten Rochefort goes on a crossing route escorted by the Munster of the Midway storm vermin. They are wide open after some blown coverage by Warwick Kinrade.

Mad Johan: That looks like a touchdown right there.....

Lord Summervale: King Chedda' drops to pass and launches a nice tight spiral to the streaking Rotten Rochefort. However, the Gutter Runner turns up field too early and drops the pass!

Mad Johan: That was all on Rochefort.... I guess they do not call him rotten for nothing.

Lord Summervale: Well, with that we end the half with the Nobles up 1 to nothing. The first half was pretty back-and-forth but the Nobles have a well deserved lead. Now... let's go to the Cabalvision IV half-time report brought to you by Wierdstone Sasparilla....it is the Wierdstone that gives it kick!

* * * * * * *

Lord Summervale: Welcome back to Cabalvision IV's coverage of the Nottingham Nobles versus the Skaven Cheese-Ballerz in the Deep North League- Southern Regional Conference pre-season play. Today's game is brought to you by our sponsors at Bloodweisser- We are O Positive that you will love it!

The Nobles have taken the lead with 1 touch down. However, the Cheese-ballerz team captain, King Chedda'; wisely elected to receive in the opening of the second half.

Mad Johan: Skaven teams are well known for being able to score quickly, so they are not out of the game yet. Both of their Gutter Runners are on the field.

Lord Summervale: Indeed. The kick is up, and King Chedda scrambles to receive it. The Nobles lined up for the deep defense again, trying to space out and stop the deep strike. However, their plan does not work to plan as the Cheese-ballerz managed to overwhelm the line and break out on the flanks.

Mad Johan: Wow, a punishing hit as both the Munster of the Midway and Space McQuirk go down!

Lord Summervale: That was enough. A super accurate strike from King Chedda' to Horrible Havarti gives the speedy rodent more than enough time to run into the end zone and tie the game up!

Mad Johan: I told you these vermin were fast!


Lord Summervale: This time, the Cheese-Ballerz send a high short kick to Priestly in the backfield. His fellow Noble smash through a flank and surge across mid-field. Priestly looks to pass.

Mad Johan: Look at the nice cage they have started to form around Jervis Johnson. I would expect to see the pass go there.


Lord Summervale: Hold on Johan. It looks like those line rats have other ideas! They have easily managed to bust through the line and are swarming Priestly. They knock it loose and there is a mad scramble for the ball.

Mad Johan: Those rats were eager to get there, but they can't seem to come to grips with the ball.

Lord Summervale: Indeed, for the second time in the game Rick Priestly has managed to recover the ball and unloads it quickly. This time he finds Jervis Johnson.

Mad Johan: Some great blocking downfield allows J.J. To scamper into the endzone.


Lord Summervale: Looks like The Nobles are up by 1 again.

Mad Johan: The team that is going to win this game has to score more points than the other....

Lord Summervale:... um, yeah.... The Nobles kick-it off back to the Cheese-Ballerz. This time, it is the Nobles who smash through the line and get some quick penetration. King Chedda' dumps it off to a Gutter Runner in the back field, but it isn't enough and the Nobles pop it loose. Gav Thorpe scoops up the ball and dashes it into the endzone.

Mad Johan: It looks like the Cheese-Ballerz are not the only team that score quickly.

Lord Summervale: The Skaven line-up to try again. This time, King Chedda' squeaks some encouragement and threats to his line rats. He does not want to see the Nobles get through so fast again. The kick is short, and Horrible Havarti catches the kick and begins to move it up field.

Mad Johan; Look at that Summervale! The Skaven are actually running a cage right through the teeth of the Nobles line!


Lord Summervale: You do not see that everyday! The Nobles line was spread to prevent a quick strike, and the Cheese-ballerz led by the Munster of the Midway and Pepper Jack; the Storm Vermin have slammed it up the gut!

Mad Johan: It looks like the cage is starting to collapse, that is why Skaven teams are better at the quick strike game....

Lord Summervale: Not so fast Johan. Horrible Havarti has flicked it out Rotten Rochefort. He has found the flat and easily runs in for the score!


Mad Johan: ...those dirty rats!

Lord Summervale: It is late in the second half and the Cheese-Ballerz are kicking it to the Nobles. The kick is short, but Gav Thorpe manages to recover it. He and Jervis take it deep into their territory. The rats desperately try to break through, but it doesn't look like they will be able to get there in time.

With that, time runs out and the Nottingham Nobles have won their first match! The crowd goes wild.


Mad Johan: It just goes to show, if half your team isn't in the injury box, it helps you win!

Lord Summervale: Thanks for watching this exhibition match between the Nottingham Nobles and the Skaven Cheese-ballerz on Cabalvision IV. The Nobles have their first win of the pre-season by a score of 3-2. Nuffle be praised.

We now turn you over to the final moments between the Dwarf Rock-N-Rollers and the Chaos Goat Herders all ready in progress.... bye-bye!

Monday, July 30, 2018

Wargame Design: Creating Tactical Game Play


In several of my recent reviews, I have talked about the lack of “tactical” combat, especially for skirmish games. If you look at a game like Outremer: Faith and Blood, Frostgrave, etc, your frequently see the focus on the game on the campaign elements, and the game play itself streamlined for quick and easy play. I have no issue with quick and easy play, but I think a skirmish game that fails to create a strong tactical core is hurting itself in the long run as it loses replay ability.


With all of that being said let's take a closer look at what “tactical” game play is. In a word it is decision-making. As a game designer, your core mechanics and design should be a method to encourage decision making on the player during the course of the game. For a broad example, is it better to shoot that enemy model who is nearby, charge them, or move away from them. The more decision-making there is in a game the more a player has to “play the game”. However, decision-making alone is not sufficient, they also need to be meaningful decisions with clear advantages or dis-advantages that force a player to choose which is the best option with the situation they are in. The optimal option should not always be obvious.

Note, tactical game play is all about what happens in the game on the board. Most campaign elements, list building, or force management outside of the game itself is not “tactical”. Instead, it is what I would term as “Strategic”. How to make a game more “strategic” is for another post. However, many people get these two elements confused so I want to make sure we are all on the same page before proceeding.

Now that we know that Tactical game play involves making meaningful decisions during game play how does a designer go about adding “Tactical” play? There are a few ways I have seen people tackle this problem:
  • Modifiers- The most common and tried and true method is to add some sort of modifiers to the success test. Things that are harder increase the difficulty of a test, while actions that are easier reduce it. Therefore, a designer can reward or punish the correct tactics by using a modifier. I think we are all familiar with this simple method. The advantages are that Modifiers are simple and easy to create and test for a designer. They simply change the probability curve of any tests either up or down. The downside is that they can lead to False Granularity, If This/Then That rules, or simply become to burdensome to recall them all during play.
  • Action Arcs- This is another common and simple way to increase the need for tactical decision-making in a game. Instead of a model being able to see and react to everything at anytime, instead they are limited based on fields of vision, arcs, etc. Essentially, it places an artificial limit on how a model can act which a player must decide how to minimize or maximize to their benefit. Think of the difference between a model that can see and act in a 360 degree arc, versus one that can only see forward 180 degrees. The options available to the 180 Degree unit is limited and therefore the player must make decisions on how to respond or position themselves for maximum effect. The advantages are that this is a very simple and easy to implement design solution, but he disadvantage is how do you designate and easily agree on what is and is not in view?


  • Limited Actions- A third simple way is to limit what a model can do in an activation. This forces the player to prioritize what is most important for them to do first. This is another decision. If a model can either shoot, move, fight, or perform another action the player must think about which is best at the moment. Again the advantage is that it is very easy to implement in a game system. On the downside, players can chafe at these artificial restrictions.
  • Resource Management- This can be points or tokens that can only be used so many times in an activation, turn, or game. Once they are used, they are expended and therefore the player must decide when is the best time to use their resource or horde it. Games that use decks, dice pools, or command tokens are all using the idea of resource management to increase the “tactical” feel for their games. The advantage is that this is a great and organic way to add tactical thinking to a game that players enjoy. On the downside, they can be difficult to balance and the side game of deck building can distract from the may focus of the game.
  • Activation Methods- One of the key aspects to add levels of Tactical Play to a game is through the use of a good activation method. Wherever possible, you should allow a player to choose when they can act and with what units; even if it would “interrupt” another players turn. The more action flows between players based on the decisions they have made, the more “tactical” feel the game will have. Alternate Activation is the easiest and most blunt way to do this, but there are other alternatives such as action/reaction systems like Force-on-Force, push-your-luck systems like Blood Bowl, activation rolls like Lion Rampant, or using resources to interrupt like Robotech RPG Tactics. To me, this is one of the core decisions of a game and once you have made this decision will drive the level of tactical play.


  • Paper/Rock/Scissors- I use this to refer to any game where certain units or weapons are designed to be “better” against some units and worse against others. This is very common in “historicals” because that is how it has worked historically! For example, Napoleonic war games use this all the time. Infantry in square is great against cavalry, but artillery is great against infantry in square, and cavalry is great against units out of formation. Therefore, you threaten an infantry unit with cavalry, they form square, and then you pound them with artillery until the break, and let the cavalry sweep them up.... in theory. The challenge for the player is getting the units to interact in the right way, despite their opponent trying to stop them. This level of unit interaction and layering is difficult to build into game and requires a great deal of playtesting, but can also be one of the most enjoyable to play and succeed at. Many games try to create this Paper/Rock/Scissor effect but misjudge the balance to make it pay off successfully.
  • Escalation- In this scenario, certain actions escalate the potential risk/reward scale by performing some key activities. Games with a threat rating or doom clock are using this method to force players to decide what actions they should take and when to manage the “threat” or risk/reward calculation as they play. This is a great way to ramp up tension in a game, but again the balance can be difficult to achieve correctly and require extensive play-testing.
Now, with all of this being said, not all games need to be super-tactical all the time. Sometime, you want to prioritize quick play over strong tactical elements. However, it is not always an either/or dilemma that designers are faced with. Most of the elements listed above can be implemented into a game without sacrificing quick play ability or simplicity. Quick play and tactical play do not need to be enemies and in fact good tactical game play can make the strategic elements of a game that much more rewarding.

I am sure there are other elements or mechanics that can be used to increase the “tactical” play of a game that I missed. Feel free to add more in the comments section, or in the Messageboard.

Monday, July 16, 2018

Review: Outremer: Faith and Blood- Osprey Games


The Crusades seem to have been gaining in popularity in the wargaming circuit in the last half decade.  Games like Dues Vult, Soldiers of God, Saga: Crescent and Cross, and LionRampant have fueled this surge of interest with gamers.  In addition, a number of interesting model lines have also been released.  Plus, the Crusades themselves have a pretty intriguing and interesting history of their own to draw in players. 

Outremer: Faith and Blood is set during the Crusades.  It is the most recent addition to the Osprey Games blue covered Wargame Series.  Unlike some of the other Crusade-era games, Outremer is designed for small scale, model vs. model skirmish action.  Each side is between 3 and 12 models.  In addition to be a small scale skirmish, the focus of the game is campaign play.  This type of game is right up my alley and I look forward to digging in closer to the rules. 

Dues Vult!

Things I Liked
This is an Osprey Wargame Series book that takes the campaign element of their game very seriously.  Most have it as a few page add-on at the end, but this book uses over half the length of the book on it!  Each warrior in your warband has an experience progression path to become a unique warrior and part of your Crusading force.  They can gain experience, special skills, buy equipment, gain injuries, die, be captured, ransomed back, or sold into slavery!  To me, a strong campaign element is essential to a good model vs. model skirmish game and this game delivers.  It uses the familiar Necromunda/Mordheim standard set by Games Workshop back in the day.  This is the biggest draw of these rules in my eyes.      

Before a model can engage in hand-to-hand, they must pass a Faith test.  If successful, they can move in to engage.  However, if failed, the model dithers and can not act.  Close-combat is a scary and terrify place to be so I like this way to simulate a warrior’s hesitation in getting into harm’s way.   Plus, it is an easy way to differentiate a more war-like model such as a Knight of a Militant Order from a lowly peasant.

A simple and obvious touch, but heavier and more armor makes your model very slow.  Therefore, a heavily armed and armored knight will move 3 inches or so, while a lighter armed Saracen can move 6.  This mobility makes you carefully think about how you arm and equip your Crusaders.  It is a simple mechanic with big gameplay impacts, and is a great example of using simple rules to add tactical variation to your games.   
   
From the Outremer Author's Blog: 
http://outremerfaithandblood.blogspot.com/2018/01/welcome-to-official-outremer-faith-and.html

Things I Did Not Like
The game uses a card activation mechanic.  Each model is assigned a card.  The cards are then shuffled and randomly drawn.  If a model’s card is pulled, they can take two actions.  Once complete, a new card is dealt and that model can then activate.  This is a simple method to create activation uncertainty and is a tried and true methodology.  Why would I put it in this section then? 

First, I prefer to have control over who activates when as a decision point in the game with a  mechanic (like the faith test to engage in melee) that may limit my freedom of action that I need to decide how to react to.  In such a situation, I as a player still have the agency and decision making.  Cards activation (and random activation in general) remove that agency to create a randomize friction.  I prefer friction to occur AFTER I have made a decision. 

Secondly, I am not a fan of action point systems.  Two is fine, but I prefer players having to choose only a single action.  Again, as the player I have the agency to decide what I will do but it is limited to create the friction. 

The game uses a variety of dice common to those who ever bought a Dungeons and Dragons starter set.  You need a d4, d6, d8, d10, d12, and d20.  Typically, I see a variety of polyhedron dice (some that are rarely used) as a bit of a barrier for entry.  D6 are easy for most people to come by and understand the probability curves for.  I prefer to use dice pools of d6 for skirmish games.      

All of these points are clearly my personal preferences, and the rules as written are perfectly serviceable and work.       

Meh and Other Uncertainties
The game has more skilled models have bigger dice (i.e. d10 is more skilled than d6), and you typically roll against a target number of 5+.  Then, any hits are roll the damage dice of the weapon trying to get a higher number than the defenders toughness.  Toughness is modified by armor with some armor allowing a special saving throw if the Toughness test is failed.  The big innovation here is the varied dice to allow a greater range of outcomes based on the weapons being used.  The process of the mechanics will be familiar to many of us who have played many skirmish games. 

The game has 6 scenarios that are pretty vanilla.  Again, if you are familiar with Skirmish games, you have probably played the scenarios in this book many times.  The game also allows for three main warbands of Militant Orders, Crusaders, and Saracens.  I could see this easily being expanded in supplements or by the author to include Albigensians, Byzantines,   However, the starting ones presented here do the job that it says on the tin. 

From the Outremer Author's Blog:
http://outremerfaithandblood.blogspot.com/2018/01/welcome-to-official-outremer-faith-and.html

Baltic Crusaders, etc. to move beyond the Crusades proper and into other medieval periods and types of crusades.

There is a “Catch-up” method built into the rules.  If your warband fights other groups with superior Reputation, they can earn bonus cash and experience to help them catch-up.  The greater the mismatch between forces the greater the reward is for playing as the underdog.  This is a must have element for any campaign heavy game.    

Of course, the book pulls from Osprey's delicious library of artwork and all of the artwork present in the book is great!  The model and terrain pictures are solid as well.  

Final Thoughts
The core rules for Outremer: Faith and Blood are solid and will be familiar with most wargamers.  They do not break new ground, but add some variation with different dice styles and a card activation system.  This differentiates it from some of its competition in the marketplace.  Like many skirmish games, the tactical play is not as developed for things such as flanking, vision arcs, etc. as the emphasis is instead quick play with a focus on campaigns. 

The strong point of these rules is each model as an individual unique character.  They have various abilities and skills that you must use together to achieve victory.  I can think of few rules where a model can become a merchant, craftsman, or scholar and have them be full tables of abilities themselves.  As the campaign progresses, each model will have a key role to play in the warband and their loss to capture or death will be keenly felt.  This book will become a go-to source for me as I develop and build my own campaign based games. 

If you like skirmish campaign games, I would recommend checking it out.  This is the best “Campaign” of any in the “Blue Book” Osprey Wargame Series.  
 
From the Outremer Author's Blog: 
http://outremerfaithandblood.blogspot.com/2018/01/welcome-to-official-outremer-faith-and.html


Monday, July 9, 2018

Random: Mid-way Through 2018 and Look What You Have Done!


Look at the time!  July all ready!  It is hard to believe that 2018 is half over with.  So much still to do, so much completed, and yet even more to come.  It was the best of times…. It was the worst of times…. But it seems like a time to review my progress according to my 2018 goals and see where I am at.

Typically, I break them up into the following categories for ease:

·         Purchasing
·         Playing
·         Rules Writing
·         Miscellany

I normally do not get all my goals done by the end of the year, and these are more guidelines than anything else.  Nothing holds me to this list to complete it or even do the stuff on it.  However, I find it helps me from jumping to project to project without making any progress.

So, let’s look at what is done.

Purchases
Typically things I will spend money on are in this section:

-          Purchase all new Osprey Wargame Series of Books- I look to be on track with this one.  The latest two were Kobolds and Cobblestones and Outremer: Faith and Blood.  I have them both in my collection, but have only reviewed Kobolds and Cobblestones so far.  Outremer: Faith and Blood should be following soon.


-          Pick-up 6mm Successor Armies from Baccus- I took a look at the range and priced them out.  I am scratching together the cash as I want to get enough minis for two armies to play Heirs to Empire with.  This one might not happen his year at the rate I am going.

-          New Professional Terrain- I have purchased a swanky new terrain cloth that looks great!  In addition, I picked up some cool Greek temple ruins from Terrafin too.  I still would like a nice river, some rocks, and maybe a forest or two.  I will call this partially complete.


-          Purchase Blucher- Looks around shifty-eyed and embarrassed.  I got as far as putting it into an online shopping cart once…. Never finished the transaction though.  Someday…. I mean it!

Painting and Modelling
Items I am making a bold effort to get painted or modelled for the tabletop go here.  I was very conservative this year in my painting goals.  This category usually trips me up the most. 

-          Paint Mobile Artillery for All Quiet on the Martian Front- After two years they are complete! 


-          Paint D.A. Thompson from Pulp Alley- Complete after….. I do not know how long?  But he is done!


Playing
Here I list the games I want to play for the year!

-          Play 8th Edition 40K- Complete! There was a lot of positive buzz about the new edition, so I figured I would check it out.  I mean, I have been playing since Rogue Trader days so I have plenty of models. 


-          Finish theBalkan Uprising Campaign- I did manage to play another game for the Campaign using Castles in the Sky but the Ottoman League needed a decisive win to wrap up the campaign.  Let’s just say, the campaign is not over yet.  I have the next game arranged and ready to play but I haven’t had time to play it yet.  Partially complete I guess.    


-          Play OneGame I have Not Played Before- Complete!  I played Super System 4thEdition.  It was a good time between the Union of Semi-Professional Heroes and the Blackhearts.  I all ready have two more Nano metal figs set aside and statted out to expand my teams and set-up for the next issue.


Rules Writing
On this part of the list, I put my goals for actually producing games.  I am typically very productive in this category as all I need is some research, computer, and time to do it.  That is a lot less of a lift than the other categories. 

-          Complete 2 New Rulesets for the Blog- Complete!  I think I have completed three or four for the Work-in-Progress section?  RampantGalaxies, Fog of War, Conquest! Rome in Italy, and Rampant Sun.  I took Conquest! back down as I work on some other aspects of it.  However, the others are still up and I am looking for play tester feedback on them.  However, I have made no progress on Mageloque, which has been on my to-do list for about 5 years now. 


-          Get Photos for Men of Bronze completed- Complete!  I have shared some on this very blog!  In addition, Osprey sent me some cover art drafts for the book!  Exciting times!


Miscellany
This section is filled with random stuff that is related to Blood and Spectacles but does not really belong any place else. 

-          Blog Once Every 2 Weeks- This year, I have managed to keep my blogging pace up to weekly.  However, it has been a stretch.  I do not expect this trend to continue as the year progresses.

-          Clean-up a Game for Wargames Vault- I managed to get Green Army Men: Plastic Men, Steel Resolve completed and placed on the Wargame Vault this year.  If I am really lucky, I might get a second up by the end of the year. 


Conclusion

Wow, so far I have done pretty good!  8 out of 13 complete, with another 2 partially complete.  This might be my best year yet!  However, I did scale back my goals a bit from 2017.  

Besides the stuff listed here, I also invested more into Blood Bowl and got the Dwarf, Chaos, and Skaven team.  My family has played a few games, but I have not been able to document them enough for the Blog.  I didn;t think Games Workshop would get me to spend money with them again, but the Blood Bowl play worked on me! I will probably get one more team and the Ogre too. I have played a good deal of Men of Bronze and binged on Green Army Men: Plastic Men, Steel Resolve on a few days.  In addition, I have tried a few boardgames and card games as well.  However, it was not enough for me to really document.  Overall, fairly productive.  


I might not be as prolific in the second half of the year due to work and “Real Life” getting in my way.  However, so far a good start and I look forward to finishing 2018 strong!  How about you?  How is your 2018 going so far? 


Monday, July 2, 2018

Review: Kobolds and Cobblestones- Osprey Wargame Series


The Osprey Wargame series has been one of my favorite sources of rules systems. They are typically a quick read and bring interesting mechanics and ideas to the table. The price point and length of the rules have introduced me to all sorts of interesting games. This in turn has spurred my own creativity and game design.

Today, we are going to take a look at Kobolds and Cobblestones. This is a game of Fantasy gang combat for control of the underworld of a cosmopolitan fantasy city. As I was thinking about the game, I was surprised to read their take that Kobolds are a form of lizard man style creature. I have been forever stained by the old Ad&D Monster Manual that had art showing them looking like little dog men. The idea of them being lizard-like frightened and confused me! However, I got over it.  It turns out I was the one completely out of the loop!  


This game does not have an design notes. However, I did read in the acknowledgments that the game was built by “making it up” as he went along with some of his gaming buddies. I like the spirit of this approach. Now let's take a closer look and see how it all hangs together.

Things I Liked
This game was very innovative when it came to its core mechanics. It did not go with the old movement stand-bys and instead did something very different. The main tool for movement in the game is a standard Poker card, using either the width or length to measure distance. This game uses no special equipment.

The game does not stop there. It then decided to fore go normal gaming conventions and use those same standard poker cards as the way to resolve opposed actions. I was expecting a draw mechanic like Malifaux. Instead, they went a different rout where you use cards in your hand to create opposed Poker hands, play blackjack, or do a simple card flip to determine the outcomes for melee, missiles, and magic. It was very creative solutions and a fresh approach. I would have preferred if it stuck to one approach instead of three, but there is no denying the creativity of the mechanics.

The game also has a clever Critical Hit mechanic, where the number of cards from an 'aligned” card color used in your combat hand can trigger an escalating series of events and special interactions. The critical hit mechanic flowed in easily and elegantly with the combat/magic rules.

Unlike other games, no gang is expected to be made-up of only the same race. Instead, race mixing is encouraged. I like that idea and allows you to use a selection of miniatures that you have on hand.

Things I Did Not Like
The game is very innovative with mechanic resolution. However, the core game play relies too much on existing card games for my taste. It is essentially playing no draw poker with minis. Once you get beyond the card interactions, the game has very little nuance beyond hand management and usage. For example, there is little benefit for tactical maneuver, morale, or command and control in the game. Thankfully, the Campaign rules force you to think of the meta a little to act as a Morale limitation.

The game could end up with a lot of table clutter, or off-board book keeping. Many models have multiple wounds. In addition, there are various effects from the critical hits that will impact models throughout the turn. Tracking the number of effects could be a turn-off for some players.

In addition, the game has certain “leaders” that you must use one of. I am not a fan of such “named Character” approaches to games and prefer to build my own characters that grow and build as a campaign progresses.

Meh and Other Uncertainties
The game uses three decks of Poker cards. One for each player's combat hands, and a third for an Event deck to help resolve non-combat event such as initiative, set-up, some magical effects, etc. In addition, you will want the Jokers as measuring tools, but not in the deck. This system uses alternating activation, and I think could scale well for more than one player at a time.

Gangs can choose not to spend all of their starting cash on members, and instead use them in game to bribe models, heal, siphon off magical energies and other little tricks and treats. Any many games, such excess cash at gang creation is simply lost or of no use in-game. This was a clever way to make use of it and force some more choice during list building.

As mentioned, the game comes with a campaign system which is a huge plus in my book! It covers the basics such as model death, recruiting new members, etc. Do not get to attached to your runts and thugs as they will die pretty fast. However, as you gain Notoriety, you use this as cash to “buy” new figures for the gang. Unlike a game like Necromunda or Mordheim, most of these gang members will be pretty disposable. This fits more of the Frostgrave model.

The game also comes with 8 scenarios. They also include optional objectives to increase the re-playability even further. These follow some standard tropes, but are well executed designs.  Plus, using the 2x2 board and the ability to Move/Dash you will get to the action quickly with these scenarios.

A note on the artwork. The book uses stand-alone character art similar to the Rogue Stars book. I like the style of the artwork as the gangs have a more Edwardian/Elizabethan vibe to them instead of a standard Medieval Fantasy style. I liked it. However, the way this artwork was used was unsatisfying to me due to the white space. In addition, the miniature pictures in the book were uninspiring to me as the palette did not pop enough. These are minor quibbles, as they are painted nicely and the city terrain is very cool. However, it just did not grab me.

Final Thoughts....
I was pleasantly surprised by the cleverness of the core mechanics, but I felt they were still just a bit wanting and a bit too light. Like many of the Osprey Wargame Series games, this would be a great short series of games for a club, or even a stand-alone Convention game for relatively new wargamers. I do not think it has the depth for longer campaigns or heavy rotation. However, I still found myself impressed with the rules and re-thinking the use of cards in my own designs again. To me, it was worth the read just for that and I can see myself giving it a go with my family.