Monday, October 26, 2020

Operation: Hemlock- Aeronautica Imperialis: Platform Attack


As conventional Ork counter-attacks have been ineffective in stopping the Imperial advances in Da Deff Islands Warboss Skarbash has had to turn to less conventional ways to counter the Imperial troops.  Ork submarine raiders had largely been stymied.  That meant that the warboss was going to need to lean on the less conventional arms of his mobz.  The only effective forces so far had been the Ork Air Waaaghz against the Ammoriss Air PDF so he quickly made plans to utilize them to take the pressure off of his troops retreating back to the Green Zone.

“Snaz” Boomgob along with Skarbash devised a cunning plan.  The submarines had failed to stop Imperial supply ships from getting to Ommie Island (Grig’s Island).  However, there was more than one way to kick a grot.  Ork air boyz deployed from the Green Zone in large waves and raided the nearby platforms in the approaches.  These platforms were mostly abandoned or had only a skeleton crew of workers on board.  They would prove to be easy picking for the Ork drop troops…. If the drop troops put boots on the platforms. 

When Commodore Miles of Taskforce: Chalice saw the augurs light up across the board with contacts, he ordered an immediate scramble from all Air PDF bases.  In addition, he reached out to the Imperial Navy, and fighters from the 95th Fighter Wing swooped in from orbit to help engage the enemy. 

If the Orks got a foot hold in the Approaches, resupplying the Imperial troops would become much more difficult.  Ork aircraft and Submarines could use these platforms as staging areas for convoy raids.  Plus, cleaning up the platforms would be a difficult and costly military task. 

This will be a V1Aeronautica Imperialis using aircraft from the core rule book and the Airspace Compilation set during Operation: Hemlock.

Forces

Taskforce: Chalice
4 Sentry Interceptors with Skystrikes
2 Sentinel Interceptors    
2 Imperial Navy Lightnings with Skystrikes
1 Hydra on the Platform

“Snaz” Boomgobz Boyz
2 Fightas with Rokits
2 Grot Buzzaz
2 Fighta-Bommaz
2 War Kopters with Troops
2 Buzz ‘Ards with Drop Troops

Mission
The board has a large platform close to the Imperial short board edge, about 24 inches in and 12 from a long board edge.  This is the drop target for the attack.  The Orks are trying to drop/land as many troops onto the platform as they can.  The Imperials are trying to stop them. 

Set-up
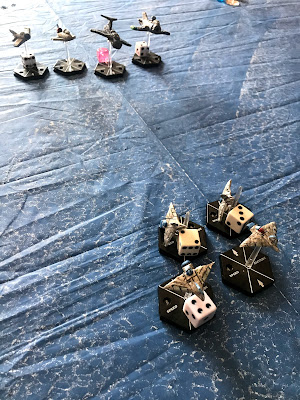
The game is being played on a 6x4 table.  It is primarily over the ocean so there is no other terrain present than the drop target. 

The Imperials have a Hydra platform on the Platform to help defend it.  The Imperials have the Sentries in the center at mid-altitude and speed.  The Sentinels are together on the left flank at mid-altitude and full speed.  The Lightnings are together on the right coming in from Orbit. 


The Orks have the Kopters coming in low on their left.  Then the Buzz’Ards at mid-altitude in the middle.  They are protected by a clump of Ork aircraft at various altitudes and speeds.


Turn 1:
Initiative: Imperials

For the most part, the two sides simply close in on each other.  The Imperials stay in their groups, with the Sentinels seeming to drop towards the Ork Kopterz.  The Lightnings are also trying to bleed off height to get into the fight.  The Sentry pilots just gulp as they realize how hard it is going to be to bring down those Buzz'Ards.  

The Orks kind of fly all over the place.  However, their key troop carrying units seem pretty set on moving to the drop zones.  Their escorts just sort of splurge out into an expanding bubble of dakka. 


Turn 2: 
Initiative:  Imperials

The Sentries stay in a tight formation as the Buzz'Ars and their escorts come straight for them.  The Orks are not being shy in the teeth of Oomie firepower.  They feel confident they can dish it out as well as take it.  

The Sentinels race in with the leader dropping low to engage the Kopters, and th esecond staying high as an interceptor.  The Buzzers move to engage, but do not have great heights.  Fighta 1 tries to dash in from the side, but has the wrong angle and ends up in the kill zone of Sentinel 2.  

Meanwhile, Fighta-Bomma 2 goes up to meet the two Lightnings coming down from orbit.  

Shooting: 
Auto-cannons, Big Shootaz, and Skystrike missiles fly out.  The lead Buzz'Ard starts blowing smoke from two hits.  However, in return, 2 Sentry fighters are shot out of the sky.  Both pilots manage to eject in time to be picked up by the Navy later.  


Sentinel 2 engages Fighta 1 witha spray of stubber fire, but fails to cause significant damage.  Sentinel 1 is fired on by the War Koptaz, but flies through the tracers and opens fire.  No one gets taken out.  

Lightning 2 fires on the approaching Fighta-Bomber 2, and his auto-cannon and Las-cannon are enough to blast the Ork plane from the sky!  No parachute is seen from the crashing plane.  


Turn 3: 
Intiative: Orks

The damaged Buzz'Ard with its Fighta-Bomma escort plows straight towards the target.  The Fighta-Bomma tries to gain some height as he approaches.  Buzz'Ard two swings out wide as the Lightnings try to turn into the attack, but they are still out of position.  The Sentries wing over or Half Loop to pursue, but Fighta 2 is all over them as well.  

The Sentinels and the Koptaz and escorts are in a wheeling furball of their own.  However, the Koptaz turn in to make a bee line for the platform.  


Shooting: 
Fighta 2 sprays down Sentry 1, and blows the plane from the sky.  The pilot never had a chance.  

The Hydra opens fire and tracer fire stitch into the sky looking for the Ork transport.  


Turn 4: 
Initiative: Imperials

Tailing Fire: Tailing fire from Sentry 4 causes Fighta-Bomma 1 to blow smoke.  

Movement: 
The smoking Buzz'Ard flies over the platofrm, while its companion opts to dive near the ocean and just misses the platform.  Fighta-Bomma 1 also smoking, dives over the platform.  They are being pursued by Sentry 4 and Lightning 2.  

Meanwhile, the slower Kopta attack force proceeds to the landing area with Sentinel 2 trying to get in a firing position.  However, their slow movement makes them hard to get a good angle on.  

Due to a orders mix-up, Fighta 1 is flying away from the air battle.  

Shooting: 
Lightning 2 fires everything it has at Buzz'Ard one at optimal range.  The auto-cannon strikes home, but is not enough to down the craft.  Ork Storm Trooper eagerly begin to bail out of the back and sides of the Ork transport.  many of them are killed by the near miss and explosion of the Imperial skystrike, and some just miss the landing zone.  Only 1 Ork unit successfully lands.  However, blasts from the Hydra manage to take the big plane out of the sky and the last remaining drop troops down with it. 


The Crew of the Hydra have no time to cheer as the Ork Fighta-Bomma unloads their bombs across their position.  The gun emplacement is destroyed with loose ammunition firing off around it.  Sentry 4 fires the last of its ammo at Fighta-bomma 1, but misses.  

Sentinel 2 fires on Buzzer 1, but fails to hit the nimble craft.  


Turn 5: 
 Initiative: Orks

This battle is not over yet!  

Tailing Fire: Sentinel 2 fires on Buzzer 1 and misses again. 
  
Movement: 
Fighta-Bomma 1 is satisfied with his work and disengages off the board.  Out of Ammo, Sentry 4 gains permission to return to base, and makes for safety as well.      
    
The War Koptaz have to begin to slow as they approach for a landing.  The Buzzers try to stay with to protect them while Imperial aircraft close in. 

Meanwhile, the last Buzz'Ard, still full of jump troops; tries to turn back but it looks like the Transport will have to disengage soon instead.  

Shooting: 
Buzzer 2 managed to slip behind Sentinel 2 as the Imperial pilot closed in close on the Koptaz.  The grot opened fire and took the PDF plane out of the sky.  Sentinel 1 tries to get revenge on Buzzer 1 leading the approach, but misses.  Lightning 2 also fails to find Buzzer 1. 


With the loss of Sentinel 2, the PDF receive orders to disengage and leave the Platform to its fate.  Casualties have been too high.  

Turn 6: Disengagement Turn
Initiative: Orks

Movement: 
Buzz'Ard 2 managed to stay on the board and started circling.  Eventually theymight be able to move into position to drop their troops! Sentry 4 skee-daddled off the board and back to base. 

The Kopterz moved in slowing even further to land.  The Buzzerz stayed with them as a Linghtning ot in close.  The Sentinel and Lightning 1 were also in firing position.  

Fighta 2 left the board to head to home too.  

Shooting:
Buzzer 2 fired on Lignthining 2, but failed to shake the Imperial Navy pilot.  However, Lightning 2 missed his shots at Kopter 1 as he raced past in the blink of an eye.  Sentinel 2 and Lightning 1 also took shots at the Ork forces, but failed to find their targets. 
     
Conclusion:
The Orks lost 1 Fighta-Bomma to the Imperial Navy and 1 Buzz'Ard to a combination of shooting.  The Imperials lost 3 Sentry fighters, and 1 Sentinel.  Not great.  

Plus, the Buzz'Ard landed 1 Jump troop and it can be safely assumed the 2 Kopterz would have landed unopposed.  The other Buzz'Ard would probably have had to return home to refuel.  That means 3 Ork units made it to the target.  Ork stormboyz would have made short work of the few workers and servitors on the platform, after all it had even been bombed too!  

No need to add up the points for this one.  The Orks won and managed to push the perimeter of Da Deff Islandz out further into the Approaches.     

The Buzz'Ard is pretty hard to bring down with 4 hits, at least for low firepower planes like the PDF.  As I have found before, low and slow can be surprisingly hard to take out!  The War Koptaz made it to the target unharmed, and I struggled to get guns on them.  Finally, the PDF planes were simply not tough enough and I had poor firepower rolls.  The PDF can throw out okay firepower, but I couldn't get any of it to stick.  I really need to stop going head-to-head against Orks with PDF planes.  It never works out.  

Commodore Miles clutched clutched his wrists as he stood rigidly watching the battle unfold.  As he watched blue PDF lights blink out across the Approaches, his heart sank.  They were going out twice as fast as the green Ork lights.  It was clear that the PDF pilots were taking the brunt of the Ork offensive yet again.  

It was clear, that the momentum was with the Orks.  He gritted his teeth.  Another defeat for his Taskforce.  Admiral Travers and the Naval PDF were stealing all the glory, and that was almost as bad as losing to the greenskins. 

"Officer on the Watch, please have the Air Controllers call for a general disengagement," Commodore Miles ordered with a firmness he did not really feel.  

Commodore Miles adjunct approached slowly and saluted crisply, "General Kurtz requests an update on the battle Commodore."  

Commodore nodded.  He clenched his wrist even harder.                    


You can follow Blood and Spectacles Facebook page for more fun: https://m.facebook.com/pg/BloodandSpectacles/posts/?ref=bookmarks&mt_nav=0

Or our website:

Or our Messageboard:

Or our Wargames Vault Page:

Monday, October 19, 2020

Review: Clash of Spears- Fighting Hedgehog


Clash of Spears is a Skirmish game for Ancients.  Many Ancients rule set focus on the "Big Battles" like Plateae, Cannae, Zama, etc.  However, these take a very different approach since instead they are looking at the smaller scale skirmishes between soldiers.  I can understand why the gaming world would focus on these larger scale battles as that is where most of the sources are, and where the scholarship is!  There is very little actual historical detail about skirmish combat, even though we can be confident that small scale engagements between individual and small units must have occurred. 

This level of gaming has always appealed to me for a simple reason.  I can not typically see myself or imaging myself as one of the "Great Men of History" to use an out-of-favor term.  I can see myself as a poor, confused, scared, grunt on the front lines trying desperately not to get killed!  Therefore, smaller scale model-vs-model and small unit-vs-small unit type skirmishing appeals.

Thankfully, Clash of Spears begins with a high level overview of the designers intent.  The idea is to have short, violent bouts of violent action.  Then both sides need to withdraw and regain their strength and courage.  The game is also intended on how leaders of such smaller units must maintain focus on keeping their units battle ready, even when faced with fatigue.  This can be mental and physical fatigue.  Finally, the game is intended to keep both players engaged through out the battle.  

That all sounds dandy to me, but can the rules actually pull off what it says on the tin?  Time to form ranks and march in to find out.

What I Liked

At the end of each section of rules, they had a nice little summary.  This made finding relevant rules very easy!  Boxed out examples were also helpful.  

Measuring is done from the closest model to the closest model.  This is an easy and sensible way to approach distance between units.  You can also not remove casualties in a way that would increase distance, so casualties come from the back of the unit. 

The biggest "innovation" in the rules is that units acquire "fatigue points" that hinder their ability to carry out actions.  These rules interact with actions, armor and terrain to indicate that units trying to push through difficult terrain while fighting will have a big disadvantage.  All fatigue applies AFTER the action is performed. These Fatigue Points impact your combat and morale tests.  Too much Fatigue and your units just run away.  You can remove Fatigue points by resting your troops.  This forces you to think through how and when you  need to time "the big push" for victory.  On the downside, a QRS and Tokens are needed to apply these appropriately in the heat of the game.  

You can use Command Points to influence Initiative rolls!  This makes it a bit of a bidding system. After that, it is alternating activation with a reaction phase.  Perhaps the reactions are over-engineering in an alternate activation game, but it does require both players to stay focused on what is happening in the game.   

The rules have a nice "Putting It All Together" Chapter that walks through a sample turn.  This was very helpful for me to understand the flow of the game and how all the components laid out in the rules went together.  This was very helpful and helped illustrate all the decision points in the game, and really highlights the importance of fatigue.  Decision points are good.   

Deployment involves using counters so you can set-up using "blinds".  Counters can continue to move onto the table until they are "detected".  Then they halt movement.  No counter can be moved in more than 6 times, or up to 24 inches without being halted.  This allows for a more varied deployment methods and some uncertainty.  Once all are deployed, you can reveal the units and they acquire starting Fatigue based on their deployment, terrain, and type of troops.  If you want to just throw down and play, you may find this approach tedious.  I like it since you have to start making decisions early.  

The book had great shots of models on the table, some of them full page shots!  They also have nice art.  They also had diagrams and images to help illustrate the rules of the game.  This is a plus in my book. 

What I Did Not Like

This rarely comes up for me, but I am not sold on the lay-out of the rules.  For example, it talks about fatigue tests and how it impacts the game, before I am even sure how the game turn is structured.  Therefore, I am left a bit confused on how the Turn Sequence and the Fatigue rules interact.  There were some other head scratchers of lay-out where I was unsure how it would play as key aspects of the interactions were not clear based on the structure of the rules themselves.  That is probably why the "Putting It All Together" section was needed.    

For maximum effect, the game seems to use Character Models and the Command Points and Command Range they provide to give you maximum tactical flexibility.  The commanders themselves are not better fighters necessarily than the rest of the troops, but allow them to execute more actions.  This makes sense to me, but the downside is that "Character" models become essential to how much you can do tactically, therefore your officer must roam the battlefield and tell your guys what to do.  I am no longer of fan of this model, with a few exceptions based on genres. 

I feel that individual units will have their own leaders  and the soldiers themselves probably know the business of soldiering.  They don't need Artorious The Named to tell them to move forward, throw their Javelins, and then fall back!  Sure, this is a skirmish, but it still feels a bit weak sauce for the level of game we are playing, but it is not the only "skirmish" style system to do something similar. Look at games like Land of the Free, Chosen Men, and Sharpe's Practice as examples.  

The game is not as streamlined as I would like as armor, terrain, actions, combat results, etc all interact to generate Fatigue Points.  In addition, each unit will have a a Fatigue Token, Activation Tokens, and Casualty removal to determine their state.  This seems a bit heavy on the tracking for each unit.  In addition, there feels like a lot of dice rolling to generate somewhat ordinary results.  

Meh and Other Uncertainties

The game allows pre-measuring.  The idea here is that troops know their engagement ranges very well, and there are plenty of other places to make a tactical mistake.  Judging distance is not one of the mistakes to be made.  

To activate a unit requires 1 CP from a Character, and 2 if the unit is out of range.  If the unit has Fatigue they will also need an additional Activation Test!  For those who complained about Lion Rampant, this is not the activation process for you!  You can see how this game is very tactical in its design where the position and state of troops really matters.  I will also emphasize that Command Point respawn is 1 less than the Character's Profile, so there is also an attrition/resource management component to the use of Command Points and a limit to the number of characters you will probably have access to in a battle.      

Units once Activated, can try to chain their activations.  However, in between chained Activations the opponent can try to react and interrupt the chain.  Reactions always require an activation test and a Command Point usage.  Finally, due to the way Fatigue accumulates sometime sit is just better to wait and remove fatigue instead of pushing all out.    

Units can activate up to three different times in a Phase. This includes reactions as well.  So theoretically, a turn could have a force with 5 units, take 15 activations.  This is unlikely to occur due to mounting fatigue.  

The board set-up has a pretty comprehensive set of rules, but they seem a bit dice heavy to create a "randomization" effect.  The idea it to limit one person or player dominating the terrain placement too heavily to provide and advantage.  There also rules for gaining re-rolls before a battle by consulting the Omens or giving a rousing speech, these are flavorful additions.  There are five basic scenarios in the rules.  

Finally, the last section has some rules for warbands for the game.  These mostly come from the Rise of Rome period, so it has Republican Romans, Gauls, Carthaginians, Greek Colonies, Numidians, Pyrrhus, Iberians, Samnites, and the Italic tribes to start you off with.  That should cover most people's ancient army lists for a good start.  The authors even acknowledge the limitations of any points system, but one is provided for players to argue over.  This should be enough to get you started with your Ancient Skirmishing.          

Final Thoughts   

This game is heavy on the friction and decision making in how to resolve said friction, and I like it in theory.  Running out of Command Points is really bad! Having too much fatigue is even worse!  However, there is a bit more book keeping and charting to the process then I would like.  In practice, a unit would have up to 3 action tokens and up to 6 fatigue tokens, which is at least 2 markers per unit, with casualty removal a third way to show the state of the unit.  In addition, there are a number of actions a unit can take that apply different situations and modifiers for a unit. Perhaps a side board is needed to help track it all?    

I am sure in practice, the modifiers and details will fall away pretty quick, but just at first blush a QRS will be needed to recall what Modifiers apply when, and how many dice you roll in certain situations.  Thankfully, the game does come with a QRS you can copy, and a card version too!  

I can't shake the feeling that this started life as a Mod to Warhammer Ancient Battles, and tacked things on instead of peeling elements off.  The way base-to-base works, the casualty removal, the focus on individual armaments and gear, the dice approach, initiative in combat, it just feels like the level of "Crunch" vs. "Abstraction" that the old GW game had.  I had the same feeling about Osprey's Chosen Men, too.  I am probably wrong in this case because there is a lot of divergence from that model.  In fact, at one point the designers say, "We have tried to use simple, standard mechanics for combat and shooting to leverage the experience that many players have had with previous games".  This maybe the source of this thought, since the focus on Fatigue is VERY different than many other games systems.     

Overall, I think the games emphasis on Friction and Fatigue is a great idea.  To me that is the heart of ancient battle.  The delivery I am not as sold on.  I feel more thinking on the process could have led to a more streamlined approach to achieve the same desired results.  There is some places where they choose to abstract such as measuring, formations, flanking, etc; and others where they choose to get detailed such as weapon initiative, defensive postures, how actions impact location and formation, etc.  I know these are skirmish rules, so a certain level of "detail" is needed; however I can't shake the feeling that the level of abstraction is still too granular.  There is no doubt a good scope for decision making.  There is nothing fundamentally wrong with the methods used, and I am sure they give a fine game.  There are some points I think they abstract better than others in the rules.  


You can follow Blood and Spectacles Facebook page for more fun: https://m.facebook.com/pg/BloodandSpectacles/posts/?ref=bookmarks&mt_nav=0

Or our website:

Or our Messageboard:

Or our Wargames Vault Page:

Monday, October 12, 2020

Review: Rogue Planet- Bombshell Games/Brent Spivey


I have been meaning to pick up these rules for about two years now.  I finally got around to it when they went on sale at the Wargame Vault as part of the Summer Offensive.  The price was hard to pass up and I ordered the PDF and a soft cover of the book.  Today, I will be looking at the E-book.  I also received a Desolation Planet edition which is full of really awesome artwork, but I am using the E-book for the rules.

Rogue Planet starts with a nice couple of paragraphs about what it is.  It is Sci-Fantasy.  What is that?  The book spends a lot of time telling you.  I think my favorite description was Sword-and-Planet instead of Sword-and-Sorcery.  The book points out examples of the genre such as Star Wars, Final Fantasy, and Heavy Metal.  I think we can all think of one or two others as well. 

From there, Brent Spivey then spends some time explaining a bit of the flavor and his design philosophy for the game.  I am always a sucker for such designer notes.  Rogue Planet lands squarely in the camp of cinematic action.    To paraphrase the author: "If you find yourself wondering why a mechanic operates in a certain way, chances are the answer is one of the following reasons:
  • It is cool
  • because it is Sci-Fantasy
  • You are on Rogue Planet
  • It leads to interesting tactical decisions"
Well, what isn't to like about that philosophy?  So, now that we are marooned on Rogue Planet, let's see what we discover.....

Things I Liked
I always am a sucker for a Scale and Model agnostic game.  Yeah!

The game starts each turn with a choice.  You can roll a dice to generate 1d6 action points, or you can play it safe and get 3 guaranteed.  The player with the most action points can choose to go first or second.  Now, everyone knows I am not a fan of action points BUT this initial choice is intriguing to me.  It forces a player to make an early decision that will impact the tactical play for the rest of the turn, and may impact initiative.  The player who had fewer action points last turn can roll 2d6 and choose the highest dice, a simple balancing mechanic.  All of this in the first actions of a turn.   

The game uses a simple 2d6 skill check roll.  I like 2d6 as it gives a nice curve of results.  7+ is a partial success, with 10+ being a complete success.  Interesting, if you fail a skill check your opponent gains two free move activation immediately.  A success of 7-9 also allows a single opponent activation for movement.  That means every time you pick up a dice, you are risking allowing your opponent to act.     

Some units or equipment can access and use something called a "Rogue Die"  It is rolled at the same time as the skill check.  If the Rogue Die matches one of the other dice, it could trigger additional benefits.  This is separate from Crits and the like.  

Movement in this game is entirely free-flowing and promotes terrain placement.  Why?  When moving a unit can move as far as they want in a straight line until they interact with terrain or are halted by the opponent making a Counteract action and using Action Points, which are a limited pool.  Therefore, if you pick up the dice and fail, your opponent can potentially really exploit the situation.  In addition, there are no ranges, only engaged in melee or available to shoot at.  There is no measuring in this game.     

In addition to having a random Action Point pool generated at the beginning of the game, players also have a pool of energy.  This can be used to help save models based on their armor.  However, it is a limited pool and once it is out, it is out.  Choose how you use it wisely.   The pool size is based on your forces construction.   


Things I Did Not Like
As we have mentioned, players get 1d6 (or 3) action points a turn to activate and use any of their models anyway they wish.  All actions cost 1 action point.  There are some rules about no more than 2 consecutive actions (Heroes get 3), but it would have been much easier to just give everyone 1 action.  I suppose this forces you to decide who and how you want to use each model, but it could also just lead to your champion getting the bulk of the actions while the others cheer them on. 

Modifiers are capped at +3 and -3.  The caps are a bit confusing as why maneuver for maximum effect?  It is capped anyway.  However, the difference between two opposing units ability scores will also be a modifier.  Ability scores range from 2-7 so if a combat ability of 4 went up against a combat ability of 7, the difference would by +3.  However, the bonus only applies to the active units.  This game has a lot of modifier calculations to apply to that initial 2d6 roll.   

Doubles rolled on the 2d6 can trigger a critical.  Criticals make using energy expenditure to save the target much more expensive or impossible. 

Since the game uses no actual measurements, there are some events or effects that DO need a standardized measure.  The game uses the width of three fingers.  This is a method I have used myself in various dexterity games, but those are different types of games than this wargame.   


Meh and Other Uncertainties
The game also allows the non-initiative player to spend action points to counter-act to things.  You know dodge, counter-charge, return fire, that kind of stuff.  However, the active player can not counter-counter act. 

Of course, as a model and scale agnostic game that means it must have a way to create and stat up models.  There are several pages on creating stat lines, armor values, weaponry, skills, Hero abilities etc.  It is pretty straight forward and easy to use.  

The game outlines 4 different "power levels" to play the game at.  This sets some limits on what can or can not be taken and gives players a way to scale their games and units to be of roughly equal power.  In addition, there are 6 scenarios.  Lastly, there is discussion about multi-player games too.   

There are some extra fun combat actions besides just moving and shooting.  These include throwing objects, destroying terrain, colliding, staggering a foe, etc.  One of these is that when a enemy unit is in Treacherous Terrain, your opponent can choose to spend an Action Point to have the Treacherous Terrain "attack" that unit.  Nice additions to add flavor and chrome.    

The Desolation Planet version of the book has some amazing artwork!  Love it!  Some example models linked to game rules/profiles could be helpful though.  Afterall, the FAQ specifically calls out that these rules could be used to play out a grim, war-torn, gothic future!    


Final Thoughts
Who doesn't love a good scale and model agnostic game for sci-fantasy games!  This will allow you to bring whatever you have to the table and play an interesting and tactically challenging game.  For a 24 page rulebook, this game covers a lot of ground and allows for a wide variety of situations, models, and stuff.  

This game has a lot of interesting and good ideas.  However, I can't help but think that as a whole the game is a bit over-engineered.  In that respect, it reminds me a bit of Pulp Alley where there are a lot of great mechanics and ideas, but perhaps too many in one game system.  I can't shake the feeling that it is trying a bit too hard, and is therefore a bit challenging with all the minutia of when to do what when.  A good quick reference guide seems like it is a must have for this game.  Thankfully, one is provided when you buy the PDF!  

That being said, if I compare it to other scale and model agnostic games in this genre it has a lot of positive things going for it.  Customization and unit creation is pretty simple.  The power scales also allow you to do some sort of "escalating" campaign.  I think the rules give you enough lee-way to do some fun stuff, and the FX and Rogue Dice allow for some "cinematic" moments to be created as well.          
I just need to figure out how I want to use this game for myself so I can get it on the table.  The game feels geared to a hero model and a couple pawns, with a group or two per side.  That fits small scale skirmish, but I could also see it being usable Mode vs. Model too.  Now I am rambling as I think about how to use it myself.....

Anyway, this looks like a solid set of low model count rules that you will want a good FAQ to play the first couple times.  I will probably play it a few times.      


Monday, October 5, 2020

Wargame Design: Deployment is a Choice


As I continue to think about Wargames, I realize that the pre-game has a number of opportunities to drive choices for the player.  Choices and decision making are important to make a game "fun: and replayable.  We have looked at Movement can be Cool and we have also discussed Terrain Placement as commonly overlooked segments of the rules that can help create more Tactical Game Play in your games.  A related, but often overlooked piece of the puzzle is how a game allows you to set-up your initial pieces.   

For a long time, I was blinded by a "Line 'em Up and Shoot" mentality in my wargames.  I like to think it was because that is what I initially was raised on.  However, as I go back to those early games, I have come to realize that it was more of a self imposed sanction.  Many of the games I was playing had other ways to deploy than that.  I was just choosing not to look at them as I barely had a grasp of the basics of wargaming at the time.  Therefore, the nuances of deploying tactically were beyond me.

As my skills advanced, my interest and desire for alternative deployments grew.  I was looking for new ways to shake up games and keep them interesting.  I was also interested in recreating actions I read about in history, saw in other games, or to just tell a interesting story on the tabletop.  Deployment of my forces changed the tactics available to me and how my own units interacted with each other.  This became much more interesting to me than the actual resolution mechanics themselves.

For some reason, when I made the jump to designing game myself, the nuances and interest in deployment did not follow suit.  Perhaps because games themselves had gotten better at integrating alternate deployments into their rules and scenarios.  Skirmish games especially seemed to excel at these alternate deployment models.  Larger scale battle games seemed slower to adopt these alternative ideas.  Either way, my early games designs focused more on the mechanics to resolve actions and less on how armies were arrayed for battle.

After being exposed to a number of games and systems, I am now realizing that deployment options and what you provide is an interesting way to help Create Balance and differentiate Historical Scenarios.  

Deployment can be broken down into two broad categories:

1. Where you can put troops
2. When you can put them there

Both of these key considerations have a big impact to how the game flows.  Think of Chess for a moment.  Imagine if the pawns were not placed in the front rank, but were on the flanks?  What if instead of setting up both sides across from each other at the same time, you could place them anywhere you wanted in the two rows by alternating placement?  I think you can all ready imagine how such simple changes to the rules of Chess would completely change how the game is played.

Your wargame design is no different! Simple changes in these types of mechanics change the entire flow of the game.  Remember, the simple maxim; the more choices the more decision points.  The more decision points the more replayable.  All of these lead to more fun in your design.

So, let's talk a bit about how it is done.  As always, be sure to go out and research a bunch of games so you can build your own tool box of ideas for your own designs.


Where to Put the Troops
In this case, we are mostly talking about deployment zones.  This is where your troops set-up to start the game, and where your opponent can deploy troops to start the game.  There are a variety of ways to go about it, but here is a selection of some of the most common, the pros and cons, and a game example that I can think of.

Long Edge to Long Edge
One player has one long side of the table, and the other has the opposite table edge.  This is the most common example you see.  There maybe some fiddlying around about how close you can get to the side edges, but overall you are looking across the table at the opponent with room to maneuver on the flanks. 

Pros: Long edge to long edge is very common, as the dynamics of the table are well known and allow you to get into the action early.  If your average move rate is 6 inches and shooting is 24, you know you will have one round of maneuver followed by a decent firefight in the center area.

Cons: Games with long ranges or poor move to shoot ratio can be compromised in a long edge to long edge scenario.     

Game Example: Warhammer Fantasy Battle/Warhammer 40K for many editions, Bolt Action.

Short Edge to Short Edge
Both players are set-up on opposite sides of a long table.  They are on the shorter board edges with a longer distance between the two sides.   

Pros: This disrupts the normal "flow" of a Long Edge to Long Edge battle.  However, there is more time to close the distance, but less actual maneuver space.  This works better for games with fast moving units or where you need to see attacks develop in advance. 

Cons: As mentioned, there is actually less maneuver space than the traditional Long to Long lay-out.

Game Example: Aeronautica Imperialis  

Square Side to Side
Very similar to Long Edge to Long edge except the table itself is a square surface.  Both players take opposite sides of the table and can deploy either along it or up to X space inwards.  Since the board is square, all distance between points on the board is the same.

Pros: Quick and easy to set-up.  Everything is about the same distance away.

Cons: A very traditional set-up that can get a bit repetitive and samey after a while.

Game Exampls: Most skirmish games use this as a default

Corner to Corner
Instead of deploying along a board edge, you deploy in the corner of the board.  Typically, you can go so far in up the corner edges and then across from those two imaginary points.

Pros: On a Rectangular board this really changes up the normal move and range calculations used to break up a game.  On Square boards it is similar to Square side to Side only edges.

Cons: Setting up and explaining the deployment zones can be a bit more complicated.  Pictures really help.

Game Example: Often a variant in Skirmish games

Corner vs. Edge
One player gets to deploy in the traditional "edge" zone, while the other starts in the Corner zone.

Pros: Can be used to set-up specific scenario rules or add flavor to historical scenarios.

Cons: Getting all of the a large warband or army into the edge zone in a compelling way can be a challenge.

Game Examples: Men of Bronze- Scenario Specific

T-Shaped
Instead of a straight box, the deployment zones are inverted T shapes, allowing penetration into the center of the board.  This could be a special rule for some units, or for a specific purpose.

Pros: Good for setting up early confrontation with follow-on forces afterwards.  This could represent a Spearhead or a tripwire defensive installation.

Cons: Typically best when used in a specific scenario.

Game Example:

Center vs. Edge
In this case, one force has a deployment zone in the center of the board.  Then, enemy units are placed on opposite board edges or any board edge.  Allows enemy forces to mass against the center forces weak spot, while the center force must use interior lines of communication to move to the threats. 

Pros: Great for Ambush scenarios and similar situations where escape is the order of the day.

Cons: Scenario specific is the best use as opposed to everyday game play.

Game Example: I can only think of scenario specific examples in various games.

Anywhere Plus X
Units can be deployed anywhere as long as they are X distance away from enemies or objectives.

Pros: Allows free form deployment that gets to the action quick.

Cons: Leads to scattered and piece meal forces.

Game Example: Of Gods and Mortals

Jump off Points
Each player has a "jump off" point where they can deploy units within X distance into the game.  Often this is combined with reserves and other "timing" related deployment rules.

Pros: Used , this can add an element of force management to a game as the player needs to get his troops where they can do the most good in a timely and coordinated way.

Cons: Forces can be piecemeal and deployment can be seen as chaotic.

Game Examples: Chain of Command


When You Put The There
The next key element of a deployment rules is the timing of placing your models.  The order you can or can not put models on the table also drives a great deal of choice and the flow of the game.  A unit not in the battle influences it differently than one on the table.  Knowing a powerful unit is waiting to deploy will change how a player thinks about how to use their own units to prepare for that units arrival.

Here are some common timing related elements of deployment:

All at Once! 
Both players can put all of their models on the table at the same time in any order.  Often, deployment in such a method maybe set to a defined map or historical set-up.

Pros: Quick and easy to explain.

Cons: Player choices are made in the vaccuum of their own army list or model counts.

Game Example: Many Historical rules

Side A, Then Side B
Once side fully deploys, the other side can then deploy based on how Side A deployed.

Pros: Can be useful to give Side B an advantage and works good in attacker/defender type scenarios.

Cons: Side B is seen to have the advantage in deployment.

Game Example: I can not think of one

Alternating
Players take turns placing models.  Player A puts one down, then Player B.  They continue until all models are deployed.

Pros: Players have to make choices about the order they place their models.  Does it make sense to put down the heavy hitter in the center to influence your opponents deployment, or to wait until they can not react to where it goes?

Cons: The longest process for deployment.

Game Example: Most Skirmish games

Restricted Alternating
Like Alternating above, except there is some arbitrary restriction to the order you can place a model down.  For example, Cavalry, Infantry, then Artillery; Or Units with the "Scout" special rule first.  This puts limits on what can deploy when.

Pros: Allows you as the designer to build some advantages for units into the rules as "chrome" or force a certain "deployment" method.  I.e. Destroyers first....

Cons: Takes the longest, similar to Alternating but with an extra layer to explain.

Game Example: Many editions of Warhammer Fantasy/Warhammer 40K

Reserves
Some units can not be deployed until after the game has begun or at a different time in the game.  This can be after a number of game turns, when the player chooses, or by a random dice roll/card flip.

Pros: Allows you to add "Chrome" to some units.  Also, adds an element of force management as the "right" units need to get to the board at the right time to accomplish their mission.

Cons: Again, a complicated approach to explain and balance in the rules.

Game Example: Jovian Chronicles


The Right Tool for the Job
Like most of the decisions a game designer needs to make, you are really looking for the right tool for the job.  What are you trying to create on the battlefield?  What fits your Design Goals?  There is avast array of options to choose from, which fits what you are trying to do?  As the designer, it is our job to make that decision.


You can follow Blood and Spectacles Facebook page for more fun: https://m.facebook.com/pg/BloodandSpectacles/posts/?ref=bookmarks&mt_nav=0

Or our website:

Or our Messageboard:

Or our Wargames Vault Page: