Tuesday, January 31, 2017

Review: Pikeman's Lament- Osprey Publishing


Osprey’s Blue Wargame Series continues to roll on with this release.  The focus in these rules is Pike and Shot battles of the 17th century.  However, unlike many games from this genre it is focused on skirmish between small units as opposed to full scale battles.  If you are familiar with the Rampant series of rules, then you know the scale and design philosophy behind these rules.  Before reading further, I recommend you take a look at my Lion Rampant and Dragon Rampant reviews first.  Pikeman’s Lament uses the same core rules with some improvements.  With that in mind, this review will try to focus on the difference between this rules set and the previous two that were mentioned.

Things I Liked
There are two main differences that I thought were improvements on the system.  The first was an expansion of the campaign system that built off the old Glory/Boasts system.  However, this one was called Honor.  As your leader won battles or accomplished special orders your officer gains Honor.  As they go up in Honor they can acquire new skills and leadership traits.  You can also lose Honor from failing missions and special orders, and enough failure leads to your officer getting executed!  If your leader is removed from the table, there is also a campaign chart to see what happens to them.  These changes were a nice improvement from the previous campaign rules. 

The second big change is also with the Leadership traits.  In Lion Rampant the traits were from a smaller list that was not as balanced.  In Pikeman’s Lament, your officer gains an initial trait that is tied to their randomly rolled background.  From there they can earn additional traits as they progress with improved Honor.  The leadership traits are better thought out and more balanced than from Dragon and Lion Rampant.  However, the list is not as extensive as The Men Who Would Be Kings

I was excited that they managed to capture the caracole maneuver in the rules!  That particular way of fighting was interesting to me. 

Things I Do Not Like
I was disappointed by the sample armies presented in the booklet.  As I was reading it, I was interested in a Thirty Years War Catholic force aligned with Tilly.  However, when I got to the sample armies, they covered only a handful of very specific engagements.  Granted, it was cool that they were small engagements ripped right from the type of “Outpost Warfare” the game was focused on but it did not cover some key forces in the period.  Granted, that means I will have to do some basic research but since I am not an expert on the period it is just another thing I need to do before playing! 

The scenarios in the game look like they are similar to the ones found in the other booklets.  However, I believe the Rescue scenario is new.  If your Officer is removed from the table you roll to see what happens to them, and one of the results I captured.  You can use the rescue mission to try and save them!  However, the others looked like a rehash, which was disappointing since Lion Rampant and Dragon Rampant had unique scenarios.  

Meh and Other Uncertainties
Pikeman’s Lament continues the tradition of a failed activation test leading to the end of your turn and activation moving to your opponent found in Lion Rampant.  This is unlike The Men Who Would Be Kings which also deals with more firepower forces.  However, I think the traditional DragonRampant approach fits better for this period as it will lead to a free flowing game with lots of back and forth.  However, some players have been disappointed by this activation method as some units will not get to act reliably.                  

The rules also still use the 12 or 6 models per unit method made famous in the original LionRampant rules.  That means your units will only have 6 or 12 models.  That does not appeal to some gamers, and it uses model removal for wound resolution.  You don’t have to use that method, but it is recommended in the rules.  I have come to prefer systems where there is no model removal because we all work too hard painting stuff to simply remove it from the board after a turn or two. 

The other rules systems that Pikeman’s Lament is related to also had a Morale mechanic where Wavering units that were forced into a Wavering condition again or could not retreat took wounds instead.  This mechanic is in these rules too.  However, I had forgotten about it until I read it again.  It is a good mechanic and I wanted to call it out here. 

Final Thoughts
After Lion Rampant came out there was a small cottage industry of game systems coming out using those rules.  One of my favorites was Quetzcoatl Rampant about Aztec and Conquistador warbands.  I also heard reference to using the system with Ancients, Vikings, Nappies, Chariot wars, and other settings.  I even tried my hand at a Sci-Fi version myself called Rampant StarsPikeman’s Lament was one of those versions floating about online.   I am curious to see how often Osprey will go to the Rampant well and take a drink? 

If you like the Rampant approach to games, then Pikeman’s Lament will not disappoint.  It only builds a more robust campaign element and adds period specific spin to the army lists.  Other than that the core engine works the same.  So if there were things in Lion Rampant or Dragon Rampant that you did not like, they will still be here.  I like the core mechanics as they emphasize small unit skirmish, quick resolution, and streamlined play.  I look forward to using them in a new setting. 

Monday, January 30, 2017

American Civil Paw- Battle Report- Battle of Miller's Creek


In 1862, the state of Kenteddy had declared themselves neutral, but Tederalist and Contederates had both moved into the region.  Contederate sympathizers established an alternate capital at the city of Bowling Green.  However, their numbers were inferior to that of the Tederalists in the region. 

Luckily for the Contederates, the command in the west was fragmented between several competing commanders for the Tederalists.  This led to confusion and an inability to unify their efforts.  Tederalist Brig. Gen James Bear Garfield  attempted moved to drive Contederate Brig General Humphrey Bearshall from the area as they had been using it to recruit new bears to their cause. 

After maneuvering, the two, roughly equal forces met not far from the fork in Miller’s Creek.  They fought over a small field and swampy region between the woods and rocky ridge line that was the border of the creek.  This battle would help decide who would control Kenteddy.       

The Forces
The American Civil Paw: Battle of Teddysburgh is an interesting version of the American Civil War since is being fought by teddy bears.  

Tederalists
-          Brig Gen. James Bear Garfield- Brigade Officer
-          3 Infantry
-          1 cavalry
-          1 Battery of cannons

Contederates
-          Brig Gen. Humphrey Bearshall- Brigade Officer
-          3 Infantry
-          1 Cavalry
-          1 Battery of cannons

I purposely chose identical armies for this battle so that I can test out the rules fully and highlight how they work.  I am interested to see what I find out. 

Set-up
The board is 6 x4.  It is flanked by difficult terrain with woods on the west side and rocky ridges on the east.  On the north side is a couple of small fields that the Tederalists are deployed in.  The field will be difficult terrain, but also offer some light cover.  A small pond and swamp are off-center.  On the South side, the Contederates are deployed in the open. 

The Contederates deploy with the cavalry on the left, then two regiments of Infantry in line, their cannons, the General, and a column of infantry in the ridgeline.

The Tederalists have two lines of infantry backed up by the third line with cannons on the left of them.  On the far left behind the pond is the cavalry.

 Mission
This will be a straight forward battle where each side is trying to run the other side off the field and out of the state of Kenteddy.  No fancy mission objectives here just knock the stuffing out of the other side. 

Turn 1:
The two sides close in on each other, they are still too far away to fire, but anticipation is in the air. 

Tederalists on the left and Contederates on the right. 

Turn 2:
The Blue Jacket cannons ring out and the balls find their mark in the advancing Grey cavalry.  This is followed by Union infantry firing into the Contederate hobby horsemen, and a charge by Union Teddy’s own cavalry.  The Contederates are sent reeling backwards with 4 hits and panicked! 

The Contederate infantry advances and manages to injure some of the opposing infantry in a brisk exchange of musket fire.  On the Western flank, musket fire through the crops does not go the Contederates way. 

Turn 3:
Tederalist troops move up and pour fire into the 1st Contederate infantry regiment.  The Contederates respond with a charge, but are sent reeling back in a panic.  The two cavalry units clash again, and the Contederates are forced back reeling. 

The third Tederalist troops form column and charge into the second Contederate infantry.  However, these Contederates are made of sterner stuff and force them back panicked.  The Contederates must have a spine of steel as they counter-charge and smash back the Tederalist cavalry and beat the remnants of the Tederalist infantry again, forcing them back in a further panic! 

This gives general Bearshall some breathing room and he is able to call in his reserve infantry units.  They dash forward in column and then change to line to back up the 2nd Contederate infantry regiment.  He also manages to rally his panicked cavalry.

Tederalist General Garfield is not as lucky and fails to rally any of his panicked units.  This could be the decisive moment of the battle!

Turn 4:
Contederate cannons find the Tederalist cavalry with a barrage, but fail to break them.  The fierce Contederate 2nd infantry switches into an assault column and charges into the Tederalist 2nd Infantry in line, who has been untouched by fire.  However, the thin blue line holds and pushes back the Contederates in a panic! 

The 1st Tederalist infantry unit tries to Volley fire, but is too unorganized.  However, their shooting is still effective, and the 1st Contederates are near the breaking point!  Sensing that the 1st is about to scatter, General Bearshall shuffles his 3rd infantry into place to back them up.  This re-shuffling was just in time as the 2nd Tederalist’s fire breaks the 1st Contederate infantry and they scatter and rout to the rear!  They are first unit broken in the game.  General Bearshall rallies the pancked Cavalry and orders them to fill the game in his line by the pond.  Ineffectual fire from the rallied unit fails to tell on the 3rd Tederalist forces. 

General Garfield fails to rally the panicked 3rd infantry and they stay in their panicked columns.  The Tederalist cavalry charges home on the Contederate brothers.  However, they are again repulsed and sent panicking backward.  The third infantry manages to pull themselves together enough to change formation and set-up to backstop the Union lines.  With the flight of the Tederalist cavalry, the artillery fires at the Grey cavalry but fails to cause significant injury. 

Things look bad for the Contederates.


Turn 5
General Bearshall rallies the 3rd Infantry of the Contederates and they shake out of column and into a firing line.  The 1st and 2nd Tederalist infantry fire on the reformed Contederates with volley fire, but failed to do more than scratch them! 

Gen Garfield rallies his cavalry, but they let eh artillery do the dirty work.  The Union battery blasts the Contederate cavalry from the field with a precision barrage.  With the Contederate cavalry fleeing, their batteries try to return the favor on the bluebellies, but fail to get the range.  This allows the Tederalist cavalry to hit the flank of the Contederate 2nd Infantry, but the Contederates repulse them easily! 

Turn 6
The Contederates try to reform their lines, but an exchange of fire between the 3rd Tederalist and 2nd Contederates leaves the Grey bears routing the field.  They had had enough.  The Contederate artillery battery manages to rout the 3rd Tederalist infantry unit.

Gen. Garfield managed to rally the panicked cavalry, who rushed forward and opened fire on the last Contederate unit.  However, their fire was mostly ineffective. 


Conclusion
Gen. Bearshall surveyed the field and decided discretion was the better part of valor.  He ordered a withdrawal, and his last remaining units retired under artillery fire.  His troops withdrew to Teddessee and left Kenteddy to the Tederalists.  The secessionist legislature fled, following after Gen, Bearshall and his troops. 

Gen. Garfield was unable to follow-up and pursue as he became caught up in the bearocracy of the Tederalist War Department.  The chain of command was unclear.  Despite freeing Kenteddy from Contederate forces, further follow-up would not come to later. 


Final Thoughts
Interestingly enough, shooting was much more effective in this game that a first read through would indicate.  The long charge range seems to indicate that charging is a preferred attack.  However, I had almost zero positive results from charging.  Assault columns were rebuffed by line formations, cavalry was repulsed by infantry, and even a flank charge failed!  My reading of the ACW would seem to indicate that this is accurate to the warfare of the time and that charging was a last desperate strategy.  However, I was really disappointed by the result of the flank cavalry charge. 
We were also late to learning the amazing firepower of artillery in this game.  I should have been using it more effectively, but my own troops often screened their firepower.  It will take careful planning to make the best use of it next time. 


On game mechanics I think some work still needs to be done on flanking, LOS, and partial LOS/cover firing.  I enjoyed the initiative system immensely but once a unit was destroyed mid-turn there needs to be a way to remove a counter.  I am unsure how that would work.  However, it was a quick game and ran smoothly.            

Friday, January 27, 2017

Review: Shockforce: 2nd Edition- Demonblade Games


I was directed to the Shockforce 2nd Edition rules by an acquaintance on the Dakka Dakka message board.  Eilif is a member of the Chicago SkirmishWargames Club and he has had exposure to a lot of skirmish games.  If he points me towards a game, I tend to take his advice.  I found the rules on the Wargame Vault and they are a “Pay What You Want” downloadable set.  Therefore, the price is affordable. 

The rules themselves are a skirmish set in the remnants of a future America.  There is a set of army lists, but the main point is the WarEngine system that allows you to stat up any miniature you want into the system.  That makes the rules look like a relatively versatile set for your Sci-fi Skirmish needs. 

So, let’s dig into the rules proper and see if it lives up to expectations.

Things I liked
The game uses a dice system that reminded me of the Legend of the 5 Rings role-playing game.  In this game, you are given a set amount of dice that you roll and can keep a set amount.  Modifiers allow you to roll or keep more dice depending on the modifier.  These are opposed rolls, so the player with the higher roll is the winner with ties going to the defenders.  This is an interesting dice mechanic and I am glad to see it applied in a different game.    

The game gives each unit a leader who has a command radius.  The command radius seems to be between 6 and 10 inches usually.  Troopers outside of the leader’s command radius operate marginally less effectively than ones in radius.  This is a method to create unit coherency as a bonus, but not required part of the game.

A unit can be forced to test for Routing because of casualties and/or because their leader was killed.  Troopers in control could stay in the game, while uncontrolled troopers run off.  This is another nice touch to encourage unit coherency but not force it.      

There is a “Massed Attack” rule that allows multiple lesser enemies to gang up on a larger, better enemy and potentially take them out.  This applies to ranged and/or close combat attacks.  This means that units working together can be more effective against larger targets.    

Things I Did Not Like
Units can move and shoot as many times during activation as they have movement and shooting.  Typically, I prefer a bit more restriction.  It seems a bit counter-intuitive but it forces you to make choices.  Troops can’t always do what you want them to do when you want it. 

The game has a decent amount of modifiers, but sometimes they can be challenging.  How many extra dice do you get, and how many do you keep?  Some of the modifiers once you include tweaks and powers can be a bit much.  You will definitely want reference sheets handy for your units as I don’t recall seeing a QRS in the booklet.  I am getting to old (and play too many games) to remember all of these details.       

Movement in Shockforce is in multiples of 3.  Therefore, many of the movement ranges can be pretty large with the average Move looking to be 9 to 12 inches.  That means units will be moving pretty rapidly.  Shooting is only 18-24 inches for the most part so there you go.  Maneuver and assault will be the focus of the game.    

Much of the book is dedicated to the Shockforce background.  It makes sense but I wasn’t that interested.  It is more useful to help you understand and balance your own custom units.  However, it takes up the bulk of the book. 

Meh and Other Uncertainties
The turn starts with an initiative check, and the highest can decide to go first or second.  Play is alternate activation.  When a unit is activated they do all their moving and shooting. 

The game has a resource management system with the use of Hero points.  Forces buy a certain number of hero points that can be used by any model, up to their limit. The Hero points can be added to the dice roll results to try and guarantee a hit or avoid one.   

The game allows you to customize your forces.  In theory this is really cool.  However, the method of doing it can get a bit clunky.  You have personal points, tweaks (good and bad), weapons, and special powers.  This makes it more of a toolbox than anything else.  It feels like building and customizing your own forces could take a while and is best done prior to the game.      

Final Thoughts
The Evil Monkeigh from the Delta Vector blog claims that all wargames designers start their career by trying to make a better 40K.  I can’t shake the feeling that this game was spawned out of a desire to make “better” 40K rules.  The mechanics are very different from any edition of 40K, but there are some signs to me.  Realistically, it might be someone trying to make a sci-fi version of a Legend of the 5 Rings tabletop game too.   

The most interesting feature of the game to me is the lack of “Coherency” rules.  Troopers out of coherency can still act as normal, but just not as well as when they are in command radius.  This is an interesting way to encourage units sticking together but they do not have to.  This is an idea I would like to explore further and reminds me a bit of A World Aflame

The WarEngine is cool, but a bit clunky.  The core mechanics seem designed for single model skirmish style game, but the game structure seems to be squad on squad.  I think the mechanics will work fine for a handful of models a side, but squad vs. squad would get really clunky.  To be honest, after reading the rules I am unsure how the makers intended the game to be played. 

I do not see myself playing this game further.  

Wednesday, January 25, 2017

Aquanautica Imperialis- Battle Report- Duke of Iron vs. Da' Big Boss

After the escape of the Scourge of Ammoriss into the southern ocean, NavComm North turned to securing the merchant lanes for the safe conduct of cargo from Greater Ammoriss to the manufactorum's of the North.  Weeks after the outbreak of the South Ammoriss rebellion, Ork forces made planetfall on the planet under Warlord Gark.  Soon, the sea lanes were menaced not only by heretic raiders, but by xeno scum as well.  

The newly commissioned Duke of Iron was assigned to protect the Salvation Island chain.  This key stretch of islands acted as a midway point on the long merchant routes from Greater Ammoriss to the western ports of the North.  The island chain was home to several key strategic points, and only a small Naval flotilla protected the critical zone from the enemy.  

Flag Captain Augustus St. Pierre was put in overall command, and provided the newly recommissioned Duke of Iron Reliable Class Cruiser to act as his command ship.  A days sail away from his new assignment, the look-outs on the Reliable spotted smoke on the horizon.  Augur signs confirmed a ship, but could not identify.  The Flag Captain ordered a rendezvous course set, and the other ship seemed all to happy to oblige.  

As the mystery ship drew closer, look-outs were able to confirm it was a xeno raider.  NavComm North was not the only ones interested in the Sailor's Rest Chain.  The Orks had also come to raid the shipping lanes.

The Ork craft seemed all to eager to engage.  Flag Captain St. Pierre didn't back down from a challenge.  So, history has recorded the first battle of the Salvation Islands Campaign, a ship-to-ship engagement between the Ork Big Dakka Boat, Da Big Boss; and the North Ammoriss PDF Reliable cruiser, the Duke of Iron.              

Enemy Sighted!
My opponent and I agreed to randomly roll up a Raid scenario.  I was not excited to see us roll-up Cruiser Clash.  By mutual consent, we both agreed to only bring one cruiser apiece.  In retrospect, it was a good scenario to get us going.  It allowed us to familiarize ourselves with the rules, and ease our way into the Campaign.  

We decided that this battle was going to take place in the open ocean.  It was going to represent the Duke of Iron sailing towards its new command.  Meanwhile, Da Big Boss was patrolling the merchant lanes looking for victims.  By chance, the two ships happen to cross paths along the main merchant routes.  Therefore, we did not place any terrain for this battle.  Again, I was hesitant, but my opponent wanted to get a strong feel for the mechanics.

Duke of Iron versus Da Big Boss
Cruiser Clash

Turn 1
Initiative: Orks win

Move:
Unsurprisingly, the Orks use their Waaagh! Move to race forward and try to close the distance between the two ships.  For her part, the Duke of Iron turns to the side to bring her Broadsides to bear.  She has crossed the T of Da Big Boss, and is heading to the Ork cruisers starboard side.

Shooting:
Da Big Boss finds that the her firepower is reduced as the gun krews hold on for dear life as the ship surges forward.  In addition, the PDF ship is cunningly moving abeam to make the few shots that can be fired harder to hit with.  Wetboss Narblitz just shrugs and bellows for his boyz to open fire.

Two of the shots seem to be on target, and the Flag Captain has a serious problem.  Should he Brace for Impact and potentially avoid damage or trust in his ships armor and attempt to Lock-on when he could fire?  One of the hits could potentially cause Critical damage!

This early in the game, Flag Captain St. Pierre decides to risk it and trust in his armor.  The extra hits from Locking On could make the difference as the Ork Krooza will be able to Brace freely, since they have all ready attacked.  The Flag Captain's gamble pays off, as his ship's armor belt absorbs the Ork shells, sending an ominous ringing throughout his ship.

Now, the Duke or Iron can attempt to return the favor.  Thanks to the turrets on the Reliable cruiser's Macro-cannons, she can turn all her firepower on the xeno marauder.  The St. Pierre gives the order to Lock-On and fails the command check. The ringing of the ship's hull garbles the message, and the gun crews are unable to carry the order out.  The gunners have a difficult shot as Da Big Boss is wreathed in obscuring smoke, and moved over 12 inches.  They need 6's to hit.  Locking On would have made things a lot easier!

Despite the tough shot, two shells strike home.  Wetboss Narblitz orders the Ork krew to hunker down,  and his Nobz ensure the order is carried out.  Good thing too.  The shells batter the armored super structure, but the grot riggers are able to seal key bulkheads thereby avoiding any serious damage.  

End:
There are no Hulks, no Ordinance, and no wake at this point.

Turn 2
Initiative: Orks Win, the +1 Leadership due to Nobz is really paying off!

Move:
Da Big Boss slows its movement, choosing not to Waaagh! This turn.  She makes a turn to starboard to try and keep the PDF ship in her Bow weapons arc.  That is where her heaviest gunz are.

Flag Captain St. Pierre knows that the Orks will shoot first again.  He decides to try to increase speed to get out of the front arc of the Big Dakka Boat.  He successfully orders All Ahead Full.  This successfully moves his ship away from the Ork ships bow gunz.

Full dodge!
Battle:
Wetboss Narblitz fumes impotently as the PDF cruiser has rushed out from under his gunz.  The Starboard batteries open fire with a belch of flame and smoke, but the shells splash harmlessly short.

The Duke of Iron's stern gun batteries swivel smoothly on their turrets and bring their superior range to bear on the ork vessel.  This time, it is moving abeam, and still wreathed in smoke.  The Macro-cannons open fire, but fail to find the Ork ship.

End:
Nothing to do in this phase.

Turn 3:
Initiative: This time the PDF won!

Move:
The Flag Captain wants to set-up for future broadsides, so he orders, Come To New heading.  This will reduce his firepower this turn, but will hopefully help him get the angle for future shots.

The Ork Wetboss is in a tight spot.  His ship is somewhat out of position.  He can either rush ahead to create a greater distance and move out of range, try to match the PDF ships maneuver and risk her guns, or turn slowly and hope to find the range with her side batteries.

The Narblitz decides to Waagh! forward.  This doesn't require a command roll, and keeps him moving abeam to the other ship.

Battle:
Despite the Ork raiders best efforts, she is still in range of the Duke of Iron's heavy shells.  However, the shot will require 6's to hit, and the ship has all ready used  its Special Order.  The Reliable cruiser rocks back as her full broadside booms out!  2 box cars out of 8 dice.

Since the Ork Wetboss is pretty sure he has nothing to fire back with, he declares a Brace for Impact against the two potential hits.  However, this time the boyz of the krew are caught out of position.  They don't get to their stations in time.  It is up to the Big Dakka Boats armor to protect them.  Two fours are rolled.  Not enough!  Worse, the hits cause critical damage as they were both sixes!  A roll on the Critical Damage chart indicates that the Starboard Gunz and Torpedo Tube have been knocked out!

The Ork has nothing to shoot back with.

We shudda put gunz in da back ov da boat!
End:
The Ork Mekz leap into action directing their grot charges on what to do.  Their diligent work quickly gets the Starboard gunz remounted, and after shooting a few Grot Riggers through the bow torpedo tube the jam is quickly cleared.

Turn 4:
Initiative: Orks win

Move:
Wetboss Narblitz surveyed his position and that of the enemy vessel.  It was clear that it would take extreme manuevering to get to fire some dakka into the PDF ship.  Meanwhile, the long range macro-cannons of the Oomie ship would pound him mercilessly.

With a roar of frustration, he ordered his krew to steam away.  When an Ork runs away, it doesn't count as losing, because he was just going to get more kroozaz and tubz.  Da Big Boss fired up a head of steam and disengaged from the battle by sailing off the edge of the board.

End of Battle

By the time the Duke of Iron came around, the Ork vessel all ready had a substantial lead.  Despite that, Flag Captain St. Pierre doggedly gave chase.  The Flag Captain's efforts to have reinforcements routed to the area to pin the Ork raider came to nothing.  No other ships were in the proper position to hem in Da Big Boss.  

As night came, the Duke of Iron gave up pursuit.  The darkness let the Ork craft slip away undetected.  She lived to raid again.  However, the engagement had kept a small convoy of merchant ships from falling under the gunz of Wetboss Narblitz.  All in all, a small victory. 

You can find everything you need to play Aquanautica Imperialis in the Free Wargames section to the right.  This includes rules, fleet lists, paper terrain, and ship templates.  

Monday, January 23, 2017

Castles in the Sky- Campaign Set-up- The Balkan Uprisings

I am setting up and preparing to test the Castles in the Sky campaign rules.  These are included in the main rulebook after the scenario section.  The game uses an alternate timeline where flying battleships exist and a Martian invasion occurred in 1878.  However, much of the "fluff" follows real  world pre-World War I history.  This takes place in an alt-First Balkan Wars scenario.  However, instead of the Greek Navy doing all the work, it will be a coalition of Russian/French airships.  However, when in doubt I will try to weave in some real world history.

For much of the 19th century, the Great Powers of Europe had shared different aims over the resolution of the Eastern Question.  The Eastern Question was the perceived dismantling and break-up of the Ottoman Empire of the Turks.  Each Great Power had their interests and the region was ripe for conflict.    

Russia wanted access to the waters of the Mediterranean Sea via the Dardanelles.  They also believed in the Pan-Slavic ideals of unified Slavic peoples.  As a contingency, the Russians supported an expansion of the Greek nation in case the integrity of the Ottoman Empire collapsed.  France wished to strengthen its position in the Levant, and was a nominal ally of Russia.

Austria-Hungary wished for the continuation of the Ottoman Empire.  Both were troubled multi-national entities and the collapse of the Ottoman’s would de-stabilize them as the various nationalistic groups in her own borders would be agitated for their own homelands.  The Ottoman’s were a counter-weight to the nationalistic tendencies of her own people.  In this she was supported by the Germans who wished to make the Ottomans an intact client state.  Italy made no real claims, but wished to keep the Adriatic clear of other state assets and was part of the Triple Alliance with Germany and Austro-Hungary.

The Ottoman Turks themselves wished to maintain the integrity of their nation.  In fact, they had undergone a revolution in 1908 under the Young Turks and were on a reformist movement for the government, army, and navy.  This progress made the Balkan people restive and a number of illicit organizations were formed with Nationalistic intent. 

After the fall of the Young Turks with their defeat in the Italo-Turkish War, the rebellious Balkan states formed the Balkan League to act against the Ottomans.  If Turkey could bring in troops from Asia, then the Balkans could not hope to win.  Therefore, the Balkan League had to rely on the support of some of the Great Powers if they wished to be free.  However, the existence of the League proved to be a noisy political nuisance to all the great powers.  Only Russia secretly approved and supported their efforts.   

The Balkan League was loosely aligned with the Russo-Frankish alliance, while the Ottomans were aligned with the Triple Alliance.  So the groundwork for hostilities was laid, with the threat of a Great Power war hanging in the balance.   

Map of the actual First Balkan War
  
The Balkan Uprisings will be a campaign using the campaign rules found in the Castles in the Sky rulebook.  This will be a medium sized campaign of 75 Armor points per side.  Each faction will be able to choose a percentage of ships from the aligned Fleet Lists at the percentage indicated.  The sides will be:

Balkan League Allies
Russia- Up to 60 Armor Points
France- Up to 20 Armor Points

Ottoman Allies
Ottoman Empire- Up to 35 Armor Points
Austro-Hungary- Up to 35 Armor Points             
Italy- Up to 15 Armor Points

Each fleet must have at least 50% spent on Cruisers or smaller and no more than 25% on battleships.  Each fleet will have 4 Strategic Assets.  Here are my fleet selections....  

Balkan League Forces- 74 Armor Points

Russians:
Poltava                                           Captain:  Pyotr Senyavin                Command: 2 - Flagship
Class: Imperatrista Mariya            Category: Battleship                        Armor: 8

Imperator Pyotr                              Captain: Pavel Ivanov                     Command: 1
Class: Imperatrista Mariya             Category: Battleship                        Armor: 8

Oleg                                                Captain: Aleksey Rozhestvensky    Command: 2
Class: Bogatyr                                 Category: Cruiser                             Armor: 7

Rurik                                                Captain: Nikolai Ushakov              Command: 1
Class: Azova                                    Category: Cruiser                            Armor: 7             

Vityaz                                                Captain: Georgy Vysotskiy           Command: 2
Class: Bogatyr                                   Category: Cruiser                          Armor: 7

Pallada                                               Captain: Matija Yumashez            Command: 1
Class: Bayan                                      Category: Cruiser                          Armor: 7

Albatros                                          Captain: Feliks Golokov                 Command: 3
Class: Krasnoye                              Category: Gunboat                         Armor: 5

Kondor                                            Captain: Nikolay Konovalov         Command: 3
Class: Krasnoye                              Category: Gunboat                         Armor: 5

Sova                                                Captain: Vladimir Greig                  Command: 1
Class: Krasnoye                              Category: Gunboat                         Armor: 5


French:
Brennus                                           Captain: Theo Aube                        Command: 4
Class: Charles Martel                      Category: Heavy Cruiser               Armor: 8

Primauguet                                      Captain: Jean de Vienne                Command: 4
Class: D’iberville                            Category: Cruiser                            Armor: 7


Ottoman Alliance- 73 Armor Points

Ottoman Empire:
Sultan Mehmed II- Fatih                  Captain: Seydi Al Reis                    Command: 3- Flagship
Class: Sultan Osman-I Evvel            Category: Battleship                       Armor: 9

Basra                                                 Captain: Hasan Rami Pasha            Command: 2
Class: Barbarous Heyreddin             Category: Heavy Cruiser                 Armor: 8

Mecidiye                                             Captain: Medvid Reis                    Command: 1
Class: Hamidiye                                 Category: Cruiser                            Armor: 8

Trakya                                               Captain:  Piri Pasha                      Command: 2
Class: Midilli                                    Category: Light Cruiser                 Armor: 7

Barbaros                                            Captain:  Murat Pasha                     Command: 2
Class: Berk Efsan                              Category: Torpedo Boat                    Armor: 4

Austro-Hungarians:
Prince Eugen                                      Captain: Anton von Sterneck             Command: 2
Class: Tegethoff                                  Category: Battleship                          Armor: 9             


Sankt Georg                                       Captain: Rudulf Horthy                      Command: 4
Class: Kaiserin                                    Category: Armored Cruiser               Armor: 8

Bravo                                                  Captain:  Anton Pock                       Command: 4
Class: Huszar                                      Category: Destroyer                            Armor: 6

Volta                                                    Captain: Ludwig Brommy                Command: 1
Class: Huszar                                      Category: Destroyer                           Armor: 6

Italians:
San Bartolomeo                               Captain: Paolo Revel                              Command: 1
Class: Vettor Pisani                          Category: Armored Cruiser                    Armor: 8

The Balkan League is attempting to assist the Balkan forces in driving the Ottoman’s out of Europe.  Meanwhile, the Ottoman Alliance is attempting to maintain possession of European territory and support and protect the ferrying of troops from the Asian part of the Empire across to the European part of the Empire. 

The campaign will last until one side reaches 7 Campaign Points with a victory margin of 2 points.  The winner of a scenario earns 1 campaign point. If they inflict twice as much Armor loss then they gain 2 campaign points, and if the difference is 3 times they score 3 points. 


The normal rules for Campaigns found in the Castles in the Sky rules will be used.  Like my last battle report, I will be using templates from my Aquanautica Imperialis rules for my ships along with Aeronautica Imperialis bases to keep track of altitude and speed.  

I plan on starting this campaign by the end of January.  Stay tuned.         

Friday, January 20, 2017

The Games: Blood and Spectacle- Battle Report- Exhibition in the Forum

The magistrate of Roman controlled Luptis Minor in North African welcomed the traveling Gladiator Troupe of Marcus Crassus Quintillius.  Quintillius had left the Spanish town of Tarraco in a world wide tour for his troupe.  It seemed logical that his first stop would be in his hometown's sister city.  

The Roman nobles whispered that the Troupe of Quintillius fled Roman Spain under a dark cloud.  Some claimed unpaid gambling debts, others an affair with the wife of a powerful man, and others claimed that he had secretly converted to some outlawed religion.  Whatever the truth, the Troupe of Quintillius was the talk of Lupti Minor.   

The Magistrate of Lupti Minor was eager to see how the Troupe of Quintillius fared against the local Gladiator ludus of Lanista Metallus.  His local school was know as the Ludus of Lupti Minor.  The Magistrate himself offered to be Editor of the Games between the local favorites and traveling gladiators.  However, before the main event of the Spectacle Gladiatora; he asked the rival Lanista to put on a display to the public masses in the marketplace.  

Before the days events, the Gladiators of the rival troupes marched from opposite ends of the town into the marketplace.  The citizens of Leptis Minor lined the streets to cheer and jeer.  For their part the Gladiators made a nice show of flexing, rattling their weapons, and thumping their chests.  

The two troupes met in the center of the marketplace. There they were surrounded by the crowd.  The Magistrate went to the center.  There he officially introduced the rival troupes.  


Since this was going to be our first run through for the campaign, my opponent and I decided to start with a “lighter and gentler” set of Games.  We purposely decided to make the crowd Merciful, and choose the events instead of randomly rolling them.  Plus, I didn't have any Noxii, chariots, or animals painted up so....

Event 1- Puglarius- Merciful- Sunny and Bright
House Quintillius to be represented by their Gaullus Marcomanni.
House Luptis Minor would be represented by Lupin Lupinious the Velite.

Event 2- Warm-up Match- Merciful- Normal Weather
House Quintillius would be fielding Priapus the Retarius.
The local boys of Luptis Minor would send out one of their Secutor, Ordinarri.

Event 3- Single Combat- Merciful- Normal
Quintillius sent out their champion Juggartha!
Versus Luptis Minor's own Mediocrates the Samnite.

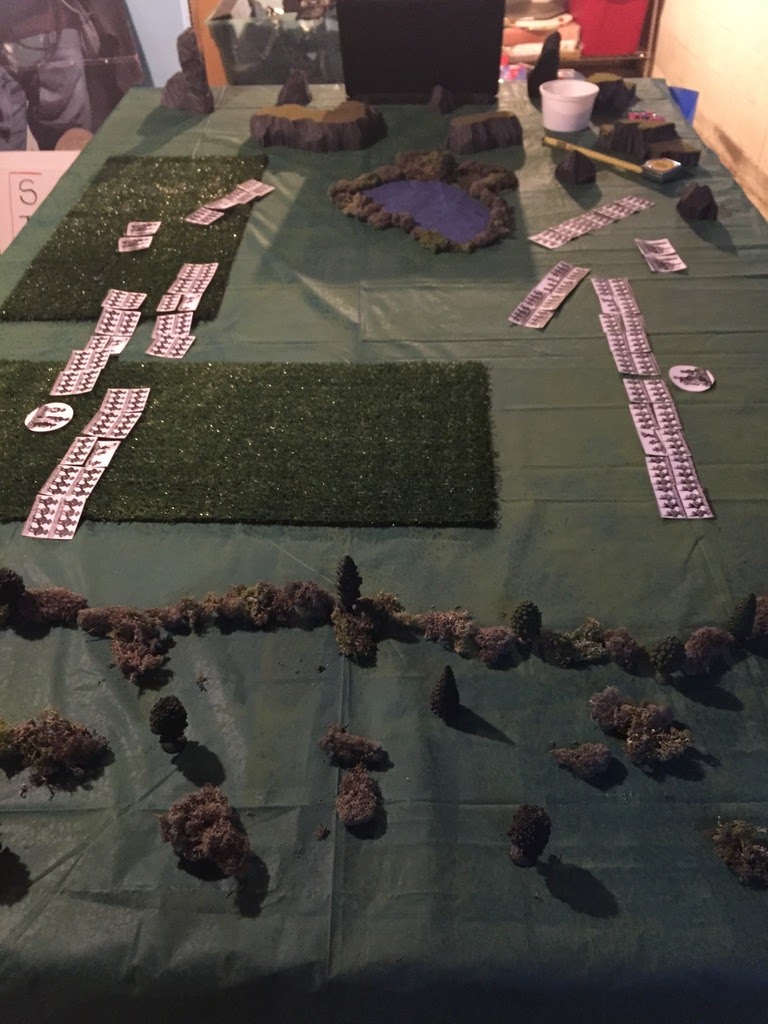
Since this series of Games was suppose to take place in the forum, we pulled out a rectangular board 19 inches across and 14 wide.  We placed two rows of columns, three on each side as obstacles/terrain.  Luptis Minor got the South end of town, while House Quintillius got the North side.

Event 1 Puglarius
Both combatants handed their weapons, and slowly unlatched their armor.  With a flourish, Marcomanni removed his helm and hoisted in the air with a roar.  The crowd returned his cheer with vigor!  

Across the forum, Lupin carefully wrapped the heavy clothes around his hands and wrists.  When he was done, he inspected them carefully.  Then, to please the crowd he let out his trademark wolf howl, and his local fans picked it up and it carried around the forum.  

Satisfied, the two men eyed each other carefully.  The magistrate, and Editor for the Games introduced each combatant, beseech the Gods,  laid down the rules, and with a flourish gestured for the event to begin!

House Quintillius
Marcomanni
Barbrian Gaulus- Cost 65
M CP  I  P  F  AV  XP  Matches
4   4    3  2  3   5+  24    0
Two-Handed Weapon- Can not be parried, -1 Armor Save

House of Luptis Minor
Lupin Lupinius
Slave Velite- Cost 35
M  CP  I  P  F  AV  XP  Matches
4    3    2  2  3  5+   16    0
2 Spears- Thrown
Shield- May parry    

Since this is a Pugliarius, neither Gladiator has their armor or weapons.  This is a bare-knuckled brawl!

Turn 1
The opening turn, both warriors confidently step forward towards each other.

Turn 2
Lupin turns and darts behind one of the pillars.  Marcomanni turns towards him and confidently strides closer, not even raising his fists.  Next turn looks like someone will make the first move.

Turn 3
Lupin wins the Initiative, and decides to try to charge the Gaullus.  Lupin puts all his CP into the attack, and the +1 for charging.  Marcomanni, only puts 3 CP into it his defense and decides to save one for a potential counter-attack.

Lupin charges with a ferocious howl, but the wily barbarian is ready.  Not only does he intercept the attack, but he manages to land a solid counter-strike (Knock Down Striking Success Defense) that knocks the velite to the ground.  The Gaullus follows it up with a kick, that reduces Lupin to Pain 1.

After the blow, Lupin springs back to his feet.  Marcomanni finally takes a ready stance to fight.

Turn 4
After landing the first blow, Marcomanni gets ready for some serious brawling.  He decides to put 2 of his Combat Pool into the attack, and holds onto two for defending.  Lupin puts 2 to defense as well.

Marcomanni shows his ability with another striking success that gets past Lupin's guard.  The crowd shouts as the Velite looks like he will be momentarily Dazed, but the Velite shakes it off quickly.  However, his counter attack fails to find the mark as he shakes off a punch to the face.

Turn 5
Lupin puts all his dice into his attack, while Marcomanni puts only 2 to defend.   Lupin got a success and a striking success, and he decided to keep the double Success from his 6.  This is a wise move, and Marcomanni rolls 2 successful defense dice.  Marcomanni is reduced 1 Pain.  However, the Gaullus' return strike lands clean and the velite is reduced to 0 pain.

The crowd is beginning to get involved.

Turn 6
Marcomanni is quick to follow up his hits and attacks with all 4 dice!  Lupin had decided to defend with only 2.  Lupin is lucky and wards off the Barbarians frenzied blows.  However, he misses with his counter-attack.

Then, Lupin tries to break away from the combat by backing up.  However, Marcomanni keeps him locked up.  

Turn 7
Marcomanni again attacks, this time with 2 dice.  Lupin defends with 2.  The Barbarian's attacks are swatted aside, and the Velite pushes him back with a shove.  Marcomanni stumbles backwards fromt eh defensive striking success.

This gives the Velite some room to move.  He turns and moves away from the Barbarian with a  howl.  Safely out of range, he tries to Recover Strength.  Which he does successfully with double 1's!  This gives him a Pain of 1 again!

Turn 8
The Velite begins to run circles around his opponent.  True to his name, Lupin Lupinius begins the bay wildly, and signals for the crowd to join him!

Frustrated by his inability to take out the lighter gladiator, Marcomanni turns to give chase.    

Turn 9
This time, Marcomanni cuts the angle on the Velite, and charges him.  He puts all of his CP into the attack.  However, Lupin doesn't see him coming and can not properly defend.  Marcomanni easily thros the Velite to the ground and kicks him a few times too.  Lupin is Down and reduced below Pain 0.

Lupin crawls two inches away and tries to regain his strength, but fails.

Turn 10
Marcomanni begins to suffer from fatigue.  However, he easily walks up and knocks Lupin out while he is downed.  The crowd hisses, jeers, and boos as the local Gladiator is dragged unconcious from the forum.  However, he will recover with no serious injuries.  

Winner: Marcomanni!


Event 2- Warm-up Match
The attendants of the two Ludus' rush forward and clear the forum of any accumulated debris.  The slaves of House Luptis Minor drag Lupin from the forum, and revive him with a bucket full of water.  With a nod from his Laniste, Ordinarii the Numidian dons his Secutor's helm and steps into the Forum.  

The Magistrate proudly announces the Luptis Minor gladiator.  A ripple of approval and applause race through the crowd as Ordinarri raises his sword high in salute.  However, their enthusiasm is cut short as Priapus the Retarius steps in on the other end.  The Germanic barbarian and his blind hair hush the crowd.  He calmly stares down his opponent, before breaking into a deep chested laugh,  

The crowd bristles at the jeer from the blonde German, and begin to roundly boo him.  The Retarius seems to relish it.  

The magistrate cuts the intro short, and motions the two gladiators to their ready positions.  Ludus slaves carefully replace the live weapons of the Gladiator's with their wooden training equivalent.  Priapus sneers at his wooded trident with disdain.

House Quintillius
Priapus
Barbarian Retarius- Cost 65
M  CP  I  P  F  AV  XP  Matches
4    4    3  2  3  6+   24    0
Trident- Thrown, -1 Armor Save
Net- Thrown, Entangles
Dagger

House of Luptis Minor
Ordinarri
Slave Secutor- Cost 50
M   CP    I      P  F  AV  XP  Matches
4(3) 3(5) 2(1) 2  3  4+  12     0
Gladius- May Parry, +1 CP when attacking
Large Shield- +1 CP, May Parry
Heavy Armor- Reduce M and I by 1

Turn 1
Surprisingly, Ordinarri nimbly springs forward and runs towards his opponent on the other side of the forum.  Priapus jogs around behind a column and begins to swing his net.

Turn 2
Priapus jogs behind the next column.  From there he casually shouts insults to Ordinarri in Germanic.  Ordinarri begins the circle around the back of the column the Retarius is hiding behind.  The crowd begins to chant for Ordinarri.

Turn 3
The two Gladiators continue to circle around the column, and the crowd starts to get restless.

Turn 4
Priapus moves out from behind the column, and throws his Net.  He uses all 4 of his Combat Pool to try and entangle the Secutor.  He defends with 4 and saves 1 to attack.  The Net easily goes over Ordinarri, and entangles him.  The Secutor twists and turns in the Net, but is unable to disentangle himself from it.

In the Recovery Phase, Ordinarri again fails to get the net off himself.

Turn 5
With his opponent safely entangled, Priapus charges into him.  He puts all of his CP into the attack.  Ordinarri's CP is half due to being entangled, and decides to use 2 of his 3 to defend.  Priapus manages to land a hit on the Secutor, but the trident slides off Ordinarri's Manica.  The Secutor attacks back, but his sword fails to find the nimble German.      

In the Recovery Phase, Ordinarri tears the Net from him, and tosses it aside.  Priapus begins to sense the tide turning.

Turn 6
Priapus disengages and backpedals away from the Secutor.  However, freed from the net Ordinarri charges forward and attacks with all of his dice.  Priapus tries to block with all of his dice.

Ordinarri's sword strikes true, and he hits the Retarius potentially 3 times, but one of his swings is absorbed by Priapus' greave.  The Retarius is reduced to Pain 0.  Ordinarri locks him up.

Turn 7
Ordinarri wins initiative and presses his ferocious attack and wins Initiative!  Savagely, he puts all of his Combat Pool into the attack and holds nothing back.  Priapus tries to defend with 3 and holds one for a counter-attack.

The Retarius manages to beat back the Secutor, and pushes him back 2 inches due to a striking success.     With some breathing room, he darts away from his opponent and begins to circle towards his discarded net.

Turn 8
Priapus dashes forward and retrieves his net, and then quickly backpedals away from Ordinarri.   In return, the Secutor begins to turn towards his foe.

In the Recovery Phase, Priapus tries to regain strength, but fails.

Turn 9
Priapus again tries to entangle the Secutor.  He uses all of his CP, while Ordinarri defends with 3. The Net flies out, but Ordinarri easily swats it aside with his shield, and it lands behind a column and safely away from the Retarius's ability to retrieve it.

With that, Ordinarri manages to charge the Retarius and attack.  Using his shield as a weapon, the Numidian catches the German in the side of the head.  The Retarius goes down.

Turn 10
Priapus crawls away, but it won't be far enough.  Ordinarri runs up and with a shot from his wooden sword, puts the Retarius out of the fight.
Winner- Ordinarri the Secutor!

Event 3- Single Combat!
Lanista Quintillius grimaced as the final blow was struck.  His servants ran out and pulled the german to the north gate of the marketplace.  He turned to his prize Murmillo.

“It is up to you now.  Finish this rabble.”  

With a nod, the Nubian Murmillo latched the iron grill of his helm.  A slave adjusted the straps to his shield while another placed his Gladius in his hand. 

On the other side, The Luptis Minor slaves and Gladiators whooped and cheered their Secutor champion.  The winner grasped the forearm of the next man, a fellow Numidian.  With that, the Samnite Gladiator stepped into the forum and drank in the wild cheers of the crowd.  

Quintillius sneered, “A samnite?  How archaic.” 

With that, the Magistrate introduced the Lutpis Minor gladiator as Mediocrates.  The crowd was going wild for him.  Then, he introduced Juggartha and a terrified hush fell across the forum.  As he entered, the Murmillo slowly gazed around the arena before settling his gaze on the distant Samnite.  With that he offered a traditional salute.  

As the magistrate signaled the fight to begin, an expectant hush fell over the forums.

House Quintillius
Juggartha
Prisoner-of-War Murmillo- Cost 90
M     CP     I     P     F     AV     XP     Matches
4(3)  4(6)   3(2)2    4      3+      25      0
Gladius- +1CP Attacking, May Parry
Large Shield- +1 CP, May Parry
Heavy Armor- Reduce M and I by 1

House Luptis Minor
Mediocrates
Slave Samnite- Cost 60
M     CP     I     P     F     AV    XP     Matches
4 (3) 3(4)   2(1)2     3     4+     15       0
Short Sword- May parry
Large Shield- +1 CP, May Parry
Heavy Armor- Reduce M and I by 1
       
Turn 1
Juggartha jogged forward, eager to slug it out.  Mediocrates was a bit more cautious, but came forward.

Turn 2
They both moved towards each other, carefully sizing up the opponent.

Turn 3
Juggartha judge the distance to be right, and charged forward with only the sound of metal-on-metal as his armor jingled together. He put 4 CP into the attack and +1 for charging.  Mediocrates decided to defend with 3 CP and saved one to counter-attack.  The wily Murmillo's attack managed to sneak through and draw blood, reducing Mediocrates to Pain 1.  The Samnite's counter-attack banged loudly off the Murmillo's greave.

Turn 4
Mediocrates attacked with 4 CP, while Juggartha defends with 3 CP.  The Murmillo easily defends and gets a pair of Striking Successes.  He attempts to disarm Mediocrates sword, and the blade goes flying and lands with a  clang on the tiles of the Forum.  This is followed up with another Striking Success that disorients Mediocrates with a solid shot from the Murmillo's shild into his opponents face mask.  The crowd gasps at the martial display!

With that Juggartha goes on the offensive.  He hits Mediocrates twice, but worse goes past his guard with a striking success!  This reduces the dazed Samnite's armor save.  He is injured twice and reduced below Pain 0, and downs Mediocrates!

In the Recovery Phase, Mediocrates lifts the two fingers in a sign of submission.  With that, the battle is over!
Winner- Juggartha!

The crowd, awed by Juggartha's martial display roared with approval.  The Nubian reached down and helped Mediocrates to his feet and congratulated him on a well-fought and honorable battle.  The two clasped forearms in friendship before returning to there sides.  This sign of solidarity and sportsmanship only caused the crowd to grow even louder.    

With that, the Magistrate declared House Quintillius the winner of the demonstration and announced the date of the first set of official games in the Arena between the rival Gladiator schools.

Campaign Post-game
Well, as the first game of the campaign let's see how it goes....

1. Determine Permanent Injuries

No injuries occurred since this was mostly a demonstration match, and Mediocrates asked for mercy without going Out of the Fight.

2. Allocate Experience

Juggartha earned an Initiative Increase!

3. Earnings

House Quintillius earned 110 Denarri at the gate, which equals 40 in profit!
Luptis Minor earned 70 Denarri at the gate, which equals 18 in profit!

4. Reputation

House Quintillius earned 1 reputation

5. Troupe Rating

House Quintillius is now 674
House of Luptis Minor is now 620

Next time they face-off, House Luptis Minor will be the Underdogs.

That about wraps it up for this first campaign Games of the Gladiator season! With set-up, post-game and documentation that took about 2 hours.  Right about where it should be! You can try the rules out for yourself right here.