
If you look to the right hand side of this blog, you will
see several links for Free Wargames.
These are games that I have created for you. I made them because I like to make
games. I made them for no one else, but
myself. Therefore I give them away to
you for free. I am not trying to make
money with these games at the links. If
you play them, I only ask one thing, that you share your experiences so I can
make better games in the future!
Castles in The Sky
is a game of ponderous warships of the air; battling on the edges of empire
after the Martian Invasion of the 1880’s.
The destruction of the Martian menace by microbes left a number of
tripods available to be studied. From
these war machines, great leaps forward in technology were made including the
Air Screw. From these discoveries the
great nations of the world built a new kind of war machine; the airship.
In this blog, I will share adventures with my own games
as well as published games. Today’s battle
report features Castles in the Sky
using templates created for Aquanautica Imperialis and Forgeworld bases from Aeronautica Imperialis. Sadly, Forgeworld no
longer makes these bases. In a pinch you
can also use Litko flying bases as well or no bases at all. I also used burst markers from All Quiet on the Martian Front. Enjoy!
This game came about when The Evil Monkeigh from DeltaVector started playing around with his own version of Aeronef.
Castles in the
Sky
Place- Off the
coast of Montenegro in the Adriatic Sea circa 1914.
Scenario-
Italians are Raiding the
Austro-Hungarians
Nation-
Operational Cost- Armor Value
Italy- 24 (24)
Armored Cruiser- Vettor Pisani- 7 (8)- Command: 4-
Flagship
Frigate- Soldato- 5
(5)- Command: 1
Torpedo Boat- Pilo- 8 (4)- Command: 3
Cruiser- Zenta- 4 (7)- Command: 2
Austro-Hungary- 33 (46)
Heavy Cruiser- Radetzky- 6 (8)- Command: 3
Heavy Cruiser- Habsburg- 6 (8) Command: 1
Cruiser- Novara- 4 (7)- Command: 1
2 Destroyers- Huzsar- 6 (12) – Command: 2, and 3
Battleship- Tegetthoff- 11 (9)- Command: 2- Flagship
Operational Costs are an experimental method for
determining balance rather than Armor Value. The current rules call for Armor costs.
None of the vessels are in squadron.
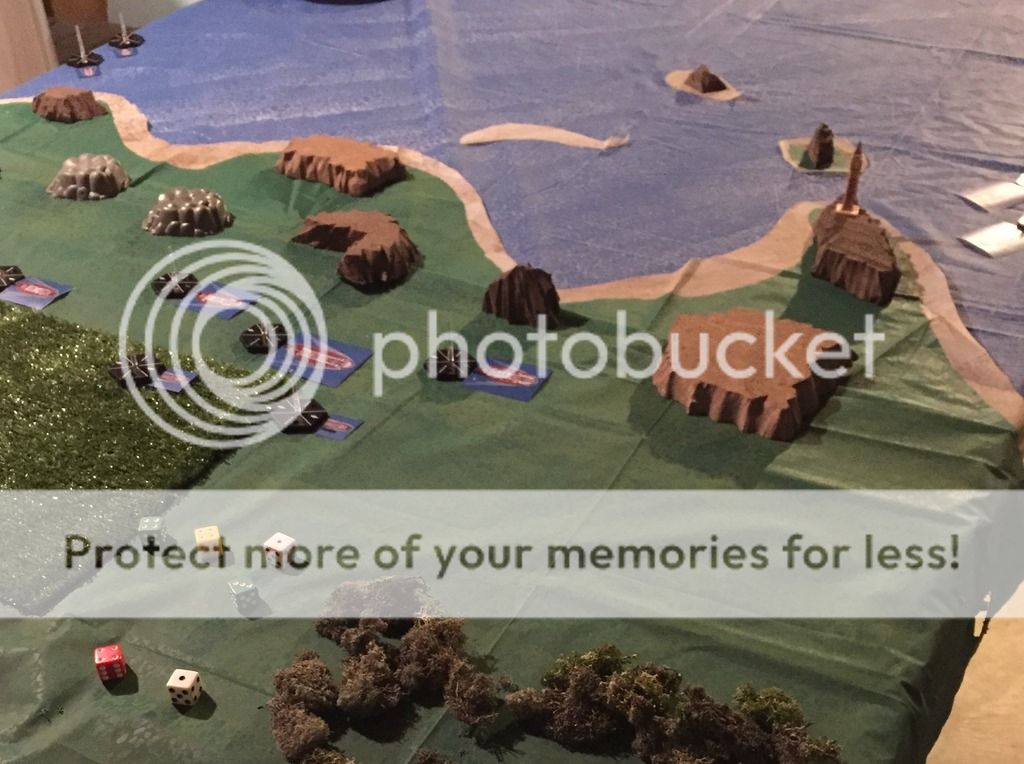
Set-up
The coast of Austro-Hungarian territory is set-up
dividing the board in half. The
Austro-Hungarians are set-up heading north with the coast to their north edge.
They are cruising at mid-altitude (3-5) and mid-speeds 3. The line is led by the Radetzky, followed
Tegetthoff, Habsburg, and Novara. The
Huzsars are to the starboard side of the Tegetthoff.
The Italians are coming in from the Adriatic Sea. They are coming in at full speed and
relatively high altitudes. The Italian cruisers
are trying to attack the front of the Austro-Hungarian battle line, while the
frigate and torpedo boat are sneaking up on the rear of the line.
Any rocks are assumed to be Altitude 1, so a ship must be
at Altitude 2 or better to cross over them.
If they are not, they will crash into the rocks. LOS is also blocked at Altitude 1 by the rocks
Turn 1:
The Italians win the Initiative and elect to go first.
Movement:
All Italian vessels move to drop altitude and
pick-up speed. They are still too high
to engage the Austro-Hungarians, unless they choose to rise up to the
challenge. The frigate and torpedo boat
move to try to get behind the Austro-Hungarian column.
The Tegetthoff drops altitude and speeds up. The Radetzky makes no change, and dares the Italians to attack him, her turrets turning to face the threat. The Huzsar’s begin to double back towards the
other smaller Italian ships, and the Novara moves out of line to try and line
up a shot with her air torpedoes.
Battle:
The Italians open fire at the Radetzky. The Italian’s are one altitude above, which
means they need 5+’s to hit the Austro-Hungarian ship. The shells from the Zenta ping harmlessly off
the heavy cruiser’s armor. The air torpedoes from the Vettor Pisanti are much more effective and reduce the
Radetzky 1 armor point. The Radetzky is
surrounded by blast markers now. The
smaller Italian craft are out of range.
The captain of the Radetzky prepares to return fire on
the impudent Italians. The heavy batteries
target the Zenta. The captain would love
to give a Lock-On order, but the burst have disrupted his attempts. Instead, he must satisfy himself with the
boom of the heavy guns. Due to the
altitude difference and the burst, he will need 6’s to hit. One shell manages to get through and jams the
Zenta’s rudder!

End Phase
All damage is applied to the ships. 7 Burst markers are removed, which leaves one
on the Radetzky going into the next turn.
Turn 2:
The Italians win Initiative again and decide to go first.
Movement:
The Italian small craft raced up to try and get into
position on the trailing Novara cruiser.
Meanwhile, the Armored Cruiser tries to get into a position where her
broadsides could come into play. The
poor Zenta moved forward, and tried to drop altitude to avoid getting pummeled
by the Radetzky since her rudder was out.
The Huzsar’s managed to turn about and move towards the
smaller Italian craft. The Novara
dropped altitude to avoid the chasers, but it would not be enough. The main Austro-Hunagarian fleet plowed
forward. The Tegethoff moved up to
target the damaged Zenta with her broadsides.
Battle:
The Zenta knew she was about to get pummeled and went on
Brace for Impact orders. Her shells went
wide of the mark. Thankfully, the captain passed the Ammo check, so the ship still had shots. The Vettor Pisani Re-loaded Ordinance but was
too high to fire on the Austro-Hungarian Radetzky.
The Soldato and Pilo tried to put air torpedoes into the
side of the Novara. The Austro-Hungarian
gunners were ready and took them out with quick-firing deck guns. However, this put three bursts on the
ship. Not much luck for the Italians
with their shooting.
The Radeztky found the stricken Zenta in its broadside
arc. Bursts kept the crew disrupted, but
the heavy cruiser still managed a broadside on the Italian cruiser. A heavy shell smashes into the Italian ship
again reduces its armor. The crew’s
attempt to Brace failed.
The Habsburg also can target the Zenta with its bow
batteries, and opens fire with a salvo.
Three shells hit, and one manages to strip a further armor point off the
Italian cruiser. Again, the crew failed to Brace. In
addition, the Habsburg fires a salvo of air torpedoes. However, Italian point defense destroys both
before they reach their target.
Finally, the captain of the Tegethoff ordered his men to
Lock-On, it was too bad they did not listen.
3 shells strike, two bounce harmlessly off the armor, and 1 strikes home. The crew fails to Brace again! They need better training! Another Armor
point will be stripped away!

End:
All damage is applied, and to the Zenta and is
reduced to 3 armor from the battering it took from the Austro-Hungarian
fleet. Plus, it still has a damaged
rudder.
6 total Bursts are removed. The Zenta still has 4, the Novara has 3, and
the Radetzky has none.
Turn 3:
This time the Italians choose to let the
Austro-Hungarians go first!
Movement:
The vanguard of the Austro-Hungarian fleet moves to
engage the Italian cruisers by spreading to cover Altitude 3 through 5 as they
steam towards the safety of their air defense zone. The Huzsar’s race back towards the smaller
Italian craft, and the Novara tries to get out of the way.
The Zenta drops to altitude 2, and speeds up but is
hampered by the bursts around her. The
Vettor Pisani moves up to altitude 7 to avoid the Tegethoff and Radetzky, but
that also means she is out of range for her own weapons. The Soldato and Pilo move into attack the
exposed side of the Novara.
Battle:
The second Huzsar fires on the Italian torpedo boat with
its forward battery, but misses. The
Novara uses its stern battery on the torpedo boat. However, a near miss allows the torpedo boat
to absorb the shrapnel and keep on course, but she has picked up a burst.
The Habsburg fails to Lock-On to the Italian Zenta with a
command. However, its gun batteries open
up on the Italian craft at close range, with 1 altitude separation. 7 hits on the Italian cruiser! The ship breaks out in a fire, it’s screw if
fouled, and its hull is breached in several places. The Italian Zenta will be reduced to –3
Armor. One overkill hit and she will
explode. The crew will need to abandon
ship.

The Austro-Hungarians have no other shooting, so the
Italians take over. The crew of the
Zenta give a final barrage of fire before abandoning their vessel. The barrage causes 5 hits on the Hapsburg
with one managing to cause a hull breach on the Hapsburg heavy cruiser.
The Pilo and Soldato both try to Re-load their
Ordinance. They both succeed but the
Pilo may not fire as she has picked up a burst.
The Soldato fires at the Novara at close range. The
deck gun misses. The
Austro-Hungarian gunners fail to hit the incoming torpedoes at close range, and
one smashes into the Novara. The cruiser’s hull is breached.

End
There are no aeroplanes to move.
The damage is applied, and the Italian Zenta begins to
lose lift and sink. The crew abandons
ship as a fire rages across the craft.
Her speed is dropped and she loses 1 altitude band.
There are no repairs to be made.
The Italians roll 4 and the Austro-Hungarians roll a
4. The bursts are removed from the Pilo
and 3 from the stricken Zenta. The
Austro-Hungarians remove all 4 from the Novara.
Turn 4:
The Italians win initiative. They choose to go first.
Move
The Italian commander realizes they have made a hash of
things as he watches the Zenta begin to sink.
At least his countrymen are over land, making them more likely to escape
the crashing airship alive. His command
ship stays high, and turns to move along the sides of the Austro-Hungarian
fleet, knowing that they do not have the lift to catch him. Instead, he is hoping to close in on the
weaker Navara before the Austro-Hungarians can make it to the safety of their
air defense network.
The smaller Italian frigate and torpedo boat break-off
from the Novara and head to meet-up with the larger Italian ship.
The Austro-Hungarian heavy cruisers move to eventually meet-up
and support each other. The Tegethoff
speeds up and heads towards the safety of the Austro-Hungarian defense
network. The Huszars begin to come
around to escort their larger brothers away.
Battle
The Italians Re-load Ordinance, but no one has the
altitude or range to fire.
The Austro-Hungarians also do not have the range or
altitude.
Everyone is still maneuvering for round 2… if there is
one.

End
The fire aboard the Italian Zenta reaches the combustible
gases and magazines of the ship. She
explodes spectacularly. The explosion
catches the nearby Hapsburg and rocks the ship, but fails to cause further
damage.

There is no damage to repair.
The Italians remove 4 bursts from the explosion from the
Zenta, while the Austro-Hungarians roll a 2 and remove the bursts from the
Hapsburg.
Turn 5
The Italians win, and choose to go first.
Move:
The Italian commander of the Vettor Pisani comes down from
his high altitude and offers battle to the maneuvering Austro-Hungarian Heavy
Cruisers. The Soldato and Pilo race up
to support and follow their command ship.
The Tegethoff speeds up and manages to successfully and
safely disengage from the battle. The admiral leaves the captain of the Radeztky in charge of the mopping up operations. Seeing the Italian come down to a lower
altitude, the Radetzky and Hapsburg are happy to oblige the Italian and rise up
to meet him. The Novara drops for cover
and speeds up to pass near the lighthouse on the coast.
Battle:
The Italian commander is confident in his armored cruiser’s abilities, and opens fire on the Austro-Hungarian Hapsburg. His confidence is misplaced, as the majority
of the shells pass over head harmlessly, and a single light shell bounces off
the heavy cruiser’s plate with a dull ring.
Seeing the futility of his broadside, the Italian quickly orders his men
to Brace for Impact!
The Hapsburg opens fire at medium range with a 8
firepower barrage. Only a single shell
finds its mark, and the rest fly past underneath. The single hit clanks dully and careens off
into the sky. At long range, the
Radeztky’s heavy guns boom out, and hit the Italian 4 times. However, the range dulls the impact and no
damage is done.

End
Bursts are removed, with the Italians removing the 5 on
the Vettor Pisani and the Austro-Hungarians removing bursts from the Hapsburg
and the Zenta explosion.
Turn 6
The Italian commander wins again, and decides to go
second this time.
Move
The Italians seem to be content to move out of range and
try to disengage. They go to high altitude
out of the range of the Austro-Hungarians.
They signal their intent to disengage the Austro-Hungarinas. The pending twilight makes pursuit difficult,
and the captain of the Radetzky is content to let the Italians flee.
End
All remaining bursts are removed.
Conclusion
The Austro-Hungarian papers are quick to condemn the
Italian attack on their fleet. The
Italians, embarrassed by the incident blame the raid on pro-Balkan agitators
within the fleet who were incensed by false reports of Austro-Hungarian
atrocities in the Balkans. They mutinied
against their officers and coordinated the attack.
In Rome, a few unfortunate sailors were hung. In addition, the Italian government quietly
paid a hefty indemnity to the Dual Monarchy.
Any surviving Italian sailors found alive in Montenegro were given a
brief prison stay before being sent home to Italy.
Behind closed doors, the Austro-Hungarian admiralty was
pleased by the day’s actions. The Heavy
Cruisers’ and Novara had taken only light damage while destroying a rival
Cruiser. The captains of the Hapsburg,
Tegethoff and Radetzky were seen as heroes of the Empire. Their views and opinions were given
considerable thought and value in the admiralty going forward.
Post-game Analysis
Enough with the fluff let’s break down the game
play. As the Italians, I made a huge
mistake right off the bat. The Italian
capitals were deployed to go straight into the teeth of the Austro-Hungarian
main battle line. I would have been
better to attack from behind and overwhelm the rear ships piece meal, and
inviting the heavier classes to try to come about and attack. I paid a heavy price, with the Zenta being
beaten to death with very little to show for it in return.
So, did Castles inthe Sky meet its gameplay objectives?
They were:
1.
Decisions, decisions, decisions
2.
3D gameplay
3.
Tough ships that can take a beating and then
suddenly crumple
4.
Individual ships, that can scale up to larger
battles
5.
Not a dogfight, but a fleet battle.
6.
Campaign play
I didn’t try the campaign yet. However, here is what I found in this
playtest.
1.
Initiative was a tough decision if you won. Going first allowed you to make orders, put
burst on the enemy, etc. However, the
second player was allowed to dictate the terms of the engagements.
2.
Big ships move and maneuver slowly, so
pre-planning matters. You are trying to
guess where your opponents will be, and then slowly get there too. As intended.
3.
The engagement envelope is small at only +/-1
altitude difference, so it is easy to avoid fighting if you want to.
4.
Point Defense can take out most Torpedo attacks
5.
Putting bursts on targets makes a huge
difference. It stopped the Zenta from
fixing its damaged rudder, stopped the Pilo from launching a torpedo attack,
and kept the Novara from escaping the Italian pursuers. Putting bursts on opponents is a big part of
game play.
6.
The bigger ships were taking multiple hits, and
shrugging them off, but once their armor started to peel away, it could
suddenly add up quickly. As intended.
7.
Volume of dice on target makes a big
difference. As intended.
There are still a few things I want to tweak after
playing, but overall I am pretty happy with how this game turned out. The tweaks involve adjusting Air Torpedoes,
perhaps opening the engagement envelope a bit more, and clarifying Bursts since
they were so critical to the game play/tactics.
I hope you enjoyed this battle report for Castles in the Sky. Feel free to try the game for yourself. It’s free!
If you try it out, let me know what you think.
No comments:
Post a Comment