Showing posts with label Blucher. Show all posts

Monday, August 23, 2021

Review: Absolute Emperor- Osprey Games


I will start this review with my usual caveat.  I really do not know that much about the Napoleonic Wars.  I have been interested in them, but have kept my distance.  The pageantry, uniforms, combined arms, and of course the big hats have always been of interest but...... the many rulesets, depth of knowledge of the players, and so many models and painting have kept me away.  

To date, I have really only played Blucher with any regularity.  The joy there being I have been playing it with the cards.  I have La SalleChosen Men, Black Powder and a few others but have never quite pulled the trigger on Nappies.  To be honest, making the large units and all the nomenclature has scared me off for the most part.  

It was these factors that made me interested in Absolute Emperor.  I read through the introduction and recognized a kindred design spirit.  He was advocating for "Big Battles with Small Armies" which is an approach I have found near and dear to my heart.  In fact it was one of my main design goals with Men of Bronze, Heirs of Empire and Wars of the Republic In addition, abstraction and units acting as a foot print for larger elements was another theme that matched my style.  Finally, he was a strong advocate for not having to re-base anything!  Basing is the bane of wargaming.  I felt I had found a kindred design spirit!  

This intrigued me enough that I wondered if I had finally found the Napoleonic wargame that would get me to pull the trigger on Nappies and buy some models.  With all that pre-amble out of the way.  Let's get into Absolute Emperor and see what is under the Shako.....

The French army at the bottom is for the Waterloo scenario, that gives you an idea of size of a big game. 

Things I Liked

Well, I always like when a game starts or has some design notes.  This game starts off in the Introduction laying out what to expect in the rules and what NOT to expect as well.  This will make it much easier to judge if the game accomplished what it set out to do.  Plus, I really value this glimpse behind the curtain and into the mind of the designer.  

As I have eluded to, the game is scale and model agnostic.  The rules were written for 28mm, but there is discussion of how to use 2mm to 54mm scales in the rules.  In addition, the game strongly encourages you to avoid re-basing!  Those are strong elements that I like in my wargames.  To be base agnostic, the rules use a standard "frontage" size that allows you to use various basing to meet the needs.  Infantry is 6 inches, and Cavalry is 8 inches, with different scales modifying the frontage up and down.  Therefore, I can probably still make use of my Blucher cards to get a game in.  

The footprint of each unit is supposed to be a Division of troops.  Now, naming conventions in Napoleonic warfare for units is pretty all-over the place, so this is the naming convention this game uses.  These footprints are the main bodies of troops.  The game abstracts skirmishers and battalion batteries into the shooting mechanics.  It assumes the 4 inch space between units in a firefight is full of people fighting and dying in these units.  The exact deployment of brigades and battalions is not relevant to the rules.  This aspect reminds me of Blucher since the focus of the two games is at the same level.    

One aspect of Napoleonic warfare I had not appreciated before was how up close and personal so much of the fighting was.  My games of Blucher and reading these rules have made this much clearer to me.  Musket range is generally equivalent to charge range, which is equivalent to movement ranges.  Sometimes, movement range is further!  Therefore, there could theoretically be a lot of "free" maneuver where enemy firepower does not come into play.  What constricts movement and maneuver appears to be the density of the formations due to command rather than firepower.  Now, with this ruleset and the few others I have dabbled in this "truth" of the period fighting is obvious to me.  

The game abstracts and simplifies limbering and unlimbering a great deal.  It also allows Interspersion freely as long as the unit can completely clear the other. Both steps helps the game avoid so much of the "If This/Than That" of this periods wargames. 

Each Corp Commander has Elan points.  These can be used to give Corp Commands and impact upon gameplay, establish initiative, but more importantly they are also the Victory Points used to decide the winner of a game.  You can lose Elan by using it as a resource, losing Division, etc.  If you defeat an enemy Division, there is also a chance you can overrun them and gain Elan.  If a Corp Commander is ever reduced to 0 Elan, his entire corp retreats.  As Corps are removed from the game and forced to retreat, it can cause an army to collapse very quickly as nearby Corps must make a test to not switch to defensive or retreat orders.      

The first 8 pages are introduction.  Pages 8-33 are the basic game rules.  The last 34-42 is advanced rules.  43- 54 is setting up the game and scenarios.  56-61 is a walk through of a game using Scenario 1.  The last few pages are author's notes and appendix stuff.  I like the format of the book as it allows me, the Nappie Newbie to get my head around the core gameplay rules, then layer in some of the eccentricities of the period, and the walk through at the end helped me put it all together.    


Things I Did Not Like

One interesting choice I noted was that units can change formation in this game.  Considering the "scale" of the game as being divisional, this seemed like an odd. tactical element in a high-level army game.  Different formation also impacted firepower, movement rates, etc.  I am considering this a convention of the genre so that is why the author felt compelled to add it.  Honestly, such details at the army scale should not matter much as the unit officers should handle that level of detail.  The unit is just a footprint.  

The game makes use of single based Corp Commander and Army commander models.  This is to facilitate the Command Radius mechanic so common in Horse and Musket style games.  I prefer a more abstracted commander level and am not a fan of radius.  However, this also seems to be a staple of the genre.  One interesting aspect was that you also placed your order token under the base of the Corp Commander to be revealed in the right phase of the game.   


Meh and Other Uncertainties

These rules include "Conforming".  This means that when a unit charges, they are aligned "face to face" in the battle.  Flank attacks are lined up on the side, and rear attacks on the rear.  In addition, shooting is always straight forward from the edges of the unit.  No firing at an angle.  This may not be to some people's taste, but to me they seem like a good way to "simplify" the battlespace and keep the game orderly.  I point out the conforming aspect of the rules as this approach was surprisingly controversial in Men of Bronze.  For an abstracted game like this, I prefer it; but other opinions vary a lot.   

Combat in this game is attritional in nature.  This fits the period very well.  Each unit can take 8 hits, and at 5 hits it moves down in skill level which impacts its target numbers.  Various hits during combat or shooting may also cause other effects.  Artillery uses a d4, but can be destroyed from a single combat hit.  You may need more d8s and d4s than most gamers have in their collection.  In addition, most modifiers are simple dice add or subtract but a Quick reference Sheet will be useful to recall which apply when.  I did not see one in the book, but have not checked online yet.  

The game has several pages of advanced rules to allow more experience Napoleonic gamers to add things they particularly like such as Horse Artillery, Guards units, and Lancers.  There is also some National traits and historical Commander Elan to quibble over.  There are rules for scaling it down as well so instead of playing at Army level you are playing at Corp or lower levels.  There are rules for smoke, ammo, secret deployment, terrain generation, and other period flavor elements as well.  Finally, there are some rules for list building that I am sure will be controversial.    

There are 6 scenarios.  Three are relatively large, famous battles; Eylau, Wagram, and Waterloo.  Three are smaller engagements designed to help new players escalate their games as they build forces and learn the rules, they are the battle of Bumville 1-3.  There is also a walk through of what playing the game with Scenario 1 might look like. 

The allied army for the Waterloo Scenario.

Final Thoughts 

This is the type of wargame I would design.  It uses a high degree of abstraction to get the right feel of the battles, but with smaller numbers of troops needed.  You are maneuvering footprints and rolling dice pools to get results.  Modifiers are about adding or subtracting dice looking for a target number based on skill level of the unit.  The game adheres to a couple of genre conventions that I would probably have done away with such as formations and Command Radius, but they work within the context of the game and help Nappie Newbies get a feel for the period and battles.  

Since this game follows a design ethos similar to my own, I am pretty excited about it!  Will old grognards of the genre like these rules?  I have no idea!  However, as a Nappie Newbie they really seem to hit the spot.  They are easily digested, seem to give a flavor of the period, and are an easy gateway into the period.  Even the biggest battles look like doable painting projects with each division being about sixteen 28mm models that will help Newbies get into the game, and still be able to have forces for Chosen Men, Rebels and Patriots, La Salle and  Sharpe's Practice and other games as well. 

Of course, I will want to be odd and use 6mm or 10mm to give me that "army" feel and then use them for Blucher or Est Sans Resultant as well.  If I am not too busy with Ancients, I might have a 2022 personal project!  


Monday, April 12, 2021

Battle Report: Blucher- The French Empire Strikes Back!


I always start these games with the following caveat:  I know NOTHING about the Napoleonic Wars.  In fact, about the only thing I know comes from reading Sharpe!  However, every wargamer eventually ends up doing something with them because the era is just too darn compelling not too!  Blucher is my window into this world of wargaming because it abstracts the tactics due to the level of play it is, and it can be used with cards.  Everyone knows I love Paper Templates!  

After the border clash with the Prussians, the French have decided to go on offensive!  They crushed the Prussians so badly, that they did not expect them to get much of an army together in the area.  For the most part, they were right and they marched in Prussian territory looting and living off the land.  However, the Prussians were quickly shuttling troops from elsewhere to resist them, and it was only a handful of weeks before another Prussian force was in the field to oppose the French.  After a series of maneuvers, the two sides met for battle once more.  

Nice and generic intro for this game! 

Forces: 

This time, we agreed to 18 French units in 3 corps, vs. 21 Prussian units also in 3 Corps.  Like last time, we went with randomly assigned forces!  We took the cards from the 100 Days campaign box and shuffled them up.  We then drew the forces out of the deck randomly.  Therefore, we will get some pretty unusual Corps composition with some strange units in them!  You can not always fight with the army you want, but the one you have instead! 

Prussians

1st Corp:  

  1. Infantry Regiment #22
  2. Infantry Regiment #23
  3. Infantry regiment #24
  4. 6th Kurmarsk Landwehr
  5. 4th Silesian Landwehr
  6. Schwerin Light Cavalry
  7. Foot artillery
2nd Corp: 
  1. Infantry Regiment #18
  2. Infantry regiment #28
  3. Sohr Light Cavalry
  4. Thumen Light Cavalry
  5. 1st Kurmarsk Landwehr
  6. Horse Artillery
  7. Heavy Artillery
3rd Corp:
  1. Infantry Regiment #6
  2. Infantry Regiment #10
  3. Infantry Regiment #29
  4. 2nd Silesian Landwehr
  5. 3rd Silesian Landwehr
  6. 2nd Kurmarsk Landwehr
  7. 5th Westphalian Landwehr
This Prussian force seems to be pretty infantry heavy, with a decent backbone of regular units.  Should be good for breaking through the French lines! 

French

1st Corp: 
  1. 2/14 Toussaint
  2. Horse Artillery
  3. 2/Grenadiers
  4. 1/11 Dufour
  5. Horse Artillery
  6. 2/12 Schaeffer
2nd Corp: 
  1. 1/Grenadiers
  2. Maurin Light Cavalry
  3. Horse Artillery
  4. 2/2 Aulard
  5. 2/10 Dupeyroux
  6. 2/9 Jamin
3rd Corp:
  1. 1/12 Rome
  2. 1/1 Quiot
  3. 2/8 Corsin
  4. Guard Foot Artillery
  5. Heavy Artillery
  6. 2/13 Desprez
In fine French tradition, they seem to have the advantage in artillery.  Plus, the two grenadier units will give them a stiff backbone to the force!  

Mission

Both armies have two objective markers in the enemies back field. 

In addition, they are looking to break the enemy force by reaching their respective break points in lost units.  The Prussians break at 10, and the French at 9 Units.  

Set-up
Like last time, the French are on the West side of the board, while the Prussians are on the East.  Between them is a valley, and both armies are stationed amongst the hills and heights.  In the center of the valley is a copse of trees.  

The Prussian objective is to the Northwest behind the French left, and to the Southwest beyond the hills.  The French is behind the Prussian center, and one to the Northwest on the bluffs.  

The armies are placed in their "blind" state, so it is hard to tell who is what, and where they are at set-up.  I forgot to take pictures before the game started!  Woops!  

The Game
There are potentially 30 turns to the game, so I will not detail every turn.  Instead, I will try to document the flow of the battle as it progresses from morning, to mid-day, to afternoon, and into the evening.

The French forces moving up looked a bit thin compared to the Prussian forces.  However, the French looked strong in the Center, while the Prussians looked thin there.  French Horse Artillery range ahead of main force.  By mid-day, the French horse artillery has the range and position.  They begin counter-battery fire on the Prussian Heavy Artillery.  The battle has truly begun! 

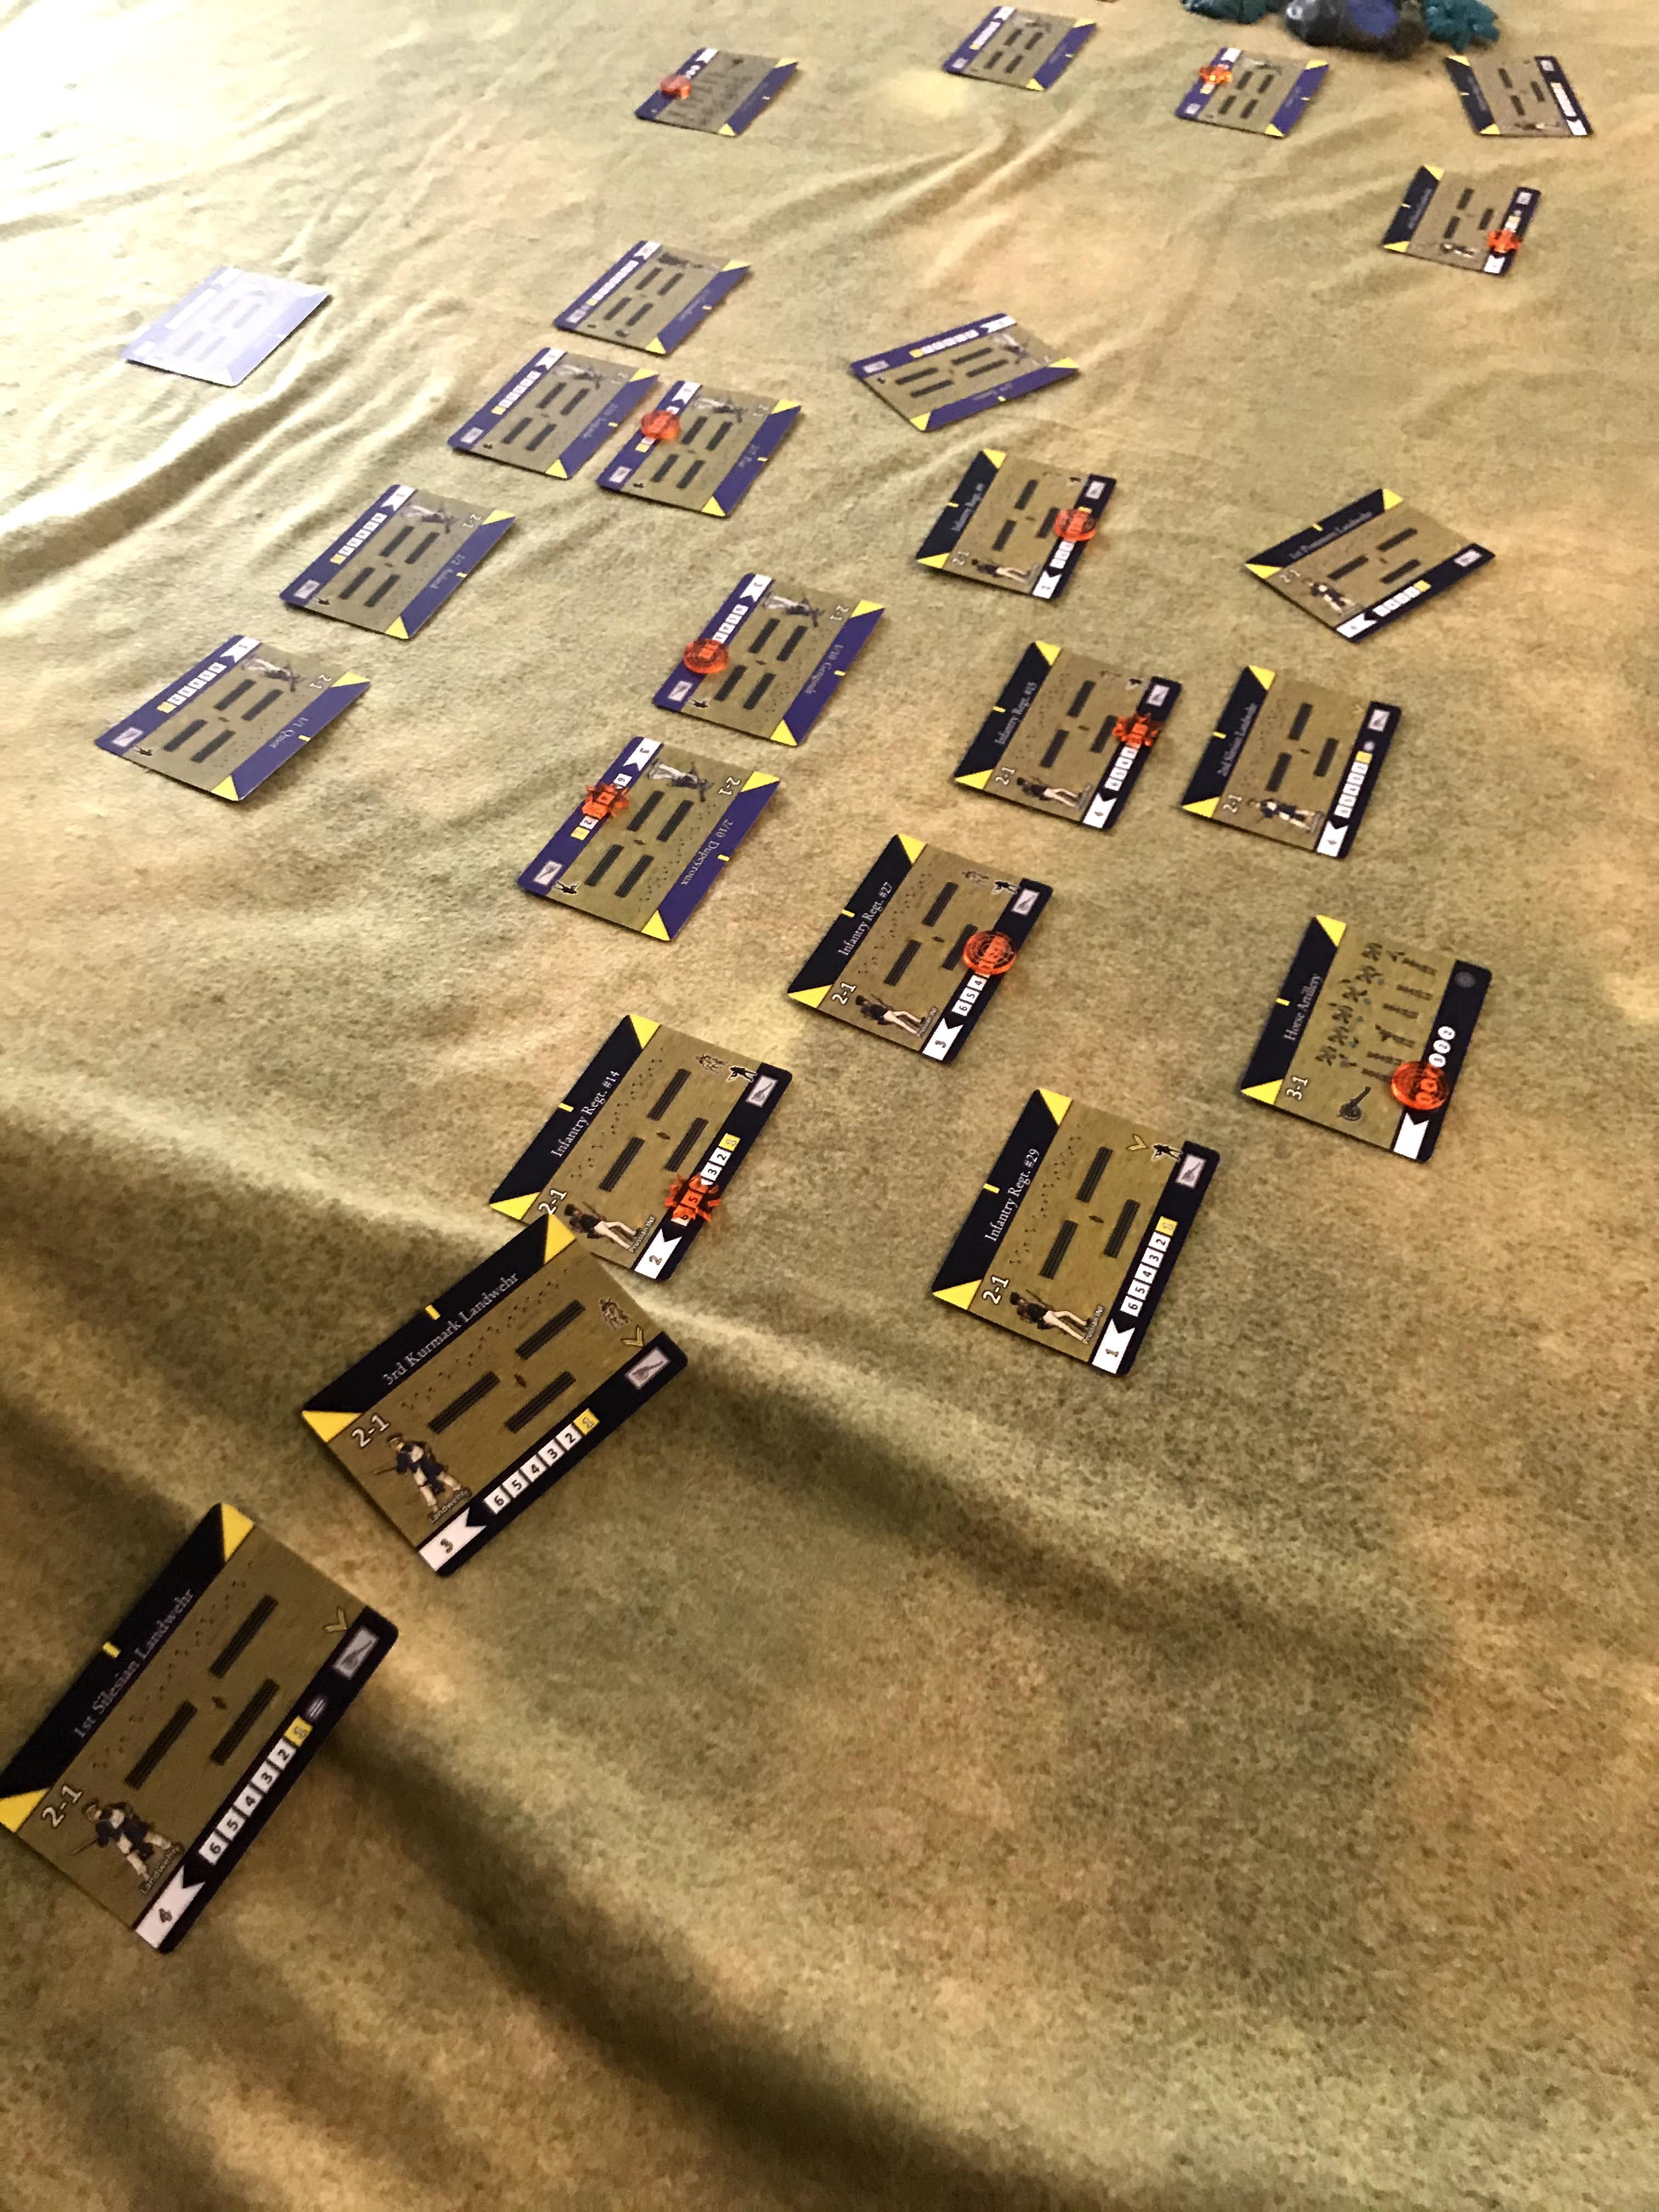
Closest to camera is the Prussian Right flank


The Prussian guns are no longer silent, but the batteries on the Prussian left target a French infantry regiment instead of the French guns.  On the left the Prussians continue to advance, with their formation taking on an echelon approach across the line.  The French and Prussian guns exchange fire.  

Prussian Center

Early in the mid-day, the French advance hesitates as they redress their lines.  Poor command means very little movement occurs as they re-shuffle.  This gives the Prussian guns more time to pound the center and the French right.  The Prussian Left moves into musketry range.  
Prussian Left

Just before Mid-day, the French Horse Artillery in the Center manage to break a Prussian Horse Artillery unit opposite them, and force them to withdraw.  However, French musketry proves lack luster at the point of the Prussian attack.  The Prussians are mush more effective there, and the Prussian Foot artillery breaks a French Horse Artillery unit.  Meanwhile, Landwehr units moves to put the French attack in the center into a cul-de-sac of pain. 

Prussian Center

As Mid-day approaches the afternoon, Musketry fire erupts across the Prussian Left (French Right) and Center as the infantry exchange a brisk fire.  The Prussian Regiment #24 is repulsed in an assault against the battered 2/10 Dupreyoux.  Meanwhile, a charge on the French far right pushes back the Landwehr there, and the light cavalry on the flanks engage indecisively.  French Grenadiers march from reserve and take the heights near the Prussian Objective on the French right.  The French Left also moves to engage the Landwehr on that flank.  

Prussian Left

The 4th Silesian Landwehr is withdrawn from the Prussian left, leaving a bit of gap to be filled by the 6th Kurmark Landwehr.  The Prussian Foot artillery is also withdrawn as they were low on ammo. The frontline French forces are starting to see some heavy casualties building up.  

Prussian Left

The Prussian attack on the Left is barely being held off by the thin line of French defenders.  The French light cavalry manages to see off the Prussians in vicious close combat.  However, the French attack in the center looks to be stopped, as the Infantry Regiment #28 routs the 1/11 Dafour with a charge and the 2nd Kurmask Landwehr obliterates the 2/12 Schaeffer with overwhelming firepower!  

Prussian Center


In the middle of the Afternoon, Prussian Light Cavalry came from reserve and quickly moved through the gaps in the Prussian Left and Prussian Center.  They moved to threaten the French Heavy Artillery and towards one of the Prussian objectives behind the heights on the left flank.  

Gap between the Prussian Left and Center

Late Afternoon is tough for the Prussians as they lose 3 units.  The French on the Prussian left are holding, and the right is collapsing.  However, the Center is holding, except for a French grenadiers unit pushing through to the French objective!  On the Prussian left the Infantry Regiment #23 finally forces 2/10 Dupreyoux to withdraw from the field.  In addition, Thunen's light cavalry is repulsed by the Heavy Artillery in an assault!  Both sides need only lose two more units to lose the game! 

View across the front, with the Prussian Left in the foreground


It is early evening, and the battle is on the brink.  The Light Cavalry from both forces managed to secure an Objective.  However, the 2/Grenadiers are being bogged down from reaching their objective by 1st Kurmask Landwehr.  The Infantry regiment #22 manages to break through the 2/2 Alulard on the Prussian left, but they are in bad shape.  Both sides are 1 unit away from breaking, and the Prussian Light Cavalry is threatening the final objective.  
Prussian Center and Right

By Mid-evening, the Prussians have had enough!  They withdraw from the field, just outside of their last objective.  The 1/Grenadiers blasted Infantry Regiment #22 off the field with a well-timed close range volley of musketry.  With the Prussian left obliterated, the center weakening, and the Prussian Right also under heavy attack, the troops had enough a decided the fight was over.  

Prussian Left


Conclusion:

French narrowly win!  The Prussians were beating down the door to their last objective, and the French were only 1 Unit away from breaking.  Some well timed withdrawals kept them going at the end and denied me the last Unit I needed to win.  

Prussians
Withdrew- 3 Units
Broken- 9 Units

French
Withdrew- 7 Units
Broken- 6 Units  

So close!   As the Prussians, I really thought my Light Cavalry blitz through the gap was going to be the game winner.  1 more turn and it would have been!  In retrospect, I should have withdrawn on the Left flank sooner.  You can see by the Withdrawn count that I was very aggressive with my units today, and ultimately that is what cost me the game.  I guess I was confident as I was outnumbering the French and had a higher Break Point.   

Today, we went 26 turns!  Almost the whole game length before we reached a decision.  I am sure we are not playing everything 100% right, but we are having a good time doing it!  Those damn French are a tough nut to crack!  The Grenadiers were amazing and in my mind were decisive units.  My Landwehr did their job for the most part, but let me down on the Prussian left, but did great in the Center. 

Overall, I look forward to playing again.               


You can follow Blood and Spectacles Facebook page for more fun: https://m.facebook.com/pg/BloodandSpectacles/posts/?ref=bookmarks&mt_nav=0


Or our website:

Or our Messageboard:

Or our Wargames Vault Page:


Monday, March 22, 2021

Battle Report: Blucher- Prussians vs French


I know nothing about the Napoleonic Wars.  If it wasn't in a Sharpe book then I really know nothing about it!  However, as a Wargamer it is the 600 pound gorilla in the room.  I have always had some interest in the big battles, the tactics, the pageantry and the big hats!  However, that has easily been countered by the historical details, the many rule sets, basing, and the lack of a Nappie mentor.  

Therefore, to help me get a feel for the world of Nappies, I bought the Blucher and 100 Days game late in 2018, and played in early 2019.  I really liked the ability to use cards instead of models, and it gave me a high level introduction to the period without getting bogged down in the minutiae of it.  Plus, the rule set itself was very user friendly and gave a good balanced game.  Therefore, I broke it out again for some more gaming this year as a palette cleanser and to do something completely different.

Prussian forces are maneuvering to try and enter France and bring the war "home" to their enemies.  However, French commanders have been alerted and have moved 3 Corps to intercept them.  The two forces meet and a battle is fought near the border.   

Forces: 

Since I know nothing about the period, I decided to go completely "ahistorical" for our outing today.  I took the cards from the 100 Days box for the Prussians and the French.  I shuffled them, and I drew 18 cards for each army, 6 into each Corp.  

Prussians

1st Corp

  1. Foot artillery 
  2. Landwehr Cavalry
  3. 4th Silesian Landwehr
  4. Infantry regiment #11
  5. 2nd Elbe Landwehr
  6. Foot artillery
2nd Corp

  1. Infantry Regiment #15
  2. Horse Artillery
  3. Infantry Regiment #9
  4. 2nd Silesian Landwehr
  5. 1st Pommern Landwehr
  6. Heavy Artillery
 3rd Corp

  1. Heavy Artillery
  2. Infantry Regiment #29
  3. Infantry Regiment #27
  4. 1st Silesian Landwehr
  5. Infantry Regiment #14
  6. 3rd Kurmark Landwehr           

An infantry heavy force with a decent amount of artillery support.  A mixed bag of units for sure.  The Third Corp seems like the Prussian heavy hitter.....

French

1st Corp

  1. 1/12 Rome
  2. 2/11 Logarde
  3. 2/Grenadiers
  4. 2/7 Piat
  5. 2/9 Jamin
  6. Heavy artillery
2nd Corp
  1. 1/10 Grengoult
  2. 2/10 Dupeyroux
  3. Maurin Light Cavalry
  4. 1/1 Quiot
  5. 1/4 Pegot
  6. 2/2/ Aulard
3rd Corp
  1. 4 Soult Light Cavalry
  2. 1/19 Bellair
  3. 1/14 Hulot
  4. 2/8 Corsin
  5. 1/ Chassuers- Old Guard
  6. Heavy Artillery

The French came with plenty of line infantry as well!  However, it looks like the French have the cavalry advantage, even if it is only one unit.  

I am not using any personality cards for this game. 

Mission

Both armies have 2 Objectives placed on the field.  This will just be a straight up battle with both forces trying to break each other OR secure their objectives behind their enemy lines.  

Set-up

The board is a 6 foot by 4 foot board.  The French and the Prussians both have some heights on their side of the board.  The French are on the West, and the Prussians are on the East.  There is a small pond and swampy region on the northern side of the center line of the board.  Other than that, there was very little terrain of interest.    

One interesting thing in Blucher is that both sides set-up using blinds!  You place the cards face down, and they are not revealed unless they shoot, or move into view.  Therefore, when we look at the board we see 18 cards per side with their national flag on the back.  


The Prussians have the 3rd Corp deployed on their right, then the 2nd and the 1st is on their left.  The French have the 2nd on their right, then the 1st in the center, and 3rd Corp on their left.  


The Battle

The French are on the offensive so will begin turn 1, as both armies are ready to engage in the morning.  Each turn the one player takes all actions, but is limited by their Momentum, as tracked by the opponent who secretly rolls the momentum dice.  Since the game has 30 turns using an I-GO-U-GO system, I will not detail out each turn.  That will get boring! Instead, I will just try to share the flow of the battle as it evolves and key moments.  

Prussian Right early in the battle

By mid-morning, the Prussian left and the French right had moved to engagement range.  However, most of the rest of both armies seemed stalled.  They both seemed to be deploying in echelon into the fight.  The Prussian 1st Corp and the French 2nd Corp seemed eager for a fight.  Meanwhile the Corps in the center were a bit more sluggish, with the other Corps still having units as blinds and still at the base line.  The Prussian Horse Artillery of the 1st Corp start the battle by shelling the French 2/10 Dupeyroux regiment at the forefront of the French advance.  

Prussian Left and French Right engage at mid-morning

Scattered firing breaks out as the various Infantry units on the south side of the battlefield begin to find the range.  Skirmishers are deployed and attack.  As Morning wanes into Mid-day, the Prussian Infantry Regiment #15 makes contact with the French 1/10 Grengoult and are bloodily repulsed.  The Prussian Heavy and Foot artillery also manages to fire on the French center Corps Heavy artillery and cause some damage.  However, the strong French battle line is able to deliver effective firepower on the leading Prussian units.  
Prussian Left

Skirmishing and volley fire breaks out across the front, with the main action still concentrated on the South side of the battlefield (Prussian left and French right).  Both the Prussian and French forces are grinding it out with short range firepower punctuated with hand-to-hand assaults.  Meanwhile, to the North the French artillery has taken a beating but has forced the 2nd Elbe landwehr to withdraw from the battle.  Just as French line infantry have begun to engage on that flank with skirmishers.  

Prussian Right

At the mid-day point, the first French unit is broken by firepower on the French right.  The 1/4 Pegot regiment on the hillside is forced to fall back.  Meanwhile, one of the French Heavy batteries is also withdrawn, their ammo spent.  Despite the loss, the French forces are on the attack, and are in good position!  The Prussians had to withdraw their Heavy battery and Foot artillery in the Center, and a Landwehr regiment on the Prussian left.

Prussian Left, will the Prussians be able to turn the flank?
  
French troops manage to smash through Prussian Infantry Regiments #15, #9, and #27 at the main point of attack on the French right.  This leaves only Landwehr to hold the line, while the French have a reserve of Line Infantry moving up!  In desperation, Prussian Heavy and Foot artillery come out of reserve to fill the gap in the Center.  Prussian counter-attacks on their Right flank are repulsed, while on the left at the foot of the heights they push back the French.  

The French repulse the Prussian attack on the Prussian Left!

The Prussian counter-attack on the French right is short lived as the reserve Line Infantry units destroy the Prussian Infantry Regiment #14 in combat.  The last French Heavy Artillery battery withdraws from the field as the French line infantry push their assault. On the French Left a light cavalry unit moves up from reserves to threaten the far flank.  Prussian Landwehr Cavalry comes out of reserve and counter-attacks the French light Cavalry on the Prussian right, but to no avail.  The newly arrived Prussian artillery punishes the 2/9 Jamin in the Center.  The battle for the heights on the Prussian left is easily pushed back by the light cavalry on higher ground.  However, the Prussians do manage to break another French Line Infantry unit!  
The Prussian Right is also crumbling under the French attack

As dinner time approaches, the French seem to have broken through on the Prussian right, only the de-moralized Infantry Regiment #11 still stands to stop them, after the Grenadiers obliterate the 4th Silesian landwehr, and Soult's cavalry finishes off Sydow's Landwehr cavalry. The Prussians have lost 7 units, with a break point of 9.  The French have only lost 3.  

The 1st Silesian was badly injured by the French cavalry and withdraws, as does the Infantry regiment #11.  An assault on the Prussian left is easily dealt with by the French Line infantry there.  However, the Prussian cannons in the Center do manage to rout another French unit.

The Prussian Right crumbles

As evening settles in, the battle is all but over.  The French push manages to sweep up the Prussian foot artillery, taking them to 8 units broken.  Despite the French's best efforts, they can not completely break the Prussian army.  Seeing all hope lost, the remnants of the Prussian force withdraw with their tails between their legs, thoroughly beaten.  Meanwhile, the French still had the Old Guard Chasseurs in reserve.    
French victory as the remaining Prussians withdraw

Conclusion
The French force the Prussians back across the border and into their own territory.  The Empire was safe again, and the drumming they gave the Prussians would hopefully keep them away for the weeks to come. 

As the Prussian player, I knew I had an uphill battle.  Landwehr were no match against the Grenadiers and Line Infantry of the French.  I had hoped to turn the Prussian left flank, and things looked promising when I broke the French line infantry on the edge, however, I just couldn't sweep the French light cavalry off the top of the heights, and my opponent was able to shore it up with more Line units.  

I knew my Right and center would be vulnerable, so I tried to delay there as long as I could.  It actually lasted longer than I expected, but when the French broke through my line Infantry on the South Side of the battle, I knew it was pretty much all over but the crying.

Final tally:

French
Withdrew- 2
Broken- 4

Prussians 
Withdrew- 5
Broken- 8

Ouch!  The way we "picked" armies led to a somewhat lopsided game.  However, that is war!  You do not always get to fight with the units you want, but the units you have!  Overall, I found it a fun challenge and Blucher always plays differently than most games I play.  The short ranges and movement make it especially interesting since you are coordinating armies.  I look forward to trying it again soon!          


Monday, May 11, 2020

Wargame Design: Solo Gaming Deployment


As we talked about last time with Solo-wargaming we are all in a Brave New World!  No longer can we count on going down to the local shop, gathering with our buddies in the basement, or stopping by at the Club for a game.  Instead, we have to find alternate ways of doing things for the forseeable future.  That is going to involve figuring our how to do this Solo-wargaming thing!

Thankfully, this is a diverse and interesting hobby.  It is challenges like these that help me think and engage with it differently.  Lately, I have been thinking a lot more about solo wargaming.  Admittedly, I am late to the part.  There have been plenty of other games out that all ready tackle this ground.  I will outline a few below if you need them:


  • Horizon Wars: Zero Dark- Sci-fi
  • Rangers of ShadowDeep- Fantasy
  • The Walking Dead- Zombie
  • Chain Reaction - Sci-fi
  • The Men Who Would Be Kings- Colonial
  • 4 Against- Fantasy
  • Spellslingers and Sellswords- Fantasy
I am sure there are many more so feel free to add to my list in Comments or on the Messageboard.  Heck, I even took a stab at making one called Combat! Starring Vic Morrow!

Surprise Party!
Today, we are going to continue to talk about some of the unique aspects of Wargame Design that pertain particularly to designing Solo wargames.  One of the challenges of playing a solo wargame is that you have a bird's eye view of the battlefield.  As the commander, you can see everything.  When you are playing an actual opponent the advantage is mitigated by facing an actual, living, breathing, thinking, decision making opponent.  It is always a bit hard to predict what exactly they are going to do.   

In a solo-wargame, one of the key tenants that a design should strive for is "surprise".  In this case I am specifically refering to a situation that takes the player a bit off guard and that can derail their tactical plan.  In most wargames, this is provided by an actual opponent.  Solo wargames can not rely on such a luxury.  I am sure we have all heard the concept that "No plan survives contact with the enemy", and create "surprise" in a solo game is intended to force the player to "re-think" their approach and force them to make decisions. 

One way to set-up players with tactical surprise in a solo-wargame is to try and make deployment less obvious to the solo-player.  Enemies should be everywhere, and no corner of the board necessarily safe.  Therefore, solo-players are making decisions immediately once they deploy.  Here are a few ways to tackle this issue that I have seen: 
  • Blinds
  • Hot Spots
  • Random Deployment
  • Mixed Deployment

Blinds
Blinds are an old way of deploying in a way so that your opponent does not know exactly what you have deployed where.  This is a trick even used in traditional two-player wargames.  I have seen this executed in a number of different ways.  However, the idea if that there is a marker on the board that represents an enemy unit.  

When a Player's unit gets within a certain distance it forces the unit to be "revealed".  Once revealed, the Blind is replaced with the actual model/unit it represents.  As an added twist, not all Blinds need to correspond to a unit and instead maybe dumbies.  Typically, a blind can be revealed by moving too close to it, shooting at it, the blind acting, or some other type of reveal such as a drone sighting, off-board observation, etc.  The way a Blind can be revealed often helps fit the theme of the game you are playing. 


Some example Blinds are: 
1. Playing Cards that correspond to a particular unit/Dumbie by number
2. A Chit that once revealed is a roll for a random unit, including nothing
3. A single model that once revealed allows the unit actual location to be randomly determined within X radius of the model or none at all
4. A unit that looks like X can be replaced by Unit Y

There are many types of blinds that can be used to remove the certainty of where and who your enemy are.    

Game Examples: All Quiet on the Martian Front, Blucher, Zona Alfa

Hot Spots
Unlike a Blind, a Hot Spots will spawn enemy units from it at certain intervals.  Unlike Blinds, they do not correspond to a set unit on a 1 for 1 basis.  These units maybe respawn of killed units, new units, or even multiple enemy units.  Some games may have various Hot Spots spawn different types of units.     The key is that these units will appear at regular intervals.  The only way to stop new units from spawning is for the Player to "shut them down" by coming withing a certain distance, destroying them with firepower, investigating them, etc.  Once properly dealt with no new Units can be produced.  

Hot Spots allow a stream of enemies to come forth at the Player unless they specifically act to shut them down.  This may be part of their mission, or a distraction from their mission.  It depends on the game and the scenario being played. 

Game Examples:  Force-on-Force/Tomorrow's War, Space Hulk   


Random Deployment
In this scenario, the enemy forces are randomly deployed in both time and space.  This can be from random charts, set lists of options, based on timing, or any combination the designer can think of.  Here when  unit is "spawned" its placement is randomly determined.  This can be based on Hot Spots, Blinds, distance from the player's troops, or truly randomly from a cotton ball flick or something similar.  Many times, the game will dictate the method in which the random deployment occurs, but the player will not know when or where enemy forces will appear.

Game Examples:  The Men Who Would Be Kings

Mixed Deployment
A mixed deployment combines a couple of the above elements with a traditional wargame deployment in a deployment zone.  So, there will be obvious and present forces deployed per the scenario (such as within 12 inches of the Objective) and additional Deployment options for other units.  This forces a player to face some known enemy troops and objectives while having to plan for additional forces from an unknown source.  

Game Example:  Rangers of ShadowDeep, The Walking Dead


Final Thoughts
Where and when enemies Deploy is a great way to create "Surprise" in a solo-wargame.  Especially in games that encourage Tactical Gameplay, fresh troops appearing from unexpected locations can make the game much more challenging to accomplish objectives.  It is this "fog of War" that leads to Friction, and friction forces decision making.  The more decision making a solo-wargamer needs to make the more interesting and exciting the game.   


You can follow Blood and Spectacles Facebook page for more fun: https://m.facebook.com/pg/BloodandSpectacles/posts/?ref=bookmarks&mt_nav=0

Or our website:

Or our Messageboard:

Or our Wargames Vault Page:

Monday, July 1, 2019

Random: July! The Half-way Mark for 2019 is Here!


Wow, half way through the year all ready.  It is time to review the progress on my 2019 Goals. 
Time flies by when you are having fun!

As you may recall, I tried to divide the year up into categories.  However, this year I tried to focus it a bit more on genres this year.  I then placed goals within the genre to help guide me through the year.  So, let’s get a break down on each category and goal. 

Period 1- Ancient Greeks

1.       Create a Social Media campaign to help promote the release of Men of Bronze.


-          I have made some progress with the help of T and T Consulting Solutions.  I have integrated my blog in with a website, Facebook page, and message board.  I have also added a few other tricks and gimmicks.  Feel free to join and follow them below. 

-          Website: Website
-          Facebook: Facebook
-          Support Page: Support
-          Message Board: Board

2.       Complete 2 of 3 armies: Corinthians, Spartans, and Macedonians. 

-          I have made some progress.  I painted one more Corinthian Unit, but it looks…. Not great…..


-          I assembled all the Pikeman and Hypaspists for the Macedonians
-          My painting associate has started working on the Spartans   
-          Overall, some progress but not enough.

3.       Purchase and paint a box of Victrix Greek Cavalry- No progress

4.       Use painted Greeks to create two rival Greek forces for Of Gods and Mortals

-          I have had issues tracking down 54mm models I like to be Athena or Artemis as the Gods

5.       Create Argonauts Warband for Broken Legions

-          I painted my Argonaut Hero and Herculean Champion for the Warband.


-          I also worked up the warband to rival my Sons of Spartacus warband


-          Have not gotten it on the table yet though.

6.       Document 6 Menof Bronze battle reports, including two video reports

-          I have 1 battle report completed and on the blog


-          I do have a nice lighting set-up for video/photos now

7.       Create a Quick Reference Sheet for Men of Bronze

-          I wrote it all up and sent it to Osprey for their site
-          You can also find a draft on the Messageboard

Period 2- Diadochi of Alexander

1.       Complete publishing process

-          Things may have gone a bit side ways on that front, more to come….

2.       Purchase, paint, and base two 6mm successor armies from Baccus Miniatures


-          I have made the purchase and they have arrived!
-          I also got a new set of paints to try and do them justice

3.       Complete painting my Victrix Macedonians including successor Phalangites, Hypaspists, and Heavy Cavalry

-          All infantry assembled and ready to paint.


4.       Purchase and paint a Victrix war elephant- No progress

5.       Take good photos of the models for Osprey- No Progress

Period 3- Roarin’ 20s

1.       Purchase and paint enough 28mm gangsters for 2 gangs

-          Purchased the Copplestone Gangsters from Brigade Games


-        Created two gang lists

-          Painted 1 gang completely


-          Painted 3 gangsters and undercoated last 3 for a second gang


2.       Pick-up some 1920’s style farm house

-          I picked out the one I will eventually buy, but have not purchased it yet.

3.       Buy and paint Cthulhu-esque Lurkers from the Reaper Bones line- No progress

4.       Update the TurfWar book with model photos and artwork- No Progress

Period 4- Blood Bowl

1.       Finish painting all of my current teams

-          Complete!


2.       Pick-up the Dwarf and Skaven alternate board

-          Complete, sort of. 
-          I bought the winter themed board instead


3.       Pick-up and assemble two more teams to bring me to 12

-          No progress
-          I am holding out for Lizzies and Chaos Dwarfs

Period 5- Napoleonic

1.       Play a game of Blucher- Complete!


2.       Pick-up the Osprey Wargaming Series- Rebels and Patriots- Complete!


3.       Complete a draft version of Mageloque- No Progress!

Period 6- Frostgrave

1, Purchase and paint enough fantasy models for 3-6 wizard warbands- No Progress

2. Purchase the Maze of Malcor and Ulterior Motives

-          Maze ofMalcor is complete


4.       Build, buy, and create enough terrain for a 3x3 Frozen city board- No progress

Period- Random Stuff

1.       Get Onlythe Strong Survive into the WIP section- Complete!


2.       Keep trying to get 1 new blog post up every 2 weeks- So far so good!

3.       Buy two armies from Vanguard Miniatures for Rampant Galaxies- Not Started

4.       Buy all the Dracula’s America Books, Last Days, and new Osprey Wargaming Series books that come out

-          I have kept up on the Osprey Wargaming Series

5.       Purchase Gangs of Rome starter set- No Progress

6.       Start building a Victrix Roman Republic and Samnite army- No progress!

7.       Play some AquanauticaImperialis- No progress!  

8.       Source two fleets for Castles in the Sky- Not Started

9.       Sell 1 new game pitch- In Progress!

Some bonus points for painting a few things for Aeronautica Imperialis too! 


Conclusion
This year I was incredibly ambitious about what I wanted to accomplish.  Honestly, I think my plans as written are more of a 3-5 year plan than a single year plan.  Last year, I was too conservative and this year I am too ambitious. 

However, good progress has been made.  I have painted over 110 + miniatures this year.  At one point, I thought I had painted everything I had in my lead pile, but I found one undercoated Mark IV tank for All Quiet on the Martian Front.  Then, a whole slew of Victrix, Copplestone casting, and Baccus came in to replenish my lead pile.

I have also managed to play about 8 games ranging from Men of Bronze, Strange Aeons, RampantStars, Aeronautica Imperialis, to Blucher.  I even got to play on International Tabletop Game Day.  Not too shabby.  If I keep this up, I might get in a game a month or even more!

Oddly, I have had the least amount of progress on the Game Design front.  Typically, this is one of my most productive areas.  However, I barely managed to get a playable version of Only the Strong Survive into the WIP section.  Despite the slow progress, I may have made more money of game design this year than previous years thanks to the publication of Men of Bronze, other work with Osprey, an article in WSS #102, and Wargame Vault sales.  I look forward to building on this progress as I have had a few projects waiting on the back burner for some time to work on them involving Carthage, the Wild West, and Vikings.

Overall, a pretty exciting year so far, but there is no way I am going to get everything done I have on my list for 2019.