Monday, December 16, 2019

Men of Bronze: Pre-Reform Macedonia


Men of Bronze focuses on Greek Warfare in the ancient world, and ends with Philip II of Macedon's victory at the battle of Charonae. In some reviews, I was properly criticized for not looking beyond the traditional, classical battlefields into the edges of the Greek world. Nicat the Irregular Warfare blog was right to point out this mistake, as I missed such important areas as Sicily, Thessaly, and Macedonia. I cover Macedonia in the book, but only after Philip's reforms. Therefore, I am trying to fill in the gaps here on my blog. I started with Thessaly and am now moving on to Macedonia.

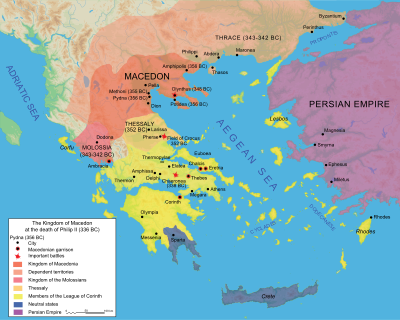
Prior to Philip, Macedonia was considered a backwater place at the edge of the Greek world. However, they did participate in the Olympic Games and the ancestry of their kingdom was traced back to Thebes, and therefore Heracles and even Zeus himself. They were considered semi-barbarous. During the Greco-Persian wars, the Macedonians had sided with the Persians. They even had foot soldiers in the Persian army at the battle of Platea. Therefore, the rest of the Greek world did not take them seriously and consequently little is written about them by the typical sources. However, with the arrival of Philip II and then Alexander on the scene, the Macedonians exploded onto the world stage!

A Brief History
Not much is documented about the military history of Macedonia for this time period. Our sources are rather limited and I don't believe any of them are contemporary. The interest in this period was more of an after effect of Alexander's success. Therefore, putting together the details of this army can be sketchy at best.

Central Macedonian was good land for raising livestock, much like its neighbor Thessaly. This region was dominated by a landed aristocracy. However, there was also a mountainous highlands region farmed by peasants. Their traditional enemies were the nearby Thracians, Illyrians, and Paeonians.

They had a checkered history with their neighboring Greeks. During the Greco-Persian Wars the Macedonians were allied to the Persians. Later, during the Peloponnesian Wars they changed sides between the Spartans and the Athenians regularly. Parts of Macedon itself were traded between the two powers. Afterwards, the Macedonians were focused on internal politics and local matters between them, the Thracians, Illyrians, and the neighboring Thessaly.

The Macedonian military at the time was very different. It was composed of a couple of primary elements. The first component was the hetairoi, or the famous Companion Cavalry. They were composed of heavy cavalry with muscled cuirass. The horseman were composed of the nobles of the land.

Next, were the Pezhetairoi of the Foot Companions. These were the backbone of the infantry for the Macedonian army. However, they were relatively few in number compared to the majority of the infantry. There is some debate about how these early foot companions were armed. It is unclear if they were early pikeman, traditional hoplites, or something more like Iphikrates' hoplites. There is some reason for me to favor the Iphikrate's style as during the Peloponnesian Wars the Macedonians were exposed to this style of fighting.

The third and final component of the early Macedonian army was the citizen militia. These were conscripted farmers and peasants from the Macedonian Highlands. These were poorly armed and equipped troops with little or no training. Indeed, in campaigns in Thrace the Macedonian kings were reluctant to use the Militia at all. They were frequently replaced by local mercenaries in the Macedonian army.


The Pre-reform Macedonian Army
The primary fighting arm of the early Macedonian army circulated around the mobility of their cavalry forces. The Macedonian nobility used heavy armored cuirass to protect themselves in battle, and some sort of thrusting spear. However, at this point in time, the Heavy Cavalry did not make use of the famous wedge formation. This seems to have been one of Philip's innovations. However, even now they were the primary arm of decision in the battle. The rest of the army were there to support the cavalry.

The Foot Companions were the primary fighting arm of the infantry. They would provide a steady center for the rest of the force. The Cavalry could sally out from around these troops. Then, after a successful or failed charge they could return behind this bulwark and re-group for a second charge. In addition, they could be counted on to hold on in a fight against Illyrian or Thracian light troops.

The militia would bulk out the armies numbers. They could hold a position if needed or force an enemy army to spread out across a wider front. This would provide weak points for a cavalry charge to exploit.

Pre-Reform Macedonian Line of Battle
Use the following lists to build your historical forces for Thessaly. The Lines of Battle help to choose the appropriate units for your historical forces. These are sample lists and there to provide a flavor of potential forces. Players can always modify these lists as they see fit

Each Line of Battle will have an entry with a number. The number indicates the limit of that Unit you can take in the army. If an entry says 1+ your army must have at least one of these units in it. If it is 0+ any number of that unit may be taken. If a Unit is not on the list, it can not be chosen

Pre-Reform Macedonian Army
1-2 Heavy Cavalry
0-3 Light Hoplites
0+ Warband Infantry
0-2 Psiloi
0-2 Drilled Infantry (Mercenaries)
0-2 Peltasts (Mercenaries)

Sample Armies
Below you can see Sample Armies built from the Lines of Battle provided. They give you an idea of what your force could look like. They are all built to a 38 point force. They range from 5 to 10 Units each.

1 Heavy Cavalry
1 Light Hoplite
2 Warband Infantry
2 Mercenary Peltasts

Battle of Therma
Just prior to the outbreak of the Peloponnesian War, Macedonia was fragmented between two rival kings, Philip and Perdiccas. The pretender Philip was allied with the Athenians. In response, Perdiccas stirred up revolt and rebellion in the Athenian tribute city of Potidaea.

This displeased the Athenians and they sent Hoplites and ships to attack. They took over the city of Therma. Then, they marched on Pydna to try and besiege it. However, they decided to leave the area on the news that Corinth was moving on Potidaea. The Athenians promptly made peace with Perdiccas and decided to align with him going forward. This allowed Perdicccas to regain control of Macedonia.

We know nothing about how the Athenians took control of Therma. All we know is that a force of 1,000 Hoplites were sent via 20 ships to attack the city. We know nothing about the Macedonian defenders or if a battle even occurred. Therefore, the scenario listed below will need to take considerable liberties and assume that a defense was even raised at all.

Forces
We know very little about the forces involved at Therma so this list will be taking some liberties.

Athenians
1 Drilled Hoplites
2 Militia Hoplites
3 Peltasts

Macedonians
1 Heavy Cavalry- Companions and Nobles
1 Light Hoplites- Foot Companions
3 Warband Infantry- Citizen Levy
1 Psiloi- Citizen Levy
1 Mercenary Peltast

This scenario uses the a scenario from the Men of Bronze rulebook as the basis for the battle. Since we know the battle around Therma was probably a siege, it makes sense to use the Ravage the Countryside scenario with the Athenians as the attackers and the Macedonians as the defenders.


Set-up
This scenario is played on a 48 by 48 Base width board. Follow the deployment rules found in the Men of Bronze rulebook for the scenario. However, since Therma is a Macedonian city to start with, we will let the Macedonian player deploy all the terrain. However, instead of the normal 4 pieces of terrain with one in each 12 base width by 12 basewidth grid; only deploy one piece in each grid space on the Athenian side of the board. Place the terrain to be ravaged as normal.

Special Rules
You can choose to play this scenario with no complications, roll for them as normal, or choose them as you and your opponent wish. This scenario does not use any special complications.

Victory
Use the normal victory conditions for Ravage the Countryside found in the Men of Bronze rule book.

Conclusion
Now we can add another Northern territory of Greece into your Greek combat with Men of Bronze. This list along with the list for Thessaly on the blog will help round out your period options. I also have a blog post coming up soon about Sicily, Syracuse,a nd Carthage; so keep your eyes open. This period had a few more secondary sources thanks to the Macedonian campaigns with/against the Persians, during the Peloponnesian War, and in campaigns against the Thracians. However, these sources were not all aligned about the pre-reform structure of the Macedonian military and the Foot Companions especially required some judgment on my part to fit the troops types available.

A shout out to Nic at the Irregular Warfare Blog and Ingtaer on Dakka Dakka for their help and information. Thank you for all the support and help.

You can get all of the updated materials including a FAQ, Campaign rules, and Lines-of-Battle in the Men of Bronze Supplement: Hercules Abroad.

I look forward to seeing your games with these lists. Feel free to share them with me in the comments, on the message board, or send me an Email through my website.

Monday, December 9, 2019

Review: Land of the Free- Osprey Games


As long time readers of the blog know, I have been interested in someday doing a series of games for the War of 1812 focused in Wisconsin or other parts of the frontier for the period.  The Battle of Prairie Du Chien has been of particular interest to me as well as various “fictional” encounters in the wilderness.  To this end I have purchased a few rulesets such as Rebels andPatriots, Chosen Men, and The Men Who Would Be Kings; all from the Osprey Wargaming Series. 


To help facilitate this project and my desire to buy, own, and read far more rulesets than I can actually play with; I decided to pick up Land of the Free by Joe Krone.  This one is a hard back from Osprey Games and was one of their early hardback games. 

This one took me a long time to get through and I read it in starts and stops.  Therefore, I apologize ahead of time if my review gets a bit disjointed.  Despite the starts and stops in the rules reading, I think I have a good grasp on the games basic concepts. 

Things I Liked
Over half of this book is scenarios to play in various wars from the period.  These cover scenarios in the Revolutionary War, the War of 1812, the French-Indian War, and more.  For a player new to the period, it provide plenty of historical scenarios of various sizes and scopes.  Mr. Krone took this part very seriously as he includes board lay-outs, army lists, synopsis of the battle, and all the great details you need to re-fight the game itself.  With many games focusing more on competitive, organized play it was nice to see something with a strong scenario bend to it.  The books is worth it just for the scenarios alone. 

On a related note, there are also nicely done army lists and orders of battle to help newbies like me get a handle on the period.  This will not be needed for veterans of the period, but helped me out as a newbie to it. 

The game was also base and scale agnostic.  You could just as easily play a game with a handful of 25-60 28mm figures, as you could with bases of 6mm, 10mm, or 15mm figures.  Indeed, the game uses generic unit “sizes” to help a player understand the capabilities of a unit.  These range from Tiny to Large units which allows for a wide variety of unit and troop types to be represented.  In addition, this game does not use figure removal and instead has hits that degrade a units ability to pass morale tests. 

Scout elements allow your officers to access more Command Points.  Frequently, these types of units are ignored or have little additional value to a game.  However, additional Command Points allow you to give more orders to the rest of your troops.  This allows you to essentially, act on your improved intelligence gathering capabilities. 

Each unit has a number of action dice.  The more dice, the more success they can get.  Frequently, the number of Action Dice a unit has is related to their size or skill.  The more dice you roll, the more potential hits you can generate in melee or shooting.  You are trying to hit a target number defined by the type of unit you are using such as Grenadiers, Line infantry, skirmishers, etc.  This is a simple and elegant way to resolve key actions, and allow some differentiation between units. 


Things I Do Not Like
Like all linear warfare games, there is a bit of “IfThis/Then That” to the rules as how artillery interacts with infantry interacts with cavalry leads to some strange situations.  For the most part, modifiers are sufficient to handle these situations.  In addition, Interpenetration rules exist because it was a thing on the actual linear battlefield.  However, most of these are more down to the period rather than the rules themselves. 

Units that are routed stay on the board and withdraw until they leave the board.  Therefore, a player must spend time dealing with a unit that is no longer viable instead of just removing it from the field as an abstraction for routing.  I am not a fan of this approach.   

This game essentially uses the I-GO-U-GO method.  This is notinherently bad, but I do not think it helps the immersion for the players.  I can forsee long periods where the inactive player basically watches the active player move troops and roll dice.  The game would benefit from some sort of method to exchange the initiative.   


Meh and Other Uncertainties
The game uses individual based officers which then generate a command radius.  This is a pretty common and straight forward approach to the period.  However, I am not convinced this is the best way to model some of the limitations of command, control, and the leadership challenge on the table. 

In addition, each officer has Command Points that they expend to have units act.  Once gone, they can not give more orders.  This acts as a resource limitation.  Therefore, an officer has two limitations on getting troops to act, the first is distance and the second is the number of Command Points.  I like the resource management this implies BUT I like the idea that a unit can always defend itself with fire or melee based on the local officers acting in their unit’s own best interests similar to The Men Who Would Be Kings.  In practice, this means units always being able to perform some actions based on training.   However, my impression is that such freedom of action was/could often be curtailed by discipline in Linear Warfare.  I am waffling here but only to sketch out some of the challenges a game designer must face and then make decisions about.


Unlike other Osprey Games hardback books, this one does not have a lot of white space.  In fact, every page is full of text.  For an old guy like me, some of the text was even a bit too small!  However, it still had great images of armies, color plates, and solid maps.  I imagine it was not cheap for Osprey to put it together and it looks great!   

Conclusion
This is a very tidy and serviceable set of rules.  It’s main strength is that allows new players easy access to the period.  It has a great selection of Historical re-fights and scenarios of various scales.  It also provides a good basis for army lists.  Finally, the game scales really well from small skirmishes with a handful of figures up to large battles.  Gamers can therefore scale their games along with their armies.  This will be important for a player like me.  In my mind, it is the games strongest selling point.    

On the other hand, the rules are rather “by the numbers”.  There is not a strong hook that really differentiates these rules from a game like Honours of War or Blackpowder.  The mechanics align pretty closely to these systems, and other Linear warfare systems I have read elsewhere.  It is unclear to me why I would use these rules over the more ubiquitous Blackpowder system?  In a sense, the game plays it a bit too safe and conservatively with its mechanics.  If you are going to tackle Linear warfare you really needs some strong hook to make your rules stand out in a crowded field.  Spit-balling, I feel it could benefit from some sort of Fog-of-War deck, a different activation mechanic, or something a bit different with the Command and Control features of the game.  I am afraid Land of the Free just does not have the hook it needs to make this a must play game.             

Monday, December 2, 2019

Wargame Design: How Do You Become a Wargame Designer?


The most common question I get asked about wargame design has nothing to do with mechanics, morale, resolution, or probability.  The most common question is much more basic. 

“How do you become a wargame designer?”

The answer is even more basic.  In our modern world, life is so much simpler.  If you want to be a wargame designer, than anyone can do it.  I have written about how I got started here.  In that blog post, you find the seeds of the answer to the question. 

If you want me to be more explicit, here are the two things you MUST do to be a game designer:

1.       You must create a game
2.       You must make it available for people to play


Today, we have access to a variety of tools to help us both create our games.  I myself have helped by creating a series of Wargame Design related blog posts that walk you through the basic process. Books, articles, and blogs exist across the internet to help guide the way.  In addition, self-publishing tools have progressed to a point that even basic computers have Publisher, PowerPoint, or even Word. 

There are a variety of distribution methods to get the games to the people.  The internet has made it   much easier.  You can distribute via message boards, your own website, other websites like the Wargames Vault, and Social Media.  You can easily reach the world-wide marketplace of ideas from the comfort of your home.    

That’s it.  Pretty simple stuff.  If it is so simple to do, how come more people do not do it?  Becoming a wargame designer is simple, but it is not easy.

I suspect there are a few different reasons why more people do not make the jump to being a designer:

1.       They are afraid
2.       They do not create a process for Creation
3.       They let the Perfect be the enemy of the Good


Fear is the Mind-Killer
I have read plenty of internet comments that are not very helpful and just mean about games and the people who designed them.  I can totally understand why a person would shy away from opening their creative labor of love to the world only to be attack, shredded and left for dead on the proverbial floor of the internet.  No matter what you try to do in life there is a line around the block of people who want to psychologically kick you in the junk, laugh about it, and then wander off to kick someone else in the psychological junk.  It is not fun to get kicked in the junk, physically or psychologically.

As a designer, there are two things that get me over this fear hurdle:

1.       I MUST create games.  I can not help myself.  It is a compulsion.
2.       I design games for a very niche target audience.  I design them for myself and no one else.

True designers or creators MUST create.  They can not help it.  I can not help it.  I watched the Matrix and immediately started writing out ideas for making it into a board game.  I couldn’t stop myself!  I had no intention of ever making a Matrix board game, but I wrote out the ideas anyway and put them in my concept folder.

If I did not create games, I would simply stop being who I am.  I would be dead. 

Secondly, I design for an audience of one.  I make games I want to play because I want to play them.  I do not try to make games for other people.  I am 100% convinced I have no idea what other people want to play.  I watch game reviews, play various games, and talk to lots of gamers.  Even with all of that research, what some people enjoy and others do not is still a mystery to me.  I don’t create for them, I create for me.      

Now, just because I create games I want to play doesn’t mean that other people won’t want to play too.  I leave that up to them.  I will still pitch ideas to publishers, self-publish games, and market them like crazy.  However, if someone else doesn’t like the way a game plays, I don’t mind.  It wasn’t for them anyway.  I can guarantee my games will always have at least 1 local player…. Me!  Any players above 1 is a great success.  Sometimes, other people even like my games!

These two factors help me get beyond the “Fear Factor” of becoming a wargame designer in the public eye. 


Creation is a Process
No game is like Athena and just springs from the mind of the creator.  To create is a process.  It can be a harsh mistress, but I have always believed in planning your work, and working your plan.  Then be flexible enough to change your plan....

To create a game requires time.  Time does not come easy.  The time you design games is always being taken by things like family, work, friends, and other choices.  You are always confronted with choices.  You have to prioritize the choices you make in a day.  I try to set about 1-2 hours a week to write.  Some weeks I do more, but I almost never do less.  Writing is a routine and you MUST get into the routine. 

However, creating a game is more than just writing.  It is re-writing, editing, testing, playing, etc.  All of which requires time and effort.  You must budget your time the same way you budget your money.  It is even more important than money.

Once you have a routine, the Creation process is much easier as well.  The more you do it the easier it becomes.  If nothing gets written down, then you won’t have a game.  Without a game, you are not a game designer.    


The Perfect is the Enemy of the Good
This impacts a number of wargame designers that I work with, collaborate with, and partner with.  I have fallen into the trap myself.  Sometimes, we get really hung up on making a perfect mechanic orsituation.  We will scrap something that works, because a one-off or edge case gets in the way.  Then, we go back to the drawing board, find nothing better and then get frustrated and walk away.  The game never gets done. 

To be a game designer, you need to actually produce games.  If you let the pursuit of perfection stop a workable game from hitting the table or playtesting phase, then you are getting in your own way.

This will be an unpopular opinion.  Of course you want to make the best game you can right out of the gate.  However, that is not typically how it works.  The more you play test, massage an idea, etc. the closer to perfection your mechanics and processes will get.  However, there is no such thing as perfection.  Instead, you want to get your current processes and mechanics as smooth, clean, and clear as you can.  Therefore, using this theory there is always one more step or modification to get your even better.  This is a trap!  If the mechanic and process works, then it is ready for playtesting. 


Conclusion
Being a game designer is very easy.  All you need to do is make a game.  Then play the game you made.  Bam!  You are now a game designer.  There is no special secret or magic to it.  It is simply a matter of sitting down and doing it.  Take those ideas, put them on paper (real or electronic) and keep adding on until you have a full game.  Then, play the game and see what happens.  The more you do it, the easier it becomes. 

The longest journey begins with a single step…. but more importantly it also ends with a single step.  Now, just go out and put the steps together in between and you are done. 

If you want to be a game designer, then make a game and make it available for people to play!            

Monday, November 25, 2019

Battle Report: Wars of the Republic- Romans vs. Gauls


As I mentioned in my blog last week, Osprey has asked me to do some work on a new Wargaming Series book based on the wars of the Roman Republic.  This project actually started by working on two separate projects for myself.  One project was centered on the Roman conquest of Italy and the other was focused on the revolt of Spartacus.  A third project about the wars of the Diadochi also ended up tied into this book as well, since the Romans and the later Successor kingdoms tended to clash as well.    


Much of the rules use the Men of Bronze engine as a base.  However, I have taken a great deal of feedback and incorporated it into the rules.  Therefore, they are their own unique beast.  However, I do maintain the basic concepts such as generic troop types, model and base agnostic, and mass battles at more manageable sizes. 

This is just an initial play-test that led to some interesting learnings going forward.  I hope you enjoy it as I work diligently on streamlining the rules. 

Celtic and tribes of Gaul were a constant problem for the Romans and the more settled people of the Italian peninsula.  Roving warbands, tribes, and clans would often swoop into the area for plunder and also ended up displacing the local populations. .  This challenge was one shared by the Romans, Latin League, Etruscans, and many more.  During the early days of the Republic, the threat of barbarian invasion was real, and it is said the Rome itself was sacked by the warlord Brennus in 387 BCE. 

Roman Consuls frequently had to take the legions out to defend the borders of Roman territory from the barbarians moving in.  Some of these missions were successful, but some were not.  However, the battle between Romans and Gauls was a perennial feature of the Roman campaigning season.      

Today’s battle will represent an Early Republic “Polybian Legion” or Triplex Acies formation facing off against a migrating tribe from Gaul somewhere to the north of Rome. 

Forces

Gauls

1 Elite Infantry
1 Drilled Infantry
2 Light Infantry
1 Warband Infantry
1 Lancer Cavalry
1 Skirmisher
1 Slinger*

Points= 42

*- Due to a faulty memory on my part, I set-up the game with the slingers and did not realize the points mismatch until it was too late.

Romans

1 Triarri- Drilled Hoplites
1 Principes
2 Hastati
2 Velites

Points= 38 Points

Mission
This will be a standard set-piece battle.  I opted not to use some of the more exotic scenarios and avoided complications this time around.  I am revamping the scenario and campaign system completely, but those will not play a part in today’s battle.  This is more of a straight up test of battle.  

Set-up
The Romans rolled up a field, and put it in the corner of their deployment zone.  The Gauls also got field and put it in the middle of the board to try and force the Romans out of formation.  The Romans put a hill in their deployment zone to avoid breaking up their forces.  The Gauls got a small wood and again put it in the middle of the field for cover and to break up the Roman Legion formations. 

Paper templates will take the field again as I test out the rules.  These are mostly using 28mm models in units of 10.  They work great with Victrix models.  I will be testing out multi-based models a bit later. 

The Romans on their side deployed with the Velites on both flanks, one in the field and the other on the hill respectively.  The Triarri were in the center back, with the Principes in front of them.  The Principes were flnaked by the Hastati.  All were deploed in open order. 

The Gauls forces barely fit on their edge of the 4x4 table.  The cavalry had to deploy in reserve as they did not have room to deploy.  On the left were the slingers, then the warband, followed by the light infantry.  The center was the Drilled Infantry and the Elite infantry.  The right was the light infantry and skirmishers. 

Turn 1 
The Gauls spend all of their Commander's Gaze to go first.  The Romans only spent two. 

The Drilled and Light infantry on the Celtic left move forward to secure the grove.  However, the Romans then steal the initiative and move up.  The Principes and right flank Hastati form Legion.  The other Hastati is in a field and can not form up.  The Roman army advances forward. 

The Gauls follow suit with their forces also moving up.  The cavalry moves onto the edge of the board. 

Turn 2:
The Gauls go first again, and the Romans do not interrupt.  The Celts win the bid 2 to 0.

The slingers try to move and shoot the Velites but fail.  The Light infantry takes the grove, while the Elite and Light infantry on the opposite flank move into the field with some skirmishers supporting them.  The Celtic cavalry hovers around in reserve ready to support. 


The Romans move forward.  Their light infantry also moves up and throw their Javelins.  The Slingers are too far away still.  However, the Skirmishers at the bottom of the hill and they take some Courage loss from the barrage, and start to Waver!

Turn 3
The Gauls bid 2 to Romes 0. 

Gallic slingers pelt the Roman Velites on the flank, and reduce them to 2 Courage and wavering.  The Romans try to interrupt and fail. 

Gallic skirmishers fire on the Velites in front of them, but fail to damage as they are wavering.  This time, a Roman interrupt succeeds.  The Velites charge down into the barbarian skirmishers, who do not try to evade. 


On the other flank, the Roman Hastati clear the field and form Legion.  This time, the Gauls use Commander's Gaze and successfully interrupt.  Gallic light infantry moves to charge the remnants of the Velite and Skirmisher battle, but they do not choose to support the Skirmishers.  Meanwhile, the Warband infantry moves up to support the slingers from the Velites.  The Gallic Light Infantry moves out of the woods and screens the Drilled Infantry moving into position.  The legion will have a tough time cracking those woods.


The Romans move up, with the Triarri staying in open order to act as a reserve.  The Velites ont eh right flank are rallied and are no longer Wavering.  The Hastati supporting their flank form legion.

The Melee between the skirmishers and the velites on the Roman left is resolved.  Both sides fight valiantly.  The skirmishers reduce the Velites 1 Courage.  The Skirmishers also lose 1 Courage, but fail their discipline check.  Since they were all ready wavering, they lose their last courage and flee. 

Turn 4
Gauls bid 2 and the Romans bid 4!  Romans go first. 

The Velites on the Roman right fall back from the slingers.  The Gauls then interrupt and steal the initiative.  Gallic light infantry on the Roman left storm out of the field and hit the Velites in the Flank.  The Velites try to evade, but fail to go far enough.  They are trapped in melee. 

The Romans try to interrupt, but fail.  The Gauls maneuver around with the Warband infantry moving in front of the Slingers to shield them.  The Gauls are inviting the Romans to attack them in the difficult terrain, and the Romans need to decide how to respond to the challenge. 

The Hastati on the Roman left break formation and try to charge into the Light infantry skirmish as a flank attack.  However, their momentum is broken up by the edge of the field and they fail to make the distance and are wavering!  The Triarri move to support them, but do not have enough Commander's Gaze to form up. 


The Hastati on the Right shuffle over to protect the Velites and square off against the Gallic warband. 

The Light Infantry Melee is resolved and the Celts steam roll the Velites into a rout.  However, the Gauls also lose 2 Courage and are Wavering. 

Turn 5
Romans bid 3 while the Celts bid 4. 

The Romans gulp, realizing that the Hastati are in a tight place.  The Gallic Elite Infantry containing the Celtic chieftain charges the flank of the hastati and is supported by the Gallic light infantry.  Meanwhile, the Celtic Light infnatry runs screaming from the center of the battle and throws their javelins at the triarri, but they are batted away by the veteran's shields. 

On the Right, the Celts fall back from the Hastati and Velites there while the Drilled infantry holds the woods. 

The Triarri form up and charge into the Celtic light infantry with abandon.  The Principes also go into open order and charge the light infantry flank. 


Melees need to be resolved, and the Celts decide to resolve the Light Infantry vs. the triarri and Principes first.  The Celtic Light infantry is swept from the board and the Triarri only take 1 Courage loss. 

The Celtic attack slams into the Hastati flank and they are reduced to 1 Courage and are wavering!  They are pushed back 2 Measurement units. 

Turn 6
Gauls bid 4 and Romans bid 0. 

Ferocious Drilled Infantry of the Gauls storms from the woods and attacks the Principes in the rear!  Meanwhile, barbarian cavalry comes thundering down between the woods and fields and also attacks the Roman Principes.  The triarri jump in to support their comrades. 

The Gallic Warband moves to block the Romans on the right from supporting their friends in the center.  The slingers also move up to threaten a barrage.  However, the Hastati break formation and charge headlong into the Celtic troops with the light infantry in support.  Things are about to get messy!

The Gallic chieftain and his entourage drive-off the Roman Hastati in a rout. 


The fighting in the center is bloody an intense.  The Romans use their Pila special ability and the two sides destroy each other in an orgy of blood and combat. 

On the Roman right, the Hastati break through and destroy the barbarian warband infantry.  However, the Hastati lose 1 Courage and begin to Waver. 

In the End phase, the Roman Hastati and Velite flee the board, as do the Gallic slingers.  However, the Celtic Elite infantry, along with their Light Infantry stay.  They have won the spoils of War this day!  

Conclusion
The Gauls manage to defeat the Romans when the Roman army collapsed at the loss of its Consul and main fighting units.  What did we learn from this test? 

The Roman Legion formation allows for powerful armor bonus, but it can be beaten by careful planning and maneuver.  For example, difficult terrain breaks up formations.  In addition, the Legion formation is more mobile than a Phalanx, but is limited in the diagonal approaches and can be out-maneuvered there.  Any overwhelming attack can cause them to fail a Discipline test and break formation.  If you keep them out of formation units with lower attack and armor ratings can beat the Romans.

Command and Control was vital in this game.  A lack of command resources hampered the Romans ability to respond effectively in the key Turn 5.  They could not use their Pila special rule and could not provide a key support charge.  In addition, a mis-timed charge in Turn 3 by Hastati left them vulnerable to counter-attack, and the Gauls had the Command points to make sure they could capitalize on the error. 

Proper supporting also was a big component of the game.  Without support units, the Elite Infantry would have tar-pitted in the Hastati.  In addition, the Triarri/Principes vs. Drilled Infantry/Cavalry fight would have not been as decisive.  Units going one-on-one would be a grind, but with support a Melee can end quickly. 

The new wavering and Discipline check rules make wavering a more common occurrence.  It is harder to recover from a devastating attack that rolled a lot of attack dice.  This means you may want to let a damaged unit get destroyed instead of helping it with more support units.  You have to decide.  For example, in this battle the Light Infantry decided NOT to support their Skirmishers allies since they were all ready in desperate shape.  Joining and supporting them would have led to the loss of the Gallic Light Infantry and Skirmishers in one melee.  I am not sure how I feel about this yet, but it is a decision point for the commander.

The terrain placement rules played a big part in this battle.  The Romans tried to keep terrain out of their way so their formations could stay together.  However, the Gauls used it to their advantage and allowed them to control the center of the battlefield.  In retrospect, the Romans should have placed out of their deployment zone and forced the difficult terrain away from the center of the board. 

Overall, a lot was learned as I start to test out the rules and lists I have written so far.  I learned a lot.  I tinkered with the turn sequence, supporting, terrain placement, and C&C.  This let me try it out on the field of battle.  More to come as I keep tinkering with the rules prior to publication.

Monday, November 18, 2019

Random: Official News from Blood and Spectacles Publishing


I know many of my readers have been interested in the follow-up plans for Men of Bronze.  I thank you for your support and love to see what you guys have been doing with the rules.  I appreciate all the feedback, and keep adding to the Living FAQ for the game.  In addition, I have also put up a draft QRS here and sent it to Osprey for editing.   


Initially, I had worked with Osprey on a game called Heirs to Empire which would feature the Diadochi wars.  Essentially, the many battles between Alexander’s generals and successors after his death.  IN addition, I was working on a game of early Roman combat set in the Italian peninsula called Conquest! Rome in Italy.  These were essentially mods to Men of Bronze and simply expanded the time period and made some small mods to the rules. 

After further reviewing these games with the Osprey editorial team and working with various miniature manufacturers, it was determined that there simply may not be enough players for such niche games.  They asked that I go back to the drawing board and try to expand the player base.  After some thought, I came back with a few suggested approaches, and we mutually agreed to broaden the scope of the game. 

I am pleased to announce that we have come to terms and Blood and Spectacles Publishing will be creating a new Ancients game for the Osprey Wargaming Series.  The working title for this game is Wars of the Republic which will allow the players to recreate the battles and campaigns of the Roman Republic and their foes.  I am excited as this is a very broad scope of history that will allow me to try and capture a wide variety of ancient combat such as the Triplex Acies, Macedonian Pike blocks, Hoplite warfare, tribal warfare, and some esoteric fighting styles.  In addition, it will allow me to cover fun topics like Pyrrhus of Epirus, the Punic Wars, the Mithridatic Wars, the Parthian Wars, etc.  This will be a tool box to cover various ancient styles of warfare across the Mediterranean.    

The core base of Wars of the Republic, will be the “Mass Battle at a Small Scale” approach similar to Men of Bronze.  If you ever look at reconstruction maps of ancient battles, you can see the approach I am using.  Your army is built of blocks of similar troops.  For example, the Battle of Marathon had three wings of hoplites, a left, right and center.  Therefore, the army on the table in Men of Bronze’s “Mass battle at a Small Scale” approach would be three units of Hoplites, one for left, center, right.  It is a slightly more abstract approach that lays out more like a re-constructed ancient battle map.  This is intended to allow small armies to fight large battles.  Of course, you can scale them as large as you like.  I want to spend more time playing than painting!  

Other features will also pull from the Men of Bronze style.  The game will continue to be scale and model agnostic and use generic troop types.  Command and Control will still be handled by leadership points.  Most combat will be opposed rolls.  However, there will be new special rules, clarified combat rules, a slightly different turn sequence, army structure changes, and a whole new scenario and campaign system. Of course, this is a lot of stuff to test and try out.  The scariest thing about writing ancients rules is that some else knows way more about it than you do! You can help me out by joining the Message board and providing me feedback here.   

As you know, the Osprey Wargaming Series is only 64 pages so some of the history and context may get put on the back burner for research elsewhere.   I am trying to cram a lot of content into a small package.  However, you can expect great Osprey artwork and we are working with vendors for miniature artwork.  The manuscript is due to Osprey by Summer 2020, and probably will be ready to buy in April of 2021.


I have also been in negotiations with Osprey for a second set of rules.  This is not an ancients set, but a different genre.  We have come to terms on the rules for Castles in the Sky.  This is a set of flying battleship rules set in an alternate 1914 setting.  You can find some early test games of the rules on this blog, and that should give you a taste of it.  There are a couple of interesting features in the rules that differentiate them from other game systems:

1.       Height bands
2.       Firepower vs. Armor
3.       Command and Control

Since there are height bands, maneuver is vital as the engagement envelope is relatively small.  Cannons and batteries can fire far, but the sky is a big place…. Even bigger than the ocean!  Therefore, you will need to maneuver your ships into combat position, or to avoid your enemies’ broadsides.  It will take skill to determine the best approach to maximize your firepower and minimize that of your foe.


The core mechanic of the game is Firepower versus armor.  Like Naval combat of the period, some ships could take a colossal beating without losing much fighting power.  Naval combat of the period had a paper-rock-scissors approach to combat.  Battleships could beat Cruisers, which could beat Destroyer, which could torpedo Battleships and then back around again.  This aspect is captured in the flavor of the rules.  You need to apply the right tool to the right job to gain the advantage.    

Finally, Command and Control is a big element of the game with limited command orders, friction, and other elements impacting how your ships react to what you are asking them to do.  Initiative and individual commander skill also play a role in the game. 

The game will have new artwork from Osprey to capture the flavor of the game.  In addition, Brigade Models UK have agreed to provide photographs of their great Aeronef range for the game.  I am very excited to get the manuscript completed for this game by summer 2021 for a likely spring 2022 release.


Lastly, I have one other small announcement.  For a variety of reasons I have been watching way too much Gundam anime and its ilk.  Along with that I have been interested in Jovian Chronicles and Lightning Strike models from Dream Pod 9.  This combined with experimenting with positioning rules for space games combined into a new Work-in-Progress game.  I tentatively call this new game GlitteringVoid.  I have a thread on the message board where you can find the game and leave some feedback.  The game has the basic rules, unit types, scenarios, and some limited campaign rules.  Those need some more work, and I plan on modeling the Black Ops campaign system but modified for this game. 

Please check it out and let me know what you think.  I am always trying to expand my design range, and I think this is a big step as I am trying out various concepts. 

That about covers it.  There is a lot of exciting things in the Blood and Spectacles Publishing space right now.  Keep in touch with us on Facebook. Instagram, the Message Board, and here on the blog to stay up-to-date.  Thanks for reading!        


You can follow Blood and Spectacles Facebook page for more fun: https://m.facebook.com/pg/BloodandSpectacles/posts/?ref=bookmarks&mt_nav=0

Or our website:

Or our Messageboard:

Or our Wargames Vault Page: