Between 90-87 BC the Republic was riven by an internal war. The Socii were the Italian allies that had fought with Rome in the previous 200 years and helped Rome conquer the Peninsula. The Italian peoples wished to become full Roman citizens, but the Romans themselves refused. In response, several tribes and city-states broke of and formed a new confederation called Italia. They quickly raised their own armies and had 120,000 men in the field, and split between the North and the South.
The Romans responded with a series of diplomatic efforts and raising troops of their own. Their goal was to hold out until troops from the provinces, deployed overseas, and client kingdoms could return to Italy. In addition, their diplomatic efforts were intended to keep the revolt from spreading.
In the North, the Socii were led by the Marci people who were joined by 7 other tribes. The Romans were led by Consul Publius Lupus. The Marci and the Socii had the advantage early in the war and they pressed it on both fronts. The initial engagement in the North had an Italian general named Presentius engage with a subordinate of Lupus named Prepenna.
We really only know the results of this engagement, so there is plenty of scope for us as Wargamers to play it out. In the history books, Prepenna loses and is forced to withdraw with relatively heavy casualties. This gives the Socii momentum early in the war and on the Northern front. However, it was far from the end of the fighting.
Forces
An interesting aspect of the Social War was that the Italians were very familiar with and had adopted the Roman war fighting techniques. Therefore, the battle was that of similarly armed and equipped foes. The Italians had been integrated into the larger Roman military for close to 200 years at this point since the end of the Samnite Wars.
Prepenna's Romans- Triplex Acies
2 Hastati
1 Principe- Prepenna
1 Triarri
1 Skirmisher
Presentius' Italian Socii - Triplex Acies
2 Hastati
1 Principe
1 Triarri - Presentius
Both armies are using the Triplex Acies army list for a Roman army, since the Socii and Romans used the same military structures at this point.
Mission
The Romans are the attackers as they try to get 10+ points across the board and off the other side. The game lasts 8 turns. That will be a tall order!
We randomly determined the scenario using the rules in the booklet. We also got a complication of Bad Weather. This makes the ground soggy to reduce movement, and improves defenses against shooting attacks due to rainfall and mist.
Set-up
Today's battle is on a 72 MU by 48 MU board. The forces are along the long board edges. We set-up terrain per the rules.
The Roman side is grid 1-3, and Socii are 4-6.
Grid 1= Swamp
Grid 2= No Terrain
Grid 3= Hill
Grid 4= No terrain
Grid 5= Hill
Grid 6= Walls
The Romans deploy their Skirmishers by the hill, with the rest in Grid space 2. The Hastati are leading with the Principes and Triarri behind.
 |
| Romans |
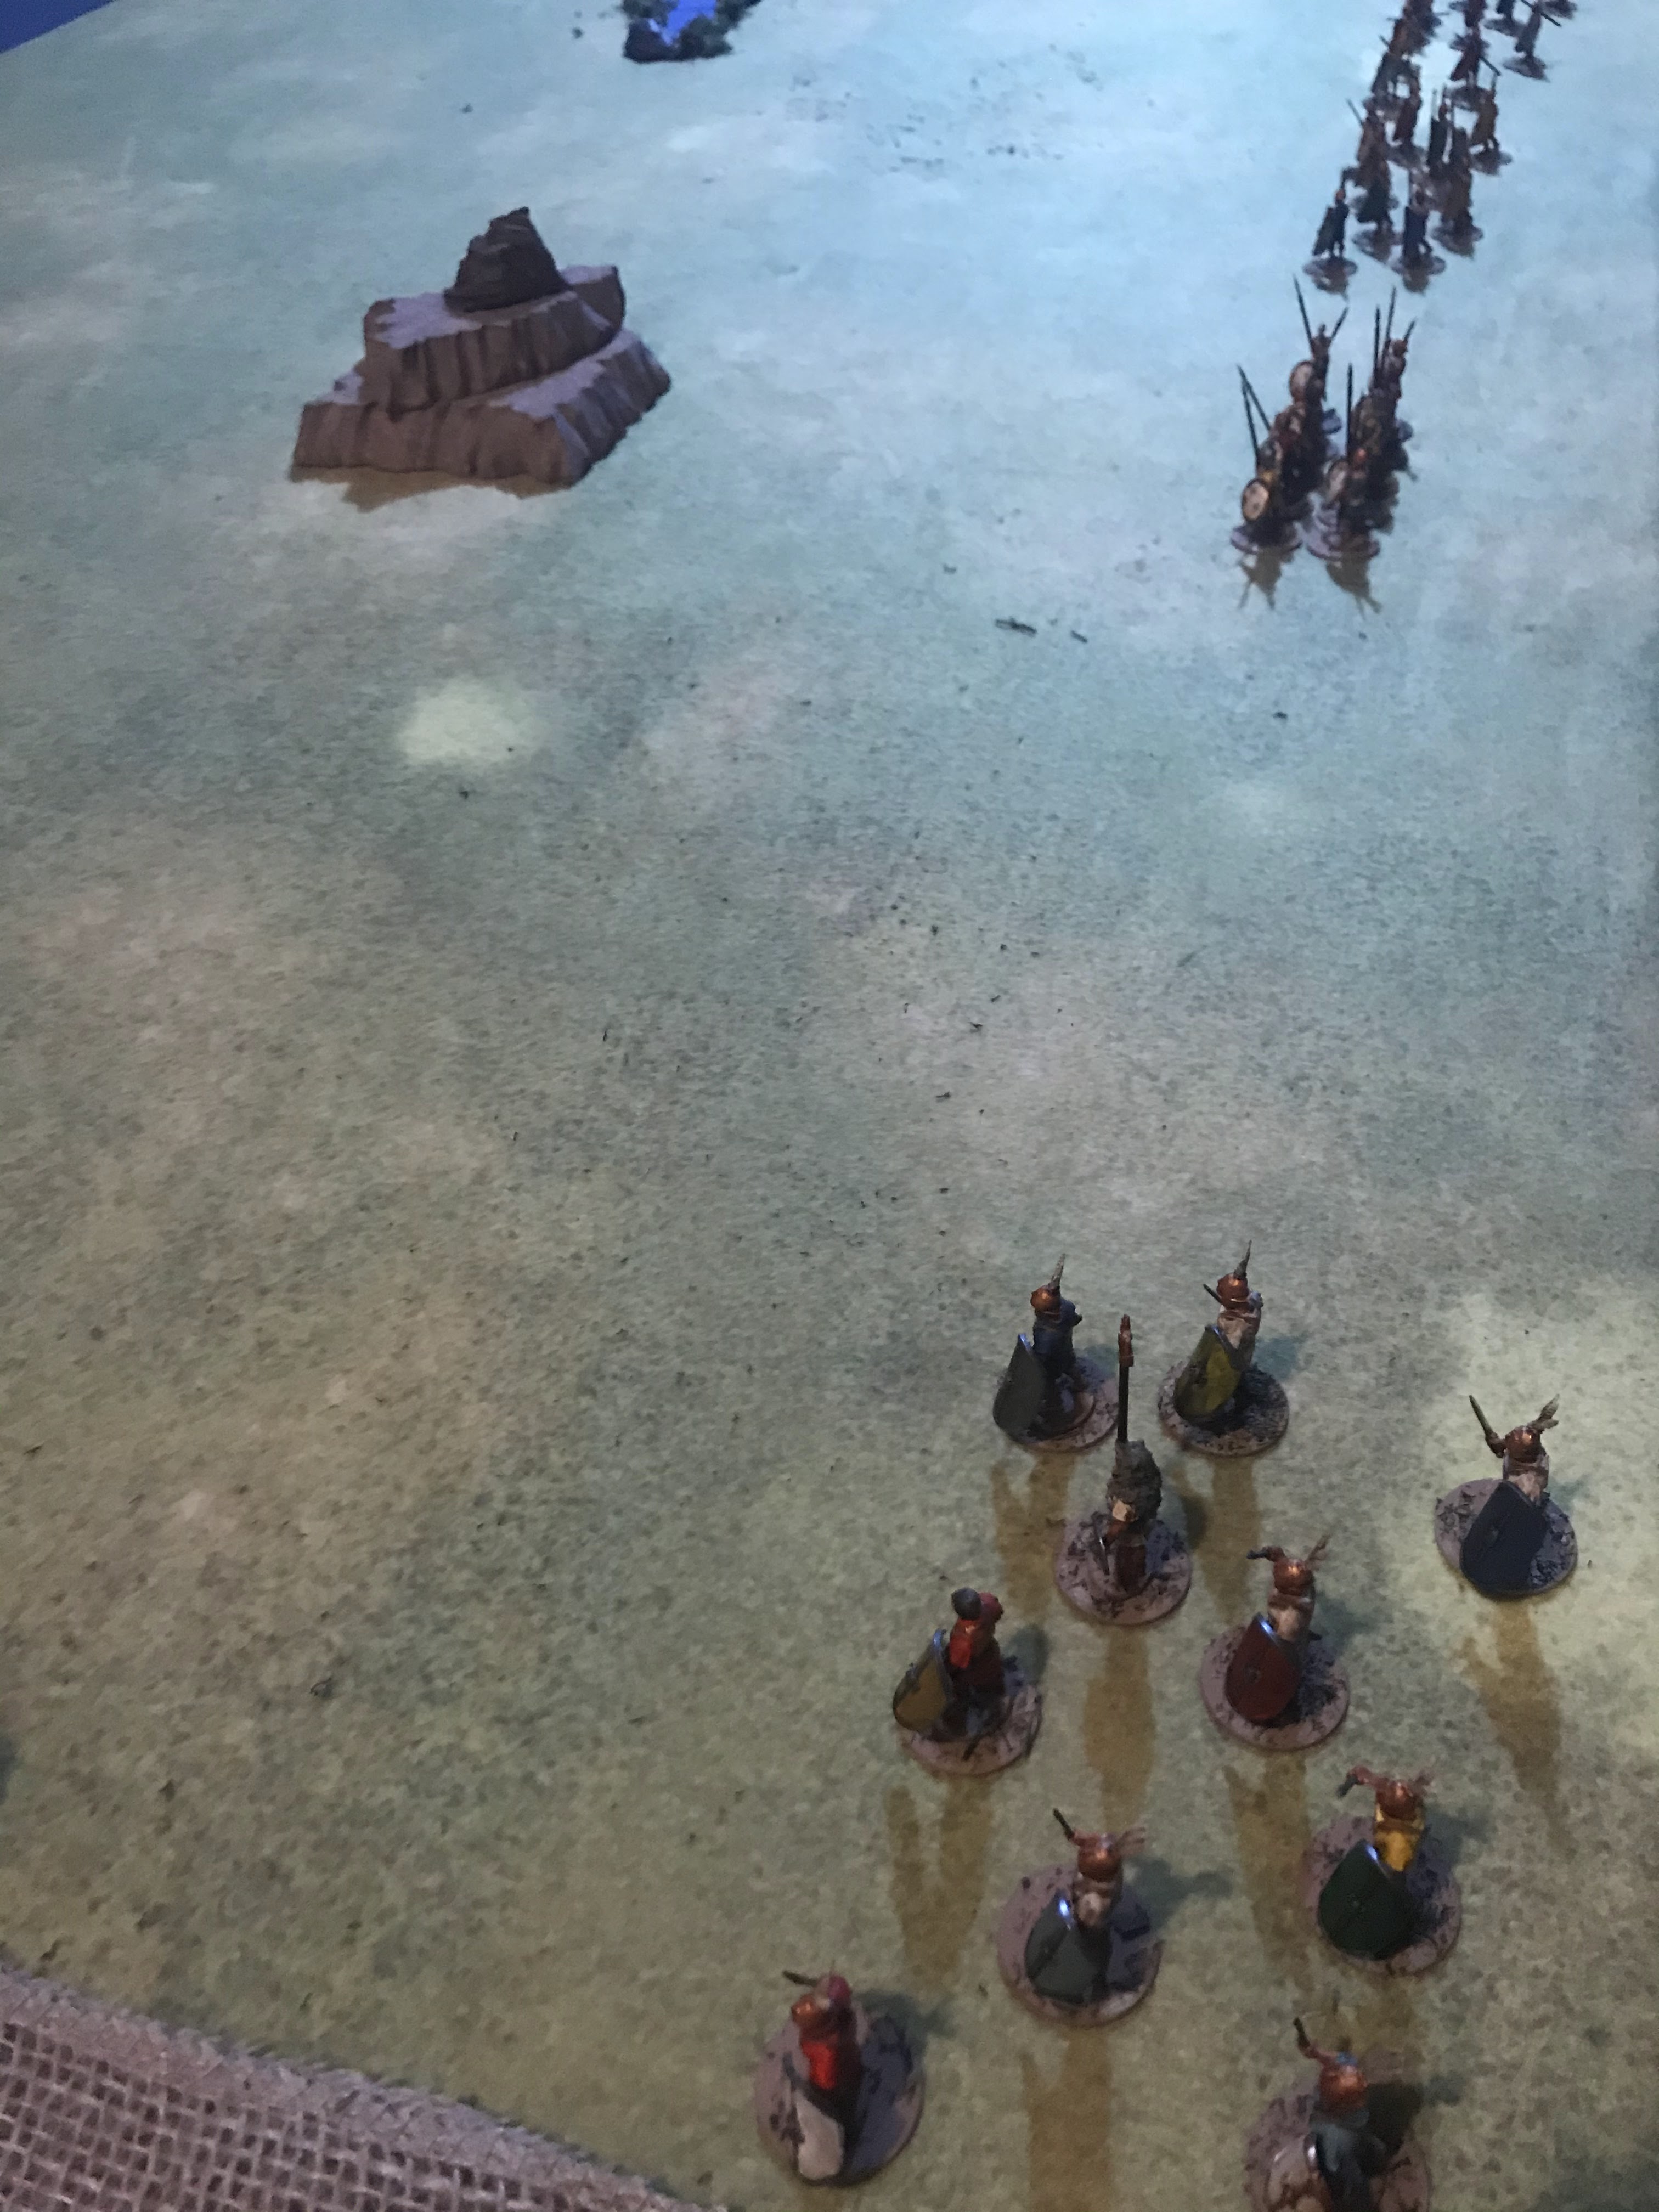
The Socci have their Triarri behind the hill, Principes over by the ruins, and the Hastati and skirmishers out wide on the right. The skirmishers are covering the no terrain flank. All units that can are formed up into Legion.
 |
| Socii |
Turn 1:
Both sides have equal Commander's Gaze at 6. The Romans bid 6, while the Socii bid 2. Romans go first. The Romans bid 2 and get to go first.
Move:
They begin by spending a point to skirmish and getting their skirmishers up on the edge of the steep hill. The rest of the war-machine starts to rumbled forward. At one point, the Socii try to interrupt but fail the roll-off. The Romans finish up their move.
The Socii begin to march forward to meet the Romans and stop them from getting across the board. The right Principes move out first, and head towards the gap between the steep hill and the rock pile. The Triarri are in phalanx and grind towards the rock pile hill before them, it looks like they will get there before the Romans. The hastati stay in open order and move forward toward the Roman Left. The Skirmishers move up and try to get to the Roman flank.
None
End:
None
Turn 2:
Both sides collect their Commander's Gaze and prepare to bid. They both have 6 tokens. The Romans again bid 2, and the Socii bid 0. The Romans are in a hurry to get across the board.
Move:
The Romans begin moving forward again. Their skirmishers use a Commander's Gaze to rush across the top of the hill. After the Roman left Hastati move forward, the Socii try to steal the initiative. They fail. As the Romans continue to move forward, the Socii try a couple times to steal the initiative but fail each time. Eventually, the Romans have all moved.
The Socii Principes move up to fill the gap between the two hills. They snap into Legion to protect themselves from a Javelin barrage. The Triarri move to the base of the rocky hill. The first Hastati unit moves forward aggressively and also snaps into formation. The skirmishers and last Hastati unit move up in open order.
Melee:
None, yet.
End:
Nothing
Turn 3:
The Romans and the Socii collect their Commander's Gaze but neither side bids for initiative. The roll-off goes to the Socii.
Move:
The Socii Triarri break formation and climb to the top of the rocky hill directly in front of the Roman advance. They dare the Romans to try and take the hill from them. The Principes and Hastati move up to support them, but are careful not to overstretch themselves. The second Hastati unit is carefully positioned to support their first Hastati unit, but stays in open order. The Skirmishers try to fil the gap between the battle line and the swamp.
The Romans then use the mobility of the Legion and they all scoot to the left, and they form a column of advance that is headed straight through the Socii Hastati in Legion. The Roman Hastati lead the way with the Principes and Triarri in support. The second Roman Hastati unit is placed to block the Socii Triarri and Principes. The Roman skirmishers run off the hill and move behind the Socii Principes to the edge of the ruins. Are they heading for the board edge, or setting up for a rear attack?
Melee:
None. Next turns looks like when the big show will start.
End:
None
Turn 4:
Both sides collect their Commander's Gaze tokens. It looks like they may need them for charges, counter-charges and other combat related reasons. Both sides still have 6 a piece. The Romans bid 2 to go first, while the Socii also bid 2. Both sides consider upping their bid, and the Romans upgrade it to 3 to go first.
Move:
The Roman skirmishers move into the ruins and threaten the rear of the Socii Principes.
With a war cry, the Roman Hastati charge into the Socii Hastati across from them, with the Principes supporting their attack. The Socii are game, and they counter-charge. The second Socii Hastati unit also elects to support their fellows. Then the Socii steal the initiative and the Socii skirmishers also charge into the flank of the main point of attack.
The Socii Principes move up and threaten the Roman Hastati in front of the rocky hill, while the Socii Triarri hold their ground. Play turns back to the Romans. The Roman Triarri breaks into open order and makes for the gap between the melee and the swamp.
Melee:
The two sides collect their attack dice and attack. The opening volley of Pilums from both sides make them all more vulnerable. However, neither side rolls particularly well and both sides only lose 1 Courage and the battle bogs down into a stalemate. The Socii even used Commander's Gaze as re-rolls and failed to make a bigger dent. Those Legions are tough as nails!
End:
None. However, the Socii commander begins to see the Roman strategy and realizes he may not be able to respond in time.
Turn 5:
Both commander's collect their Commander's Gaze tokens and consider the strategy for this turn. The Socii commander sees that the Romans have made a gap to exploit and that he may not be able to get to the Romans in time. Neither side bids any Commander's Gaze for initiative, and instead there is a roll-off. The Socii win.
Move:
The Socii Triarri slowly try to get back off the rocky hill they were on top of. The terrain slows them down. Then, the Socii Principes charge into the Roman Hastati, who counter-charge. The Roman Triarri continues their race around the edge of the Melee in the center. The Roman skirmishers use a Commander's Gaze to skirmish throught the ruins and make for the board edge.
Melee:
The Socii decide to start with the Melee in the center between the pair of Socii Hastati and skirmishers versus the Roman Hastati and Principes. It is a brutal fight where all the re-rolls possible get used. At the end of the day, the Romans are routed, while the Socii are reduced to 1 Courage. Ouch! That will put a spanner into the Roman plans. The Socii push the Romans back 2 MU before breaking them.
The Hastati vs. Socii Principe fight is a stalemate as neither side can get the advantage.
End:
The Triarri see their comrades run away from the main fight. However, they are unphased and try to continue their mission.
However, the Romans losing their two units and their Commander will force a Collapse test on all their remaining units. The Roman skirmishers fail and run for it, leaving only the Triarri left. Things look pretty grim for the Romans now.
Turn 6:
The Socii get 6 Commander's gaze to the Roman 2. The Socii bid 3, to guarantee they can track down and catch the fleeing Triarri with one of their units. The Romans bid 0.
Move:
The Skirmishers move out of the way of the Socii Hastati units to attack the Roman Triarri. The Romans then interrupt and win the roll-off. They move the Triarri forward, and with their last Commander's Gaze snap them into Phalanx to prepare for battle.
With all Roman Movement done, the Socii take over again. The closest Socii Hastati unit re-aligns, forms up and charges into the Roman Triarri with a hail of heavy javelins. The Romans can not Counter-charge as they are out of Commander's Gaze tokens. The second Socii Hastati unit re-adjusts to prepare for a follow-up charge next turn.
The Socii Triarri move back to defend the board edge from any break-out units.
Melee:
The Socii decide to start with the Principe and Hastati battle between the hills. Both sides trade blows, and with a few re-rolls manage to both lose 1 Courage in the fight. The Romans are pushed back 1 MU, but neither side starts to waver.
 |
| Looking towards the Socii board edge |
In the Hastati/Triarri battle the initial charge is powerful enough to reduce the Romans 2 Courage, with no loss to the Socii. The Romans are again pushed back 1 MU. The Romans stay steady.
 |
| Looking towards the Socii board edge |
End:
No action is needed yet.
Turn 7:
The Socii still have 6 to the Roman's 2. Neither side bothers to bid for initiative as the Roman forces are all caught up in Melee. Better to save the Gaze tokens for re-rolls. The Socii win the roll-off.
Move:
The second Socii Hastati unit charges into support the first in their fight with the Triarri. Meanwhile, the Skirmishers move towards the Principe/Hastati battle to try and get a rear charge on the Romans there. The Socii Triarri fall back to the board edge and prepare to go where needed. The Socii commander is feeling pretty confident right now.
Melee:
The Principe fight starts the Melee phase. The two sides bash at each other, but make no progress. No one uses any re-rolls on this battle.
The Hastati and Triarri fight is next. The Socii Hastati inflict 1 more Courage loss, bringing the Romans to 2 Courage left. The Romans fight back, and also reduce the Hastati 1 Courage and reducing them to 2 as well. Both sides stay steady and do not waver. There is no pushback.
End:
Nothing at this point.
Turn 8- Final Turn
It is a replay of Turn 7 as the Socii get 6 Commander's Gaze to the Roman 2. Neither side uses any for initiative, and saves them for re-rolls in melee. Socii win the roll-off again.
Move:
The Socii skirmishers manage to charge into the Roman Hastati rear in the Principe fight. Ouch!
The Socii Triarri are content to wait and see what happens next and hold their position.
Melee:
The Socii start with the melee between the hills as the Skirmishers have now charged into the battle there as well. Using re-rolls the Socii manage to reduce the Roman Hastati to 0 Courage. The Romans fail to reduce the Principes any further. The Hastati are turned around to flee.
The Roman Triarri are caught in their own life and death battle. Both sides hack and thrust at each other with vigor. The Hastati lose 1 Courage down to 1, while the Triarri also lose 1 Courage down to 1. Neither side gives any ground and they stay steady.
End:
The Triarri can not see the fleeing Roman Hastati, so no test is needed to waver. However, the Triarri do need to take a Collapse test looking for 5+. They pass with a single 6 as a success. They will be able to stage a fighting withdrawal and act as a rearguard for their fellows.
Conclusion
The Socii handily defeat the Roman forces, as the Romans failed to break any units through to their objective.
Breakthrough is a tough mission without any Cavalry! My plan as the Romans was to use my Hastati to tie up enemy units, and then use my Triarri to run around the flank and get into the backfield. It almost worked BUT the main attack was routed two turns faster than I expected! I expected my Roman Hastati and Principes to last at least 1 turn longer than they did in the center melee. That caught me off guard, and their rout led my Skirmishers to fail their Collapse test. There went my most likely unit to get off the board. Plus, it freed up several enemy units to envelope my Triarri. I almost had those Socii, as their reserves were out of position if that center Melee would have help 1 to 2 more turns.
Oh well. My opponent's plan to use their skirmishers to collapse my flank with a flank attack worked, and mine did not. It was interesting to see the match up between two identical armies. The terrain placement and mission objectives became critical in this scenario due to the matching army lists.
This battle did not go down to the last dice roll, and was pretty much over after turn 5. The battle I was basing this one on historically, the Romans also lost to the Socii. This left the North front in a tough position as the Socii had the advantage there after the Roman defeat. It would be fun to play a Social War campaign of linked games as both sides were evenly matched and traded off victories and defeats in equal measure. Perhaps a supplement, basis for a campaign day locally, or just a linked set of games? Who knows.
Become a Patron and get access to all the cool stuff, a peak behind the curtain of Blood and Spectacles, and early-access to playtest games!
Check out the latest publications and contact me at our
Blood and Spectacles website


No comments:
Post a Comment