

I finished painting my 6mm Diadochi armies from Baccus Miniatures and I wanted to celebrate with a game of Heirs of Empire. This was the game I built to use these armies in. It focuses specifically on the Wars of the Diadochi after Alexander's death. As an added bonus, I am going to add the rules for Heirs of Empire on the Wargame Vault so you can pick them up for yourself!
Today, we are going to look at a side show operation after the Conference at Babylon established Perdiccas as the Royal Regent.
After Perdiccas solidified
his position as Regent defending Roxanne and her unborn son, he had a great
deal of work formalizing and consolidating Alexander’s gains. This was no longer a campaign to push the
boundaries of the empire, instead it was stabilizing the internal arrangements
of the Macedonian Empire. This included regions
bypassed by Alexander for various reasons.
One of his first goals was to re-open the old Persian Royal Road.
Perdiccas turned his
attention to a Persian Satrap that had still been loyal to the old regime. This rebel still possessed a formidable
force and threatened the re-opening of the roadway. Perdiccas mustered the army and marched
to overthrow the Satrap.
History does not record who this was, but we do know that
Perdiccas fought two battles with his Persian foe before defeating his army in central
Anatolia. We also know nothing about
these battles, so they make good fodder for our battle reports here!
Forces
We will be using the Perdiccan Army list on one side, versus
a Minor Satrap list on the other side of the board. They are of equal points.
Perdiccas’ Royal Army
Right Wing:
Companion Cavalry- Perdiccas
Center:
Silver Shields
Bronze Shields
2 Thureophoroi
Left Wing:
Epilektoi Cavalry

Right Wing:
Epilekotoi Cavalry- Satrap
Center:
2 White Shields
1 Thureophoroi
1 Archers
2 Skirmishers
Left Wing:
2 Asphracts (Javelins)

We don’t know too much about the forces involved, so some
assumptions have been made based on the Persian Royal Army during Alexander's campaigns and the later forces Perdiccas used during the wars of the
Diadochi.
Mission
I randomly rolled up a Set-piece battle. This aligns a bit with what we know about the
history. Perdiccas faced the rebel
Persian Satrap and fought two battles before defeating him. A set-piece battle would fit right in for
such a campaign.
Set-up
The rules for terrain placement simply specify have one
item of terrain per each 24MU x 24MU foot section.
We will be playing on a 48MU x 48MU board.
On one board edge there is a river meanders on
its way. This will help secure the
flanks as it is dangerous terrain. The
opposite short board edge has a series of rocks and hills, making it difficult
terrain. In the center is watering hole
with a small oasis next to it. The
watering hole is impassable.
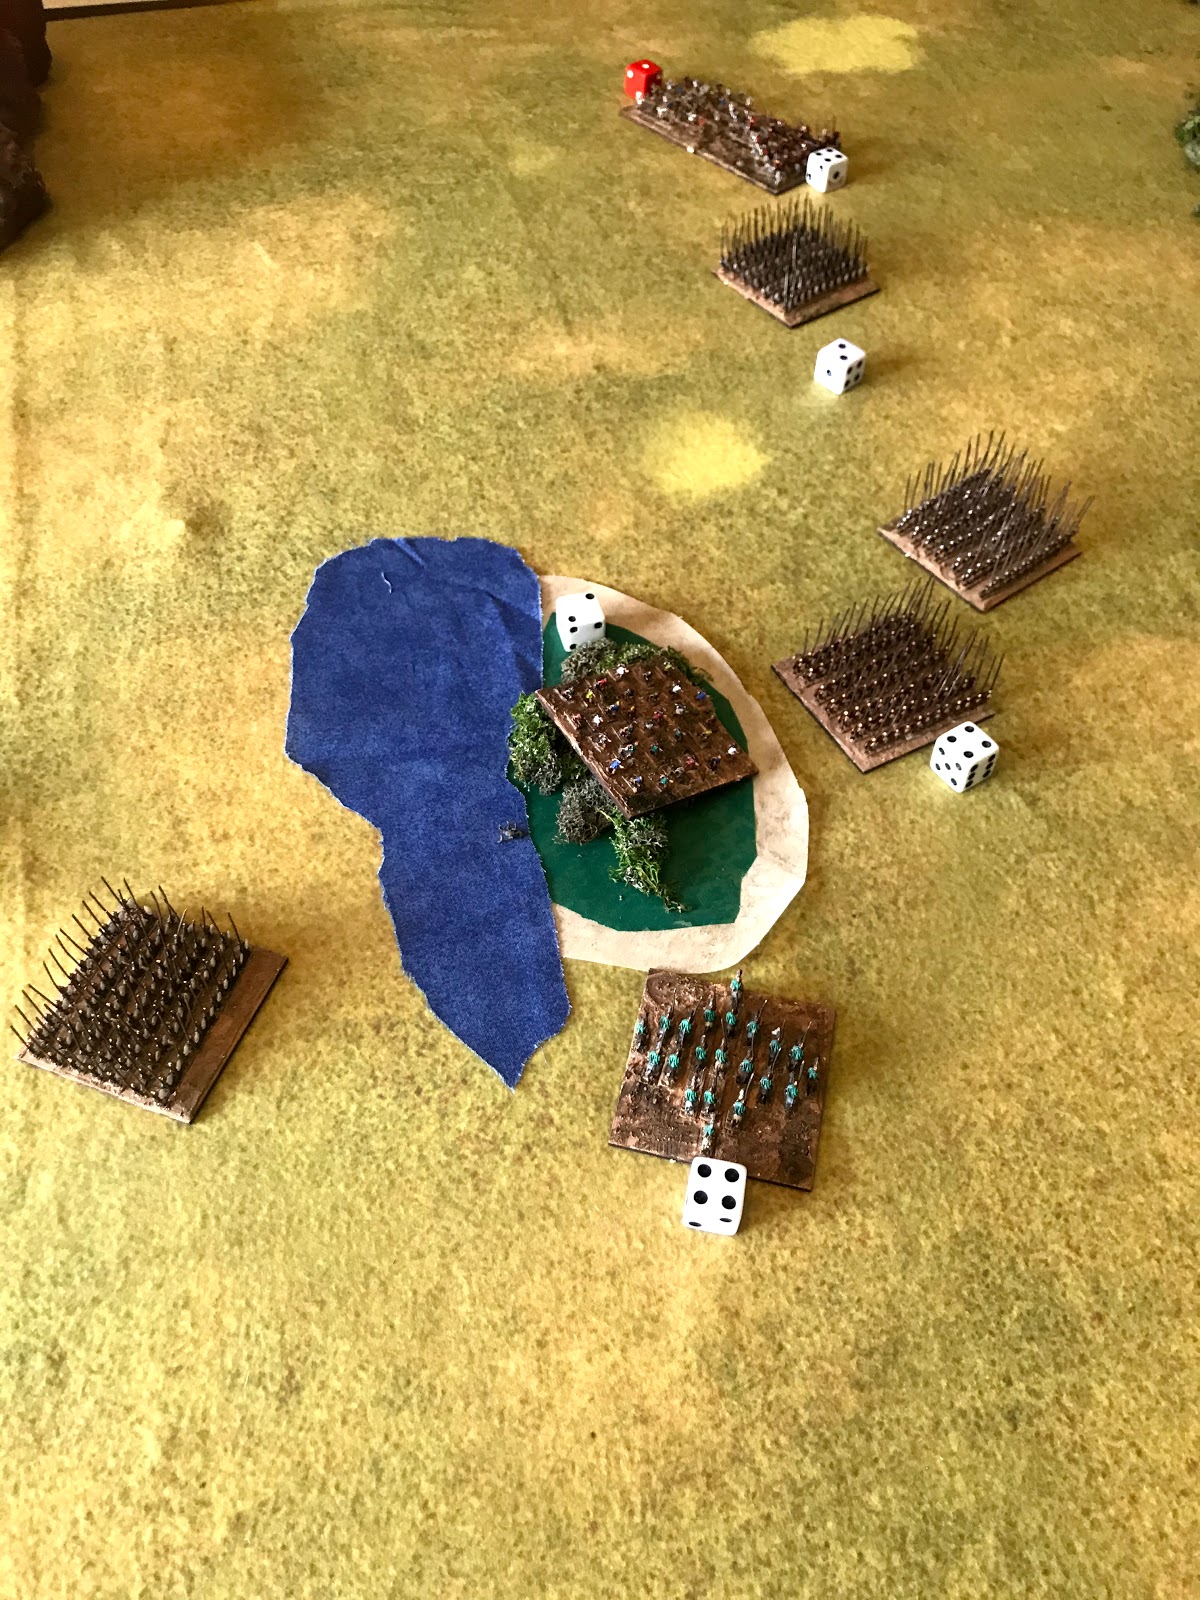
 |
| Persian Deployment |
The Persians anchor their left flank on the river, with
the Macedonians using the river on their right flank. From left to right the Persians are Epilektoi
Cavalry, then Thureophoroi, White Shields, Archers, White Shields, Skirmishers,
and then the two Javelin Asphracts. The
Macedonians follow the standard Companions, Thureophoroi, Silver Shields,
Bronze Shields, Thureophoroi, and then Epilektoi on the left flank.
Turn 1:
Both sides start by generating Commander's Gaze. Dice were rolled by the wings of the army and a total Commander's Gaze was established. Since this will mostly be a maneuver turn, Perdiccas decides to use all of his Gaze to go first. The Persian used 6 of thier 8. Perdiccas wins and starts to move out. |
| Perdiccas' Deployment |
The Theurophoroi pivot and move out first, followed by the Phalanx. They stay in their initial formation, but pivot slightly to bypass the oasis. The Companion Cavalry stay with the main line. Meanwhile, the Epilektoi move to cover the pass between the watering hole and the mountains.
The Persians did not try to interrupt at all. On their turn, the Persian Asphracts go into Open Order and sweep forward to front of the army, hoping to get into range to harass the Regent's battle line. They stay in Open Order to maximum maneuverability, but at the risk of being Disordered.
The rest of the Persian forces move up boldly, with their skirmishers and archers to the fore. The Heavy Cavalry also stays with the battle line. They are cautiosly waiting to see what the Peridccans do.
Turn 2:
Both sides generate Commander's Gaze. Both sides have 7 Gaze. The Persians bid 3 to the Perdiccas' 5. The Center army move sup and takes position, while the left flank Heavy Cavalry move into the pass boldly.
Before the Companion Cavalry can move, the Persian Asphracts try to steal the initiative with a Gaze point, and succeed. They ride up towards the far sides light infantry, and use a Commander's Gaze for the lead unit to shoot. However, the Macedonians expected such an attack, and were prepared. The shots cause no Courage loss.

The Persian center moves up. One of the Skirmisher units uses Move and Shoot to throw Javelins at the Epilektoi but the horseman are just out of range. The Persian General announces a charge and his horseman gallop into the Macedonian left wing. The Macedonians use their last Commander's Gaze to Evade, but a dismal roll sees their attempt fail. Both sides roll poorly, and no Courage is lost.

Perdiccas and his Companions move to the front of the right wing and prepare to try and roll up the Theurophoroi on the Persian left.
Turn 3:
This turn both sides need to conserve their Gaze for charges and re-rolls. Both sides end up bidding 2 Commander's Gaze, so they roll off for control. The Persians win the roll-off.
A skirmisher unit from the center goes into Open Order, and then launches a support charge to help their Satrap in the Battle with the Epilektoi. In retrospect, the Perdiccan Heavy Cavalry should have counter-charged instead of trying to Evade the Persian charge. Now, they lose two Courage to the combined Persian Onslaught and inflict non-in return even with using their re-rolls. The Thessalian Cavalry of Perdiccas begins to waiver.
Perdiccas tries to interrupt but fails. The Persian Asphract form up out of Open Order and launch a combined barrage at the Macedonian light Infantry on the Center Left. That unit is pounded by arrows and begins to waver as well. Persian Skirmishers rush into the undergrowth of the Oasis and take cover, while the Theurophoroi on the Persian left form up and brace for impact from the Perdiccan cavalry charge.

As expected, Perdiccas squares up and charges into the Persian light infantry at full gallop! They do not have enough Commander's Gaze to try and Evade. The charge is decisive and the Persian light infantry are pushed back, and turn to flee!
The battered Perdiccan light infantry uses 1 Gaze as their Commander Rallies them, then charge into the Oasis to clear out the Persian skirmishers. The heavy undergrowth makes the fighting up close and intense. The Skirmishers lose 1 Courage and are pushed back. However, they do not waiver.

End:
In the End phase the Persian Theurophoroi are removed as they flee for their lives! The Persian Archers and White Shields pass their Morale checks.
Turn 4:
The Persians have terrible Commander's Gaze rolls, which will allow Perdiccas to capitalize on his penetration of the enemy flank. Perdiccas bids 3 to the Persian 0. He gets Initiative.
He starts with his Companions riding straight through the fleeing Persian Light Infantry and into the Archers behind. There is no point trying to Evade, so they get hit. They are hit hard and are pushed back 3 MU, but hold. They are wavering though.
The Perdiccans Light Infantry charge the Asphracts, The horseman Evade, but the Light Infantry are nimble enough and catch them. The battle is intense and the it pushed back into the White Shield phalanx, which devolves into a swirling melee.

The Bronze and Silver Shields march forward and seal off the oasis from enemy flank attacks.
The Persians can finally act, and the White Shields marching towards the gap charge into the whirling melee between Cavalry and Skirmisher. The extra weight of numbers is enough and the Perdiccan Heavy cavalry breaks and flees.

The Asphracts do not have enough Commander's Gaze to break into Open Order and flee, so instead they fire into the oncoming Bronze Shields and reduce them 1 Courage.
In the fight for the Oasis, both sides fail to put a dent in their foe due to the heavy cover.
End:
In the End phase, the Perdiccan Heavy Cavalry flees the board. This frees up the Persian troops in the pass, but it maybe too little too late. No Perdiccan troops see the Thessalians flee, so no Morale tests are needed.
Turn 5:
Without a Left Wing, Perdiccas' ability to generate Commander's Gaze is weakened. The Persians have 9 Gaze to Perdiccas' 4. Perdiccas bids 3 to the Persian 4.
The Asphract switch to Open order and Flank attack (not enough gaze for a charge) into the ongoing melee between the Perdiccan Theurophoroi and the other Asphracts and White Shields. It is another brutal battle where re-rolls were used, but the Perdiccan light troops turn and flee for their lives!

The Persian general breaks into Open Order and charges into the Oasis to attack the rear of the Perdiccan Light forces there. The unexpected rear attack is enough to destroy the Perdiccan troops there. They also flee for their lives!
The rest of the army tries to maneuver around the lake to get into position for phase 2 of the battle.
However, the Silver Shields see the exposed Asphracts swirling around and charge into their side. The support unit is blown apart. Just narrowly missing a general rout as the melee with the Theurphoroi was resolved.
The Companion Cavalry also stalls against the Archers, as they lose 1 Courage apiece. Even with the wavering the archers managed to strike back!

End:
Both Perdiccan Light Infantry forces flee the field, and one Asphract unit flees from the Persian side. All troops who can draw LOS to their flee friends pass their Morale checks. However, Perdiccas has now lost over half his force and will need to make a Collapse tests with TN of 5. The Persians have lost 11 points and will need to make them at TN 4.
Perdiccas passes all of his Collapse tests. As they are elite units, they have higher Discipline and are less likely to collapse. The Persians are not so lucky. One of their Skirmisher and their last Asphract unit decide to run for it. They flee the battle. Traitorous dogs!
Turn 6:
Both sides have lost a wing, so Commander's Gaze will be more evenly determined. The Persians roll poorly and start with 3, to Perdiccas' 7. He bids 4 Gaze, the Persian 0.
He starts with the Companion and Archer battle. This time, the Archers are routed by the horseman. However, the Companions are out of position.
The Silver Shields and Bronze Shields line up and charge into the Persian White Shields, who gamely counter-charges! The elite Perdiccan unit is shocked by the ferocity of the native Persian attack! The Silver Shields lose 1 Courage and begin to waver, while the White Shields are fine. In fact, they push back the Perdiccans! This could be trouble.
A rear charge by the Persian General on the Phalanx also causes another 1 Courage loss. The rest of the Persian army tries to maneuver back into the main battle.

Turn 6:
Like many ancient battles, it all comes down to a swirling melee in the center of the field of battle. Perdiccas has 5 Commander's Gaze to the Persian 3. he bids 1 to go first, and the Persians bid 0.
Luckily for Perdiccas, his Companions had enough Commander's Gaze to switch into Open Order, turn back to the main battle, reform, and then charge into the rear of the Persian White Shields. Boom! Copious amounts of re-rolls were used as the climactic battle played out.
The Silver Shields and Perdiccas dished out 4 Courage loss, with one outstanding unapplied hit. The Persians also dished out 4 Courage loss. This was enough for the enemy to be broken! The Persians were destroyed as were the Perdiccan troops.

End:
The Collapse tests after the carnage say the last White Shield unit flee for safety! However, the Skirmisher unit in the Oasis held their ground and claimed the Oasis for the Persians.

Final Thoughts:
Persian Victory!?! No wonder why it took Perdiccas historically 2 battles to defeat the Persian rebels!
This is the first time the Silver Shields have tasted defeat on the battlefield. It is a bitter fruit. What a swirling battle that went down to the last dice rolls. The way wargaming is intended.
How did it play? Well, running out of Commander's Gaze was really, really bad. It limited what you could do and when you can do it. For example, if Perdiccas could not have gotten his Companion Cavalry re-arranged for the final rear charge, his troops would have lost in the center. Asphract light cavalry were also caught in the open when they ran out of Commander's Gaze as they could not stay mobile.
The 45 degree turn restriction for units that can not go into Open Order also forces you to think how and why you are going to deploy and move them. You must plan ahead to where the battle is going to be, not where it is now. Restricted movement also made lining up charges a bit more complicated.
Finally, Cavalry is the hammer. However, the phalanx anvil hits the hardest of all the units. Ka-boom! This battle was decided in a Phalanx battle just as the Diadochi intended.
I look forward to the re-match!
I was using 6mm models on 60 x 60 mm bases and 1 inch as a single Movement Unit. However, the rules are scale and base agnostic. The definition of a "Unit" is very loose. I could have just as easily used my 28mm troops and played the same battle on a slightly larger table, and potentially using 1 inch MU's or Half Inch MUs instead.

If fighting the Wars of the Diadochi seems like it is up your alley, I suggest you go the the Blood and Spectacles Wargame Vault page and pick up your own copy.

You can follow Blood and Spectacles Facebook page for more fun: https://m.facebook.com/pg/BloodandSpectacles/posts/?ref=bookmarks&mt_nav=0
Or our website:
Or our Messageboard:
Or our Wargames Vault Page:
No comments:
Post a Comment