Monday, December 30, 2024

Random: Drop the Curtain on 2024


Here we are dropping the curtain on 2024.  It's been a year.... another year.  Each day is a slow, painful grind but since each day is almost the same in retrospect they all went by really fast.  2024 is a bit of a blur, one that was dominated in my psyche by the US elections.  That kind of sucked all the air out of the room for me.  So much so, that by the mid-year I was feeling down right anti-social and not interested in dealing with anyone I didn't have to for work.  Not the best feeling and not the best way to live your life..... but that is what happened!    

In addition to that huge shadow over the year, life on the home front was kind of challenging this year as well.  Lot's of stuff going on that needed my attention, resources, and time.  That also cut into my energy for wargaming and design the second half of the year.    

Probably why I got so much painting done this year!   

Purchases
None of this section would be possible without the generous financial support of readers like you! 

Every time you purchase one of my books from Osprey, my Wargame Vault page, my Drive-Thru RPG page, and follow my Patreon you are helping to fund the continued existence of Blood and Spectacles Publishing.  The money I earn from these areas I put back into content on the blog, content on Social Media, and new products for you!  Any money I earn goes back into the business of wargaming and role-playing.  Thank you!  I could not do it without you!

With that said, it is always hard to decide how I intend to use these investments into purchases for the year.  Going into this year, I had a few goals lined out for what I should purchase to help generate content.  Looking at my goals, I have been following my intentions pretty closely.  
 
  • I have stayed caught up with the Osprey Wargaming Series and posted reviews.  Those titles were With Hot Lead and Cold Steel and When Nightmares Come.  There was some delay due to local availability, but I think that is sorted for now.  
  • I have purchased at least one new set of rules that were not Osprey and posted a review.  In this case, I picked up Modiphius' 5 Parsecs from Home which is a Sci-fi, model-vs-model, solo-game.   
  • I picked up a couple of Kill Teams.  They were the Hand of the Archon, Sisters of Battle, and a Blooded Chaos Guard team.  Two of them were from my local FLGS.  
  • I also picked up a force of Anglo-Saxons from Victrix for use with my Fury of the Northman rules.  I wanted to expand my forces for some of my own games for Batreps and demo games. When Victrix sent me a 20% code, I couldn't resist. Expect to see my journey with these little soldiers on the blog. 
  • I also picked up the Kill Team starter set. 
  • I also picked up three Heroquest expansion and provided a review for it; Against the Ogre Hordes, Kellar's Keep, and Return of the WitchlordI also managed to snag the Mage in the Mirror supplement at the end of the year.  Now, you can look forward to a closer look at that in 2025!    
  • At the close of the year, I got Chaosiums Pendragon 6th Edition as a gift that I will be reviewing in early 2025.  My wife also got My Little Pony: Friendship is Magic as a gift earlier in the year, but that is hers and not mine so I might not get a review together for it. 
  • I also received One-Hour Wargames: Ancient and Medieval rules.  Again, look for a review early in 2025.  

That means I just hit my goals for purchases in 2025.  Thanks to all of your help!  There are a few little treats to look forward to on the blog now for 2025!                

Painting and Modelling
Well, I was at a pretty killer pace prior to the mid-point, with about ~175 models painted up.  Nothing to sneeze at!  However, the second half of the year I did not let up on the pace.  I think painting was my biggest focus in 2024, and I even engaged in social painting events.  In the second half of the year, those were my most common social hobby interaction.  

I ended the year with this: 

    • Hand of the Archon - 10 Models
    • 6mm Hittites- 20 bases
    • Sisters of Battle - 10 Models
    • Scatter Terrain - 9
    • Kill Team Board and Walls- 3
    • 6mm Vehicles - 6
    • 6mm - Kadesh
    • Assorted 28mm - 12
    • Vet Guardsman - 10 models
    • Ork Kommandos - 12 Models
    • Kill Team Terrain - 9
    • Corrupted Guard - 15 models
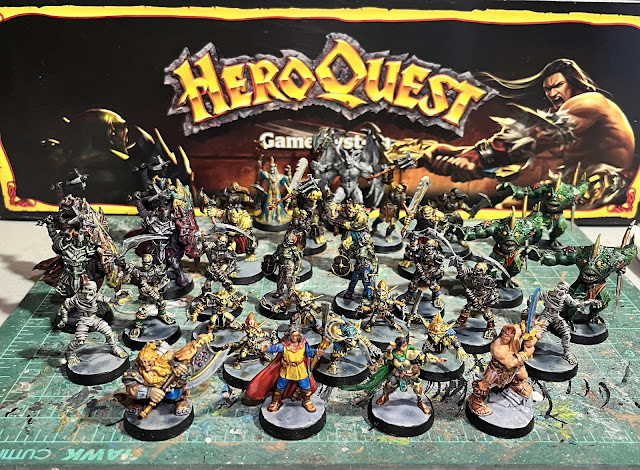
    • Heroquest - 126
    • Persian Chariots - 15 Models
    • 28mm Gladiators - 10
    • Nativity - 11 Models


Most of my painting was on Heroquest supplements, but I also painted up some historical miniatures and a few one-offs here and there for various projects.  That gives me a grand total of around 265 miniatures painted in 2024.  A good year of painting!  

Gaming
This definitely took a bit of a nose dive!  However, I did manage to play a few test games of In Strife and Conflict and to prepare for a Battle of Kadesh  demo game that I still have not committed too.  I also finished off a slow-burn Hostile Space campaign and did some solo games of Under the Martian Yoke.  In these parts, gaming slows down in the summer as everyone heads outside, but I never really came back to it when the weather changed.  In addition, an edition change in Kill Team reminded me why I got off the GW carousel.  

    • Kill Team - 6
    • Fury of the Northman - 1
    • In Strife and Conflict - 4
    • Hostile Space - 3
    • Shadows of Brimstone - 3
    • Under the Martian Yoke - 3
  
Hostile Space


In Strife and Conflict

In Strife and Conflict - Battle of Kadesh

Under the Martian Yoke

Under the Martian Yoke

The big highlight this year was that my RPG group pretty consistently met every Tuesday night!  That was a big help for me.   

Rules Writing
Yeah, nothing really of note in this space.  I have several games in the works, but nothing was completed before the end of the year.  There is some stuck in post-production, some more have basic mechanics and are stuck in the "fleshing out phase", and some are just stuck in limbo as I decide if I want to keep them going or not.  The beginning of the year was productive, but the second half not so much. 

Why you might ask?  So many reasons....... but ultimately I just didn't focus on one long enough to actually get it across the finish line all the way.  Oh well, maybe a new year will help me kick start some writing juice, instead of the writing grind I have been working on.  Most of my writing energy have gone to the blog, Patreon and Social Media.  Once I get those done for the week, there is not a lot of time left for the other stuff which is CRAZY!  

Miscellaneous Stuff
Yeah, no real progress on this front.  The things that were started kept ticking over.  However, I think I really did improve my Social Media game this year, with some really cool posts.  The adoption of Canva helped me increase the production value there, and import some more into my design work.  However, that has also increased the level of effort.  However, it is what consumers expect now-a-days and if you can't deliver it you are not selling in the market. 

There has been a lot of talk from my gamer buddies about next year BUT I am skeptical.  Some of the things floating around in the ether right now include: 
  1. Battle of Kadesh Demo Game
  2. Kill Team League 
  3. Live Streaming of our RPG game
  4. Local Con
These are all great ideas, but I think I am going to believe them when I see them, help out where I can, and just try to focus on putting my head down and completing some games.  Ultimately, that is where I need to put my head at.  I want 50+ publications at some point, and I am about half-way there.  

Well, I will keep you all up-to-date through the usual channels.  Until next time! 


Become a Patron and get access to all the cool stuff, a peak behind the curtain of Blood and Spectacles, and early-access to playtest games!  


You can follow Blood and Spectacles Facebook page or Instagram for more fun! 

Check out the latest publications and contact me at our Blood and Spectacles website

Or purchase all out games at the Blood and Spectacles Publishing Wargames Vault Page!    


Sunday, December 22, 2024

On the Painting Desk: Something a Bit Different


Welcome back all for your weekly dose of .... whatever it is we do here.  This week I am painting something a bit different.  We all know that Reaper has a wide, wide variety of miniatures in their catalogue.  I went wide and deep into the catalogue and picked up the Reaper Nativity scene.  I have actually painted this set two times previously, so this is my third go at it.  My previous two were gifts for my parents and in-laws, I figured it was time to paint one for my own household.  It is the right time of year afterall, and this will probably be the last things I paint for the year.  

The first effort


The second effort

These previous efforts were all painted with my standard base and wash approach using Armypainter paints.  This time, I plan on using a combination of traditional methods and Speedpaints.  I am interested to see how this turns out compared to my more traditional approach.  Therefore, the first step was to go ahead and undercoat it using my standard methods, Grey Seer base coat, dark grey wash, and white drybrushing.  After this, I was ready to get started.  


Oh yeah, I also painted some Giant rats real quick for various Fantasy games as a palette cleanser and warm-up.  Very simple and quick painting with a simple coat of Speedpaints.  Nothing much to say about these little guys.      


With these Nativity scenes, I do not tend to paint them in a single batch.  I tend to paint a couple of the miniatures at a time, work on them to a certain point, and then switch over.  So, I got started on the flesh colors to start with, and the Manger.  I really wanted to make the star on the Nativity scene really pop on this one.  Here is where I ended up after my first quick sit down and painting session. 


For the star, I painted the base with Zealot Yellow Speedpaints.  Then, I used my basic Armypainter paints to add a highlight of Daemonic Yellow, and then painting it up another layer with plain white.  The white really helps make it pop! The rest is simple Hardend Leather, Tunic Grey on the nails, and Zealot Yellow for straw.  

The skin tones were Crusader Flesh for the shepherd boy, Jesus, Joseph and Mary, Sand Golem for two wise men, and Dark Oak for the last wise man.  Now, it was time to dig into the models only a couple at a time.   


 Some progress as I have painted up Baby Jesus, the sheep, and the donkey.  Jesus was Crusader Flesh, Plasmatic Bolt for the blanket, Hardened Leather for the crib (same as the Manger), and Zealot Yellow for the straw.  Zealot Yellow will also be the primary basing color for all the models, to look like they are standing in straw.  The Sheep was Grim Black and Holy White Speedpaints, with a drybrush of Matte White Armypainter.  The Donkey is some Alchemy purple in the nostrils and ears, some Holy white on the nose, Grim Black mane, hooves, and tail, and Runic Grey skin.  Starting to come together!     

So, onto Mary and Joseph.  Typically, I paint Mary in blue because many times that is how I have seen the Virgin Mary depicted in artwork.  However, this time I was thinking about the idea that blue is not a common color in the Ancient world. For example, the works of Homer never really mention blue, and there is some linguistic works that indicate that blue is the last color to get a developed word in many languages.  I also decided that I want to highlight Christmas colors in my Nativity scene and Blue is not one of them.  That limits my palette somewhat to more Green, Red, and White with some accent colors/natural colors to go with it.  

Mary is relatively easy to paint.  The hardest part is the locks of hair around her face in her hood.  I used Grim Black for her and Joseph's hair. I traditionally give Joseph some grey or white in the beard, but wanted a younger looking Joseph for this go around. Mary's dress is Orc Skin while her belt and cloak is Holy White with a drybrush of standard Armypainter Pure White.  

Joseph was a bit more challenging.  My Speedpaint's have a more limited palette of natural colors than my traditional set of paints.  You can see in my other works, that Joseph is mostly natural tones.  Here I went with the Camo Cloak tunic, Hardened Leather Belt, and Dark Wood cloak.  The head covering is Holy White and the stick is Sand Golem.  The base is Zealot Yellow for straw, like all of the bases.  

That left the three Wisemen or Kings left to paint.  Honestly, these guys are the most challenging of the Nativity to paint.  I wanted Purple to symbolize their higher status, but also to keep with the Christmas color palette.  


Look at that, all the miniatures are base coated.  The three wise men I decided to give their base clothing in purple.  That was the color of wealth and power in ancient days.  From there, I wanted to use red, green, and white as the main alternate colors in order to fit the Christmas theme.  I have always enjoyed painting the Three Wisemen.  The Speedpaint colors were slaughter red, orc skin, holy white, and regular white from the regular range as well.  Any jewelry I did with Zealot Yellow, which was also the base.  The hard parts are done, now I want to do some washes, some highlights, and then seal them up.  

Here is the final product after washes and highlighting back up......


That wraps up my painting for the year.  I think next year, I will have to paint one more Nativity scene for my Scumgrod.  However, that is a project for next year!  Next week I will do my end of year wrap-up, and I wonder how many miniatures I got painted for the year?  It feels like alot! 


Until next time! 


Become a Patron and get access to all the cool stuff, a peak behind the curtain of Blood and Spectacles, and early-access to playtest games!  


You can follow Blood and Spectacles Facebook page or Instagram for more fun! 

Check out the latest publications and contact me at our Blood and Spectacles website

Or purchase all out games at the Blood and Spectacles Publishing Wargames Vault Page!              


Monday, December 16, 2024

Wargaming on a Budget: Making Walls for the Gameboard

Welcome back to Wargaming on a Budget.  Many years ago, I barely held onto the hobby of wargaming, because I was getting priced out of it.  All my money was going to being a young parent and homeowner.  No time or money for wargaming.  Plus, when I started wargaming Do-IT-Yourself was a huge part of the hobby.  There was not much pre-made terrain or supplies for wargaming, and instead you had to get creative, loot like crazy, and use your imagination!  In honor to this bygone era of wargaming, I like to show off some of the tips and tricks of yesteryear to help make wargaming an affordable hobby.  Plus, there is a certain pride one can take in terrain they built up themselves.  

Last, time you may recall that I built a Kill Team sized game board.  However, it is not enough to simply have a game board, you need to create fire lanes, corners to cover, and other nooks and crannies to make your games much more tactically challenging and fulfilling.  Today, I am going to show you an easy way to "fill-in" the board for compelling games.  

Before you begin, you will want a metal edged ruler, a razor cutter, pencil/pen, PVA or similar glue, masking tape, cereal card/card stock, sprue bits, and then the paints you will use.  Spray paint works great for this project. 


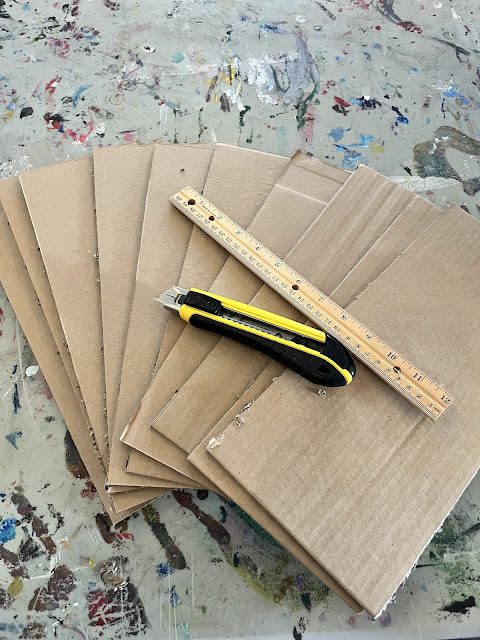
The first thing I decided to do was use some of my left-over cardboard and cut it into 6 inch tall and 8 inch long rectangular sections.  It is best to have a metal edged ruler, so that when you cut with your box cutter/razor blade you can use the metal edge as a guide.  In addition, you will want to run your razor blade over the cut a few times to get through the various layers of a corrugated box.  Cut on something you don't mind slicing up like another layer of boxes or a cutting mat.  Your blade WILL go through and cut whatever is underneath so do not cut on your kitchen table, counter top, or carpeted floor.  You will regret it.  

I cut-out 10 pieces, and you can make them various lengths and heights, but I made them all the same.  I made my walls 6 inches tall, but honestly 4 often does the job and makes it easier to get in and out of the board.     

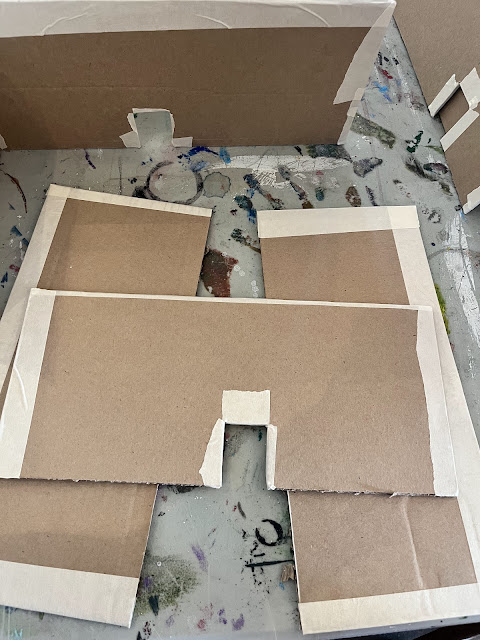
Once you have the wall sections cut you will want to add a few doorways as openings in your long wall sections.  These make great little chokepoints and short cuts to move around the board.  Each wall section should have 0-2 or these.  For most 28mm miniatures, these doorways will be about 1-1/4 inch wide and about 1-3/4 inches tall.  It might make sense to put a model where you want the door to make sure the dimensions are big enough.  Then, you use the same method as cutting the card to cut-out the door way.  Once you cut out one, the scrap can be used as a guide for the rest.      


Next step is to use your masking tape to seal all the edges and corners of the cardboard.  This strengthens the cardboard, but also seals off any bad cuts and the unsightly corrugated edge.  When you paint the cardboard, it will help it look finished.  You do not have to be too precise in this step, just make sure all gaps are covered.  


Next, take two or three sections of walls, and simply paste them together using PVA glue at 90 degree angles.  I like to make T and H shaped sections, but U and L shapes also work well.  You will need to put the glue along the edge of the wall, and then simply hold them together for a few minutes while they dry.  Not much different than assembling models.  I hade two H shapes, and 2 L shapes when I was done gluing all 10 pieces together. 

A Reaper Cloud Giant and Axolotl mage for scale 

Congrats, you are now ready to do the time consuming part.  The first thing you do is take bits of cereal packet and cut three pieces for each side of the doorway.  You glue these on to create a door frame around each archway.  So you put one strip across the top, and one on each side of the door.  Then you do it again on the opposite side of the wall piece.  This helps the openings look like actual doorways. 

From there, you grab your bitz box, cut-up sprues, cereal packet, and assorted found items and go to town gluing them all over the surface of the wall sections with your PVA.  Some good bits are squares of cereal packet, cut up straws, bits of screen, and corner sprue pieces, string hanging out from under a bit of card, or long sections of sprue.  More angular shapes work better than organic shapes.  These additions will create the illusion of texture on the walls once they are painted.  This is the longest step of the process.  

Once you have suitably covered the wall sections with scrap, you will be ready to paint.  I recommend three layers.  The initial layer should be the lightest and a full covering.  This will be the base color.  Then, I recommend a darker color than the base coat, and I would use a distance spray as you do not want this coat to over-power your initial coat.  I also spend a bit of time using the darker color on the edges of the wall and any large blocked up shapes on the wall.  The final spray is another distance spray of black to add some texture, and maybe around any doorways to darken them up.  When this stage is done, the walls will look something like the below.....


Now comes the final step.  Go online and print up some posters and graffiti online.  Carefully cut these out and glue them around on your walls.  You can also use stencils and the like in order to paint numbers and letters on the wall to add that "pop" of detail.  It is also a good time to take some acrylic paints like bronze, brass, copper, black and oranges and drybrush along the edges of some of the edges.  You can also paint a few squares here and there.  All these details make your walls look "lived in" and more like a location worth fighting over instead of a blank space  


Once you have all of your sections done, you can easily set them out on your game board in different combinations to make narrow corridors, open bays, and wide edges.  You can use your L, T, U and H shaped wall sections to make a variety of interesting shapes and tactical situations.  For added fun, you can even put them on your board at an angle instead of flush or straight with the edges.  Also be sure to add the scatter terrain for the final look! 


Well, you can see the same basic shapes in the game board and the walls in order to make compelling and inexpensive game boards.  The same spray cans can be used for each stage, and the materials are all found materials, and simple household items.  This board cost less than a single blister of miniatures.    


Until next time! 


Become a Patron and get access to all the cool stuff, a peak behind the curtain of Blood and Spectacles, and early-access to playtest games!  


You can follow Blood and Spectacles Facebook page or Instagram for more fun! 

Check out the latest publications and contact me at our Blood and Spectacles website

Or purchase all out games at the Blood and Spectacles Publishing Wargames Vault Page!    

Monday, December 9, 2024

On The Painting Desk: Return of the Witchlord- Heroquest


Hey, I was supposed to be painting my Anglo-Saxon army by now?  What gives?  Well..... I guess I'm not!  I have been cruising along on my Heroquest stuff, and I decided I did not want to break the streak I was on.  Don't worry, this is my last expansion on the desk so if you have been waiting with held breath for the Anglo-saxons..... well..... you should probably take a breath.  

I wrote a review of the expansion pack Return of the Witchlord earlier.  Once I get this one painted, that will complete all the OG content that Hasbro has come out with for Nu Heroquest.  I will have the Core, Kellar's Keep, Return of the Witchlord, and Against the Ogre Horde.  

I am secretly hoping they come out with a re-box of Battlemasters, but that ties explicitly into Heroquest with Dread Warriors, Orcs, Goblins, Abominations and Ogres on one-side.  Then on the other side would be Guardian Knights, Elves, and Dwarves.  The Witchlord and his army could be an expansion.  They have some basic sculpts for some of them all ready.  Hasbro, if you are reading this.... call my agent!  

Anyway, this set basically just has some old sculpts from the Core set.... but MOAR of them.  You get 4 Zombies, 4 Mummies, and 8 skellingtons.  Then, there are the two new doors that are duplicates from Kellar's Keep, or are they one in Kellar's Keep duplicates of these doors?  

I did the usual Grey Seer undercoat, dark grey wash, and white drybrush.  I did that to all of the models in this set at once.  I didn't even bother with a photos.    

I started with painting the mummies.  Sure, they are the most dangerous of the undead, BUT they are also the easiest to paint.  I took out my Malignant Green and hit all the exposed skin, there are some fingers, elbows, knees, and toes..... knees and toes....  Then, I gave them a blast of Dark Wash.  Base with Runic Grey and a black rim.  That was it.  Done.  Easy-peasy.  Painting Mummies is the best!   


After the Mummies, it was time to tackle some of the harder to do undead.  I decided the Zombies should be next.  I actually really like the zombie sculpt from Heroquest.  However, when you will have 6 of them, do you want to think a bit about how you want to differentiate them a bit to avoid monotony in the painting and if you need to tell them apart on the board for some reason.  

For the skin, I started by painting them Malignant Green like my orcs and goblins.  However, to make them look a bit different I then hit them with an Armypainter Green Tone wash.  This gave them a very different look than the Greenskins.  I then painted them all up, with a few metallics here and there for some details.  However, the majority of my metals I tried to stick with Graveyard Grey and Runic Grey for a NMM look.  The most fun was picking out their hair colors.  Then, I gave them all a Dark Tone wash and finished up the bases the usual way.  Sadly the Dark Tone Wash made some of the hair colors look identical at distance.  Oh well.  

With the zombies done it was off to the Skellingtons.  There was one miscast in the set I got, but take a look and see if you can find him in the crowd?  This would triple the number of skeletons I had in my HQ collection with this set.  I went back to my painting blogs for the Core Set and reviewed how I painted them up.  Unsurprisingly, Pallid Bone was going to do a lot of heavy lifting for these guys, with Graveyard Grey armor, and the scythe blades being Runic Grey with a few other metallics thrown in for flavor.  I used a variety of colors on their bits of clothing, again in case I needed to differentiate them for some reason on the table.  Bases were the standard runic grey and black trim. 

The last step was painting the two doors, one wooden and one metal.  I used some different colors from the Kellar's Keep doors I painted just in case I wanted to differentiate them for some reason.  No idea what that reason could be, but you never know.    

With the all the miniatures done, that wrapped up my Return of the Witchlord expansion packs to Heroquest.  I am open to suggestions for what expansions I should get next.  I want to expand my collection of heroes and mercenaries, so let me know which set helps me do that.  Don't worry, I am not done with Heroquest because I like painting them and it is a good family game, solo, or casual game I can play at the True Crit Gaming , at home, and even with non-gamer folks. 

Next up on the painting desk, it is finally time to get those Anglo-Saxons painted up.  I am also hoping to add a pack of Dark Age archers to the mix too.  Can I get it all done before next year drops?   Keep tuning in to find out!   


I have also been doing some research on another project as well.  Perhaps you will get an idea from some of the secondary sources I am working with.....


So, I think that is about all for now.  Let me know in comments about the best Heroquest expansion I should look at next, and what else you may think I am working on.  Until next time! 


Become a Patron and get access to all the cool stuff, a peak behind the curtain of Blood and Spectacles, and early-access to playtest games!  


You can follow Blood and Spectacles Facebook page or Instagram for more fun! 

Check out the latest publications and contact me at our Blood and Spectacles website

Or purchase all out games at the Blood and Spectacles Publishing Wargames Vault Page!          


Monday, December 2, 2024

RPG Design: The Core of an RPG


At heart, this is not a blog about RPG Design.  At best I am a dabbler.  There are far better blogs about RPG design and you should probably go look at those.  However, as a dabbler I have come to a few thoughts about RPGs that I like to write a bit about.  If I have learned anything from my forays into RPG design, it is that there are a lot of different preferences, styles, and history out there.  I know my preferences, so I will most likely be leaning into those.  I look forward to being told how wrong I am in comments!  

In Wargame Design, we know the basic elements are the 4Ms. Sure, there is a lot of flash and chrome you can add to it, but a wargame ultimate comes down to Movement, Missiles, Melee, and Morale.  These act as the starting point for any effort at wargame design.  If you can not cover those basic components, then you probably do not have a wargame design yet.  

RPGs also have a basic starting point for an RPG and everything else is just additional chrome and features built on top of it.  It is a simple equation.  

Situation + Player Action = New Situation   

At the heart of every Role-Playing Game you find this simple equation.  A situation is introduced, the player decides how to react to that situation and this generates a new situation.  The details vary from one RPG to the next, but the core is always this same equation.  

You will notice that the Core of an RPG is not about creating characters, classes, levels, skill trees, or anything else.  All of that is window dressing and chrome beyond the core function of a Role-Playing Game.  The purpose is to allow players to "play a role" and the only way they can do that is by giving a player a situation, allow them to take an action as the character, and then relate what the new situation is because of the action.  The New Situation then becomes the starting Situation, and the process repeats itself ad infinitum until the player no longer wants to generate new situations.  

Therefore, if you are going to be creating an RPG, you need to build off this core idea.  If you don't, you may not have a Role-Playing Game yet. 

Situations

Let's take a closer look at the components of this simple equation.  The first step is a "situation".  What is a situation?  

In this case, it can be one of a number of potential things and is often considered a scene, a setting, an encounter, etc.  However, a situation in this case is actually a choice.  Whenever a Player has the choice to act, that is a situation. The situation is simply a call to action, and point where the Player is asked to make a decision for the character in order to proceed.  

Some basic examples: 

- You come across two doors.  Which way do you go? 

- A rival appears.  What do you do? 

- The advisor to the king counters your argument.  Now what?  

- They land on an alien world.  Now what? 

Those are all very simple examples of a situation.  You can see that they do not need to be complex.  There is a lot more detail and nuance that can take place in the situation, but the heart of it is a call for the character to act, and the player to make some sort of decision. 

Of course, the Player will have their character take some action.  By taking action, the situation is changed.  It does not matter if the action succeeds or fails, the simple act of making a decision is enough to change things.  Even if the decision is NOT to act yet, that leads to the new situation and the next call to make a decision.  This is the New Situation.  

For example:  

- You come across two doors.  Which way do you go?  Go left.  It opens into a hallway with a doorway at the far end.  Do you go to it?   

- A rival appears.  What do you do?  I go to a nearby table and throw a cream pie at them.  It hits and they are covered in whipped filling.  They are angry.  Now what?       

- The advisor to the king counters your argument.  Now what?  I reveal he is an enemy spy.  The King is shocked and demands proof.  Do you have proof?   

- They land on an alien world.  Now what? We check for breathable air.  It is not breathable.  How are you going to go outside?


To Infinity and Beyond

The key component is that this simple equation continues to play out, over, and over, and over again.  Theoretically, there is no limit to the number of times a Situation + Player Action = New Situation as it continues to repeat.  The only way it ends, is if the player chooses to stop playing.  Even if a player's character dies, that doe not have to end this loop.  It just creates a new situation. 

The "Game" in Role-Playing Game focuses on this endless loop.  That's it.  Seeing what happens and determining your next actions based on the evolving situation IS the game.  It is not about wealth, experience, skill building, character arcs, etc.  Those are chrome that you can add onto a game but the true reason for the game is to take actions and change the situation, and see where it leads you. 


Core Mechanic and Core Gameplay Loop

Therefore, if the core Gameplay Loop is: 

Situation + Player Action = New Situations

The next logical question is how does your game facilitate the transition from Situation to New Situation.  That is your Core Mechanic.  The Core Mechanic is to help facilitate how to determine the success and failure of the Player's Action and how that translates into a New Situation.  Success may lead to one outcome while failure leads to another.   Success, failure, or no action in the mechanic should still lead to New Situations.  

The only core utility of the  Core Mechanic is to help players make the transition from the situation to the new situation.  Typically success is a positive outcome for the player's character and failure is a negative outcome for the player's character.  Anything else is all details and chrome. 

Final Thoughts

Obviously, we are still at a very abstract level when talking about Role-Play Game design.  We are not doing probability math yet, we are just talking about concepts.  However, without a strong understanding of these concepts, no probability math in the world will save you.  If you don't understand the Core Gameplay Loop, then you can't design effectively.  Of course, your Core Mechanic needs to support and ease the transitions in the Core Gameplay Loop.  If it doesn't, you will not have a successful RPG. 

I look forward to seeing how wrong I am in the comments!  Until next time! 


Become a Patron and get access to all the cool stuff, a peak behind the curtain of Blood and Spectacles, and early-access to playtest games!  


You can follow Blood and Spectacles Facebook page or Instagram for more fun! 

Check out the latest publications and contact me at our Blood and Spectacles website

Or purchase all out games at the Blood and Spectacles Publishing Wargames Vault Page!