Showing posts with label Templates. Show all posts

Monday, June 8, 2020

Wargaming on a Budget- Paper Armored Company

As we approach a climactic final battle on Baron's Rest in Operation: Hemlock, I started to rummage around in my boxes of minis to find out what I had for it.  Initially, I wanted a decent size battle of Rampant Galaxies, but decided by the time I ordered and painted all the minis for it.... well.... I didn't have 3 years to wait for that climactic battle.  Paper flats on the table just didn't seem the part.  So, I figured we will just need a big battle of Rampant Stars instead.  So off I went to see what I had for the Imperial and Ork forces.....

A Conqueror and a Leman Russ on Patrol
That's when I dug out my old Paper Armored Company from Warhammer 40K 4th edition  or so?  I Think it migrated to 5th, but only had a couple outings.  I made it more out of a labor of love.  At the time, I had no money, but plenty of time.  I also had access to a lot of cardstock and a grey scale laser printer.  I designed, modified and built something like 30+ Imperial vehicles of various styles and stripes out of cardstock.  It was enough for about 3 Companies of vehicles using the Chapter Approved Armored Company list in White Dwarf.

Imperial Command Tank variant
Chimera without a turret, hatch Heavy Stubber, and Improved Comms from back in the day

This was a very polarizing army.  People either loved it or hated it.  There was not much inbetween.  There was no doubt, that despite all the inexpensive paper and found materials, that it took a ton of work to build.  Each component required the design work in MS Paint (some were basedon existing templates I had found online, and some I designed myself), coloring in MS Paint, printing, cutting, and assembling.  There was a lot of trial and error to ensure parts fit together properly, but once they did, they were re-usable over and over again so it was easy to expand and build on what was made.
Chimera with dozer blade and Heavy Flamers
Time has caused some wear and tear to the models.  Mostly things like Heavy Bolter barrels, and other small weapon barrels, smoke launchers, etc. However, those small details are easily replaced with white glue.  These models have moved across country three times, but are still in relatively one piece.
Standard Russ- I have a lot of these guys that I did not bother to picture.....

Sometimes, I think about making the jump to 3D printing, but the thought of learning the software, learning the process of 3D printing, the effort of mastery, I just do not think I have it in me anymore.  Around this same time, I also started to learn how to sculpt with GS, FIMO, etc. too.  It is what helped keep my in the hobby when my wallet couldn't.  Now, I just don't think I could muster the energy and time to do something similar with 3D printing, sculpting, or papercraft.

Baneblade.....

I hope you enjoy the pictures I took as I started planning a big battle for Operation: HemlockMaybe some of these will hit the table again?  Maybe not.....   
 
Demolisher and Exterminator

Hellhammer.... Just an alternate turret for the Baneblade
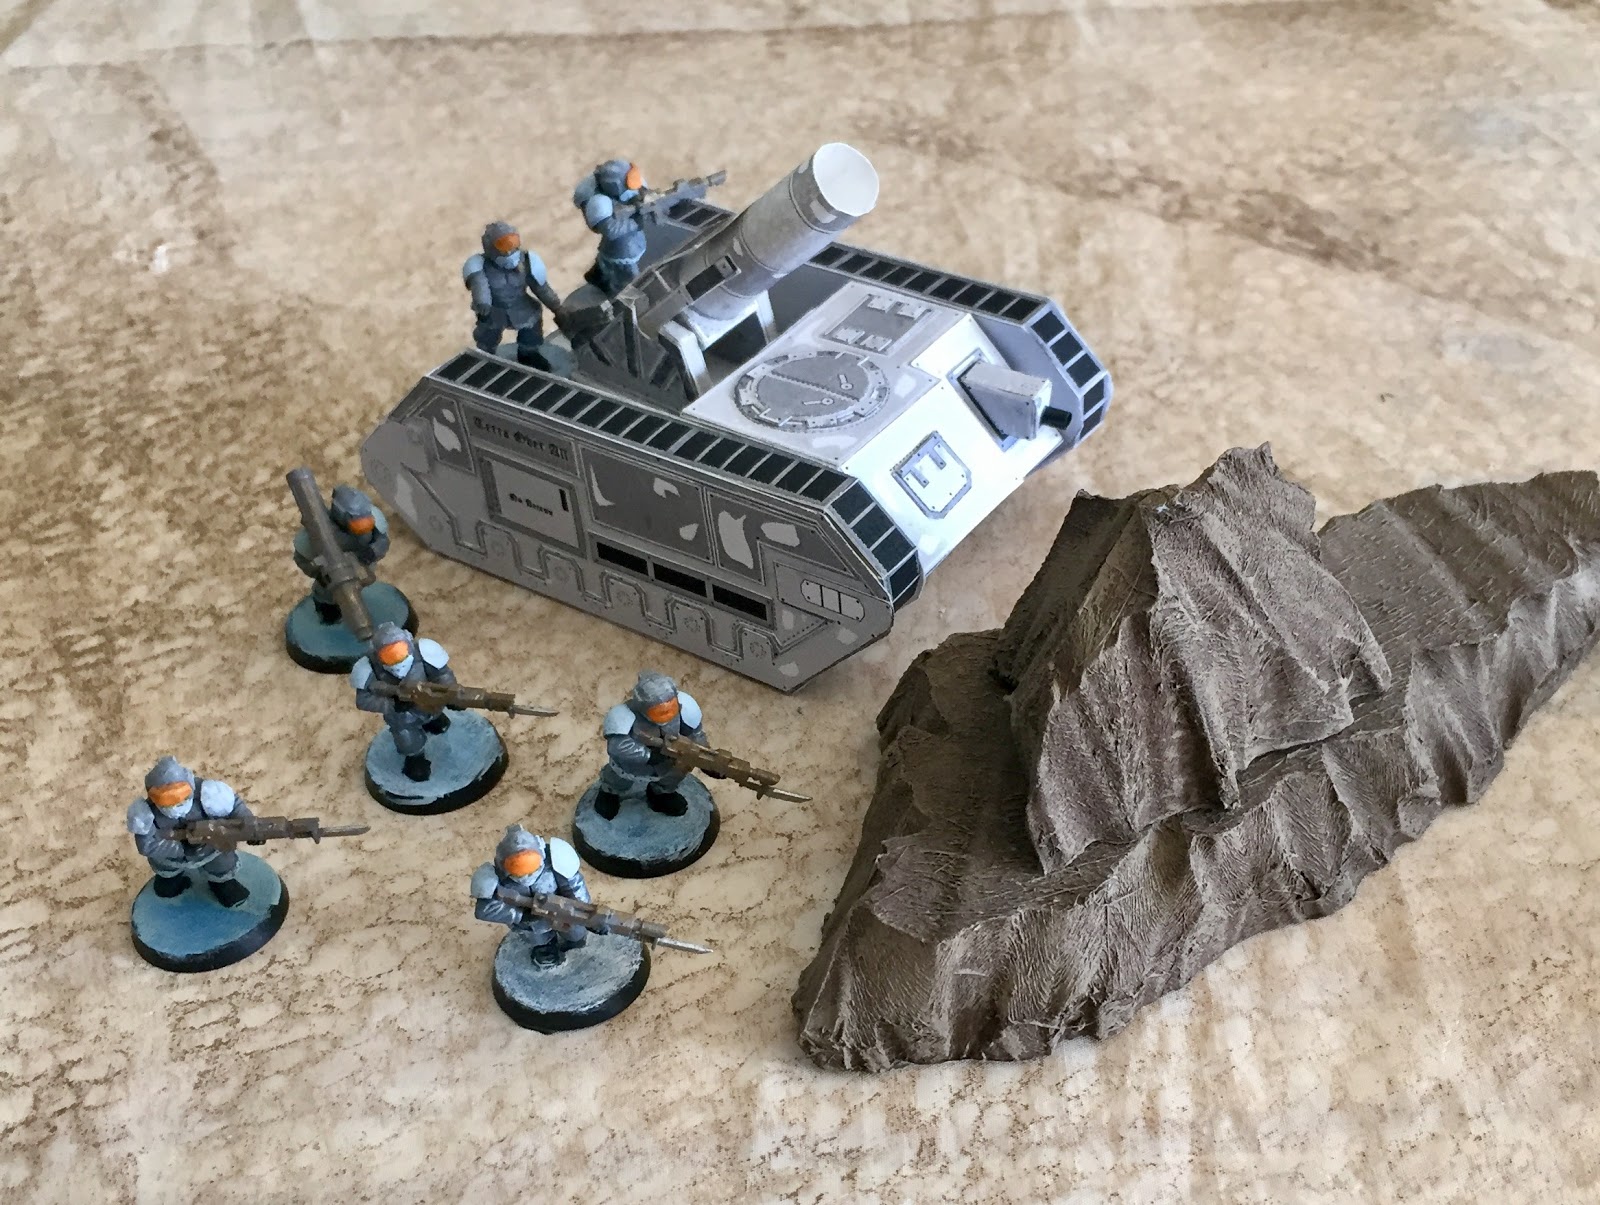
Griffon Heavy Mortar takes position behind a rock outcropping

A Hellhound is screened by PDF Armored Cars
which are Counts as Sentinels
Chimera with officer leads a battery of armored Griffon Mortars
An officer directs the placement of the Basilisk with armored crew compartment
A Destroyer Tank Hunter sets up to ambush Ork vehicles
An Imperial AA battery with Hydra and Manticores
PDF Ragnarok tanks protect a pair of Helga transports
Counts as Russ and Turretless Chimeras
PDF Scylla tankettes move to support a heavy weapon position
Counts as Sentinels with armored crew cabs

For those who stuck around to the end, I also have some bonus pictures of an Ork Stompa Tribe I was building but never finished before the bloom of warhammer 40K went off the rose for me.  Not using all those old 40K models is what prompted me to develop the Rampant Stars/Sun/Galaxies series of games in the first place.  


This army was going to be 6 Killa Kanz, 1 Deff Dread, a Big Mek, and a Stompa (Counts as Battlewagon) loaded with Ard Boyz.  Even the Big Mek was being built from scratch in this army.  As you can see, it was never fully finished.  This one also survived 3 house moves so far.... so one day maybe it will actually get completed?  Who knows? 


You can follow Blood and Spectacles Facebook page for more fun: https://m.facebook.com/pg/BloodandSpectacles/posts/?ref=bookmarks&mt_nav=0

Or our website:

Or our Messageboard:

Or our Wargames Vault Page:
   

Monday, March 19, 2018

Battle Report: Men of Bronze- Battle of Cius- Ionian Revolt


Herodotus tells us a great deal about the Ionian Revolt.  Ionia was Greek colonies along the coast and edges of Turkey that had been captured and absorbed into the Persian Empire around 540 B.C.E.  In 499 B.C.E the Tyrant of Miletus, Aristagoras; failed to capture the island of Naxos.  This left him in a bad political position with his Persian overlords.  In a desperate bid, he decided to stir revolt amongst his people against the Persians.  This led many other local cities to cast off their Persian based Tyrants and replace them with Democracies. 

The Ionian Revolt had initial success in 498 B.C.E. when the allied Greek forces (including Athens, Eretria, and Ionians) managed to successfully attack Sardis.  Sardis was the seat of a Persian Satrap and one of the personal enemies of Aristagoras.  However, this minor victory was soon off-set by the Battle of Ephesus where Persian cavalry chased down and defeated the Greek forces. 

Despite the loss, the revolt spread further.  It spread to the Hellespont and Propontis.  The city of the Carians also joined the revolt.  In addition, Cyprus also revolted.  Persian rule was in danger across the region, it was only a matter of time before the might of the Persian army would respond. 

In 497 B.C.E., The Persian King had three generals appointed to put down the revolt.  The three Persians (Daurises, Hymaees, and Otanes) divided the area into three partitions and attacked.  Their attacks spread across the region.  The battles and sieges for this period are largely unknown, with only a few details of the battles coming down to us from archeology and Herodotus. 

Today’s battle will be one of those lost battles.  Hymaees marched to the Propontis and attacked the city of Cius.  Historically, he took the city.  However, no details remain.  Below I will be fighting a battle between the Persian general Hymaees and the defenders of the City of Cius.  For the purposes of this battle, the citizen militia has come out of the city to fight off the Persian force.  

The Forces
No details remain for the fall of the city of Cius.  We only know that Hymaees took the city with his army while his fellow Persians attacked in other areas.  Therefore, I will be using some standard armies from the Greek and Persian lists.  The exact details of the true armies are not available. 

Greeks
3 Militia Hoplites
2 Peltasts
1 Archer Unit
1 Psiloi

Persians
3 Archer Units
3 Drilled Infantry Unit
1 Psiloi

This is equal points in the system and should prove an interesting game. 


Deployment
This battle will be on a 6x4 board with both forces deployed on the long table edges.  The Greeks on the North side with the Persians coming from the South.  The Western edge of the battlefield is anchored on a river.  The Eastern edge has the ruins of a temple sacked by the marauding Persian recon troops.  The river is Dangerous terrain while the temple is Difficult.   
Greeks to the Left
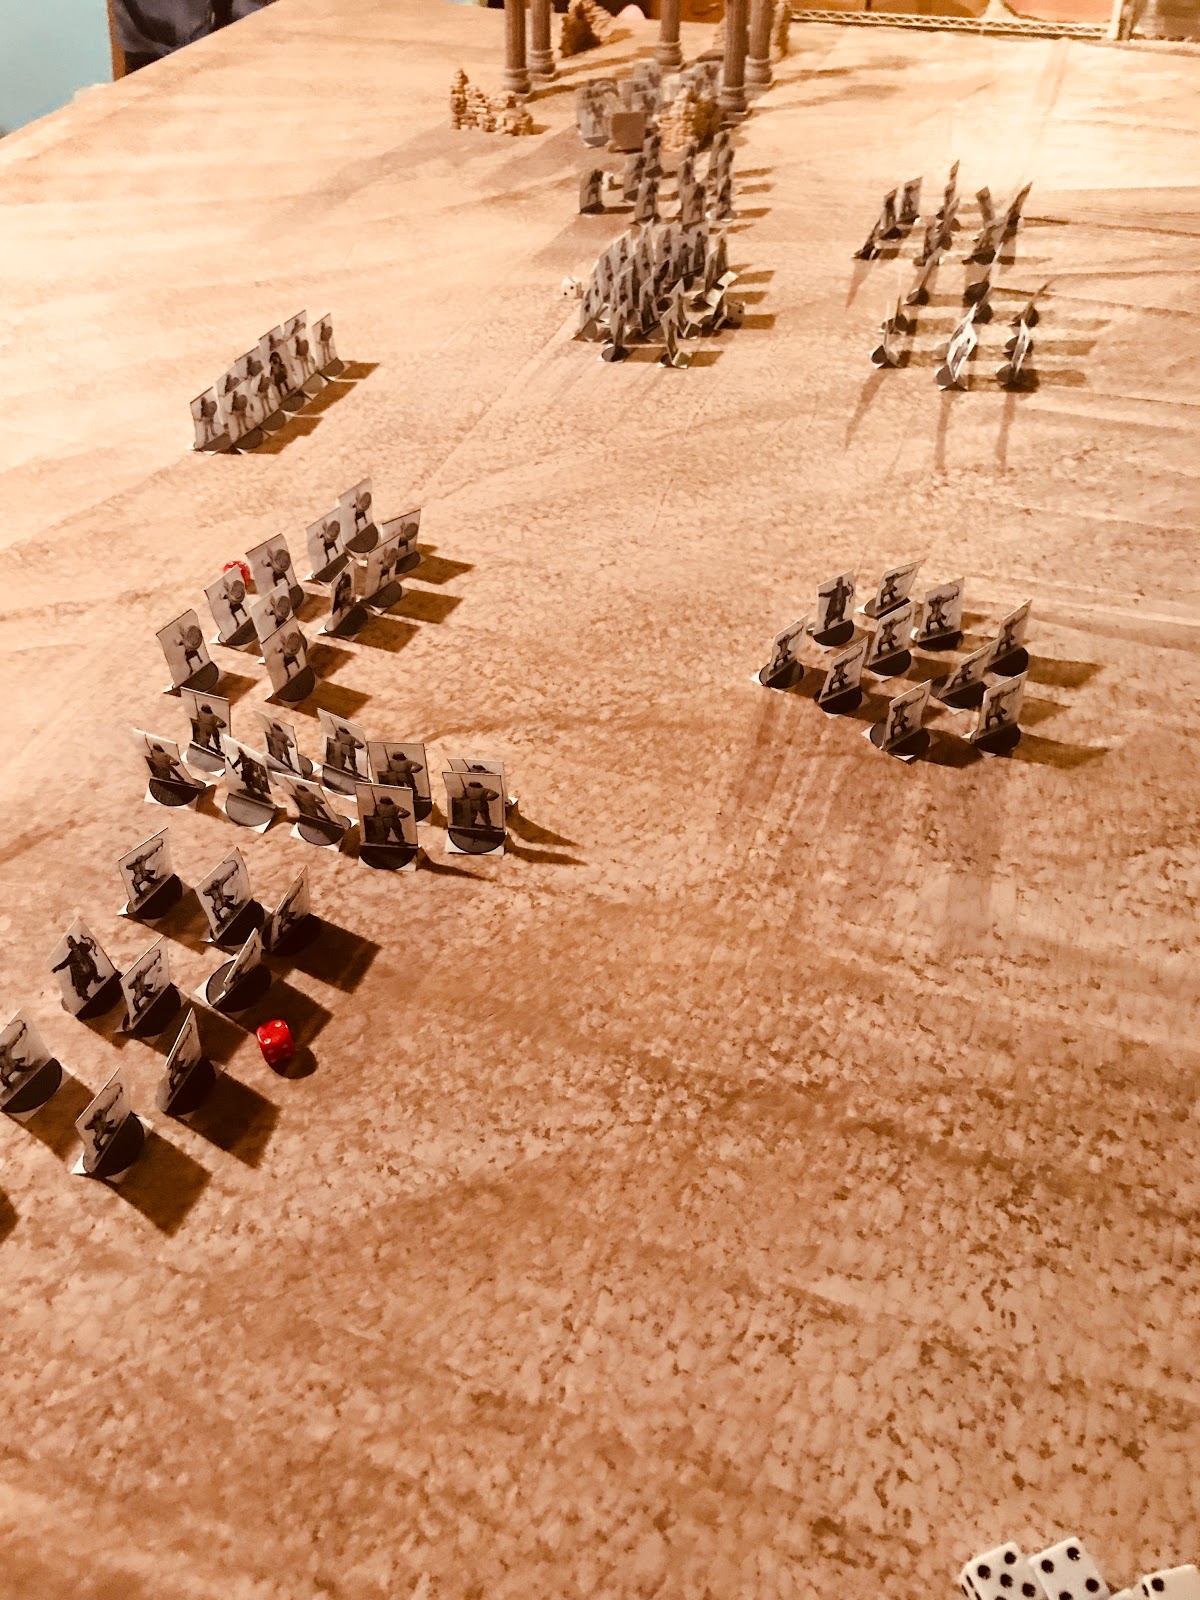
 The Greeks of Cius to the North have anchored there right flank to the river.  They deployed across the battlefield in a battle line 6 base widths in.  From right to left the units are; psiloi, archers, the 3 militia hoplites in phalanx are the core, then the 2 peltast units deployed across from the temple.  The Persians face off against the Greeks also anchoring their left flank on the river banks.  They are deployed alternating archers and drilled infantry, with the Persian right being anchored by Psiloi light troops across from the temple.   
Persians to the Right.... caught in the middle with you

Turn 1:
Both sides begin with 7 Arête Points.  That means no one will have an Arête Point advantage to begin with.  The Persians bid 3, while the Greeks bid only 2.  The Greeks wish to hold back and possibly use their Move and Shoot abilities later in the turn.

The Drilled Infantry by the temple race forward to try and get the better ground.  Seeing the Persian strategy, the Greeks decide to try to interrupt to get their Peltasts moving to the temple and try to beat the Persians there.  The Greeks win the roll-off.  Some Greek Peltasts rush forward towards the temple ruins.  The Persians challenge for initiative using an Arête Point, and this time they win it back.  The Persian psiloi move ahead.  The Greeks again use Arete to try to steal initiative back from the Persians in the race to the temple.  They win the roll-off again.  
Peltasts make for the Ruined Temple
With their key units on the left in position, the Persians decide to let the Greeks continue to see how their battle plan unfolds.  The Greeks press forward their full moves across the front.  This leaves the light troops slightly out in front of the Hoplite center.  The Greeks wanted to use their Arête Points to move and shoot, but the Persians letting them maintain the initiative has left them without targets.  

The Persian forces also move forward.  Their archers begin to pull ahead of the infantry, causing a slight checkerboarding of their lines.  However, they have no units to Move and Shoot with either. 

Turn 2:
Both sides still maintain 7 Arête Points.  Both sides consider their initiative bids.  The Persians do not think they can beat the Greek Peltasts into the ruined temple but if they get their first, they will be hard to drive out.   The Greeks bid 3, and the Persians 2 this time. 

The two sides close in- Greeks Left, Persians Right
As expected, the Greek Peltasts get to the temple and use an Arête Point to Skirmish through the difficult terrain.  The second Greek Peltast unit follows on the outside of the temple, but since they touch the terrain they must spend an Arête Point to skirmish.  However, they are still considered in cover.  The Greek player pauses to see if the Persians will interrupt, but they decline the bait.

The Ionian commander now feels confident that his left flank is secure in the temple.  His right begins to castle up, with is archers moving forward to engage the Persian archers next turn, while the Hoplites approach. 

The Persian holds his Arête Points for potential re-rolls.  The Persian archers on the left and center move forward to get in a shooting duel with the Greek archers next turn.  The Drilled Infantry stay ready to support them if they get charged.  The far right begin to refuse their flank, and try to draw the Peltasts out of the temple to attack. 

Turn 3:
This turn will probably have first blood.  Both sides have 7 Arête Points, and choose their bids.  Persians bid 3, and the Greeks 2.  The Greeks think they can use Move and Shoot this turn and hold a few back.  The Persians want to use their Archers first. 

Since units can move, shoot, or fight; the Persian archers in the center start the shooting.  The initial Persian barrage reduces the Greek Archers 4 Courage!  They are turned around to rout!  Seeing this, the Greek player decides to try to interrupt and get some revenge!  The Greeks lose the roll-off, and the Persians keep the initiative. 
Greek on the Left, Persians the Right

The Persian Archers on the right open fire at the Psiloi by the river.  The second barrage is not as effective as the first and the Psiloi are reduced 1 Courage, and pass their Discipline check.  The rest of the turn, the Persians simply re-dress their lines. 

The Greeks take over, and immediately the psiloi on the Greek right charge the archers on the Greek right.  This takes 1 Arete Point, and the Persians spend 1 to Evade.  The psiloi spend 1 more to pursue.  And catch the archers.  The two units both take 1 Courage loss in the melee, but the Persians spend 1 Arete Point to re-roll a Discipline Dice and pass the check.

The Greek Peltasts spend the last Arête Points to skirmish through the ruins.  However, they can not move and shoot due to having no Arête points left to do so.  Two phalanxes press forward, whiel the third is hampered by the Greek Archers.

In the End Phase, the Greek Archers flee the field and force the Militia Phalanx behind them to pass a Collapse test.  The Phalanx passes. 

Turn 4:
The Greeks get 6 Arete Points and the Persians 7.  The Persians bid 3 Arete to Greek 3.  The two sides must roll-off!  The Greeks win.

The Greeks start by having the left most Militia Hoplite Phalanx charge the Persian Drilled Infantry.  However, the Persians use an Arête Point to counter-charge!  The two units clash in the center of the board, and the Militia loses 1 Courage, to the Drilled Infantry 2.  They are both at 3.  Both sides pass the Discipline check.  The Persians are pushed back 1 bw.    

The Persians decide to steal the initiative with an Arête Point, and win the roll-off.  The Persian Archers on the right fire into the oncoming  Peltasts and reduce them 1 Courage.  The Persian psiloi also attack them, but fail to cause any wounds with their javelins.

On the left flank, Drilled Infantry charge in to support the Persian archers with the Psiloi.  The combat is brutal and short.  The Archers lose 1 more courage and begin to waver, but the Greek Psiloi is destroyed utterly. 

The Persian Archers in the center and the Drilled Infantry on the right reposition themselves to avoid charges and support the attack.
 
The right most Greek unit declares a charge at the flank of the Persian Drilled Infantry.  However, it fails to come into contact with them!  This leaves them in Open Formation and wavering! 
Woops!  
Greek Peltasts in the temple fling javelins at the Persian Psiloi, and reduce them 2 Courage and wavering.  The others struggle out of temple grounds and fire at the Persian Psiloi as well, causing them to route.                   

In the End Phase, the Persian Psiloi and Greek Psiloi fled the field.  No one failed a collapse check.

Turn 5:
Ionian Greeks get 5 Arête Points to the Persian 6.  The Persians bid 4 to the Greek 2.
Greeks to the Left, Persians to the Right
The Persians immediately declare a charge from their drilled infantry on the wavering Militia Hoplites.  One of the advantages of being an Open Order unit is the maneuverability, and it pays off here as they pivot and charge.  The attack is pretty powerful, and reduces the Ionians to 2 Courage, and the Persian Infantry to 4.

The Greeks then manage to steal the initiative and declare a charge on the Persian archers with the Peltasts.  The nearby Persian Drilled infantry decide to support with a flank attack.  Both units are reduced to 1 Courage, and this could sweep up the Persian Drilled Infantry now, since there was not a decisive victory. 

The Greeks use their last Arête Point to move the second Peltast unit from the ruins.  The center Greek and Persian melee has no decisive results.         

Turn 6:
Both sides get their arête Points at Greek 5 and Persian 6.  The Greeks bid 2, while the Persians bid 0. 
Greeks to the Left, Persians on the Right
The Center Greek phalanx, breaks into open formation, and joins the melee on the Greek right.  Despite the help, things did not go the Greek way, as both sides lose a point of Courage, leaving the Greeks unit at 1 Courage!   The Persians try to steal the initiative, but fail.

The Greek Peltasts charge into the center melee!  Here things go better for the Greeks, and the Persians use two re-rolls to Reduce the Greeks to Courage 2, while they have 1 left! 

The big melee on the right reduces both units to 0 Courage,a nd the Greeks lose a Skirmisher unit, to the Persians Drilled Infantry and Archers. 

The wavering Persian archers is rallied back to normal.  Both units declare a charge into different scrums to help support next turn.  On the left, it does nothing.  However, the charge into the center melee reduces the Greeks to 1 Courage! 

Turn 7:
Like ancient battles are likely to do, they have devolved into 2 big scrums in the center.  Neither side bids any Arête to go first.  They want they re-rolls instead, both have 4. 
Two big Scrums and everyone is all mixed up! 

The Persians on their left flank taking on the Open Order Greek militia hoplites with archers manage to crush them!   They are routed.  In the center, both Greeks and Persian flee the field at 0 Courage. 
That left the batter Persians on the left flank masters of the field of battle.  ! unit of Drilled Infantry at 2 Courage, and 1 Unit of Archers at 2 Courage. 
All that remains...

Conclusion:
Today, I wanted to make sure that Archers were a viable choice and that an Archer heavy force could defeat Hoplites.  Doing the math, the Hoplites would have armor 3, and Archers have 4 shoot dice, so it would be tough for them to scratch the Hoplites.  The Ionian Revolt seemed like a good place to start as it was Greeks vs. Persians. 

My findings were that the Archers are better matched up against auxiliary troops, and then used to bolster the Drilled Infantry in combat as a support unit.  By using clever placement and effort, you could use the archers for Flank Charges and support.  The other way around, with infantry supporting the archers did not work as well.  A situation where an archer unit was facing off against a Hoplite unit would be a severe mismatch for the archers, even at range as they would only get 1 shot before being charged.  Elite and Drilled Hoplites would be an even more hopeless situation.    

Another finding, one of the key things to recall in the game is that a unit can only shoot, move, or fight.  Therefore, if you choose a unit to fight they can only do it once.  If other people join the battle after the initial unit has fought, the rules are not 100% clear on how to handle that.  That is something I will need to edit before May. 

I am still not finding Unit Collapse being an issue like I expected it to be.  Most units, even Discipline 2 can pass the Collapse test.  However, placing the test after Arête Points are discarded reduce the impact of re-rolls to the result.  That is good.

Overall, this was another historical battle where the Persians won.  The key moment was the failed charge by the Militia Hoplites that forced them into open order and wavering.  That was the key engagement of the battle and swung it to the Persians.

 With their field force destroyed, and Persian reinforcements closing in the City of Cius wisely surrendered.  Propontis was secured and Hymaees prepared to support his fellow general’s in crushing the Greek revolt in Ionia. 

Thursday, September 28, 2017

Battle Report: Aquanautica Imperialis- Convoy Assault

This is a battle of Aquanautica Imperialis between the Tau Auxiliary Fleet and Ammoirss Pirates.  It originally took place in 2011, so my apologies if the pictures are not 100% in order.  I do not really recall the game.  However, it was brought to the light by the Great Photobucket Fiasco of 2017.  

Aquanautica Imperialis was my first full fledged independent game, and it was designed for wet navies in the Warhammer 40k universe.  In addition to rules, I also made a full set of fleet lists, scenarios, campaign rules, and templates for the game.  It is full playable and free.  Follow the link for more action: Link

On to today's battle report!

*********************************************************************

Captain Jack lounged in his command throne. Around him, the bridge buzzed with activity as his crew manned their posts. They were a motley bunch. Former fisherman, merchant sailors, a few deserters from the PDF, and the occasional desperate land lubber. He loved them all the same. Trust them? No way. 

“Mr. Ferris, what's our ETA to the merchant lines?” Jack called to his first mate. She would have been pretty if half her face hadn't been scarred horribly by a chemical burn. 

Mr. Ferris turned her one good eye to the Captain and glowered at him. The Captain should have all ready known the answer to his question, “About half a day, give or take an hour,” she replied testily, “We would have been there by now if you hadn't taken us so far off course.” 

Captain Jack smiled, “Mr. Ferris. I'm looking for a fresh kill.” Some of the fisherman in the area had reported strange Augur spikes in this region. It could be a new settlement, rival pirates, or something else interesting to loot. Since he was sailing out to the merchant lanes anyway, he figured he should take a look see. He had managed to convince some of the other Captains too. 

So far, nothing but empty beach and open ocean. Even so, taking this route would mean there was less chance of running into a patrol. 

“Mr. Ferris, what are they going to be serving in the galley tonight?” Captain Jack beamed at his First mate. 

“We have unidentified augur reading coming in fast from landward!” the Augur operator shouted. The man had been part of South Ammoriss PDF before he went AWOL and joined Captain Jack's crew. He knew his business. Mr. Ferris swooped over to the augur station. 

The Captain sat up sharply, “PDF patrol?”

Mr. Ferris looked up, “No Captain. Their energy signature is like nothing I've seen before.” 

“Clear for action. Let's see who or what they are,” With that Captain jack grabbed his Monoscope and stepped to the observation platform. With a practiced ease he swept the horizon. There emerging from a sheltered harbor were several bizarre vessels, like nothing he had seen on the oceans of Ammoriss before. Their lines were smooth and graceful, and utterly alien. He vaguely wondered if such unique artifacts would be worthless or priceless on the black market. 

With a low rumble, the crews pushed the Macro-cannons out on their rails. The huge cannons gleamed in the afternoon sun. Well, if these things were looking for a fight, Captain jack was willing to oblige. 


*****************************************************************

Tau Auxillary Fleet- 1,000
Bullhead 300
-Electronic Warfare +25
-Galg'El +25 (+1 LD, 1 Re-roll)
Blacktip 250
2 Bluefin 150
5 Kroot Knarlochs 150
2 Sailfin 100

Pirate Fleet- 1,000
Freebooter 150 LD 7
-Boarding Attack +15
3 Raiders 225 LD 7, 8, 8
Pillager 100 LD 8
- Minesweeper +10
Pillager 100 LD 8
Assassin Sub 100 LD 7
Assassin Sub 100 LD 8
2 Monitors 150 LD 8
1 Skiff 50 LD 6

Scenario- Convoy Assault!

The defender is moving across the ocean when they are attacked from hiding by the enemy force. The defenders are placed in a 24v l by 24 wide box 18' from the short table edge, and 12 from one of the long edges. They are all facing towards the furthest short board edge. 

Attackers are placed on the opposite long edge of the tabletop, up to 6 inches from the edge. 

Attacker get first turn. 

The winner is the side that inflicts the most DP.


The Pirates deployed...

The Tau Main Fleet...

Sailfins on the extreme left of the Tau deployment...

************************************************

TURN 1

Initiative: Tau

Sailfins pass All Ahead Full rolls and dart into the rocky channel. 
Overall, the Tau move to intercept the Pirates while the pirates begin to come about to face their foes. 


Battle:
The Bluefins use their missile batteries and reduce the Pillager in front of them to a hulk, despite bracing. They also fire a brace of torpedoes at the Pirate Raiders, but they fall short of the targte. 

Using Squadron rules, the Raiders open up on the Bluefins with their forward heavy guns. The Tau Auxilliaries were so intent on firing at the Pillager, that they failed to brace. Both craft were overkilled and sent to the bottom by the Raiders concentrated firepower. 

The Sailfins have no target other than the hulked Pillager. Their missile batteries make short work of the hulk, and sink her. 

The Monitors swivel their long range turret guns, and open fire on the Tau Flagship. However, the range is too great, and the shots fail to find their marks. 

The Bullhead fails to Lock-on, but opens up on the Raiders with his bow missile batteries. The missiles reach out to the small ships, but the pirates PD weapons swat them away. It also unloads a barrage of torpedoes at the small craft, but they are just short of the targets for now. 

End Phase:
The Tau Torpedoes speed through the ranks of the Raiders. The pirates frantically fire their PD weapons and attempt man their stations to Brace for impact. Of the ten torpedoes that pass through their ranks, only 1 is destroyed by PD, while four others detonate. Two of the Pirate craft are left as blazing hulks. What's left of their crews desperately abandoning ship. 

Remove Wake: Tau 3, Pirate 3- ! wake marker remains in play. 

TURN 2

Initiative: Tau

Move:
The Sailfins led the Pirate Pillager and Skiff down the narrow channel in a desperate chase. 

The Monitor and Freebooter tried to put some distance between themselves and the Tau capital ships. 

The last Raider veered away to try and bug out.


Battle: 
The Sailfins popped their Mines. 

The Freebooter's guns failed to find the range on the Kroot Knarlochs. And the Kroot were too far away to fire on the Pillager.

The Pillager fired on the Sailfins with her sternchaser, but missed. The port cannons fired at extreme range on the Bullhead, and hit. The Tau craft braced, but the armor absorbed the fire. The Tau missile batteries swiveled towards the Pirate craft, and launched a brief salvo, that veered off the mark. 

The Pirate Monitors also fired on the Tau flagship. This time, one of the shots slipped through and reduced it to 7DP. However, the shot caused Massive casualties, further reducing the DP to 6! 

The Blacktip fired her missiles at the fleeing Raider, but missed. She also fired Torpedoes to cut off the turning Monitors and Freebooter. Finally, she deployed 2 Interceptors and 4 Bombers towards the Pillager and Skiff. 

End:
The Tau Interceptors swoop in on the Pillager. The PD fails to take any out, and one interceptor suppresses the PD as the bombers strike. Three squadrons attack, and the Pillager's deck is hit by smart missiles. However, 1 Interceptor and 2 bomber squadrons break off and return to the carrier. 

Those that remain move onto the Skiff. Again, the PD fails to down the interceptors, and they suppress the PD for the 2 squadrons of bombers. The Skiff fails to Brace, and a barrage of smart missiles turns it into a smoking hulk. The Interceptors return home. 

The Mines drift back into the Sailfins that deployed them. The is caught by surprise, and a single group of mines detonates and damages the trailing Sailfin. 

Remove Wake- Tau 5, Pirate 2- All wake removed. 


TURN 3

Initiative: Tau

Move:
The Tau Sailfins blast their way past two more Mine markers, and head to rejoin the main fleet. Meanwhile, the chasing Pillager makes a sharp turn, but still comes in contact with two Mine markers. One is destroyed by vigilant PD gunners, but the second explodes harmlessly against the ships armored belt. Thanks to the Pillagers shallow draft, it just barely avoids going aground on the island. 


However, the Pillager is then swarmed by Kroot Knarlochs. The Knarlochs made short work of the Pillager, sending her to the bottom. However, three of the Knarloch squadrons were also lost as the creatures were killed in the assault or went into a feeding frenzy on the floundering Pirate crew. 

The Tau Capital ships moved to go around the island, one on each side where the Pirate Cruiser
was hiding with her Monitor escorts. 

The Lone Raider performed a Come To New Heading, and raced back towards the Tau escorts. 

1 Assassin sub enters play! The sub comes to attack depth just off the starboard bow of the Bullhed. 

Battle:
The Bullhead Reloads Ordinance. The Flagship sends a spread of Torpedoes at the Monitors, but they fall short. In addition, the barrage of smart missiles fail to lock onto the small, obscured craft. Meanwhile, the stern Missile Batteries have no problem sinking the foolish Pirate Raider. 

The Pirate freebooter finally has the range on the Bullhead, and fires a broadside. The Tau ships braces in time, and the shots cause only superficial damage. 

The Blacktip Reloads ordinance, and launches her bow torps at the Monitors. She Also deploys two squadrons of Interceptors and 2 Bombers towards the Pirate vessels. The forward missile batteries unload on the low lying craft, but the pirates brace and avoid major damage. 

The Monitors fire sporadically in the Bullhead, but fail to cause any further damage. 

Sailfins Reload ordinance. 

The Assassin fires both torpedoe tubes, but the Bullhead's PD makes short work of them. 


End:
The Tau Torpedoes race into the remains of the Pirate fleet. 


A torpedo from the Blacktip races past the Freebooter's PD, and crashed into the ships side and detonates, causing 1 DP. Three find the trailing Monitor escort. The armor absorbs one, and the other detonates prematurely. However, the final torpedo crashes deep into the hull before exploding. The crew are vaporized in the interior explosion.

The Interceptors bypass the first monitor and race to the Freebooter. The initial squadron is scattered by the pirate's PD, but fire from the second squadrons forces the PD gunners to keep their heads down. 

Two squadrons of bombers swoop in on the remaining Monitor, but fail to hit. One squadron peels off for home. The three remaining Squadrons of Tigersharks attack the ill prepared Freebooter. A bomb strikes home an cripples the Pirate cruiser. 

The Mines stay put. 

Remove Wake- Tau1, Pirates 6- 6 remain in play. One is touching the Bullhead. 

TURN 4

Initiative: Tau win

Move:
The Freebooter and last Monitor try to limp away from the Tau ships. Meanwhile the Kroot and Tau Capital ships move in to cut off the Pirate escape. 

The Sailfins turn to rejoin the Blacktip. 

The second Assassin sub enters play of the starboard of the Blacktip, but the cruiser moves, giving the sub a shot on the Sailfin escorts. The other sub lines up to torpedo the Blacktip, and away fromt eh rear of the Bullhead. 

Battle:
The Galg commander has the Bullhead Reload Ordinance. Stern Torpedoes streak out from the Bullhead, and miss the Assassin sub. Depth charges fall short, and the Tau cruiser launches a mine screen to defend itself. Bow Missile Batteries mark the Freebooter and fire. The Pirates fail to brace, and the smart missile barrage turns their modified merchant into a smoking wreck. 

The Assassin launches at the Sailfin, and manages to cause a critical hits which destroys the first Sailfin. 

An attempt to Reload Ordinance fails. The Tau Blacktip fires rear torpedoes at the Assassin that sunk a Sailfin. One catches the lethal sub, and sends her to the bottom. The bow Missile batteries lock onto the Monitor, and destroys it. 

The last Assassin sub fires on the side of the Blacktip. The Tau PD destroys one torpedo, and the other misses its mark. 

End:
The last torpedo from the barrage that killed the first Sailfin finds its mark on the following Sailfin and turns it into a smoking wreck.

The Pirate Monitor and Skiff hulks drift into each other and sink from the collision. 

One of the Sailfin hulks sinks. The damage and fire in the hulk of the Freebooter reaches the magazine and detonates, killing the entire crew except for a single cabin boy who was knocked over the side during the battle. 

Remove Wake: Tau 2, Pirates 3- 11 remain in play

TURN 5

Initiative: Pirates

Move: 
The Last Assassin chooses to Run Silent, Run deep. The Command Check isfailed, and the sub collides with the Tau Blacktip. The Tau capital ship suffers from critical damage from the collision! The bridge is destroyed by a feedback power surge, and the stern Depth Charge launchers are crippled. The ship is reduced to 5 DP! The Assassin sub is also destroyed and lodged in the stern of the Tau ship. 

Battle:
None

End:
Last Sailfin sinks. 


The game ends.

**************************************************************

Result! 

Tau lose 15 DP
Pirates lose 15 DP

Tie! All though, I think we can call it a Tau victory since all Pirate craft were destroyed in the battle. 

***************************************************************************** 

Commander Blackray read the after action report. The Gue'la interlopers had been successfully intercepted and destroyed. However, the interception fleet had been seriously damaged in the mission. It was troubling. 

Envoy Ro seemed to be reading the young Fire Warriors mind, “The mission here on Ammoriss continues. The humans do not know of our monitoring stations. Rest your troubled mind.” 

Blackray nodded, “Yes, but how much longer can this charade last?”

“As long as it does,” Ro answered with a response very typical of the Water Caste. 

His commander laughed, before turning suddenly somber again, “Indeed. I am at peace knowing that those who perished did so for the Greater Good.” 

The two bowed their heads in silence.