Showing posts with label Horizon Wars. Show all posts

Monday, April 22, 2019

Wargame Design: In Defense of the Humble D6


Many budding war game designers spend a great deal of time talking about mechanics, especially using dice.  It is only natural since dice mechanics are the “crunchy” part of war game design.  The only other topic that can compare in the “crunch” department are points cost or balancing mechanics.  Therefore, it is an easy topic to discuss.  This is not the first time I have tackled it on the blog.

The “Best Type of Dice” to use is a frequent conversation piece.  Lately, the humble d6 has fallen out of favor with many designers.  The main reason is the available range of numbers that a d6 can generate, and the probabilities it can simulate are limited.  Keep in mind as we proceed that I am not a mathematical genius or expert on probability.  In fact, I am just a humble war game blogger….. pretty unexciting expertise. 


Cons
So, let’s start by talking about the Cons of the d6.  As mentioned it can generate only 6 actual results.  This is much lower than a d10 or a d12, or even a d20.  Therefore, there is a much smaller range of numbers to work with and this makes differentiating of success and failure much harder. 

Essentially, you have a 16.67% chance of getting any individual result.  Therefore, if you need a 6 to do something, you will only score that 6 16.67% of the time.  If you need a 4, 5, or 6 you have a 50.01% probability.  16.67% is not very fun to calculate with, but 50% is fine.  What about 5+ then?  33.34%.  Compared to the d10 and their 10% increments, the d6 is far inferior for calculating outcomes and running the numbers quickly.  The same can also be said about a d20 AND it adds more possible outcomes.

Every modifier of + or – 1 adds a 16.67% variability in the outcome.  That is a big swing between potential outcomes made by relatively simple modifiers.  This means a -1 penalty is a big reduction in efficiency for a dice roll and a +1 is a huge gain.  Those large swings can be hard to moderate for. 


Pros
With those clear deficiencies, why would anyone want to continue using a d6 as their primary dice?  Are they insane or just stupid?  Neither, as the humble d6 also has its benefits. 

The first is that they are common and easy to get.  Custom dice or other polyhedron dice raise the barrier of entry for a game.  Granted, if your core audience is “experienced” gamers only then this does not matter.  However, most games are trying to appeal to the widest audience possible to garner use.  Everyone can get or has access to the humble d6.  I see that for sale in packs of 5 at the local gas station for less than $1 USD.  They are ubiquitous and have been in use for centuries. 

Once you start adding multiple d6 together, you have a very nice and simple bell curve of likely results.  Rolling two single pips has only a 2.78% chance, while rolling a combination that adds up to 7 is a 16.67% chance.  16.67% is actually the highest result you can get on 2d6 so you are statistically most likely to roll a 7.  This bell curve allows a designer to accurately predict outcomes than any single dice. 

Combined 2d6 also gives you same amount of potential results as a d10, without the “randomness” of any 10% option coming up.  You know a 7+ combination will come up more often than a 10+ combination on 2d6.  7+ is 58.34% on a 2d6, while 10+ is 16.67%   Meanwhile, on a d10 a 7+ is ~40% and a 10 is 10%.  Curves provide more predictability than a straight line chance, which allows a designer to “stack the deck” with modifiers to create tactical play in a more meaningful way. 

What happens when you start adding multiple dice to d10’s or d20”?  The more numbers you add, the flatter the curve, and you the less predictability it adds to the curve.  For example, 2d10’s most common result is an 11 at 10% and the equivalent roll on a 2d6 is 16.67%.  2d20 is 21 at only 5% which is the same as a single d20 result, so why roll 2 d20?  2d6 gives you the most “dramatic” bell curve. 

There is a reason d6 have been the most common types of dice for centuries.  They provide a dramatic and interesting probability curve that other dice can not match in groups.  The closest is the d12, and I can only think of one designer who really stresses the use of a d12.  Even that is just a derivative of a d6. 


Why So Many Single D6 Games Then?
Okay, so maybe I have convinced you that 2d6 is the ultimate dice to roll for your mechanics.  Then why do so many games use a single d6 resolution mechanic?  I would argue that very few of them actually do use a single d6 resolution mechanic.  They almost all temper it with some sort of multiplier….. let’s take a closer look at some mechanics in games. 

Arguably, the most familiar of the game systems that is based on a single d6.  However, to determine a hit from shooting you take a model’s shooting skill and subtract it from 7 to get the target number needed to hit.  If you have a shooting skill of 4, you need a 3+ to hit.  If you have a shooting skill of 3 you need a 4+ to hit.  Therefore, a shooting skill of 4 vs. 3 is 16.67% better and more “lethal”. 

However, you will notice that it takes more to incapacitate your target in Warhammer 40K than a shooting roll.  They mitigate the odds by adding two additional rolls for wounding and a potential saving throw made by the defender.  Therefore, to remove a single model, you are really rolling 3d6 looking for a series of target numbers.  It is not resolved by a simple d6 roll at all.  AS the probability for each roll result is added in, the likely outcome from the series is reduced. 


In Lion Rampant, they use a single d6 per model compared to a stat to determine if a “hit” is caused.  Therefore, a model with a shoot skill of 5+ will “hit” a target with a 33.34% likelihood of causing a hit.  However, when you look closely at the rules, you will see you roll a d6 per model so you are typically rolling multiple dice at a time.  In addition, the number of hits are compared against a units’ armor to remove targets.  Armor can be modified by range and terrain.  Therefore, the key arbiter of lethality is armor rating and not just a single d6 roll.


This game also only uses the humble d6.  However, it uses them in opposed dice pools.  The target number is always 4+ on a dice to get a success and then you compare successes to determine opposed tests.  In addition, the game has no negative modifiers.  Instead, extra dice are added as a bonus. 

For example, if a hero is behind a wall, their is no reduction in dice for the villain shooting at them.  Instead, the hero gets extra dice to resist or dodge the attack.  The probabilities come from the number of d6 rolled against each other, minimizing unknown outcomes with the more dice that are rolled.  However, the small element of chance is still in play.    


Final Thoughts
The humble d6 has been the dice of choice for centuries because it offers the most dramatic, yet predictable probability curves for game designers to play with.  Combine various mechanics to group dice and combine probability curves from a d6 results allows for a wide variety of game play options. 

Ultimately, very few people play a game because of its dice mechanics.  Instead, they play games that set out to model or do certain things that the players find appealing.  As a designer, the dice mechanics are simply a tool to try and reflect the “reality” of your game and accomplish the goals you have set out for the game itself.  The specifics of the dice mechanics are secondary to that goal.  As a designer, you need to use the tool that meets the games goals whether that be d6, d10, d12, or d20s.  Mechanics for the sake of mechanics are an empty and hollow exercise.          

Thursday, January 5, 2017

Horizon Wars- Battle Report- Battle of Lachute, Quebec

As Operation: Plantagenet roiled Europe, the French had not bit sitting idly by and watching the British build-up.  They had been preparing for an indirect response to British aggression.  They had not anticipated the ferocity and direct action that Operation: Plantagenet unleashed.  Instead, the French had been stoking anti-British resentment across the commonwealth to try and spread the British forces into a worldwide war instead of a regional European conflict. 

As the British opened their offensive, the French launched their own plan.  For the past several years they had been arming and supporting Quebecois separatists in Canada.  At the outbreak of war between Britain and France, the Quebecois rose up and overthrew the local government and declared independence.        

Naturally, the Canadian government was not amused.  Immediately, the 1st Canada armored brigade was activated and moved to attack Quebec from Ontario.  Their offensive was spearheaded by the Lord Strathcona’s Horse, an armored forced with a long military history.  They were met near the border by the 4th Regiment of Quebec Liberte, a newly revealed force raised by the Quebecois separatists.  The initial engagement of the war took place on the outskirts of the town of Lachute at the Ontario/Quebec border. 

I purchased and read the rules for Horizon Wars as soon as they came out.  However, I wanted to give them a play before I wrote my review.  They seemed a bit more nuanced than other Osprey titles, and I felt a play through was needed before I could give it a real review.  I remember when Robey Jenkins (Precinct Omega) first started working on these rules as part of his 5Lbs. Wargaming series.  At the time, I was working on Jugs-The Game of Big, Stompy RobotsThey felt like they had similarities in our initial design goals.  However, we ended up with two very different game systems.  I think I could convincingly argue that Mr. Jenkins’ rules are more innovative than what I came up with.  I also think they handle tanks and infantry better in the game play. 

In Horizon Wars, each unit uses a “Presence” rating to determine their value in the game.  This allows you to try to build relatively even force lists.  However, the lists could be modified by the scenario being played and the Command Headquarters you choose for your list.  According to the book, an engagement of this size should take about an hour to play.     

Lord Strathcona’s Horse- Presence 15
CHQ- Heavy Cavalry
2 Units- Heavy Cavalry
4 Units-Light Cavalry
1 Unit- Recon


4th Regiment du Quebec Liberte- Presence 14
CHQ- Heavy Infantry
2 Units- Heavy Infantry
2 Units- Light Infantry
1 Unit- Heavy Cavalry
1 Unit- Light Artillery


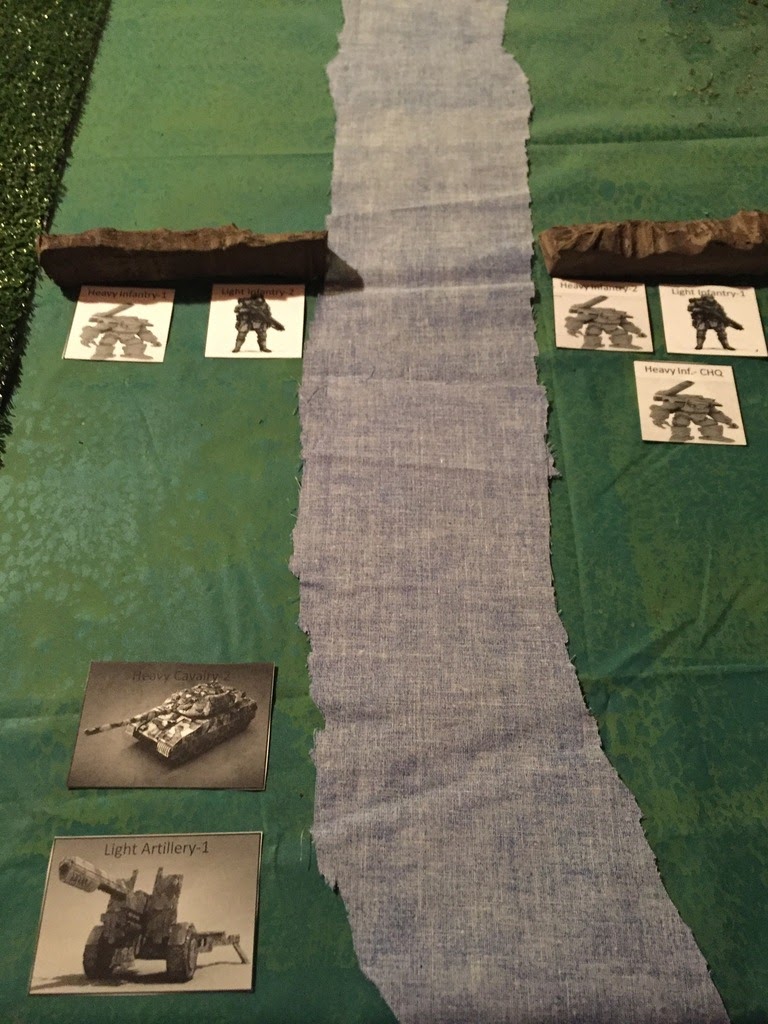
I tried to use a mixed set of forces for this battle report to see how they work out.  I purposely left out aircraft and Mechs in order to streamline the gameplay and not bog it down.  This game will be played out using templates I made in PowerPoint for proxies.   

Set-up
The forces meet coming down the 327 from Brownsburg and towards Lachute.  The board is bi-sected by the main roadway.  Fields and scattered copses of trees are along each side.  The board is approximately 4x4.    

The Quebecois have dug in quick defensive works running perpendicular to the 327.  The Light infantry and positioned there along with some Heavy Infantry units to stiffen them.  Up the 327 waits the Heavy Cavalry and Artillery to act as a reserve force. 

Lord Strathcona’s Horse is approaching down the 327 in column with the Light Cavalry leading the way.  Upon seeing the enemy forces, the commander decides to engage. 

The Mission
The Canadians are trying to smash aside the defender’s and reduce them to two elements or  less.  The defenders are trying to do the same.  The player with the most Presence on the board wins after 6 turns will win.

Turn 1
The Canadians have the initiative. 

Lord Strathcona’s Horse have a heavy task.  The Quebecois rebel infantry dig in along the ridgeline and pour fire into the advancing units.  Light Cavalry 1 and 2 both absorb a few hits, but Heavy Cavalry 1 takes the brunt of it taking 4 hits. 

The Canadians race down the 327 and return fire.  They need to close the distance rapidly, and try to get behind the fortification line as fast as possible.  IN this case, the most direct way is the fastest way.  The return Canadian fire is relatively ineffective, but they have forced the Quebec heavy units out of reserve and into the battle.  In addition, the hits that did strike home were against the Quebec CHQ.      


Turn 2
The Quebecois seize the initiative.

The battle around the 327 breach explodes this turn as Lord Starthcona’s Horse tries to force the gap, but their way is blocked by an enemy tank.  An opening duel takes out the Canadian Heavy Cavalry 1 with the help of some Heavy Infantry and the Quebecois cheer.  However, the pressure continues to mount as Light Cavalry units move forward and open fire cutting down the Heavy Infantry screening the Quebecois Heavy cavalry from assault. 

With the way forward cleared, the Lord Strathcona Horse CHQ tries to smash his way past the blocking Quebec tank, but things to do not work out as intended.  Stranded in front of the Quebec firing lines, the CHQ is blasted apart by short range fire. 

The close range fire of the Quebecois infantry units leaves the Canadian Light Cavalry units 1 and 2 in tough shape.  However, combine follow-on fire from the Canadian Heavy Cav-3 and Light Cav-3 and 4 manages to blast the Quebecois Tank force into oblivion.  This leaves the way potentially open to bypass the Quebecois defense emplacements. 


Turn 3
The Canadians regain the Initiative.

The armored units try to force the gap, which is a challenge when they are defended by Infantry units.  Light Cavalry-3 rumbles through and opens fire on the artillery piece, causing some damage.  Light infantry- 1 of the Quebecois counters with a barrage of shooting and then charging in.  However, the Canadian light cavalry fights tenaciously and small-arms fire drives them away. 

Infantry firepower destroys Light Cavalry- 1 before it can storm the gap as well.  Firepower from Canadian Light Cavalry-2 immobilized the Quebecois-CHQ.    

The larger armored units plow in as well.  The Quebecois CHQ is unable to respond with an assault as they are immobilized by gunfire.  However, the rebel Heavy Infantry-2 storms the 327 breach and blasts the Canadian light cavalry apart in close combat and fires on the Heavy armor. 

Light Cavalry-4 of the Canadians blasts the artillery away as they move into the breach.  The Quebecois CHQ is unable to destroy Canadian units with shooting.  Finally, Canadian recon unit bushwack the Quebecois light infantry in the trenches, accurate shooting with a critical and the Quebec rebel unit is destroyed. 


Conclusion
The Canadian Recon unit’s successful shooting reduced the Quebec rebels to only two units, and their CHQ called for a withdrawal.  It was a costly victory for the Canadian Lord Strathcona’s Horse but the way was now open to push into Quebec proper.  With the 327 secured, follow-on Canadian forces were able to set-up a F.O.B for the push into Montreal to attempt to unseat the rebellious Quebecois government.  The Quebecois rebels fell back to the suburbs and began to fortify the city and cul-de-sacs to repel the Canadian assault. 

This was a fun little game.  I have a feeling that Horizon Wars could be a very mobile game with lots of possibilities for maneuver and jockeying for position.  As the ranges shorten, the combat becomes fierce and the firepower begins to tell. Close engagements can be very decisive between infantry and vehicles.  Even between vehicles they all paid a heavy price.  In ordinary games where the objective wasn’t a breach the deadly combinations of assaults and short range firepower would make me wants to stay at range and maneuver for a decisive application of firepower.  

This scenario did not really allow such a tactic as the “Dug-in” infantry was very resistant to long range firepower.  The armor had to close to get quality shooting chances and use their superior firepower dice, but as you get closer the risk of an infantry assault increases.  Infantry assaults on vehicles tend to end badly for the vehicles unless you are really lucky.     

Heavy Cavalry could take a pounding, especially against Move and Shoot attacks.  Such attacks reduce the firepower of the shooter.  Infantry get a lot of defense dice, but a single critical can ruin their day with Armor/Agility of 1.  Heavy infantry was surprisingly fierce as well, especially when dug-in.  I didn’t feel like any of the units in the game were “worthless” as even the Recon unit played a key part in swinging the game, even though I didn’t have indirect fire artillery. 

The book was also pretty accurate for the length of the game.  Set-up, and take down extended the time somewhat. However, if I hadn't been documenting the game and double checking rules it would have been shorter still.  As a player gets better at the rules, I think they could have a relatively quick, enjoyable game.

So, the big question for this game is whether I would play again.  I would.  In fact, it made me want to accelerate some of my plans to get some “Not Epic” units that I could use in conjunction with Aeronautica Imperialis.  For the short term, templates will work fine while I get a few more 6mm units banged together.  The prices seem about right.